INSULATE! Mittens
By Amy van de Laar
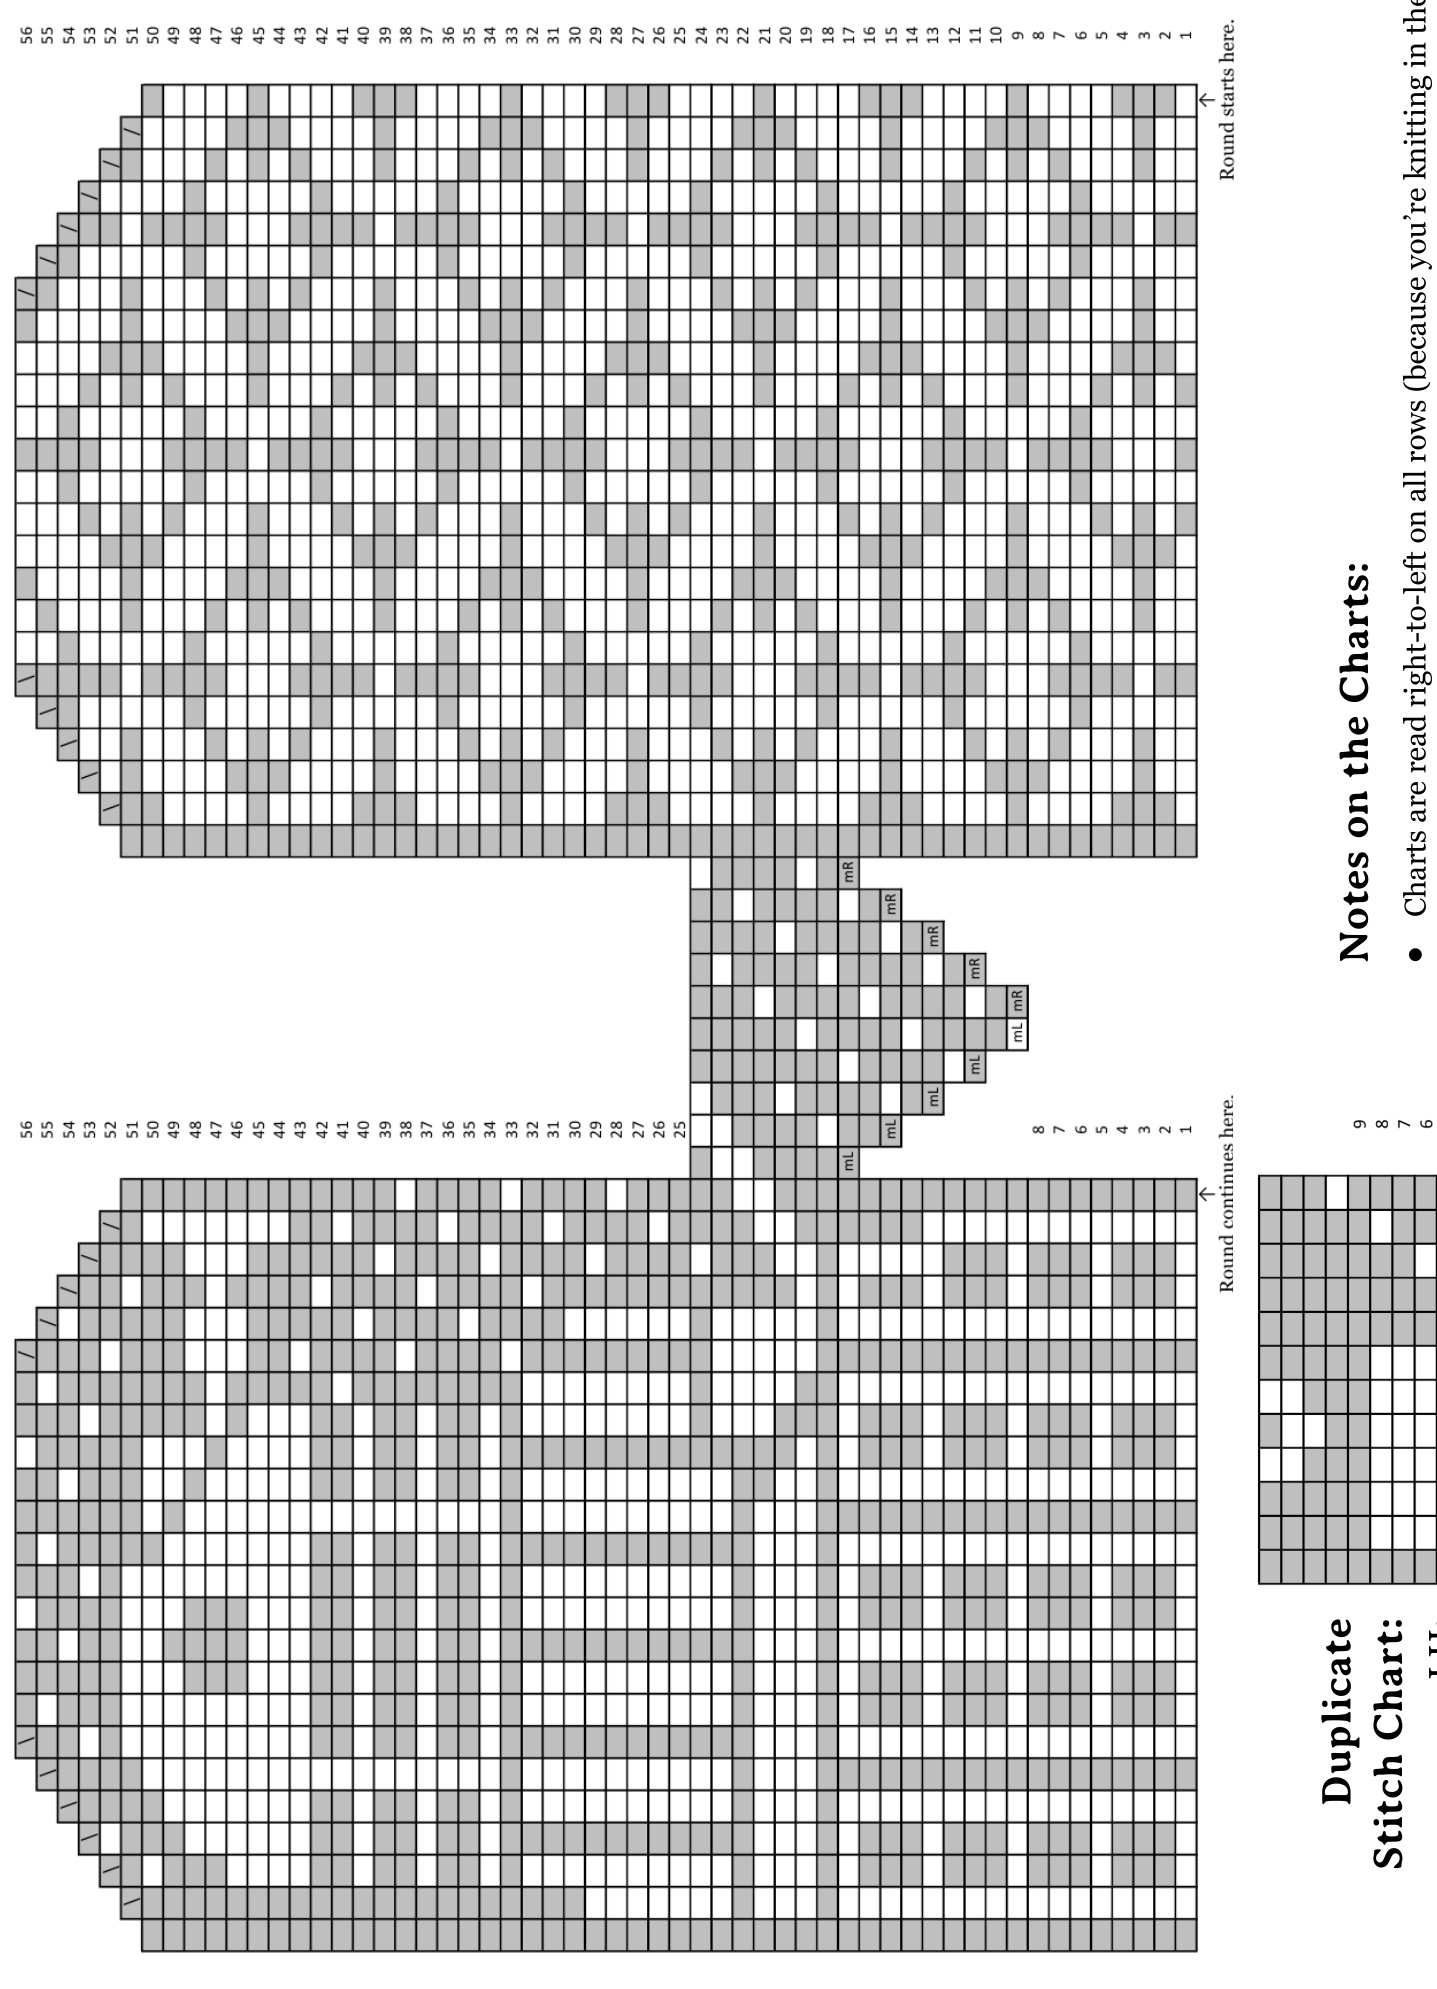
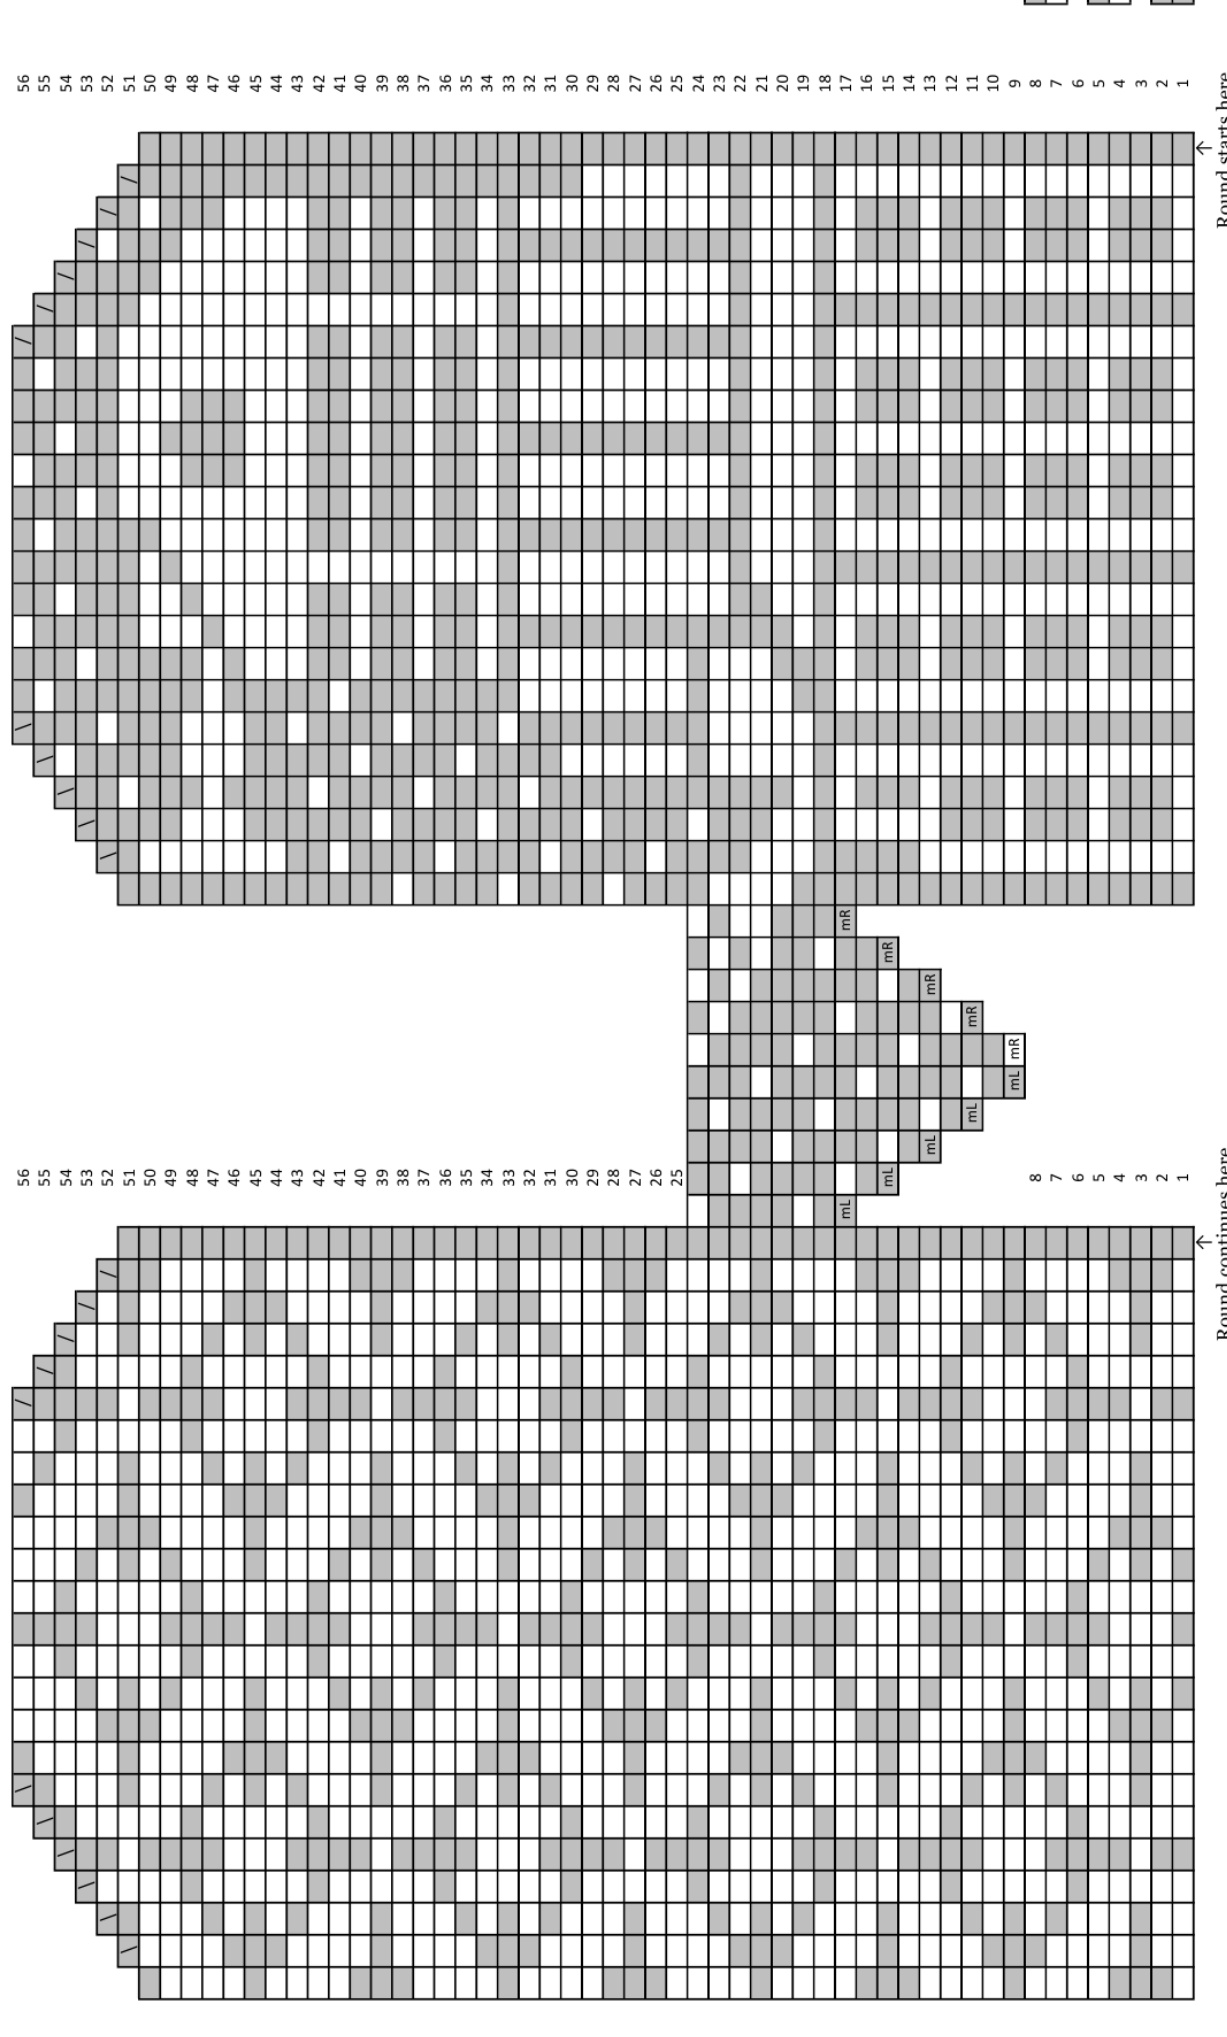
A pair of colourwork Daleks fight it out on these toasty stranded mittens. In addition to stranded colourwork, skills used in this pattern include knitting in the round, tacking down long floats, grafting or Kitchener stitch, and duplicate stitch.
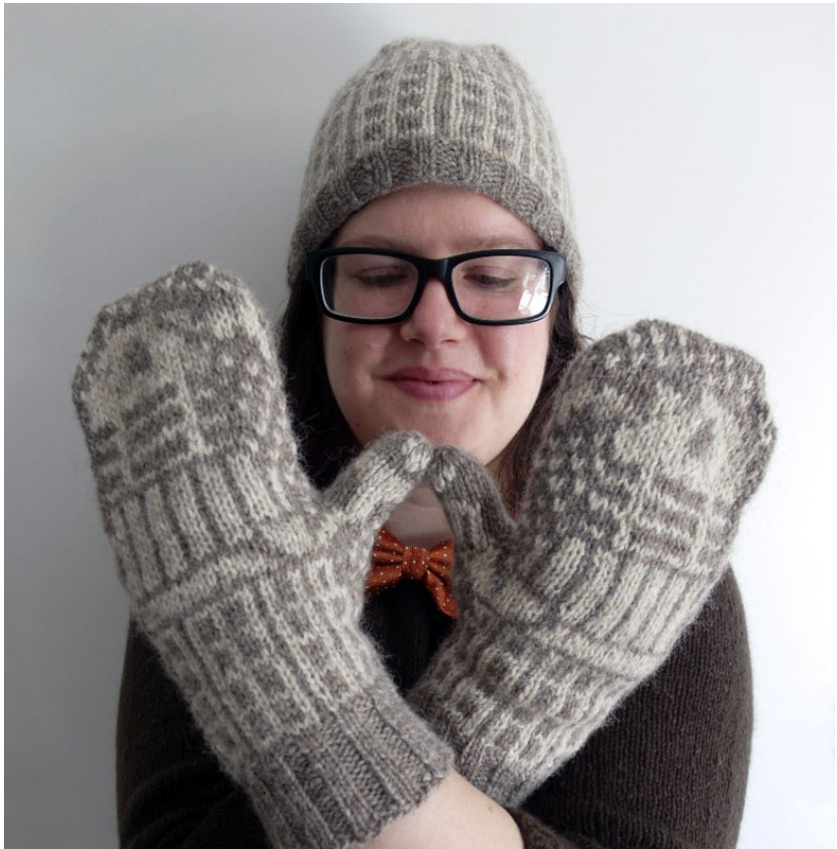
If you are new to stranded knitting, I recommend starting with the co-ordinating INSULATE! hat, which is simpler.
Materials
·DK-weight yarn in two colours. Approximately 150 yards of your main/background colour, and 9o yards of your contrasting colour. I made my mittens in Little Wool Company Pure Wool Naturals DK, in Papa’ (MC) and ‘Pumice' (CC). 3.5mm dpns or long circular needles for magic loop (whichever you prefer to work with), or a needle size that gives you the right gauge. · 3mm needles for the ribbing, or one size smaller than your main needles. · Needle for duplicate stitch and weaving in ends.
Sizing
To fit women's medium, or 7.5" palm circumference. Other sizes can be made by adjusting your gauge (changing needle size and/or yarn thickness).
Gauge
To swatch, cast on at least 28 stitches and knit several rows in stockingette. My gauge is 23 stitches and 33 rows = 4" (3.5mm needles and DK-weight yarn). Go up or down in needle size if necessary. Note that these mittens are knit at a tighter gauge than recommended for the yarn, for sturdiness (this also helps the colourwork look tidier).
Tips and Tricks
Two-Handed Stranded Knitting: This technique is great for speedy stranded knitting. There are some awesome tutorials and videos online, but the gist is that you hold one colour in each hand, and knit English-style with the right-hand colour, and Continental-style with the left-hand colour. I've always been an English-style knitter, so I practised knitting Continental-style on a plain vanilla hat before I tackled two-handed stranding. It does take a bit of practice! Yarn Dominance in Stranded Knitting: To make the design really 'pop', the background/main colour (MC) yarn should be held above the contrasting colour (CC) yarn. This is easy to do in two-handed stranded knitting (hold your MC in your right hand), and also in one-handed stranding (hold both colours in one hand with MC above your index finger and CC below). 'Catching' long floats: There are a number of long floats (over more than 5 stitches) on the Dalek-side of each mitten. Secure them by 'catching' them as you knit. See this article on stranding in Knitty: http://knitty.com/ISSUEwinter06/FEATwino6TT.html N.B. I find this much easier when stranding the two-handed way!
Pattern
With your larger needles, cast on 48 stitches in your background colour (MC) using the Long-Tail Cast-On, or your preferred method for 2x2 ribbing. Place marker, and join to work in the round. With your smaller needles, work in 2x2 ribbing (k2, p2) for 16 rounds or until your cuff measures 2" from the cast-on edge. Switch to your larger (main) needles, join in CC, and begin following the LH Chart. To avoid too -tight floats, stretch out the stitches on the right-hand needle when changing colours. I like to hold my background colour in my right hand, and my contrasting colour in my left hand. From time to time you will have some long floats to secure: ^catch' them every 3 (or 4, or 5) stitches until you need to change colour. In row 25, put the 10 thumb gusset stitches on hold by transferring them to waste yarn when you come to them. Re-join across the gap, and continue knitting the chart. After completing the chart, close up the top of the mitten by grafting it with Kitchener stitch in MC. You will then need to complete the thumb: transfer the stitches from the waste yarn back onto two needles (five sts on each), and pick up five extra stitches in MC onto a third needle, from around the edge of the thumb-hole. Knit 12 rounds in MC, or until mitten thumb reaches t0 1/4" below your thumbtip. Decrease round 1: \*k3, k2tog\* around. Knit one round plain. K2tog around, and break yarn leaving a tail. Draw through the remaining (6) stitches and pull tight. Repeat for the right-hand mitten, using the RH Chart this time. Add the finishing touches to your mittens by duplicate-stitching onto the thumbs (see Duplicate Stitch Charts). A trick to make duplicate stitching easier is to wear the mitten on your non-dominant hand while you stitch. Weave in the ends, closing up any holes at the base of the thumbs. Block the mittens to tidy everything up. You're done! ① Amy van de Laar 2014. For personal non-commercial use only. If you have any questions, please email Amy at baroquepurls@gmail.com