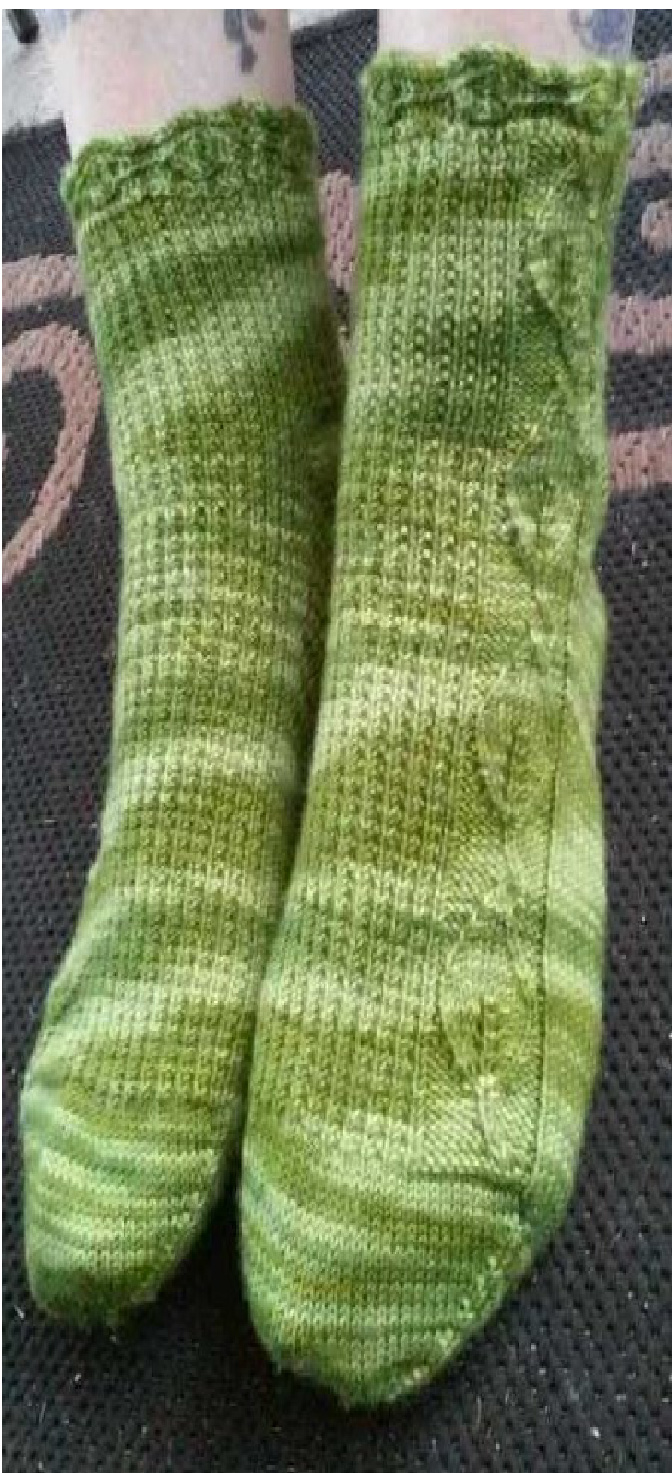
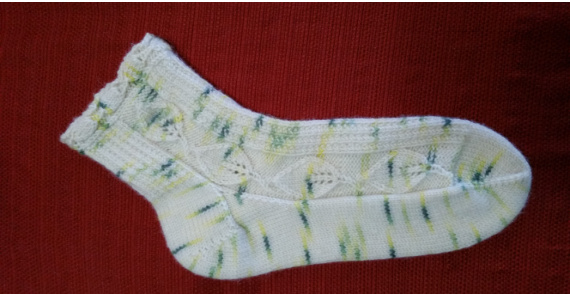
Leaf Me On by FiberFrosting Designs
A toe up, two at a time, magic loop sock pattern, featuring a line of leaves up the sides of the top, complimented by a seeded rib around. They are topped off with a bud border, knit sideways around the top. This pattern will challenge an intermediate knitter and should not be your first go at socks. It requires the following skills: knit, purl, increasing, decreasing, cables, short rows, knitting in the round using magic loop method, casting on for toe up. If you are experienced in these areas and have sock knitting experience, this should be a fun knit. SUPPLIES 6 stitch markers Yarn: Blue Moon - Socks That Rock, lightweight, 1 skein, wound into 2 balls. Needles: US 1 (2.25mm), 36-40" (81-101mm) circular (for magic loop), or size needed to get gauge. Gauge in stockinette: 8.5 sts per inch, 11 rows per inch (8.5 st per 2.54cm, 11 rows per 2.54cm) Sizes: Women's s (m, I, xl) Cast on 20 (20, 24, 28) stitches, using the Turkish cast on method (described in the Stitch Glossary at the end of this document).
TOE
The first set of rounds have increases every round. After that, increases are made on every other round. This creates a smoother, slightly rounded toe. Rnd 1-5 (5, 6, 7): Top: k1, M1R, k to last stitch of top, M1L, k1 Repeat for 2nd sock (be sure to drop sock 1 yarn and pick up sock 2 yarn). Bottom: k1, M1R, k to last stitch of bottom, M1L, k1 Repeat for 2nd sock Rnd 6 (6, 7, 8): knit all stitches Repeat last 2 rounds until there are 60 (64, 72, 80) toe stitches per sock. Knit 2 more rounds even (no increases). \*\*\* This is a good time to doublecheck your gauge.\*\*\*
FOOT
The top of the foot will be done in a seeded rib stitch, with stem and leaf motif along the outter-most side of each sock. They will mirror each other. The soles will be worked in stockinette. Please Note: When doing two at a time, references to right and left sock are AS WORN, not the position on the needles. Sock 1 and Sock 2 reference sock position as knit. Setup Round: This is where you add markers to indicate where the leaf charts are worked. Not completely necessary to continue using markers once the pattern is established...your call. Top: Sock 1: k1, PM, k11, PM, knit remaining 18 (20, 24, 28) stitches Sock 2: k18 (20, 24, 28), PM, k11, PM, k1 Sole: Sock 1 & 2: knit all sole stitches
Odd Numbered Rounds:
Note: Round 1 of leaf chart is done for 1st pattern repeat only. When repeating the chart, start with round 2. Top: Sock 1 (left): k1, SM, [work the Left Leaf Chart], SM, (k1, p1) across remaining top stitches. Sock 2 (right): (p1, k1) to first marker, SM, [work the Right Leaf Chart], SM, k1. Sole: Sock 1 & 2: knit all sole stitches
Even Numbered Rounds:
Note: Round 28 of the leaf chart is only to be knit on the last leaf pattern repeat at the top of the sock, before working cuff. All other repeats end with round 27. Top: Sock 1: k1, SM, [work the Left Leaf Chart stitches], SM, knit remaining top stitches. Sock 2: knit to first marker, SM, [work the Right Leaf Chart], SM, k1. Sole: knit all sole stitches Continue in pattern established, repeating leaf charts as instructed, until the sock measures 4.4 (4.8, 5.6, 6) inches [11 (12, 14, 15) cm ], ending after even numbered round. This is a good time to check that your desired length for your sock is in line with the pattern. Assuming your row gauge is correct, the finished sock length (slightly shorter than foot length) will measure approximately:
7.5 (8.5, 10, 11) inches [19 (21.5, 24, 26.7) cm ] If needed, adjust by increasing/decreasing length of sock before starting gusset.
GUSSETINCREASES
Starting on odd numbered round, increase for gusset as follows: Top: Sock 1 & 2: Continue in established pattern tom: Sock 1 & 2: Round 1: k1, M1R, k to last st, M1L, k1 Round 2: knit across Round 3: k1, M1R, PM, k to last stitch, PM, M1L, k1 Round 4: knit across, slipping markers as encountered Round 5: k1, M1R, k to last st, M1L, k1, slipping markers Round 6: repeat round 4 Note: markers do NOT indicate where to increase! They separate gusset increases from the sole stitches, aiding in counting the gusset increases. Repeat last 2 rounds until 10 (12, 12, 14) increases have been made for each gusset. (a total of 20 (24, 24, 28) increases per sock)
HEEL TURN
The heel turn is worked back and forth, on the sole stitches between the stitch markers. Short rows are used to create the curved shaping. There are many methods for doing short rows. My favorite at this time is the “Twin Stitch" method, described in the stitch glossary. Work top of foot stitches in established pattern, then work the heel turn on each sock separately as follows: Row 1: knit to 1st marker, SM, knit to last stitch before 2nd marker, create Twin stitch and place it on the left needle. Turn. Row 2: purl to stitch before marker, create Twin stitch and place on left needle. Turn. Row 3: knit to stitch before Twin stitch, create Twin stitch, place on left needle. Turn. Row 4: purl to stitch before Twin stitch, create Twin stitch, place on left needle. Turn. Repeat rows 3 and 4 until 10 (10, 12, 14) center stitches remain unworked. Knit across remaining center stitches to first Twin stitch pair, (knit Twin stitch pairs together) to marker, SM, knit gusset stitches and then do next sock's heel turn same as above.
GUSSETDECREASES/HEELFLAP
SETUP: Work top of foot in established pattern for both socks, bringing you back to the gusset and heel stitches. Row 1: (RS) knit to first marker, SM, knit Twin stitch pairs together as encountered, knit to next marker, SM, k2tog, turn. Row 2: (WS) slip 1, SM, purl across to next marker, SM, ssp, turn Row 3: (RS) slip 1, SM, knit to next marker, SM, k2tog, turn Repeat rows 2 and 3 until 2 gusset stitches remain (last row worked will be row 2). Remove markers and finish heel as follows: Row 1: (RS) slip 1, knit to last 2 stitches, k2tog, turn Row 2: (WS) slip 1, purl to last 2 stitches, ssp, turn Row 3: (RS) slip 1, knit to end of heel stitches Repeat gusset decrease/heel flap for other sock.
LEG
For the leg, the stem and leaf pattern will continue as established on top of foot, and the seeded rib will be worked on all remaining stitches, front and back, working in the round. Odd Numbered Rounds: Front: Work in established pattern Back: Sock 1: (p1, k1) across Sock 2: (k1, p1) across Even Numbered Rounds: Front: Work in established pattern Back: knit all stitches Continue until leg is desired length (minus cuff which will be about 1 inch/2.5 cm), trying to end at completion of leaf chart.
CUFF
The bud cuff is worked sideways, around top of sock, working the chart rows back and forth, turning workbetweenrows. The chart uses up 10 of the leg stitches per 14 row repeat. This means that for the medium and large sizes, there will be extra leg stitches to contend with at the end that are not enough for another full repeat. The spacer rows are used to distribute these extra stitches evenly in the cuff. With working yarn, cast on 7 stitches at beginning of next round, using knitted cast on or c-loop cast on. Work Bud Cuff Chart, adding spacer rows as indicated below. Spacer rows are worked same as rows 13 & 14 of the chart. Small: No spacer rows required..just work bud pattern repeats all the way around top of sock. Medium: After working 3 bud pattern repeats, work 2 spacer rows. Work 3 more bud pattern repeats and then 2 more spacer rows. Large: After working all bud pattern repeats, work 2 spacer rows. X-Large: No spacer rows required..just work bud pattern repeats all the way around top of Sock. If for some reason you still have a few sock stitches remaining that have not been used up, repeat rows 13 and 14 until done attaching cuff. If you are a knitting perfectionist, you may otherwise decide to rip back until you figure out why...I know the routine too well! :) Once cuff knitting is complete, bind off and graft end of cuff to beginning row of cuff. Here is a tutorial I find useful for grafting: http://www.learn2knit.co.uk/knitting/ioining.php
| 28 | ||||||||||||||
| 27 | ||||||||||||||
| 26 | ||||||||||||||
| 25 | ||||||||||||||
| 24 | ||||||||||||||
| 忆 | ||||||||||||||
| 19 | ||||||||||||||
| 18 | ||||||||||||||
| 17 | ||||||||||||||
| 16 | ||||||||||||||
| O | O | 15 | ||||||||||||
| 14 | ||||||||||||||
| O | O | 13 | ||||||||||||
| 12 | ||||||||||||||
| O | O | 11 | ||||||||||||
| O | ||||||||||||||
| O | ||||||||||||||
| 432 | ||||||||||||||
Round 1: P11. Round 2: P8, k1, p2. Round 3: P7, 1/1 RPC, p2. Round 4: P6, 1/1 RPC, p3. Round 5: P5, 1/1 RPC, p4. Round 6: P5, k1, p5. Round 7: P5, (k, yo, k) in 1, p5. Round 8: P5, k3, p5. Round 9: P4, k2tog, yo, k1, yo, ssk, p4. Round 10: P4, k5, p4. Round 11: P3, k2tog, k1, [yo, k1] twice, ssk, p3. Round 12: P3, k7, p3. Round 13: P2, k2tog, k2, [yo, k1] twice, k1, ssk, p2. Round 14: P2, k9, p2. Round 15: P1, k2tog, k3, [yo, k1] twice, k2, ssk, p1. Rounds 16-18: P1, k11, p1. Round 19: P1, 1/1 LPC, k7, 1/1 RPC, p1. Round 20: P2, k9, p2. Round 21: P2, 1/1 LPC, k5, 1/1 RPC, p2. Round 22: P3, k7, p3. Round 23: P3, 1/1 LPC, k3, 1/1 RPC, p3. Round 24: P4, k5, p4. Round 25: P4, 1/1 LPC, k1, 1/1 RPC, p4. Round 26: P5, k3, p5. Round 27: P5, s2tog-k1-p2ss0, p5. Round 28: P11. Stitches k p yo (k, yo, k) in 1 k2tog ssk s2tog-k1-p2ss0 1/1 RPC 1/1 LPC
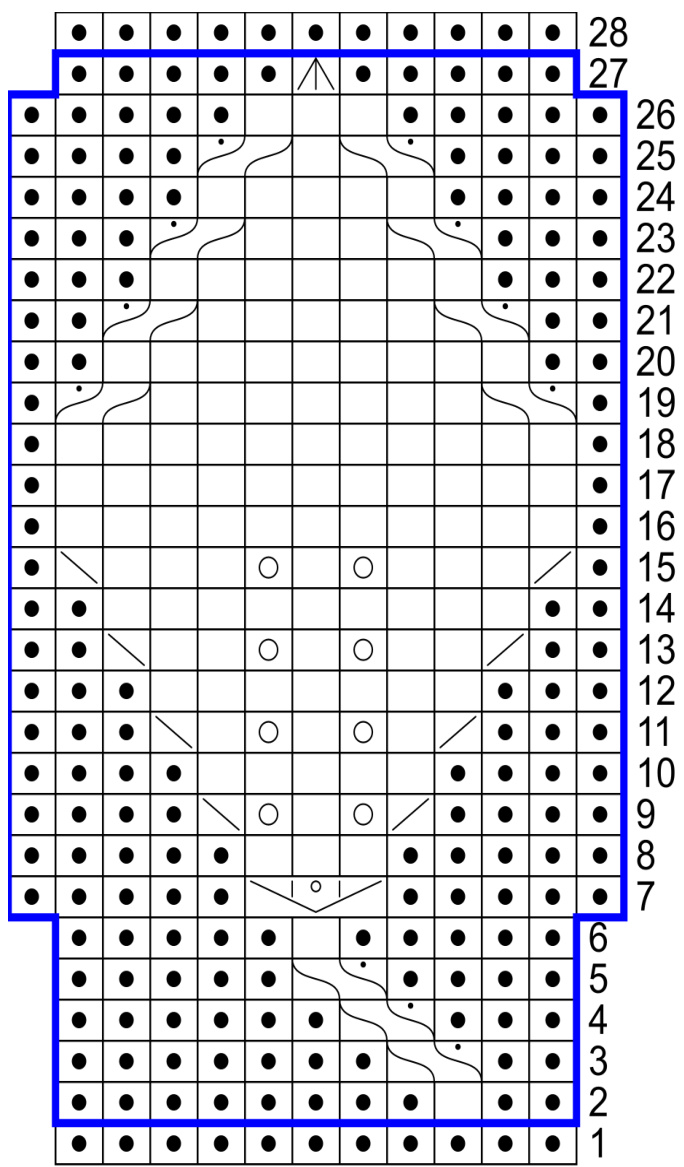
Round 1: P11. Round 2: P2, k1, p8. Round 3: P2, 1/1 LPC, p7. Round 4: P3, 1/1 LPC, p6. Round 5: P4, 1/1 LPC, p5. Round 6: P5, k1, p5. Round 7: P5, (k, yo, k) in 1, p5. Round 8: P5, k3, p5. Round 9: P4, k2tog, yo, k1, yo, ssk, p4. Round 10: P4, k5, p4. Round 11: P3, k2tog, k1, [yo, k1] twice, ssk, p3. Round 12: P3, k7, p3. Round 13: P2, k2tog, k2, [yo, k1] twice, k1, ssk, p2. Round 14: P2, k9, p2. Round 15: P1, k2tog, k3, [yo, k1] twice, k2, ssk, p1. Rounds 16-18: P1, k11, p1. Round 19: P1, 1/1 LPC, k7, 1/1 RPC, p1. Round 20: P2, k9, p2. Round 21: P2, 1/1 LPC, k5, 1/1 RPC, p2. Round 22: P3, k7, p3. Round 23: P3, 1/1 LPC, k3, 1/1 RPC, p3. Round 24: P4, k5, p4. Round 25: P4, 1/1 LPC, k1, 1/1 RPC, p4. Round 26: P5, k3, p5. Round 27: P5, s2tog-k1-p2ss0, p5. Round 28: P11. Stitches p yo (k, yo, k) in 1 k2tog ssk s2tog-k1-p2ss0 1/1 RPC 1/1 LPC
Bud Cuff Chart
| 14 12 | 13 | |||||||||||
| 11 | ||||||||||||
| 10 8 6 | 9 | |||||||||||
| 7 | ||||||||||||
| 5 | ||||||||||||
| 4 | ||||||||||||
| 3 | ||||||||||||
| 2 | 1 | |||||||||||
Row 1: S1, p2, k1, p2, k2L-tbl. Row 2: P2L, [k2, p1] twice. Row 3: S1, p2, (k, yo, k, yo, k) in 1, p2, k2L-tbl. Row 4: S1 wyif, k2, p5, k2, p1. Row 5: S1, p2, k5, p2, k2L-tbl. Rows 6-7: Repeat rows 4-5. Row 8: S1 wyif, k2, p5, k2, p1. Row 9: S1, p2, ssk, k1, k2tog, p2, k2L-tbl. Row 10: S1 wyif, k2, p3, k2, p1. Row 11: S1, p2, s1-k2tog-psso, p2, k2L-tbl. Row 12: P2L, [k2, p1] twice. Row 13: S1, p2, k1, p2, k2L-tbl. Row 14: P2L, [k2, p1] twice. Stitches No stitch RS: k; WS: p RS: p; WS: k RS: s1; WS: s1 wyif (k, yo, k, yo, k) in 1 k2tog ssk s1-k2tog-psso RS: k2L-tbl; WS: p2L
| Stitch Glossary | |
| (k, yo, k) in 1 | Knit, leaving the stitch on the needle, then yarn over, and then knit into the same stitch. |
| (k, yo, k, yo, k) in 1 | Knit, leaving the stitch on the needle, then yarn over, knit, yarn over, and then knit (5 stitches total) into the same stitch. |
| 1/1 LPC | Slip 1 stitch to cable needle and hold in front; p1; k1 from cable needle. |
| 1/1 RPC | Slip 1 stitch to cable needle and hold in back; k1; p1 from cable needle. |
| k | Knit. |
| k2L-tbl | Knit stitch together with leg stitch, through the back loop. |
| k2tog | Knit 2 stitches together. |
| kbf | Knit into the back of the stitch, leaving the stitch on the needle, and then knit into the front of the same stitch. |
| M1L | From the front, lift the horizontal strand between stitches with the left needle. Knit through the back loop. |
| M1R | From the back, lift the horizontal strand between stitches with the left needle. Knit through the front loop. |
| MM1 | Modified make one. On knit (RS) row: Pickup both legs of stitch between stitches on right and left- s n u s needle). e o s o s a o hand needles, place on left needle and purl that stitch (leave on right-hand |
| p P2L | needle). Purl. |
| PM | Purl stitchtogether withleg stitch. Place marker. |
| RM | Remove marker. |
| RS | Right side (public side) of sock. |
| s1 | |
| Slip 1: With the working yarn in back, insert the right needle into the next | |
| S1 wyif | With the working yarn in front, insert the right needle into the next stitch as if to purl and transfer the stitch from the left needle to the right. |
| s1-k2tog-psso | stitch over. |
| s2tog-k1-p2ss0 | Slip 2 stitches together knitwise, knit 1, then pass slipped stitches over. |
| sb SM | Slip stitch back to other needle to be worked again. |
| ssk | Slip marker. |
| loops | |
| ssp | Slip 2 stitches knitwise, then return slipped stitches to left needle and purl 2 together through the back loops. |
| Stitch Glossary Attach yarn with slip knot to one needle, leaving a small tail (the slip knot will | |
| Turkish cast-on | be taken out later). Hold both needles firmly together, pointing in the same direction, with the slip knot on bottom needle. Wrap the yarn around both toward you, then down in front.. Each complete wrap around creates two cast on stitches, so wrap half the number of total stitches to cast on. For example, if the pattern calls for 24 cast on stitches, wrap the yarn 12 times around both second sock stitches. After casting on the stitches for the second sock, check the stitch count and then pull the bottom needle through to start working the round, magic loop style. When you pull the working needle and the stitches are stitches a little before knitting the first round. After knitting the first half of the round, and you start the other half, the first stitch is the slip knot that started the cast on. This slip knot was just to anchor the yarn and is no longer needed. Take that stitch off of the needle and pull out the slip knot, then proceed with the rest of the round. If you are not familiar with this method and need more help, there are picture and video tutorials on line. |
| Twin Stitch | Turkish cast on tutorial: https://www.youtube.com/watch?v=zrUTWalgdMk (akaShadowStitch/Wrap) of the stitch being worked. The result is two stitches coming up through the video tutorials on this technique on-line if my description is not clear. Also, if you prefer another short row method, feel free to substitute...but if you have Here is a tutorial I found online: |
| WS | http://socktopus.co.uk/2011/02/05/short-rows-shadow-wraps/ Wrong side(inside) of sock. |
| yo | Yarn over: Wrap the working yarn over the right needle, from front to back (counter-clockwise). |


