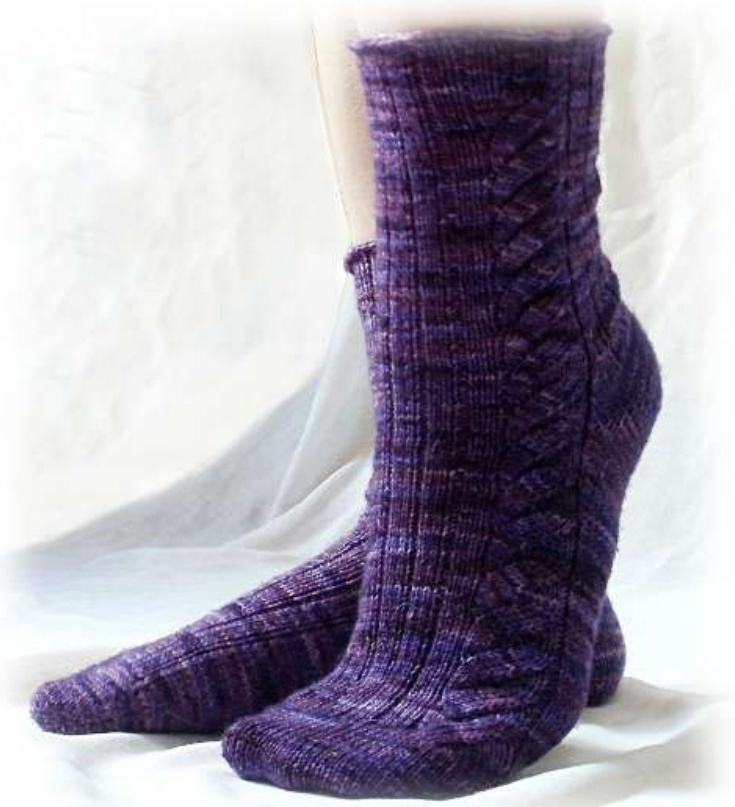
Shown in Colorway 22 "Tokyo Cream" What happens, when you intend to knit a nice braid, but you work all cable crosses in the same direction by mistake? A new, ropey cable appears, so fun you'll want to knit it on purpose! Mistake Braid socks are cushy cabled socks for snuggling in bed, lounging in front of the TV or curling up with a good book. Worked in worsted weight Calm from Dream in Color, they combine gorgeous colors with a functional, foot-hugging, comfortable construction. The mini-gusset and short row heel creates a nicelycontoured but easy-to-work heel. All-over ribbing complements the cable design and provides a snug fit. The sole is worked in reverse stockinette for maximum comfort - the worsted-size purl bumps are on the outside while the smooth side caresses the foot.
Oesowces:
Instructions for Judy's magic cast on can be found on knitty.com. Explanations for common knitting abbreviations and instructions can be found on knittinghelp.com. (Foot circumference) S\~ 20.0 cm (7.9 inches) M\~ 24.0 cm (9.4 inches) L\~ 28.0 cm (11.0 inches)
materials meeded:
approx. 180-260 m (197-284 yards) of Dream in Color Calm 4 mm (us 6) double pointed or circular needles, or size needed to obtain gauge darning needle cable needle Dauge: 20 sts and 33 rnds = 10 cm/4 inch in stockinette stitch, gently stretched
Albreuiations:
CO cast on kf&b knit into front and back k2tog knit 2 together m1l/r make one left/right pf&b purl into front and back pm place marker rnd(s) round(s) RS right side ssk slip, slip, knit slipped sts together through back loop st(s) stitch(es) WS wrong side w&t wrap and turn 3x1rib k3, p1 until end of row Pattern by

This pattern is copyright @ by Tanja Fleischer and may not be reproduced, distributed or sold without permission. Pattern is for personal and non-profit use only.

CO 16 sts using your favorite toe-up co. Pm at start of rnd and pm after 8 sts to divide instep and sole. Slip markers as you come across them.
Begin increase rnds:
Instep: kf&b, k to 2 sts before end of instep, kf&b, k1, slm; Sole: kf&b, p to 2 sts before end of sole, pf&b, k1; 4 sts increased.
Non-increase rnds:
Knit all instep sts, slm, k1, p to one st before end of sole, k1; Work increase rnd every rnd 4(5,6) times. 16(18,20) sts each instep and sole. Work increase rnd every second rnd 2(3,4) times. 20(24,28) sts each. After last increase rnd, work next 2 rnds as follows: Left sock: k instep sts; k1, p to 2 sts before end of sole, k2 Right sock: k instep sts; k2, p to 1st before end of sole, k1
Foat, sige ?
Pattern setup, left sock
Rnd 1: k9, p1, k10, slm, k1, p17, k2; Rnd 2: k9, p1, k3, p1, k6, slm, k1, p17, k2; Rnd 3: k1, p1, k2, m1r, k3, m1l, k2, (p1, k3) 2 times, p1, k2, slm, k1, p17, k2; 2 sts increased, 22 instep sts.
Pattern setup, right sock
Rnd 1: k10, p1, k9, slm, k2, p17, k1; Rnd 2: k6, p1, k3, p1, k9, slm, k2, p17, k1; Rnd 3: k2, (p1, k3) 2 times, p1, k2, m1r, k3, m1l, k2, p1, k1, slm, k2, p17, k1; 2 sts increased, 22 instep sts
Pattern rnd:
Left sock: k1, p1, work left chart, (p1, k3) 2 times, p1, k2, slm, k1, p17, k2; Right sock: k2, (p1, k3) 2 times, p1, work right chart, p1, k1, slm, k2, p17, k1; Continue in established pattern until you reach 7.5 cm (3inches) less than desired foot length.
Foot, sige M
Pattern setup, left sock
Rnd 1: k9, p1, k3, p1, k10, slm, k1, p21, k2; Rnd 2: k9, (p1, k3) 2 times, p1, k6, slm, k1, p21, k2 Rnd 3: k1, p1, k2, m1r, k3, m1l, k2, (p1, k3) 3 times, p1, k2, slm, k1, p21, k2; 2 sts increased, 26 instep sts.
Pattern setup, right sock
Rnd 1: k10, p1, k3, p1, k9, slm, k2, p21, k1; Rnd 2: k6, (p1, k3) 2 times, p1, k9, slm, k2, p21, k1; Rnd 3: k2, (p1, k3) 3 times, p1, k2, m1r, k3, m1l, k2, p1, k1, slm, k2, p21, k1; 2 sts increased, 26 instep sts.
Pattern rnd:
Left sock: k1, p1, work left chart, (p1, k3) 4 times, p21, k2; Right sock: k2, (p1, k3) 3 times, p1, work right chart, p1, k3, p21, k1 Continue in established pattern until you reach 9 cm (3.5 inches) less than desired foot length.
Foot, sige J.
Pattern setup, left sock
Rnd 1: k13, p1, k14, slm, k1, p25, k2 Rnd 2: k9, (p1, k3) 2 times, p1, k10, slm, k1, p25, k2; Rnd 3: k9, (p1, k3) 3 times, p1, k6, slm, k1, p25, k2; Rnd 3: k1, p1, k2, m1r, k3, m1l, k2, (p1, k3) 4 times, p1, k2, slm, k1, p25, k2; 2 sts increased, 30 instep sts.
Pattern setup, right sock
Rnd 1: k14, p1, k13, slm, k2, p25, k1; Rnd 2: k10, (p1, k3) 2 times, p1, k9, slm, k2, p25, k1; Rnd 3: k6, (p1, k3) 3 times, p1, k9, slm, k2, p25, k1; Rnd 4: k2, (p1, k3) 4 times, p1, k2, m1r, k3, m1l, k2, p1, k1, slm, k2, p25, k1; 2 sts increased, 30 instep sts.
Pattern rnd:
Left sock: k1, p1, work left chart, (p1, k3) 4 times, p1, k2, slm, k1, p25, k2; Right sock: k2, (p1, k3) 4 times, p1, work right chart, p1, k1, slm, k2, p25, k1; Continue in established pattern until you reach 10.5 cm (4.1 inches) less than desired foot length.
Jusset
Gusset increases
Both socks: Work instep sts in established pattern, k to 1 st before first purl st\*, m1r, k1, p17(21,25), k1, m1l, k to end; 2 sts increased. \*Left sock will have no st to knit before first increase. Work gusset increase rnd every third rnd 2 more times. 22(26,30) instep sts, 26(30,34) sole sts. Work one row over instep sts, stopping at marker. Heel will be shaped as follows on sole sts only.
Heel!
Left Sock
Row 1, Rs: work sts as present on needles until 2 sts before end of rnd, w&t; Row 2, WS: work sts as present on the needles until 1 st before marker, w&t; Row 3: work sts as present until 1 st before last wrap, w&t; Continue working row 3 until you have 9 sts between wraps. Last row should be a WS row. Start working outward asdescribedbelow.
Right sock:
Row 1, Rs: work sts as present on needles until 1 st before end of rnd, w&t; Row 2, WS: work sts as present on the needles until 2 sts before marker, w&t; Row 3: work sts as present until 1 st before last wrap, w&t; Continue working row 3 until you have 9 sts between wraps. Last row should be a WS row. Start working outward as describedbelow.
Size S and L, both socks
On all following rows, pick up all wraps and work them together with the st they are wrapped around. Row 1: p1, k3, p1, k3, p1, k wrap and st together, w&t; Row 2: p1, k1, p3, k1, p3, k1, p wrap and st together, w&t; Row 3: k1, p1, k3, p1, k3, p1, k1, k both wraps and st together, w&t; Continue working outward as established, working the new sts into 3x1 rib. When all previous purl sts have been worked, continue short-rowing, working all new sts in stockinette.
Size M, both socks
On all following rows, pick up all wraps and work them together with the st they are wrapped around. Row 1: k2, p1, k3, p1, k2, k wrap and st together, w&t; Row 2: p3, k1, p3, k1, p2, p wrap and st together, w&t; Row 3: k3, p1, k3, p1, k3, p both wraps and st together, w&t; Continue working outward as established, working the new sts into 3x1 rib. When all previous purl sts have been worked, knit all further sts. When all wrapped sts have been worked up, resume knitting in the round.
Gusset decreases
Left sock: Work instep sts in established pattern, slm, ssk, work sts as present on needles unil 3 sts before end of rnd, k2tog, k1; 2 sts decreased. Right sock: Work instep sts in established pattern, slm, k1, ssk, work sts as present on needles unil 2 sts before end of rnd, k2tog,; 2 sts decreased. Work gusset decrease rnd every second rnd 2 more times. 22(26,30) instep sts, 20(24,28) back of leg sts. After the last gusset decrease, continue in established pattern until 2 cm (0.8 inch) less than desired length. Cuff setup rnd: Work all sts except the mistake braid as present on needles; Instead of mistake braid, work: k2, ssk, p1, k2tog, k2; Work cuff in established 3x1 rib until desired length. Bind off loosely.
Finishing:
Weave in ends, block as desired. Snuggle up with a good book and your new cushy socks!
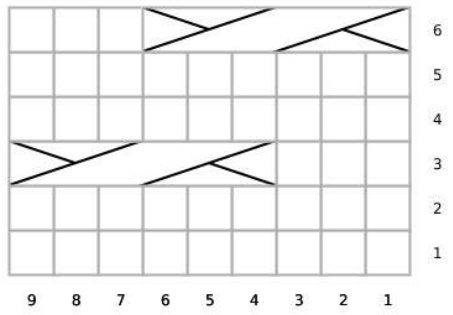
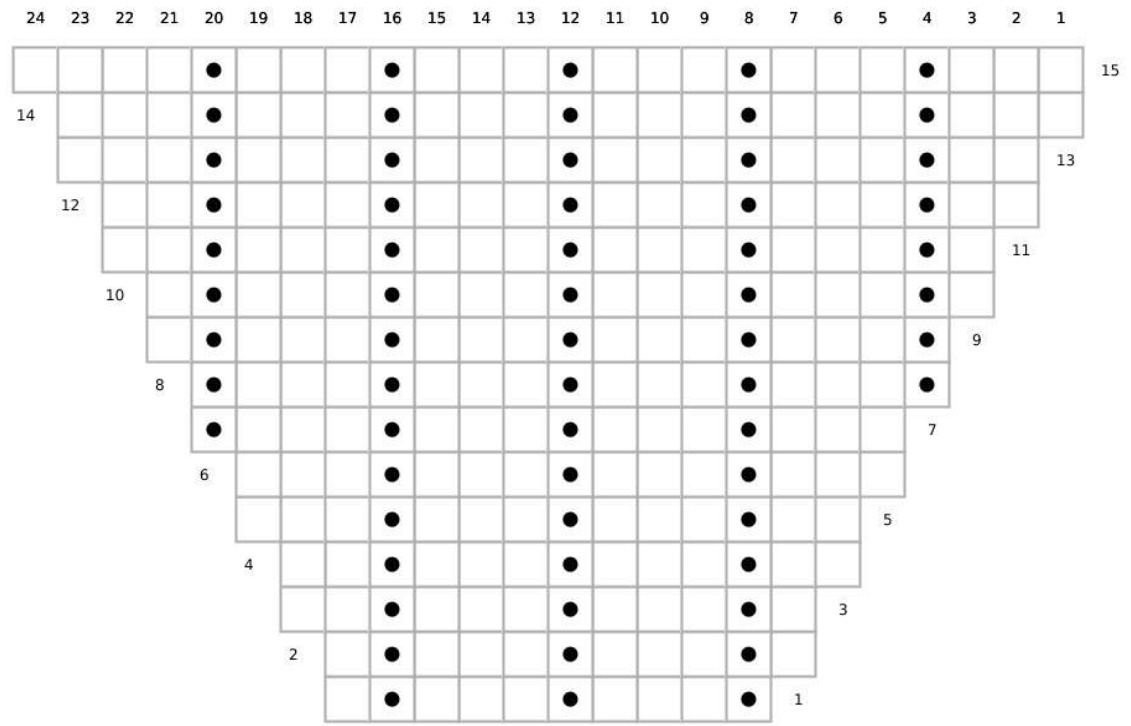
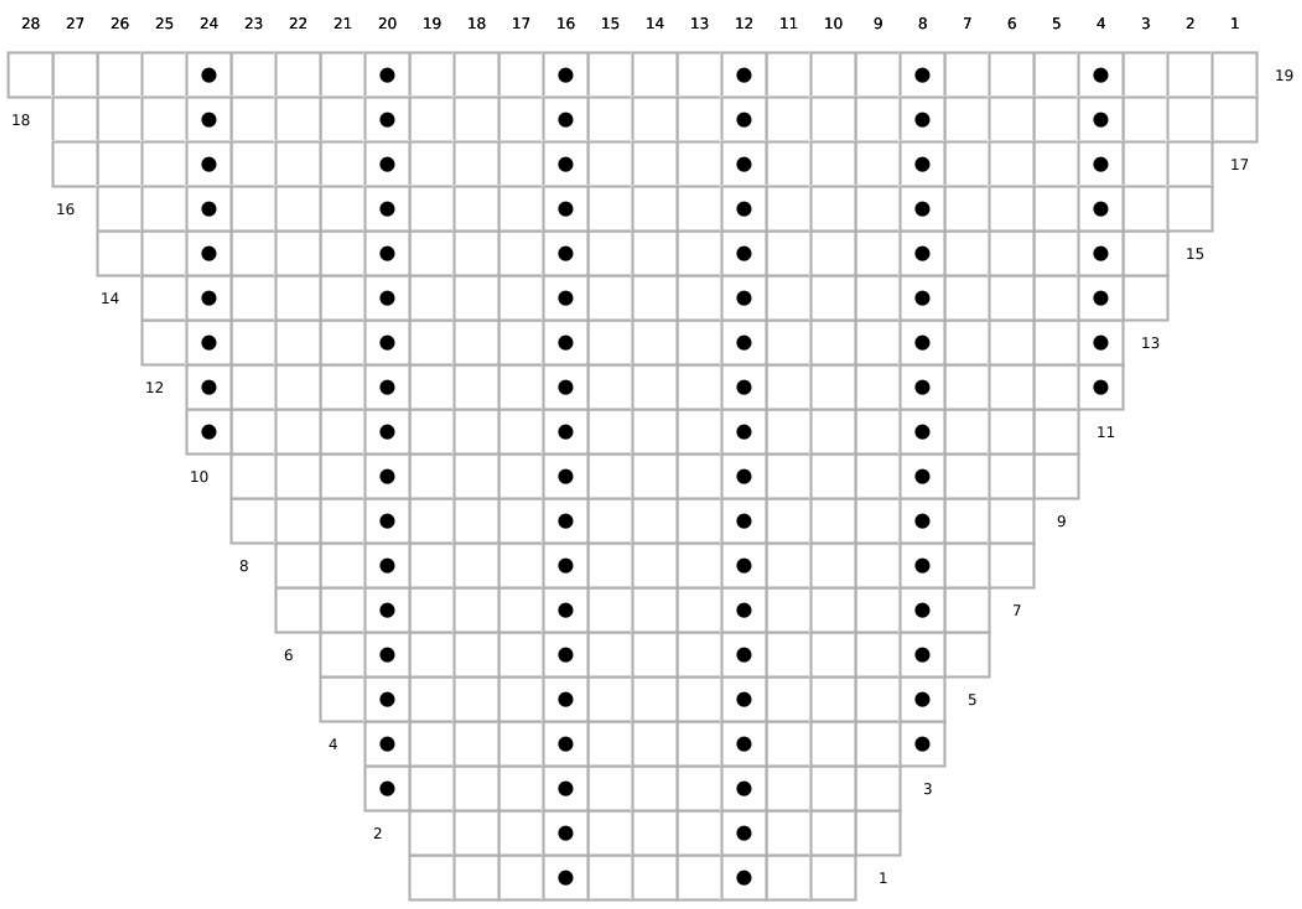
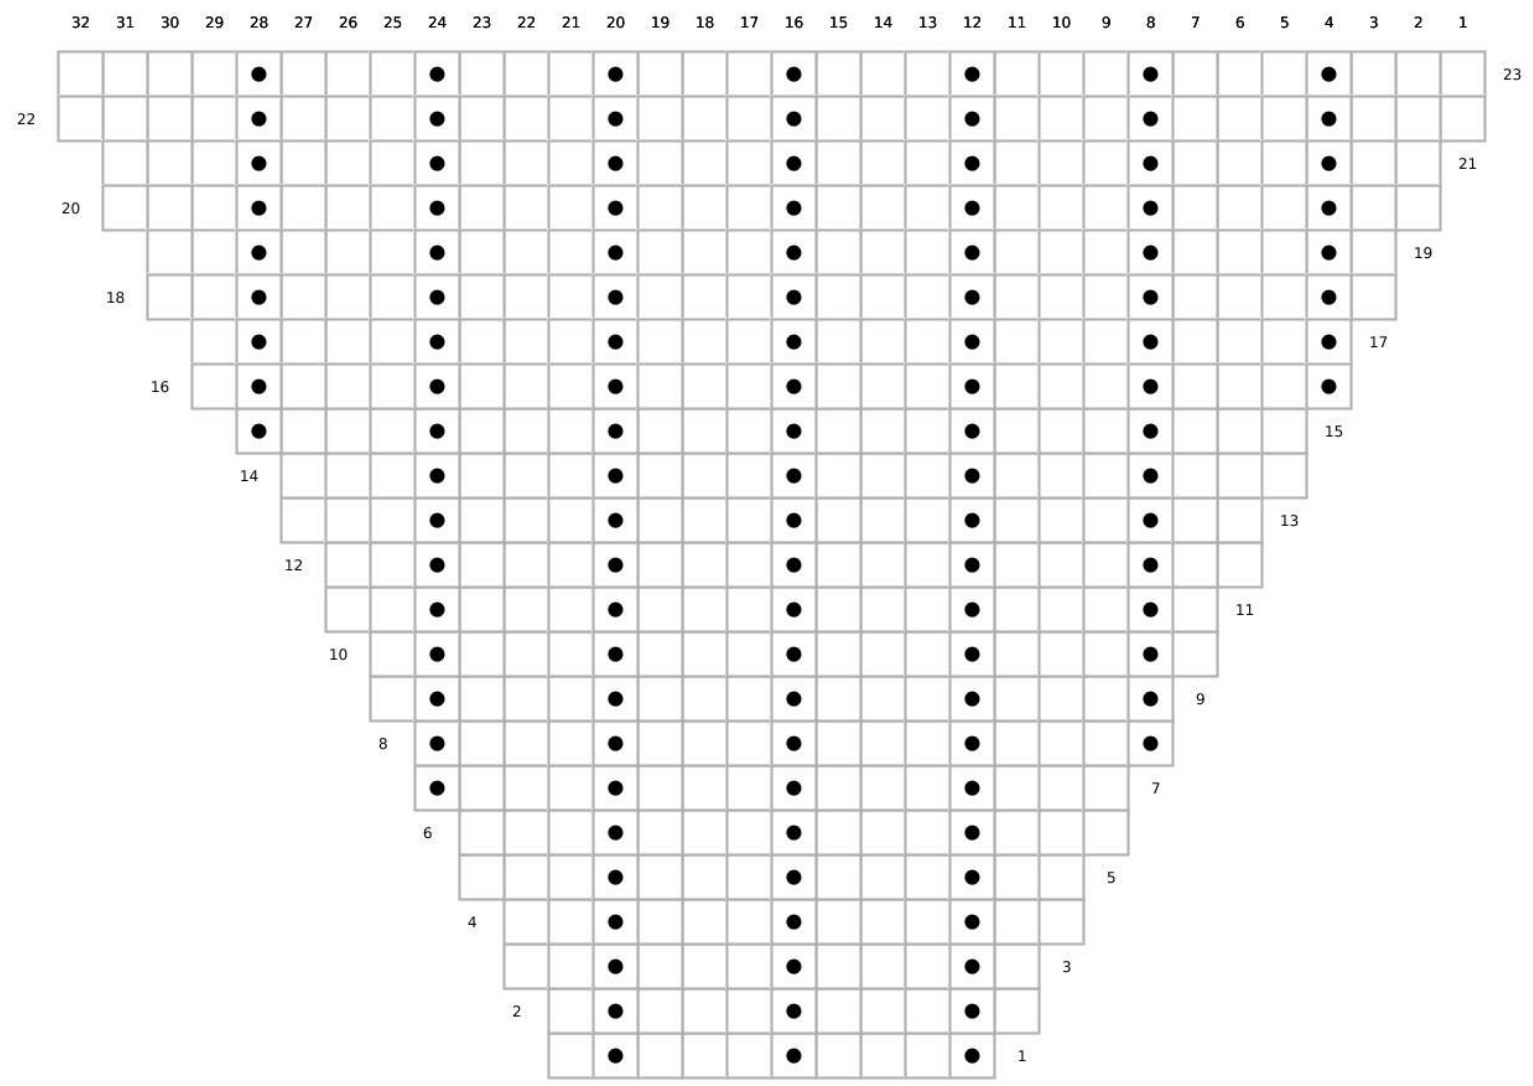
Setup Charta (instep sts shown onl)

Size S left Size S right

Size M left

Size M right

Size L left

Setup L right


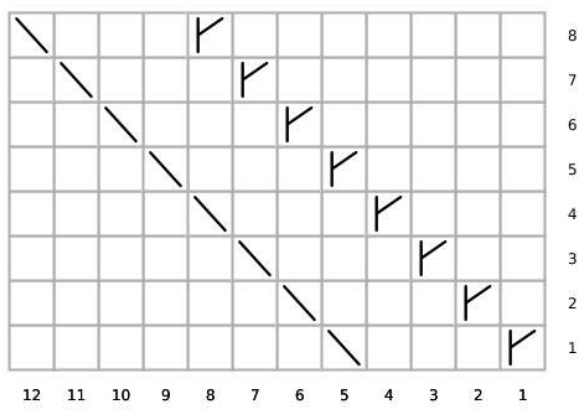
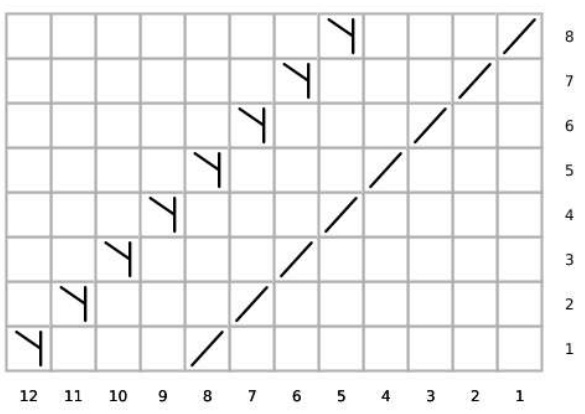
Heel Charts
(column numbers of heel charts don't refer to sts on your needles.) of each row; Pick up all wraps and knit them together with the st they are wrapped around.
Size S Size M
Size L
Chant Key
knit ·purl no sts make one left make one right 3/3RC: sl3 purlwise onto cable needle, hold to back. k3 from left needle, k3 from cable needle. 3/3LC: sl3 purlwise onto cable needle, hold to front. k3 from left needle, k3 from cable needle. k2tog ssk Not everyday is cold enough for worsted weight socks - and we all own a dragon's lair full of beautiful sock yarn to be knitted! This variation uses a faux-cable pattern for a sleeker fit, and you will still have the rope-y cable traveling up your leg. CO 20 sts. Pm at start of rnd and pm after 10 sts to divide instep and sole. Slip markers as you come across them. Increase rnd: kf&b, k to 2 sts before end of instep, kf&b, k1, kf&b, k to 2 sts before end of rnd, kf&b, k1; Repeat increase rnd every 2nd rnd until you reach a multiple of 8 sts that is closets to your preferred size. Increase one additional instep st in next rnd. Left sock: p1, work left faux chart, (p1, k3) to end of instep, k to end of rnd; Right sock: (k3, p1) until 13 sts before end of instep, work right faux chart, p1, k to end of rnd; Continue in this pattern until you reach 7-9 cm (2.8 - 3.5 inches) less than desired length, depending on your foot size.
Gusset increases:
Increase one st on either side of the sole; Repeat increase rnd every 3rd rnd until you have 5 increased sts on either side.
Heel
Row 1: k to one st until end of rnd, w&t; Row 2: p to one st until end of sole, w&t; Row 3: k to one st before last wrap, w&t; Row 4: p to one st before last wrap, w&t; Repeat row 3 and 4 until you have 12 sts between wraps; Row 1: k to next wrap, pick up all wraps and knit them together with the st they are wrapped around, w&t; Row 2: p to next wrap, pick up all wraps and knit them together with the st they are wrapped around, w&t; Continue working outward until all wraps have been worked up. Setup ribbing on back of leg sts as follows: Left sock: k5, p1, (k3, p1) until 8 sts before end of rnd, k8; Right sock: k8, p1, (k3), p1) until 5 sts before end of rnd, k5; Decrease one knit st on either side of back of leg sts every 2nd rnd, until 3/1 rib is established; 10 sts decreased. Continue until 2.5 cm (1 inch) less than desired leg length. Decrease 1 st in faux cable pattern. Work 3/1 rib over all sts for another 2.5 cm (1 inch). Bind off loosely.
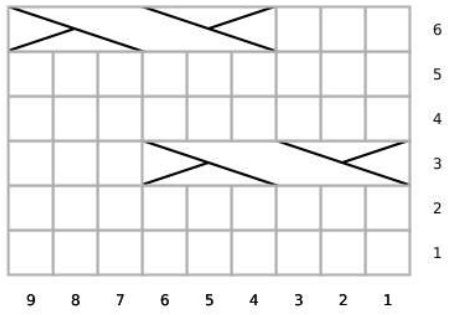
Faux Mistake Braid socks shown in Dream in Color Everlasting sock, colorway 727"Amethyst"
Left Faux Mistake Braid