Rip Cord Hat
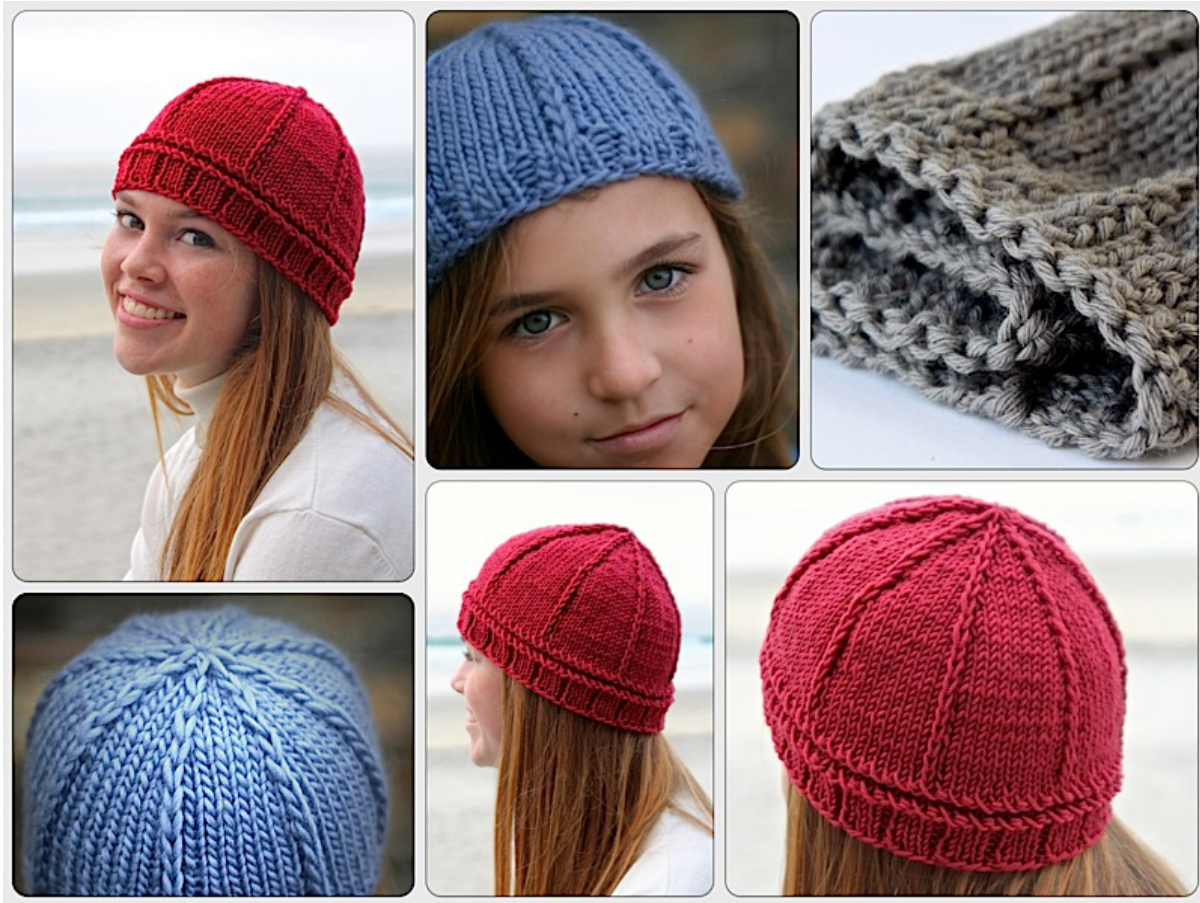
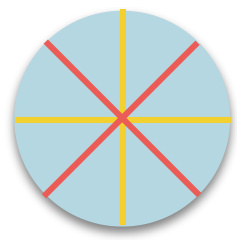
Parachute inspired lines run cleanly to the top in this simple but striking pattern.
Online Extras
Detailed pattern w/Tables & Charts 5 Gauges & 5 Cast On Options New skills including 2 versions of the Showy Decrease, the Wavy Tail Cast On, and a Double Decker Hat Close Pattern links to online tips, detailed Photobucket pictures & blog posts Chart files to load onto your phone or tablet. More project tips and technique help.
From the Designer
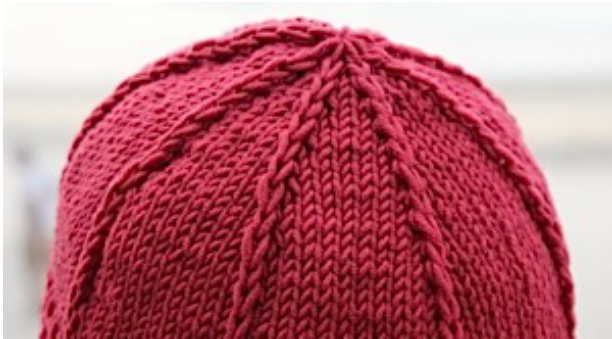
Do you have someone to knit for who likes to keep it simple? If so, this hat may be just the thing. Although one of our less complex visual patterns, the hat's simple lines are striking. This hat uses two types of vertical decreases in a similar manner - allowing the vertical pattern to seamlessly flow into crown hiding the shaping in plain sight. There are two brim options available. One introduces a perpendicular element with raised horizontal lines that are cord-like in appearance.
Laura
Overview
The Rip Cord Hat is the second in a trio of hat patterns designed to introduce and demonstrate various uses for the Showy & Subtle Decrease. The first, the Vortex Hat, uses diagonal lines of Showy Decreases to create a swirl pattern from the base to the top of the hat. The Vortex is the easier of the two patterns because the lean of the k2tog decrease naturally creates the spiral shape. Vertical decreases are a bit trickier but helpful to understand. Here's the issue when designing vertical lines. When you partner a k2tog with a yarn over on it's right side, it moves vertically. However, as soon as you take away that yarn over (so it becomes a working decrease) the k2tog tilts to the right and there goes your vertical element. Therefore, instead of the eight single decreases used in the Vortex Hat, this crown is shaped using four double decreases alternating across the eight vertical lines. You've used this decrease before, it's the Centered Double Decrease (s2kp), but this time you're going to make it pop.
The Interactive Knitting Pattern
· You're Connected with links throughout the PDF file taking you to additional online information; more project details, more tips & photos. · It's portable; download PDF file onto your computer, laptop or phone & take us along. Chartfilesare alsodownloadable. · Don't forget to check out our blog at blog.knittingnuances.com. You can find a post about the Rip Cord Hat here at blog.knittingnuances.com/2014/01/23/ripcord/hat/ Introduced in the Vortex Hat Pattern and also used here: Introduction to Showy Decreases Double Decker Hat Closure New in this hat pattern: The Wavy Tail Cast On A double Showy Decrease Vertical Showy Decreases Raised Ridge More pictures and examples are available on our Photobucket.com site.
Modifications for Beginner Knitters
Two changes make this a much simpler hat: 1. Eliminate the Wavy Tail Cast On and work a standard Long Tail Cast On. 2. Chose the much simpler 4-point hat shaping described in the lower right corner of page 5. If you're viewing this pattern as a PDF the links are live. Just click and go. However, if you have paper in your hand, the pictures mentioned can be found here: s1013.photobucket.com
Reference Sheet
| Gauge & Yarn | Size |
| Knit the hat at or a bit tighter than yarn label gauge: 5 options are included. - Gauge = 3.5 to 5.5 st per 1" in stockinette. Yarn&Yardage: Almost any yarn with some give works. The raised pattern shows better with a yarn with some structure (merino/blend) or a yarn with lots of loft (Alpaca blend). Yardage varies with size and gauge from 70 to 110 yards. We'll provide the info for all our samples for estimates. | The hat stretches to fit heads up to 2 inches larger but the looks best when it's not too tight. Average head sizes are listed below. The colors correspond to the sizing table below. Infant: 14.5" Baby: 16.0" Child: 17.5" Medium: 19" |
| Samples: Blue: Classic Elite Ariosa,100% extra fine merino, 87 yds, 3.5 sts/1" on US 10.5, Child = 60 yds Gray: Karabella Margrite, 80% merino, 20% cashmere, 50g = 154 yds, 5 sts/1" on US 8, Medium = 110 yds Red:Karabella Aurora 8,100%merino,98yds 4.5 sts/1" US 6. Baby = 75 yds, Large = 110 yds | Large: 21" |
| Notions Needles: Two 16 or 24"circular needles, US 4 -10, as needed for | |
| label gauge. Stitch Markers: 8 Tapestry Needle |
Gauge & Cast On Options
| Gauge | 64 | 72 | 80 | 88 | 96 |
| 5.5/1" | 14.5" | 16.0" | 17.5" | ||
| 5.0/1" | 14.5" | 16.0" | 17.5" | 19.0" | |
| 4.5/1” | 14.5" | 16.0" | 17.5" | 19.5" | 21.5" |
| 4.0/1" | 16.0" | 18.0" | 20.0" | 22.0" | |
| 3.5/1" | 18.5" | 20.5" |
Abbreviations
| k, p | knit, purl |
| k2tog | knit 2 together |
| sl2kp | slip 2 knitwise, k1, pass 2 over |
| k1tbl | knit 1 through back loop to closeeyelet |
| p2tog | purl2together |
| sl1 | slip 1 stitch (yarn on wrong side) |
| tl1 | twisted loop increase. Twist loop and place on right needle. |
| yo | yarn over |
| BOR | Beginning of Round |
Chart Legend
| knit knitstitch | |
| as one stitch | k2tog Knittwostitchestogether |
| Slip2,Knit,Pass Slip 2 stitches knitwise,knit 1,pass 2 slip stitches over | |
| worktbltoclose Knit through thebackloop soastotightenorclosethe yarnoverhole. | |
| purl purlstitch | |
| p2tog Purl2stitchestogether | |
| slip Slipstitch as if topurl, holdingyarninback | |
| twistedloopIncrease Twistloop of yarn and place right needle. (tl1) | |
| yo YarnOver |
Knitting Instructions
Brim
Cast on 64 (72, 80, 88, 96) stitches using the Wavy Tail Cast On in a 3 x 1 rib pattern. There is a tutorial included in your pattern. - The slip stitch counts as the first purl cast on. Continue from there as follows: \* 3 standard cast on sts, 1 purl cast on st.\* skipping the purl co on the last set. - You can choose to use the standard long tail cast on if you'd like to keep things simpler. > Connect to knit in the round (being careful not to twist) and place marker for beginning of round. Knit a 3x1 brim for 3/4 inch for infant, baby, child or 1" for adult sizes: \*p1, k3\* Work raised ridge round: \*tl1, p2tog\* (please see note to the right) ·Knit2rounds ·Work 1 more raised ridge round
Main Hat
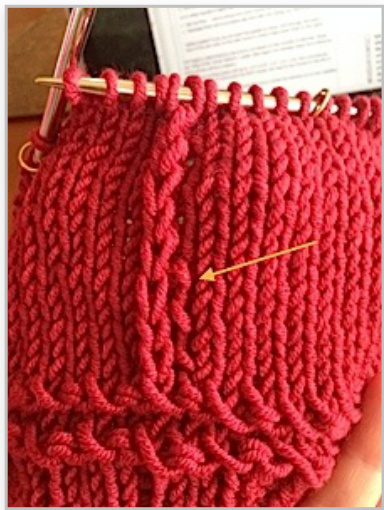
· The hat is knit in 8 sections of 8 ( 9, 10, 11, 12). Place markers for each section. > Set up Showy Decrease in the center of each set. If you are working with an even number of sts in each set, the slip stitch should line up over a Twisted Loop increase from prior rounds. If odd, this works every other set. - Round 1: \* k4 (4, 5, 5, 6), sl1, k3 (4, 4, 5, 5) \* - Round 2: \* k3 (3, 4, 4, 5) yo, k2tog, k3 (4, 4, 5, 5) \* Note:Theclosedyarnoversarelessnoticeableif youyarnover in reverse.This worked this way, you close them by knitting normally instead of knitting through the back loop. It's just as easy, wrap the yarn in the opposite direction so the yarn goes over the needle. If you forget youcanreorienttheyarnonthenextroundbeforeknittingitclosed.See photo to the right. The lower part with arrow is before, the top after. > Continue knitting Round 3 and 4 of the chart, as follows: 1. Round 3, Set Up: \* k3 (3, 4, 4, 5), k1tbl, sl1, k 3 (4, 4, 5, 5) \* 2. Round 4, Decrease: \* k3 (3, 4, 4, 5), yo, k2tog, k 3 (4, 4, 5, 5) \* >Knit until hat is 4.0" (4.25", 4.5", 4.5", 5.0") from edge. The hat height is determined by size and is not based on the number of stitches. Sizes included in this pattern are: baby (child, small, medium, large). > If you're still working on one needle it's time to divide the stitches onto two needles.
Even Repeats (8,10,12)
| 12 | 11 | 10 | 6 | 8 | 7 | 6 | 4 | 3 2 | ||||
| o | 4 | |||||||||||
| 3 | ||||||||||||
| 0 | 2 | |||||||||||
| V | 1 |
Odd Repeats (9 or 11)
| 11 | 10 | 6 | 8 | 6 | 4 | 3 | 2 | 1 | ||||
| o | 4 | |||||||||||
| 3 | ||||||||||||
| o | 2 | |||||||||||
| V | 1 |
Raised Ridge
Here's a much more interesting way to add a raised ridge than just purling one round. Alternate a Twisted Loop increase with p2tog. Make sure the Twisted Loop is not too loose or you'll lose the definition. You can skip the ridges. Knit the brim to desired height and pick up pattern at Main Hat with the knit round.
Yarning Over in Reverse
| knit | |
| k2tog | |
| Slip2,Knit,Pass | |
| worktbltoclose | |
| purl | |
| p2tog | |
| slip | |
| twistedloopIncrease | |
| yo |
Hat Top
Overview
There are 8 sets of stitches, each with a vertical Showy Decrease in the center. To shape the hat a s2kp decrease will be knit in half of them (i.e yellow lines), while a k2tog is knit in the alternating. ones (red lines). The location of the decreases switch every other row. This is done by starting the decrease pattern 2 rounds later for the red lines. Here are some yarn over guidelines: ·yarn overs are worked wITH the Double Decrease and · yarn overs are NoT used with the k2tog, which turns them both into single decreases that extend in a nice vertical line. Spotting that yarn over (or not) helps know which decrease to knit next in each set.
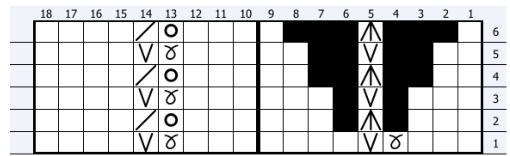
Decreasing
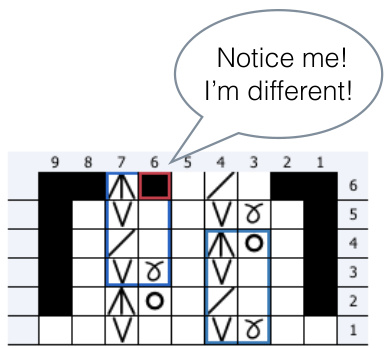
The decreases continue from the vertical line pattern you have already established as shown in rounds 1 and 2 of the sample chart to the right. This chart shows 9 sts per set but the idea is the same for all, use your existing line. Notice how the decreases start in Round 3 on the right (yellow) and on Round 5 for the alternating set (left side). These 2 sections repeat 4 times around the hat. The table below details the instructions for each size, isolating the decrease stitch instructions in their own column for clarity.
| Before | Decrease | After | Comments | |
| Rnd3 | k3 (3,4,4,5) | k1tbl, sl1 | k3 (4,4,5,5) | set up k2tog |
| Rnd 4 | k2 (2,3,3,4) | k1,k2tog | k3 (4,4,5,5) | eliminate yo |
| Rnd5 | k3 (3,4,4,5) | k1, sl1 | k3 (4,4,5,5) | set up for sl2kp |
| Rnd6 | k3 (3,4,4,5) | yo, sl2kp | k2 (3,3,4,4) | add yo for a single decrease |
On the last decrease set do not add a yarn over to the double decrease (shown as red outlined square on Rnd 6 in chart to the right). That will leave you with 1 Showy Decrease and 1 standard stitch per set (16 total).
The Last Few Stitches
Double Decker Hat Closure
A full page tutorial has been included at the end of the pattern. The 16 remaining stitches will be closed in 2 tiers: the raised Showy Decrease stitches will be closed on top of the standard stitches continuing our theme of adding texture and design detail to the hat. I like to work this part on a table. - Cut a tail about 12" long and run the end through a tapestry needle. 1. Slip the 1st stitch (regular) onto the tapestry needle and tail 2. Slip the next stitch to the other end of the same knitting needle (this just gets it out of the way). Note: you can also slip these to a piece of scrap yarn if you are using the Magic Loop method.
Yellow Lines Start at the beginning of the other needle (BOR).
Red Lines - Continue these 2 steps, 7 more times until all regular knitting stitches are on the yarn tail. Pull tight to close. - Now starting at the beginning of round again, run the yarn tail through the remaining raised stitches and pull tight (not too tight) to close. - Run the tail through these same stitches a few times to add more height. - Push the tail down through the center and weave in.
| 18171615 | 1413121110 | 9 | 87 | 6 | 54321 | 1 | ||||||||||||||
| No | 8 | |||||||||||||||||||
| V | 7 | |||||||||||||||||||
| M | 0 | 6 | ||||||||||||||||||
| V | ||||||||||||||||||||
| 0 | 4 | |||||||||||||||||||
| V | 3 | |||||||||||||||||||
| 0 | 0 | 2 | ||||||||||||||||||
| 1 |
Chart downloads for this pattern are on our web site at KnittingNuances.com/help. This link does not show in the menu bar so just type "/help" from the home page.
Is there a Simpler Decrease?
The s2kpdouble decreases are a bit taller than the yo/k2tog faux decreases. I tried knitting double decreases in four sets and continuing the Showy Vertical line in the other four, and it shows. I'll put a picture on ourPhotobucket site. However, it's more important to enjoy and finish the hat. So if you'd like a simpler decrease option, here it is. The decreases will eventually work into the adjacent sets. Eliminate yo on last k2tog.