Honeycomb Tweed Vest
\*\*\*\* This is a FREE pattern. It is for personal use only. \*\*\*\*
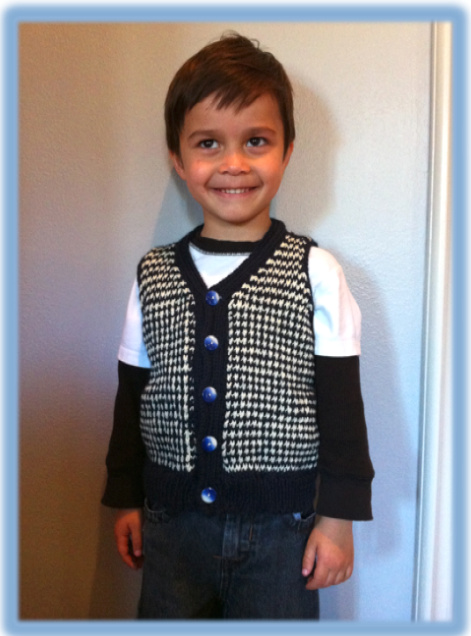
Honeycomb Tweed Vest
By Melanie Lok Size: 1-2 (2-3, 3-4, 4-5) years old Finished Chest:22(24,26,27) inches Finished Length:13 (l4,15,16) inches Yarn weight: category 3 light worsted Gauge (sts/inch): 5.5 Needle size: 7 US Last updated: 07/16/2012 This vest is perfect for keeping little chests and backs warm while leaving their arms unencumbered for unlimited play. In the winters my son wears a different one to preschool everyday. Perfect dressed up with a collared shirt and khakis or dressed down with a henley and jeans or just to add a twist to an old worn look. They are an absolute staple in my kids wardrobes! Honeycomb Tweed Stitch Pattern Row 1 (RS): With Color B, kl, \*sll wyib, kl; repeat from \* Row 2: With Color B, purl Row 3: With Color A, k2, * sll wyib, kl; repeat from \*, end kl Row 4: With Color A, purl BOTTOM BAND With Color A, CO 104 (112, 120, 128) sts. Row l: \*K2, p2; repeat from \* to end of row. Row 2: Repeat row 1 until piece measures 1-1/2 (1-3/4, 2, 2-1/4) inches from Co. End at the end of a WS row ready to start on the right side. BODY For size 1-2:(k5, ml, kl) repeat 16 times; k to end- 120 stsFor size 2-3:k2,(ml, k6) repeat 6 times; (ml, k5) repeat 7times; (ml, k6) repeat 6 times; ml, k to end - 132 stsFor size 3-4:(k5, ml, kl) repeat 20 times - 140 stsFor size 4-5:(k5, ml, kl) repeat 20 times; k to end - 148 stsRow 2: purl to endRow 3: Start Honeycomb Tweed Pattern. Continue in pattern until piecemeasures 7 (9, 10, 1l) inches from CO. End with a WS row. Divide for Armholes Next row (RS):For the Left Front - kl, ssk, work 22 (24, 26, 27) stsin pattern, then place these stitches on a holder.Bind off the next12 (12,12,14)sts.For the Back - work 46 (54,58,60) sts inpattern, the place these stitches on a holder.Bind off the next 12(l2,l2,l4)sts.For the Right Front - work in pattern to last 3stS, k2tog, k1 - 94 [106, 114, 118] sts Right Front Row l (WS): work in pattern Row 2:kl, ssk, work in pattern to last 3 sts, k2tog, kl Repeat these two rows 4 (5, 6, 5) more times Next row (WS): work in pattern Next row (RS): kl, ssk, work in pattern to end Repeat these two rows 3 (3,5, 5) more times - 10 [10, 10, 13] sts Continue to work in pattern until the right front is 13 (l4, 15, 16) inches from start. Place all sts on a holder. Left Front Row 1 (ws): join new yarn, work in pattern Row 2:kl, ssk, work in pattern to last 3 sts, k2tog, kl Repeat these two rows 4 (5,6,5) more times Next row (ws): work in pattern Next row (RS): work in pattern to last 3 sts, k2tog, kl Repeat these two rows 3 (3,5,5) more times - 10 [10, 10,13] sts Continue to work in pattern until the left front is 13 (l4, 15, 16) inches from start. Place all sts on a holder. Back Row l (WS): join new yarn, work in pattern Row 2:kl, ssk, work in pattern to last 3 sts, k2tog, kl Repeat these two rows 4 (5, 6,4) more times - 38 [44, 46, 52] sts Continue to work in pattern until the back is two rows prior to 13 (14, 15, 16) inches from start. Next row (RS): work in pattern 10 (10, 10, 13) sts.Bind off 18 (24, 26, 26) sts for the back of the collar.Join new yarn and work the remaining 10 (10, 10, 13) sts in pattern. Next row: work both sides in pattern for 2 rows. Using three-needle bind off seam together the shoulder seam. Neckband Measure the front edge of the garment from the bottom up to the middle of the back of the collar.Multiple this number by 2.This will be the length of your neckband. CO 8sts Row 1 (RS): In Color A, p2, k2, p2, k2 Repeat row 1 until piece measures l/2 inch. Next row (buttonhole):p2, k2tog, yo, p2, k2 Repeat row 1 for 2 (2, 2-l/4, 2) inches, then repeat buttonhole row. Continue to create buttonholes 3(4,4,5) more times.Your last buttonhole should line up with the start of the neckline.Continue to repeat row l until piece is the required length of your neckband as per the measurement. Bind off. Fold the neckband in half and lightly pin it to the middle of the back collar.Lightly pin the neckband at the both right and left front bottoms without stretching or gathering the band. Lightly pin the rest of the neckband in place along the front edges. Sew (mattress stitch or whatever stitch you are comfortable using, machine is not recommended) band to the body and collar. Armbands With Color A, pick up 2 st for every 3 rows around the opening making sure it is a number that is divisible by 4. Join. Next round: \*K2, p2; repeat from \* to end of row.Repeat round 3 (4, 4, 6) times. Bind off. Repeat for other armband. Weave in ends.


