LOVE & LIQUOR
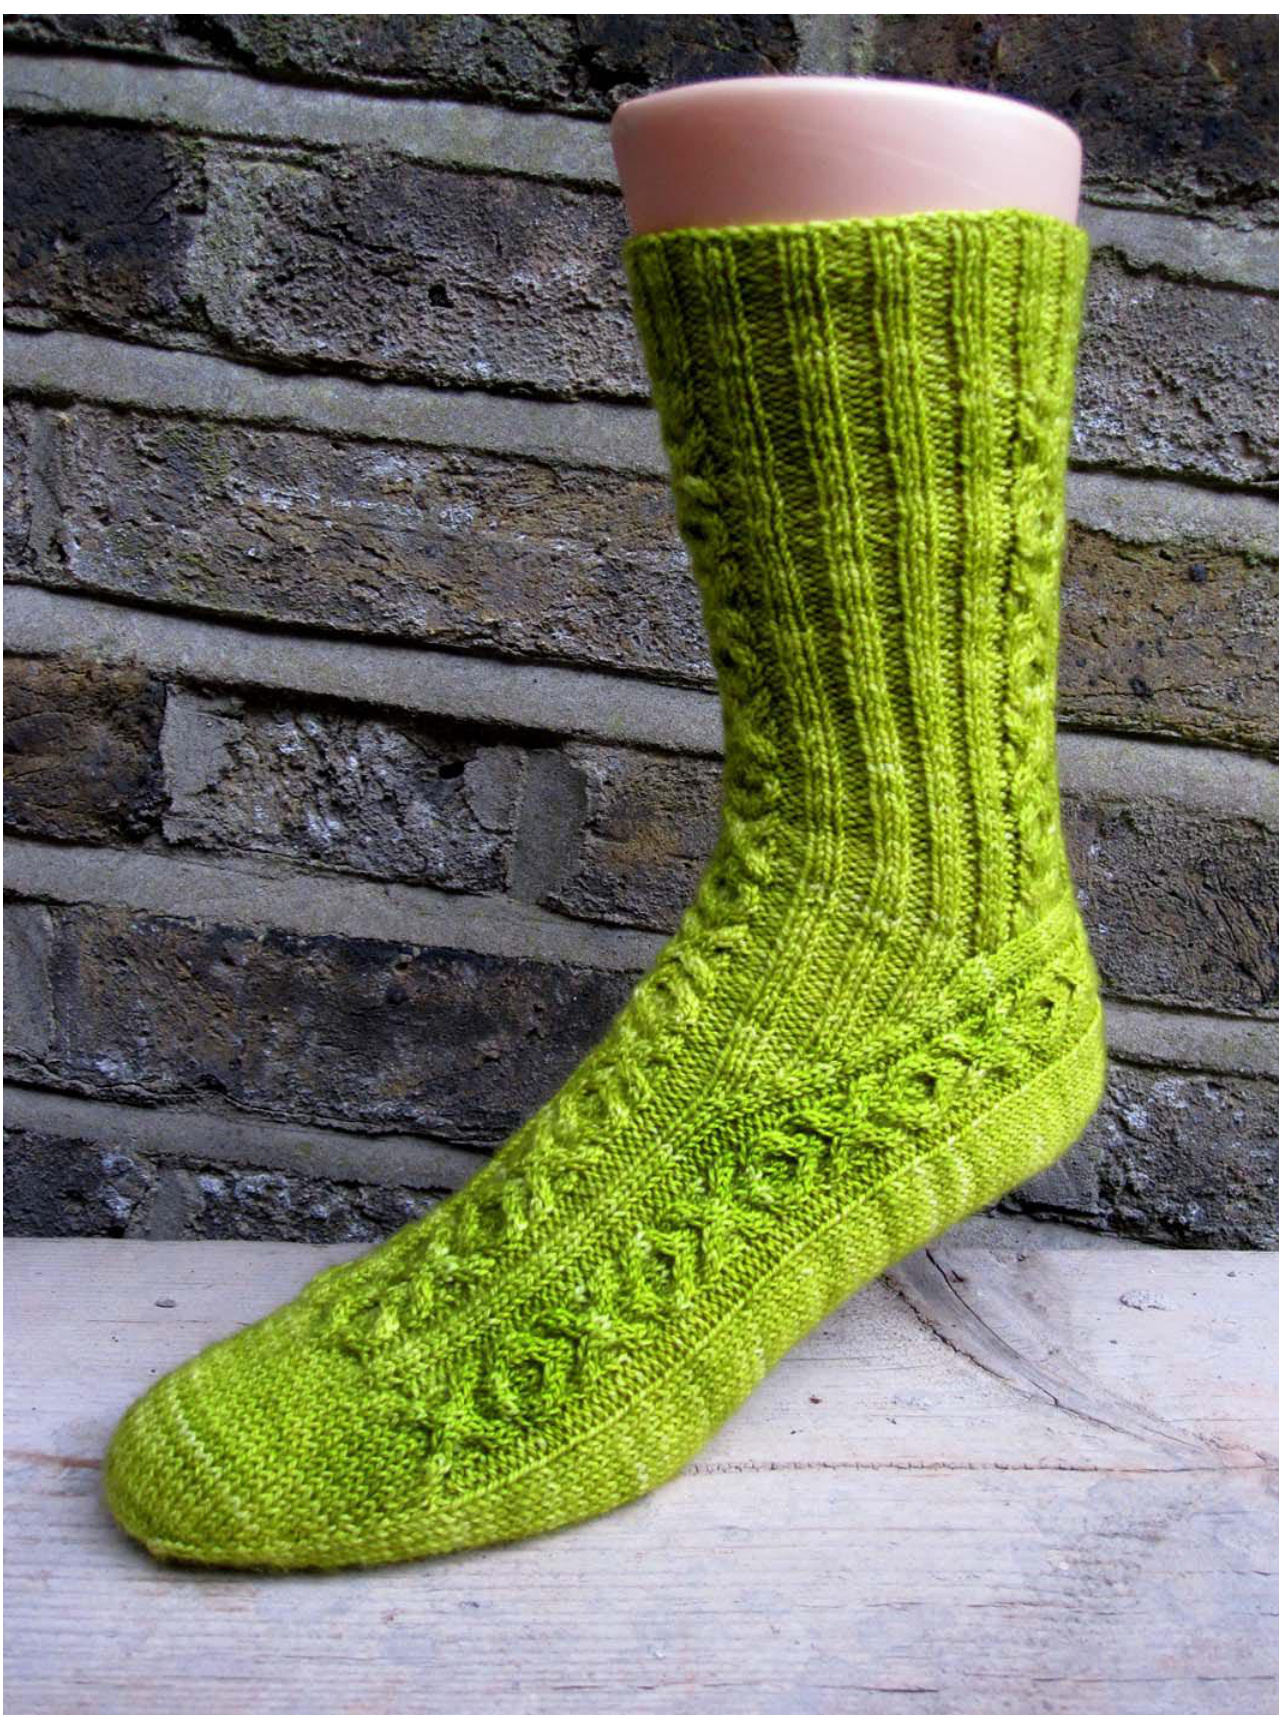
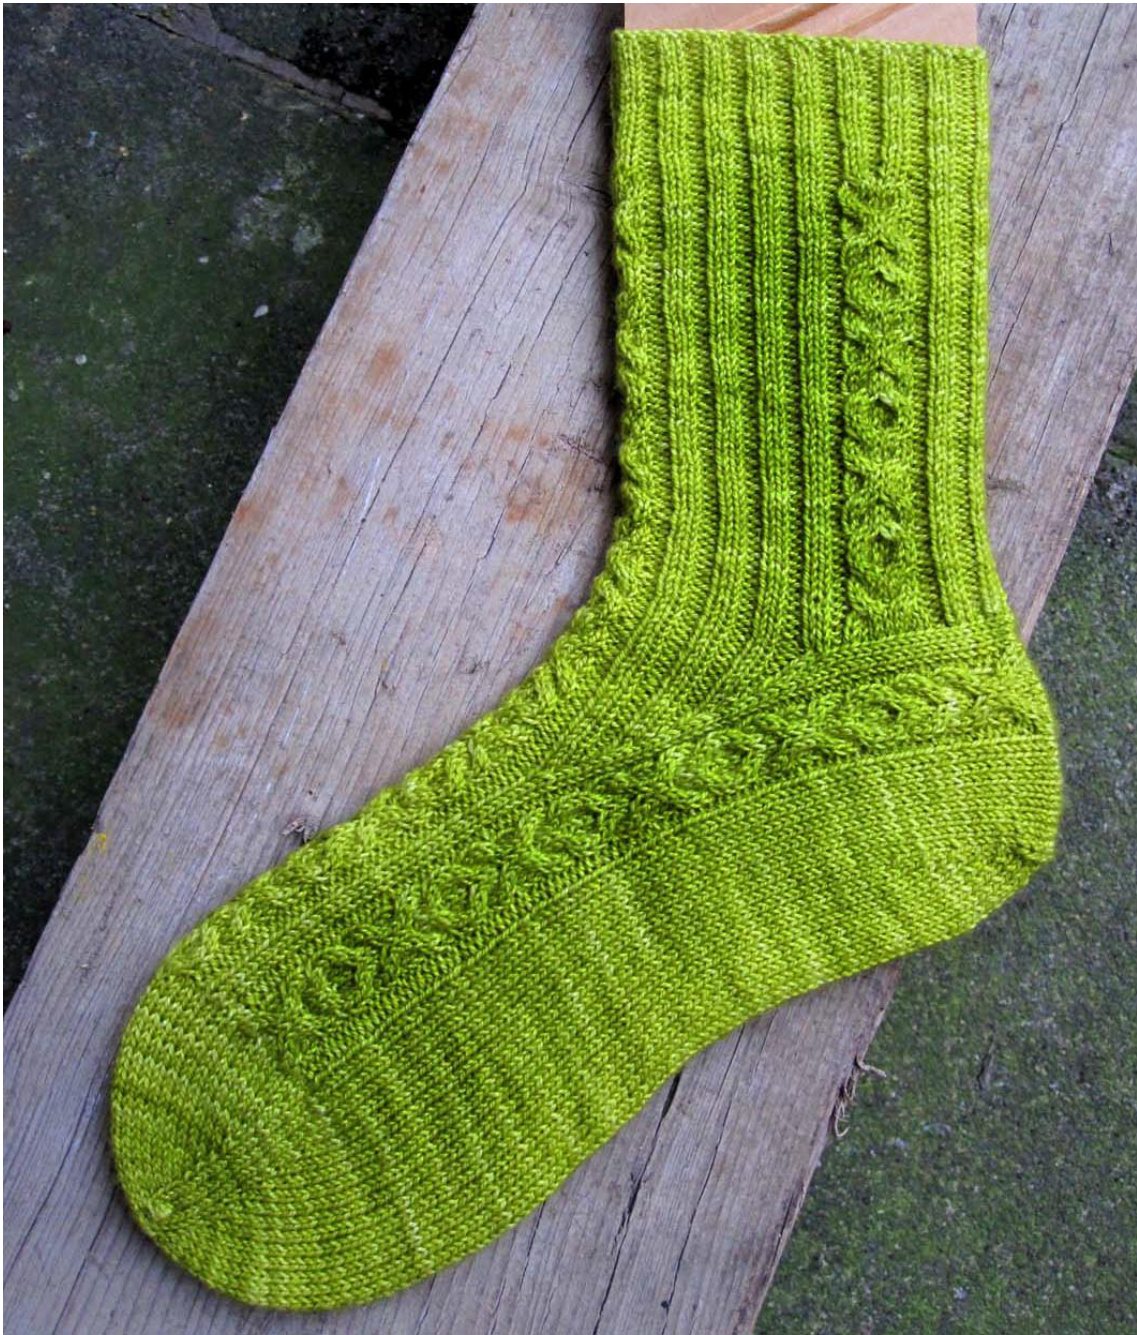
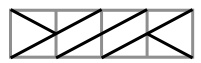
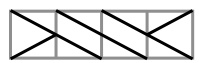
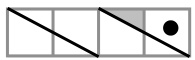
COPYRIGHT ? GENERAL HOGBUFFER 2011 The initial inspiration for this sock came from the desire to create a heel that would wrap around horizontally, ideally with a cable design to emphasize the construction. The "Love" in the title comes from the Hugs-and-kisses cable (more prosaically known as the OxO cable), which features quite prominently. It is fairly easy to memorize and looks like this:
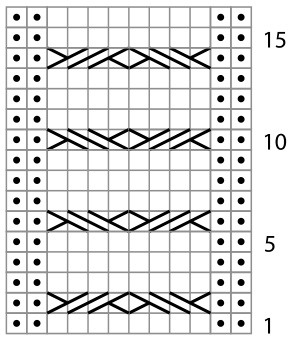
OXO CHART The "Liquor" part is a refernce to the fact that this is my entry for the September Sock Down over at Ravelry's Sock Knitters Anonymous group, where the challenge was to knit in Chartreuse. And a challenge it certainly was.
Size:
Width-wise to fit anyone who would normally knit a plain stocking stitch sock with 64 stitches in the round. Length-wise adaptable, from stumpy to flipers.
Material:
I-ply sock yarn, there is a certain leeway since the socks are knitted toe-up
Needle size:
I would recommend doing these on 2 2.5 mm circulars, but use what will give you the best result. If you need to up- or down-size the width of the sock, going a needle size up or down may do the trick. You should also have 2 DPNs in the same size.
Further requirements:
- Tapestry needle - Cable needle, unless you are comfortable cabling 2 over 2 without a needle. - Enthusiasm is always good...
Glossary of symbols used:

knit on right side, purl on wrong side

purl on right side, knit on wrong side no stitch

knit 2 tog on right side, purl 2 tog on wrong side

slip, slip, knit on right side, purl, purl, purl 2 tog tbl on wrong side

make one, by lifting the thread between sts and knitting it tbl

make one, by lifting the thread between sts and purling it tbl

slip stitch purlwise

pick up and knit one stitch
C2B: put next 2 sts onto a cable needle and hold at the back of work. K2, K2 from cableneedle
C2F: put next 2 sts onto a cable needle and hold at the front of work. K2, K2 from cableneedle
put next 2 sts onto a cable needle and hold at the back of work. K2, K2 tog the sts from cable needle (decreased 1 st)
put next 2 sts onto a cable needle and hold at the front of work. K2 tog tbl, K2 from cable needle (decreased 1 st)
put next 2 sts onto a cable needle and hold at the back of work. K2, P2 tog the sts from cable needle (decreased 1 st)
put next 2 sts onto a cable needle and hold at the front of work. P2 tog, K2 from cable needle (decreased 1 st) Before you do anything else, cut about a metre / yard of yarn and put to one side. This is for grafting the heels later, and it is absolutely crucial if you can only access one end of your yarn, or if you are working both socks TAAT from both ends of a yarn cake.
Toe:
Using your favourite toe-up cast on method, cast on a total of 16 stitches, 8 on each needle. Knit the 8 stitches on the first needle only. This is the beginning of the round. Round 1: K2, M1, knit to last 2 stitches on needle, M1, K2. Repeat on second needle (20 sts) Round 2: repeat Round 1 (24 sts) Round 3: repeat Round 1 (28 sts) Round 4: repeat Round 1 (32 sts) Round 5: repeat Round 1 (36 sts) Round 6: repeat Round 1 (40 sts) Round 7: K all sts Round 8: repeat Round 1 (44 sts) Round 9: K all sts Round 10: repeat Round 1 (48 sts) Round 11: K all sts Round 12: repeat Round 1 (52 sts) Round 13 + 14: K all sts Round 15: repeat Round 1 (56 sts) Round 16 + 17: K all sts Round 18: repeat Round 1 (60 sts) Round 19 + 20 + 21: K all sts Round 22: repeat Round 1 (64 sts) This completes your toe; it results in a pleasantly rounded shape, but if you have a different method you prefer feel free to substitute it, as long as you end up with 64 sts / 32 sts on each needle.
Foot:
K 3 more rounds straight. Increase in the next round for the cables as follows: (K2, M1, K3, M1) repeat 6 times, K2. You should be at the end of needle1, K all sts on needle 2. You should now have 44 sts on needle 1 and 32 sts on needle2. K the first 14 sts of needle 1 onto needle 2. This is the new beginning of the round. It may look awkward, sitting a third into the top of the foot, but this is to ensure the cables will all be at the same point in the sequence when you work the heel later. Just trust me on that one... To even out the amount of sts, I suggest you also shift the first 10 sts from needle 2 onto needle 1, this new break between the needles is marked on Chart 1 by a blue line. Work the foot following Chart 1, repeating the pattern section marked in red, until you have 4.5 inches (11.5 cms) less than your total foot length, ending one round after a cable round. (i.e. rounds 3,7,11 or 15 of the Ox0 chart above)
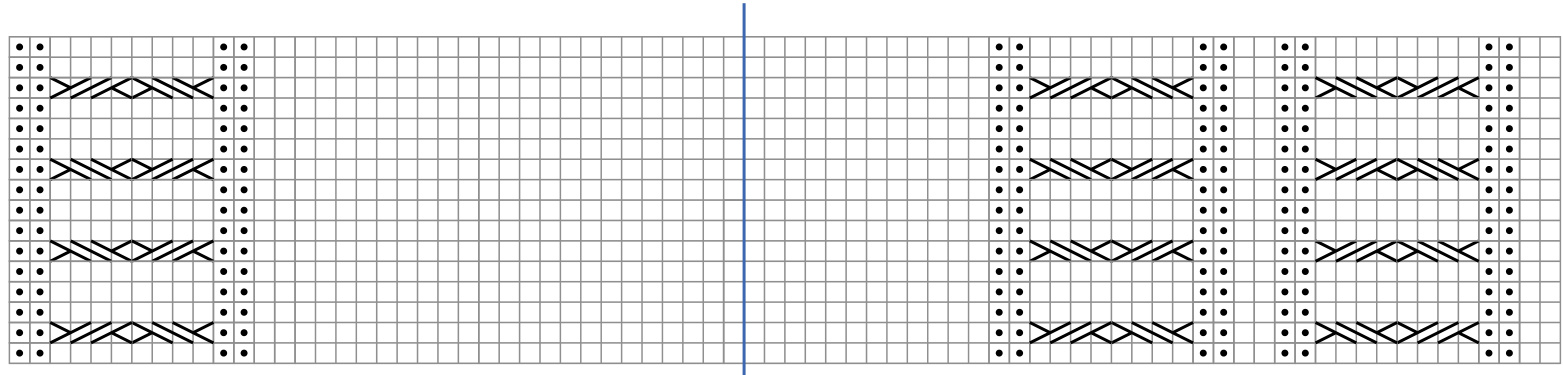
CHART 1 (FOOT)
Instep:
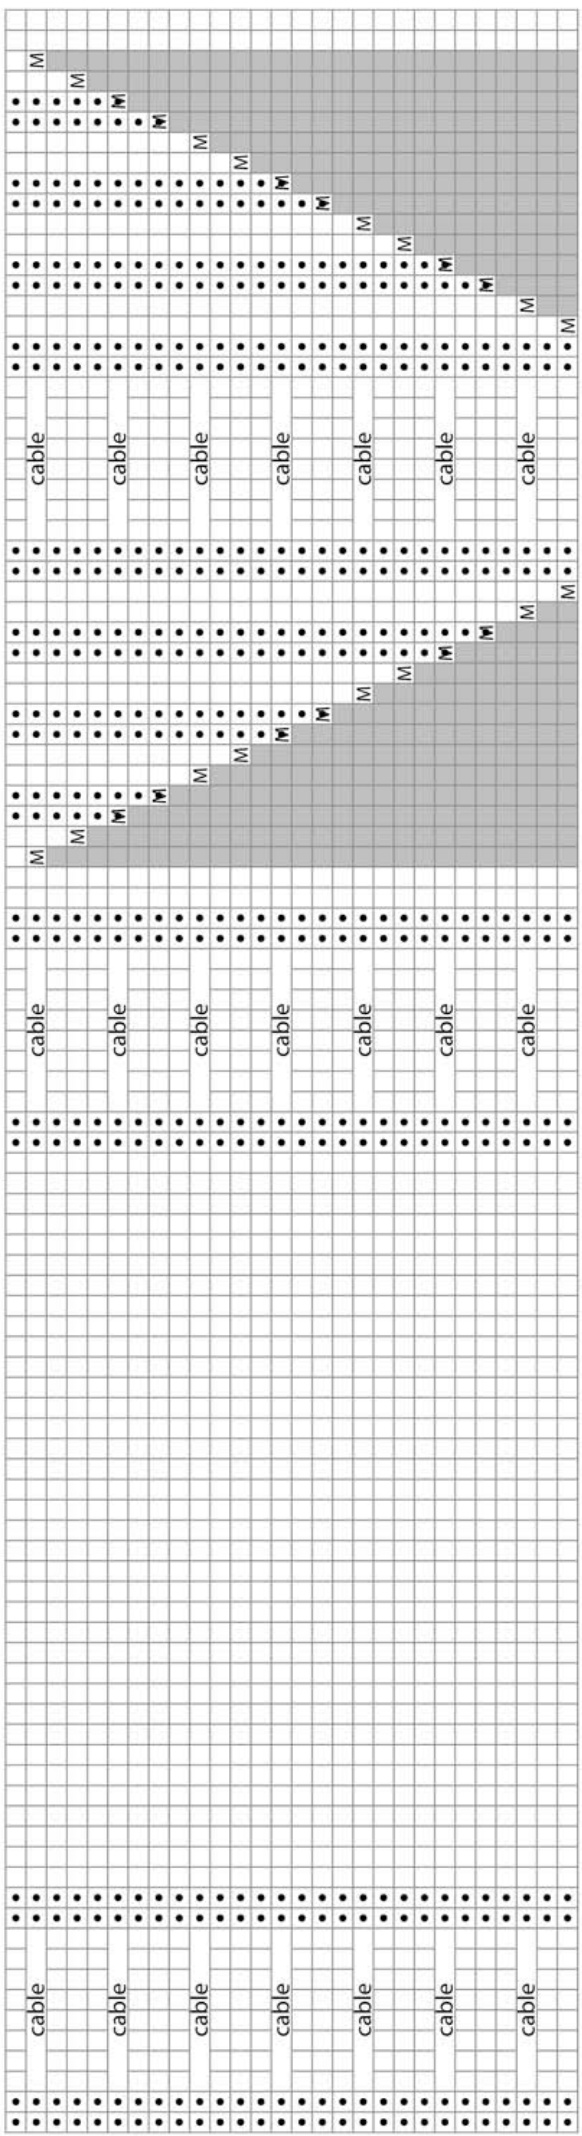
Work the instep by working the complete Chart 2 once. You can see that, in place of the cable symbols from Chart 1, there is only a placeholder saying "cable". This is because the direction you need to cable in depends on what row you ended the foot part on. The OxO cable follows a clear sequence that you probably will have memorized by now, keep following this sequence and work the appropriate cable stitch wherever you see the "cable" in the chart. But please note that the inner cable is off-set by 8 rows compared to the outer 2 cables. As you are increasing sts on needle 1, you may want to shift some sts onto needle 2 to balance out the stitch count, but this is a matter ofpreference.
Heel:
The heel is worked differently from classic toe-up heels, because we want to achieve a cable that runs horizontally to meet in the centre back. The heel chart may look very confusing at first, but it is worked simply back and forth in rows. Rows 15 - 20 and rows 22 - 27 are partial rows, but if you just follow the chart it should all work fine. Row1 is actually a full round, the 4 stitches outlined in red at the beginning and the end of the row are the same set of sts, they are knitted twice in the course of this row. Place the 36 instep sts on a separate needle or stitch holder. Turn and work Row 2 on the wrong side, and continue working in rows until you have finished row 14. Please note that, while all the cabling always happens on the right side rows, the decreases alternate between right and wrong side rows. Also, please resist the urge to slip the first stitch of each row. It might make a nicer edge, but it will prevent you later from picking up the amount of sts you will need. Just work the edge sts exactly as they are shown in the chart. Rows 15 to 20 are only worked over the first half of the sts, and please note that here, the first st of the wrong side rows is to be slipped. Row 21 is now worked over all heel sts according to the chart. To clarify, Row 21 will read as follows: K4, place 2 sts on a cable needle behind the work, K2, K2tog tbl from cable needle, K4, place 2 sts on a cable needle in front of work, K2tog, K2 from cable needle, K8, ssk, sl next 4 sts, K9, P2, cable next 8 sts according to sequence, P2, K4. When slipping the 4 sts in the middle, take care not to pull too tightly. The little float that will form can later be tacked down when you weave in the ends of yarn on the inside.
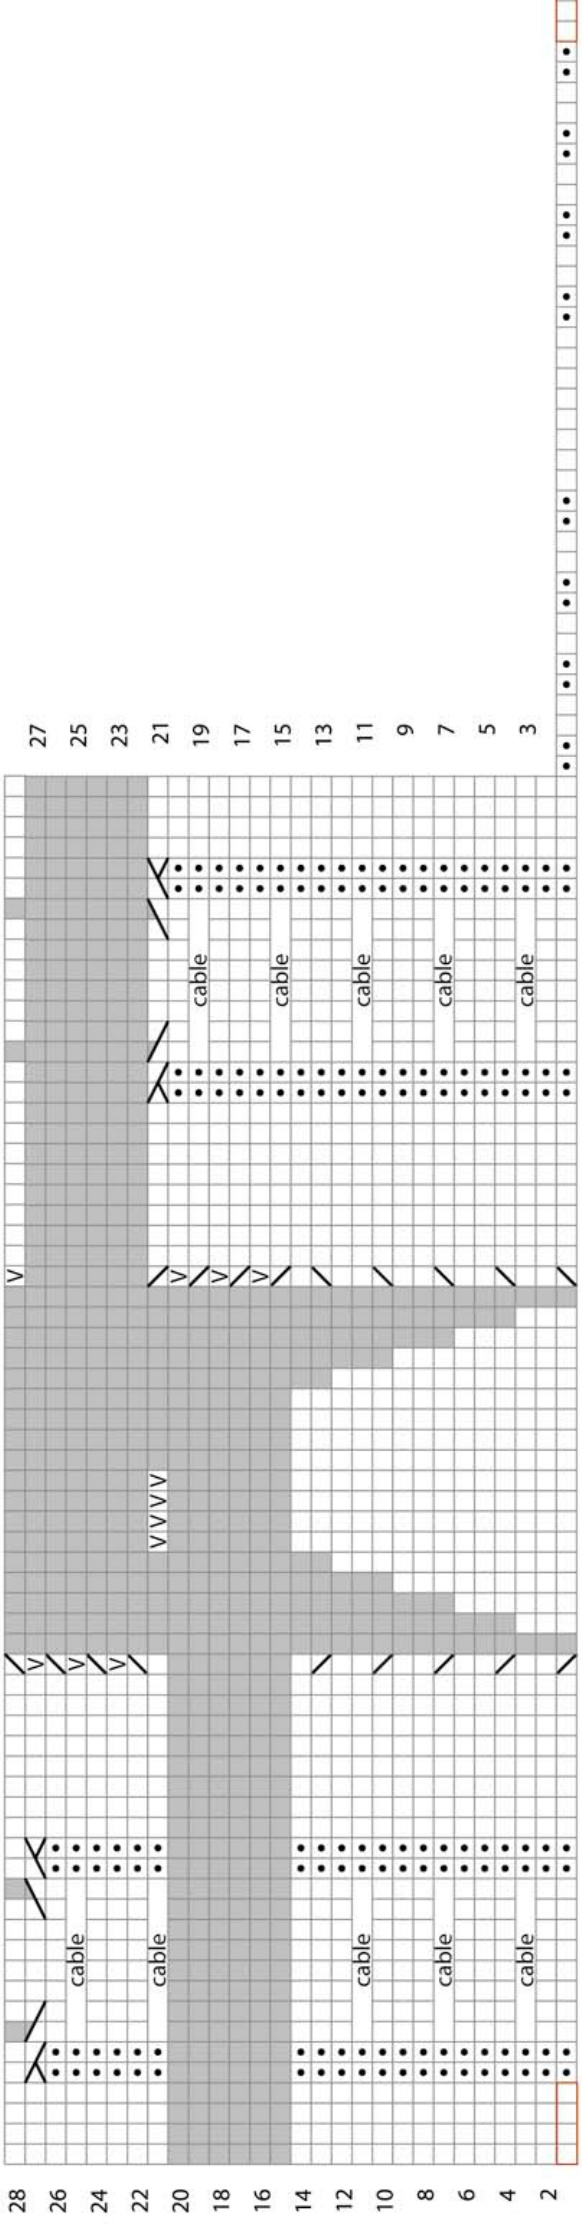
Now work rows 22 to 27 as partial rows as before. Row 28 will again be worked over all sts, and it will read asfllows:
P22, P2tog, sl1, P22
You are now ready to graft the heel with the length of yarn that you hopefully have put aside at the beginning. Put 23 sts each on 2 DPNs and, starting at the centre of the heel, graft the together using the Kitchener Stitch. Stop when you have slipped the one st before last of both needles, you should now have one stitch on each needle, and you should have sewn through each of those sts once. These sts will be the centre back sts of the leg portion, the first and last st respectively that you will work in the round. They are marked in green on the first round of the leg chart. Please note that they are simply slipped in this first round, do not knit them.
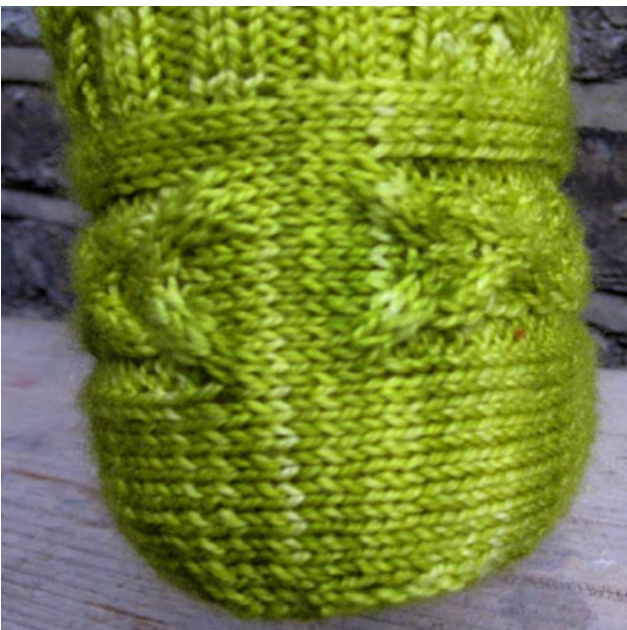
This is what your heel should look like after grafting. You can still see that the stitches are off-set by half a stitch; it would have been a lot more obvious without the transition to stocking stitch in rows 21 and 27.
Leg:
Work the first round of the leg chart as follows: Slip the left st remaining from the heel on a new circular needle, pick up and K 20 sts evenly spaced along the edge of the heel. (I find it helps to prevent holes if you pick up 19 sts in the edge and M1 in the gap before the instep sts). Work the 36 instep sts according to the chart, M1 in the gap and pick up and K 19 sts along the edge of the heel. Slip the right remaining heel st onto the needle (78 sts in total for the leg). Work the leg according to the leg chart. When you need to work the front cable in round 2, use the appropriate cable in the sequence. When you come to round 6, work all cables in the same manner, to ensure all three cables will be identical on the leg. Repeat the section outlined in red for as long as you would like your leg to be, ending in a round before a cable round. (
| cable | cable | cable | cable cable | cable | ||
| cable | cable | |||||
| cable | cable cable | cable | cable | |||
| cable | cable | cable | cable cable | cable | ||
Cuff:
When you are ready to start the cuff, work the transition round instead of the next cable round. Personally, I find this looks best if the transition round replaces round 10 in the Oxo sequence, but it will work for any of the cable rounds. Work the cuff in 2x2 rib for as long as you like (or as long as your yarn lasts). Finish off with your preferred method of binding off. I used Elizabeth Zimmermann's sewn bind off, but again, this is a matter of personal preference. If you have worked your socks parallel or TAAT - congratulations, you now have a finished pair of socks. If you have worked just one sock - congratulations, you have the same again to look forward to. Pattern for personal use only, Copyright @ General Hogbuffer 2011