"Isla" A Seamless Modern Baptism / Christening Dress By Adriana ("kaaktus" on Ravelry)
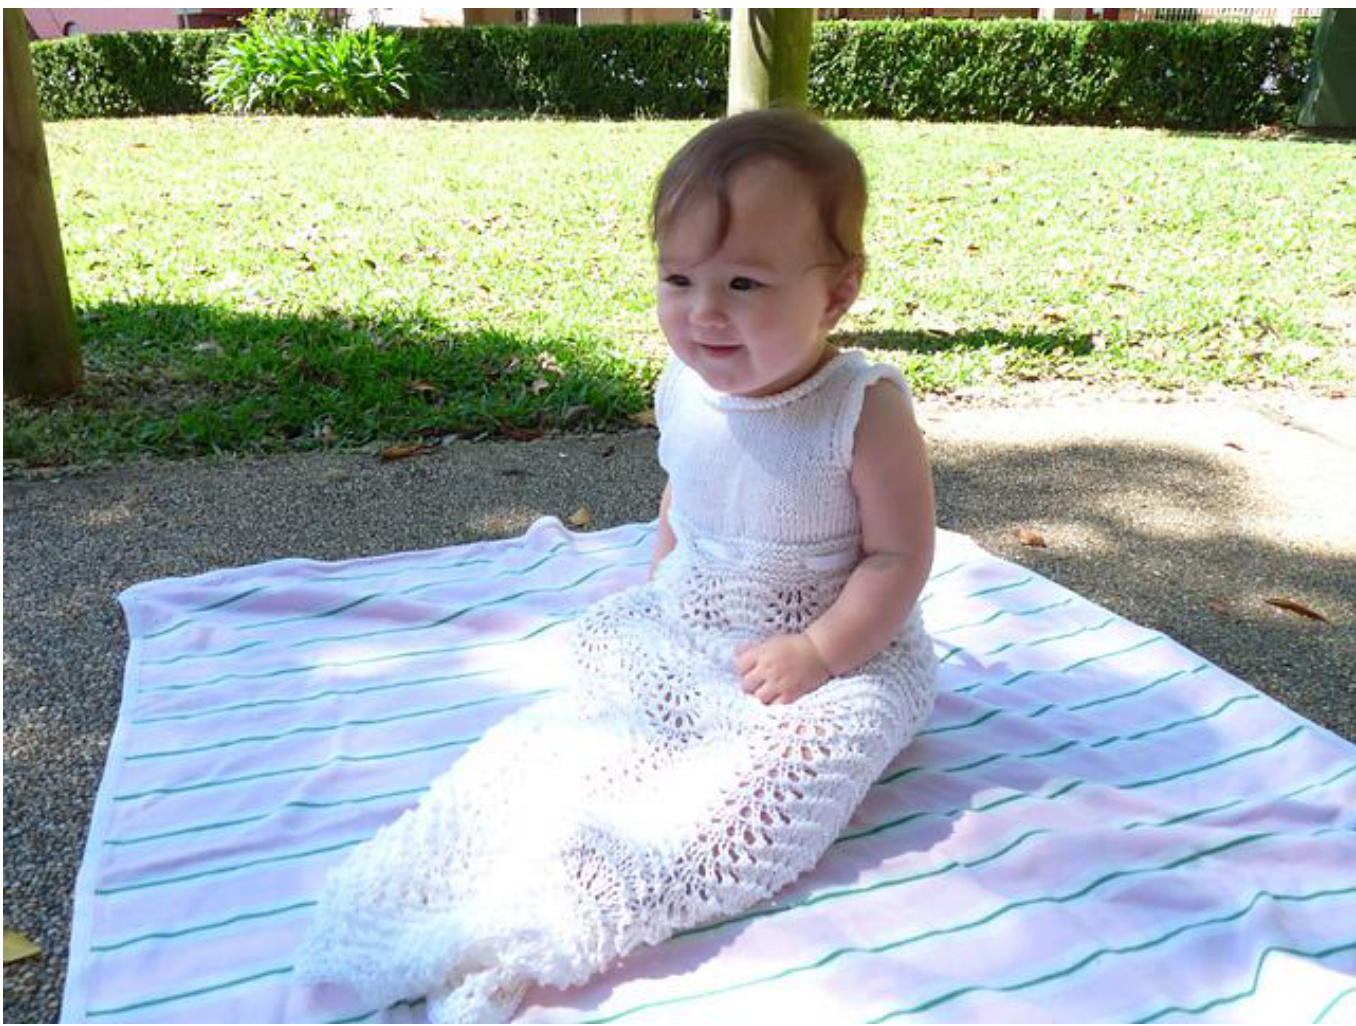
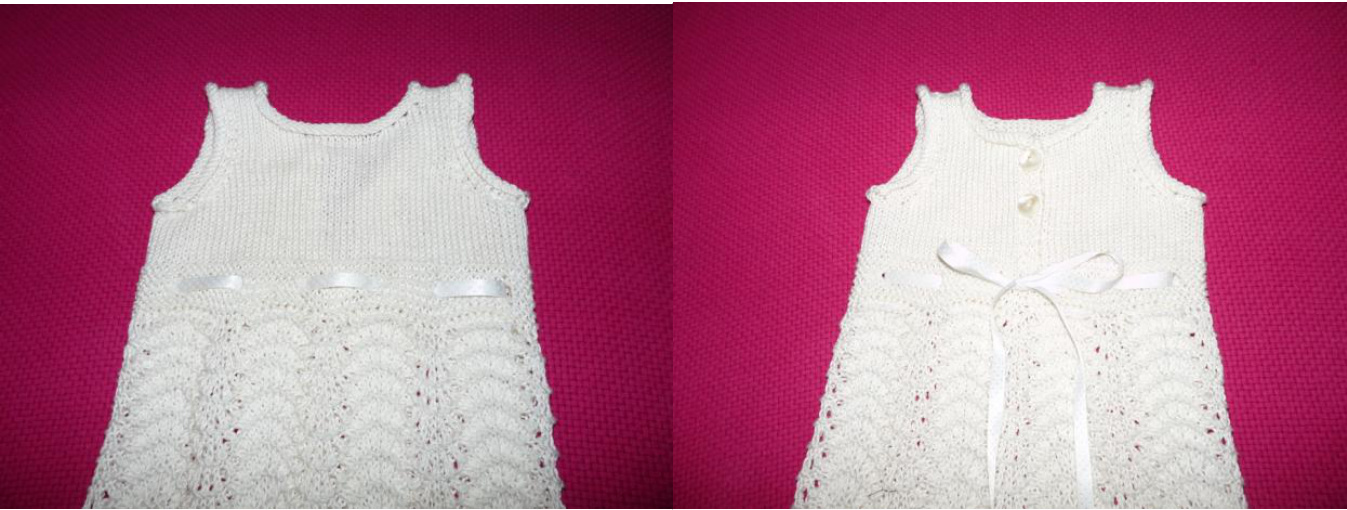
One week out from the big day, I thought "[BLEEP!!], time to cast on!". Needed something simple, fast but with a bit of "wow" factor (and not too much puff or ruffle) .. No time to hunt for a pattern so made it up as I went along .. This dress is knit from the waistband upwards, to complete the bodice. The lace section is then picked up along the bottom of the waistband and worked downwards, to complete the skirt. The dress is fastened by two small buttons at the back (the button band is built into the bodice). The flared shaping in the skirt is achieved by periodically increasing needle size.
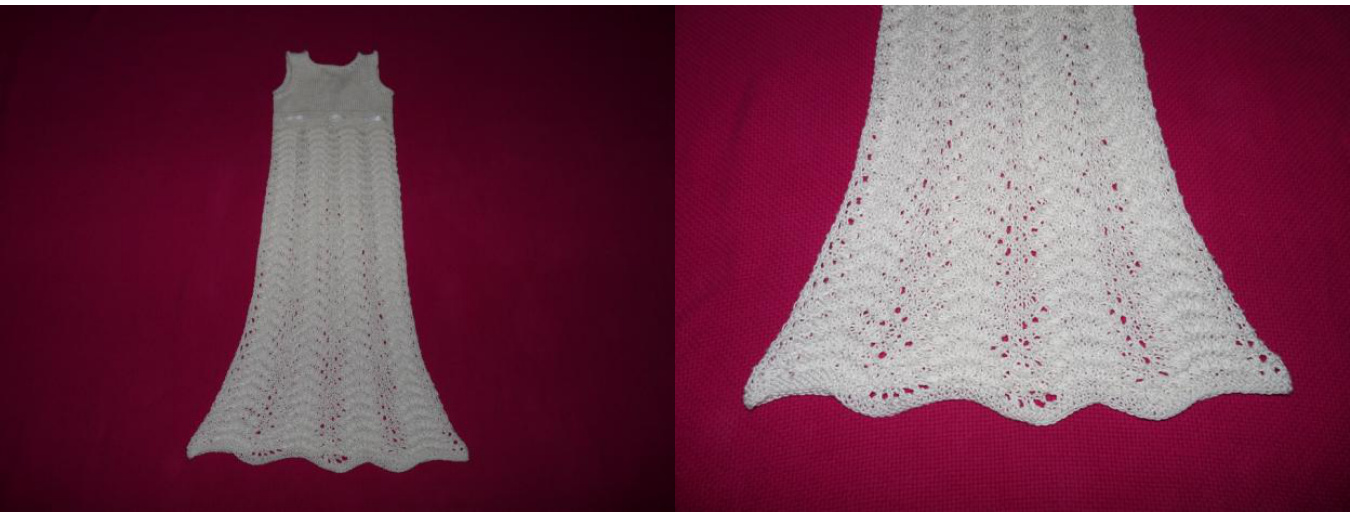
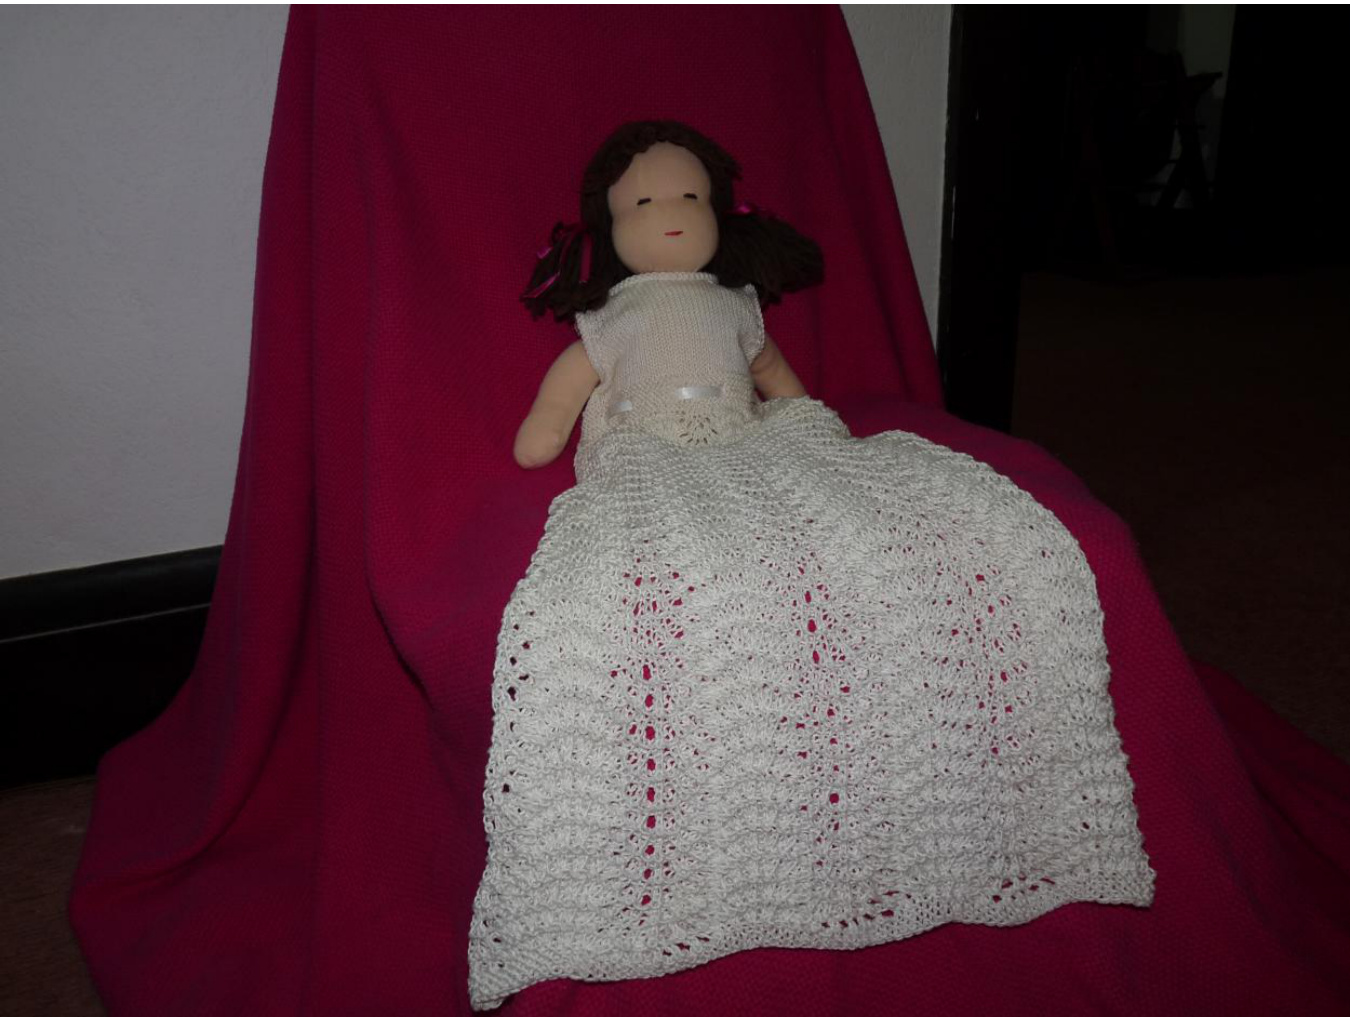
One size only, (unstretched) measurements as follows: Waistband = 49cms (this sits high, as an empire line) Centre of front neckline to bottom of skirt = 70cms Circumference around bottom of skirt = 1o0cms I'd say it would fit your average 3 to 9 month old comfortably (Ilsla was 7 months old in the photo above). Couldn't get the little miss to pose for a photo showing off the skirt properly so had to enlist the help of Lily doll ..
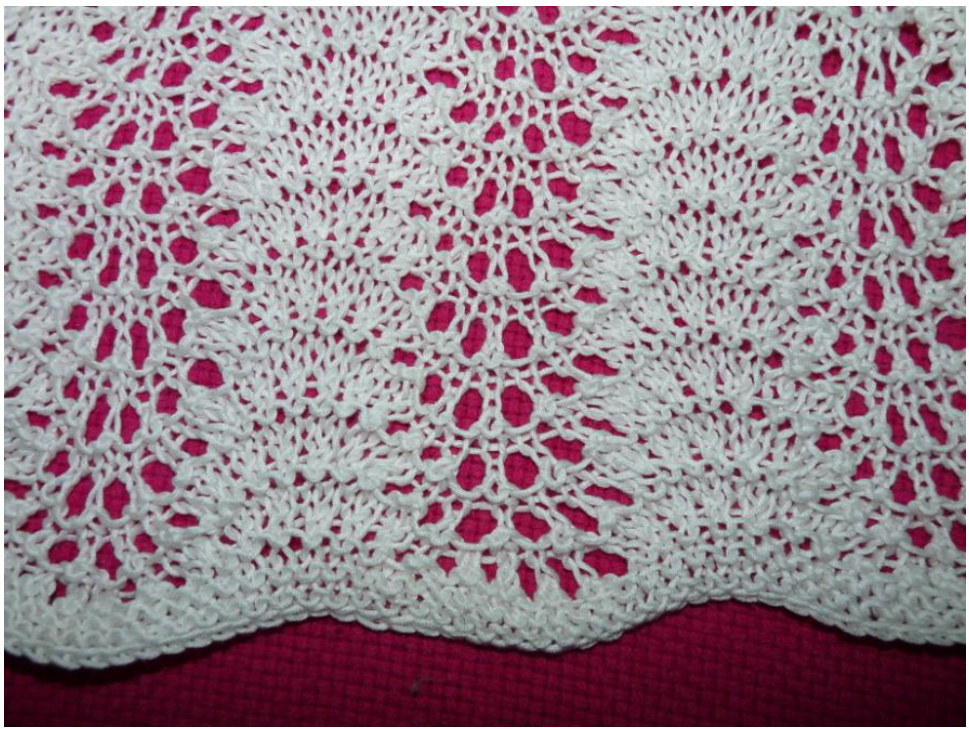
Detailed photo of Feather and Fan Lace Pattern on last page ..
REQUIREMENTS
Yarn: Online Linie 140 Luxury, 120m/50gms (5 skeins). This is a gorgeous cotton and silk yarn (perfect for a summer baptism) with a great sheen and beautiful drape, however it is quite old (had been sitting in my stash for ages) and might not be too easy to find ... Any DK yarn should do as a substitute but I'd recommend picking something with good stitch definition to show off the lace pattern. Notions: 2 small shell buttons (approximately 15mm diameter), ribbon (approximately 9mms wide and 150cms long), stitch holders (or scraps of yarn to hold stitches). Needles: 3.50mm circular needles, 4.00mm circular needles, 4.50mm circular needles, 5.00mm circular needles, 5.50mm circular needles, 3.50mm DPNs.
GAUGE
With 3.50mm needles, 24sts and 30 rows to a 10cm square in SS.
ABBREVIATIONS
BO = Bind Off CO = Cast On DPN = Double pointed needle GS = Garter Stitch K = Knit K2tog = Knit 2 stitches together KFB = Knit into the front and back of the stitch (i.e. increase one stitch) P = Purl P2tog = Purl 2 stitches together PU = Pick up RS = Right Side SS = Stocking stitch Sts = Stitches WS = Wrong Side YF = Yarn forward
WAISTBAND
Using 3.50mm circular needles, C0 108 sts and join to work in the round. Rows 1-6: GS 4 rows (i.e. K one row, P one row etc). Row 7 (eyelet row): K4, YF, K2tog, \*(K7, YF, K2tog)\*, repeat from \* to \* to last 3 sts, K3. Rows 8-12: GS 5 rows, beginning with a P row. Row 13 (RS): (In this row, place each "back" increase stitch created by "KFB" onto a DPN and hold it to the back of the work) KFB, KFB, K to last 2 sts, KFB, KFB (112 sts, comprised of 108 sts on circular needles and 4sts onholder).
BODICE
Row 14 (setting up GS button bands on this row): Turn your work (WS facing) and slip 4 sts from the DPN on to the left needle tip of the circular needles. K4 (these are the sts that you slipped from the DPN), P to last 4 sts, K4 (112 sts). From here on, work back and forth. Row 15: K to end. Row 16: K4, P to last 4 sts, K4. Rows 17-22: Repeat rows 15 and 16 three times. Row 23 (binding off for arm holes): K27, B04, K50, B04, K27. You should now have three sections: the front piece (50 sts), the back right shoulder piece (27 sts) and the back left shoulder piece (27 sts). Each of these sections will be worked separately and joined at the shoulder using a 3 needle bind off. Place the stitches for the front piece and the back left piece onto stitch holders.
BACK RIGHT SHOULDER
Row 24 (WS): K4, P to end (27 sts). Row 25: B02. K to end (25 sts). Row 26: K4, P to end. Row 27: K2, P2tog, K to end. Rows 28-33: Repeat rows 26 and 27 three times (21 sts). Row 34: K4, P to end. Row 35: K2, P1, K to end. Row 36: K4, P to end. Rows 37-42: Repeat rows 35 and 36 three times. Row 43: K2, P1, K9 and turn to work on these 12 sts only (place remaining 9 sts on a holder). Row 45: K2, P1, K6, K2tog (10 sts). Row 46: P2tog, P to end (9 sts). Row 47: K2, P1, K4, K2tog (8 sts). Row 48: P to end. Row 49: K2, P1, K to end. Rows 50-51: Repeat rows 48 and 49 once. Row 52: P to end (8 sts). Place stitches on holder.
FRONT
Re-join yarn at right armpit, Ws facing. Row 24 (WS): BO2, P to end (48sts). Row 28: P to end. Rows 29-34: Repeat rows 27 and 28 three times (38 sts). Row 35: K2, P1, K to last 3 sts, P1, K2. Row 36: P to end. Rows 37-40: Repeat rows 35 and 36 twice. Row 41 (begin neck shaping): K2, P1, K9, K2 tog. Turn your work and continue working on these 13 sts only, leaving remaining 24 sts on needle. Row 42: P2tog, P to end (12 sts). Row 43: K2, P1, K7, K2tog (11 sts). Row 44: P2tog, P to end (10 sts). Row 45: K2, P1, K5, K2tog (9 sts). Row 46: P2tog, P to end (8 sts). Row 47: K2, P1, K to end. Row 48: P to end. Rows 49-52: Repeat rows 47 and 48 twice. Place these 8 stitches on holder. Slip 10 stiches (of the 24 stitches remaining on the needle) for the centre of the neck line onto a holder. Re-join yarn to complete the right side of the neck line (working on 14 sts only). Row 41: K2tog, K to last 3 sts, P1, K2 (13 sts). Row 43: K2tog, K to last 3 sts, P1, K2 (11 sts). Row 44: P to last 2 sts, P2tog (10 sts). Row 45: K2tog, K to last 3 sts, P1, K2 (9 sts). Row 46: P to last 2 sts, P2tog (8 sts). Row 47: K to last 3 sts, P1, K2. Row 48: P to end. Rows 49-52: Repeat rows 47 and 48 twice. Place these 8 stitches on holder.
BACK LEFT SHOULDER
Re-join yarn at back armpit, Ws facing. Row 24 (WS): BO2, P to last 4 sts, K4 (25 sts). Row 25 (create first button hole): K2, YF, K2 tog, K to last 4 sts, P2tog, K2 (24 sts). Row 26: P to last 4 sts, K4. Row 27: K to last 4 sts, P2tog, K 2 (23 sts). Row 28: P to last 4 sts, K4. Row 29: K to last 4 sts, P2tog, K2 (22 sts). Row 30: P to last 4 sts, K4. Row 31: K to last 4 sts, P2tog, K2 (21 sts). Row 32: P to last 4 sts, K4. Row 33: K to last 3 sts, P1, K2. Row 34: P to last 4 sts, K4. Rows 35 and 36: Repeat rows 33 and 34 once. Row 37 (create second buttonhole): K2, YF, K2tog, K to last 3 sts, P1, K2. Row 38: P to last 4 sts, K4. Row 39: K to last 3 sts, P1, K2. Rows 40-43: Repeat rows 38 and 39 twice. 44: P10, P2tog and turn to work on these 11 sts only (place remaining 9 sts on a holder) Row 45: K2tog, K to last 3 sts, P1, K2 (10 sts). Row 46: P8, P2tog (9 sts). Row 47: K2tog, K to last 3 sts, P1, K2 (8 sts). Row 48: P to end. Row 49: K to last 3 sts, P1, K2. Rows 50-51: Repeat rows 46 and 47 once. Row 52: P to end.
COLLAR
Working with one shoulder at a time, place 8 stitches from front shoulder on a DPN. Place 8 sts from matching back shoulder on a DPN. Using a third DPN, with WS facing, execute a three needle bind off. Repeat for other shoulder. Set up row: With RS of work facing and 3.50mm circular needles, re-join yarn at back left shoulder button band. Working the 9 sts previously placed on a holder, P4, K5. PU 9 sts up the back left neckline. PU 11 sts down the front left neckline. K the 10 sts across the front centre of neckline from holder. PU 11 sts up the front right neckline. PU 9 sts down the back left neckline. K9 sts from holder (68 sts). and work back and forth. SS4 rows, beginning with a P row (WS facing). BO all sts on W
FEATHER&FANLACESKIRT
With RS facing and 3.50mm circular needles, pick up 108 sts along bottom of waistband and join to Work in the round. Row 1: \*(K2, KFB)\*, repeat from \* to \* to end (144 sts). Repeat the Feather and Fan Pattern (see below) for a total of 6 times (i.e. 24 rows) then switch to 4.00mm circular needles. Repeat the Feather and Fan Pattern for a total of 6 times then switch to 4.50mm circular needles. the Feather and Fan Pattern for a total of 6 times then switch to 5.o0mm circular needle: the Feather and Fan Pattern for a total of 6 times then switch to 5.50mm circular needle: Repeat the Feather and Fan Pattern for a total of 6 times but on the last repeat, stop after Row 2 in the pattern. GS 4 rows, beginning with a K row (i.e. K one row, P one row, K one row, P one row). BO all stitches.
FEATHER& FANPATTERN
Row 1: (YF, K1) 3 times, \*K2tog 6 times, (YF, K1) 6 times\*, repeat from \* to \* until 3 sts remain, (YF, K1) 3 times. Row 2: P to end. Rows 3 and 4: Kto end.
Sew in any loose ends, thread ribbon through eyelet row and your little darling is ready for her big day! I hope you enjoy this pattern. It's my first so any feedback is greatly appreciated.


