Bellis perennis 6"Square
Designed by: Melinda Miller Blog: MoCrochet Email: mocrochet@yahoo.com Ravelry: Melinda Miller Designs Facebook:MoCrochet MATERIALS: 4 Colors Worsted Weight Yarn Colors A, B, C, & D Crochet hook size I/5.5 mm Tapestry needle for weaving ends
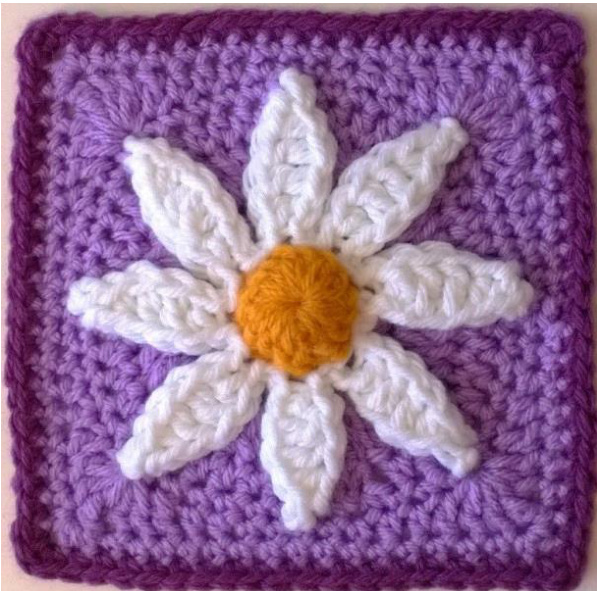
SIZE: 6" square
ABBREVIATIONS:
BLO = back loop only Ch = chain Cont = continue FLO = front loop only Sc = single crochet Dc = double crochet Tr = triple crochet Hk = hook Lp = loop Pat = pattern Rep = repeat Rem = remaining RS = right side St = stitch WS = wrong side GAUGE: 1 Petal = 1.75" from base to tip Flower = 4.75" across from tip to tip Through Rnd. 7 = 4.75"
SPECIAL STITCHES:
Sc2tog (counts as 1 sc) = Insert hk in next st and draw up a Ip (2 Ips on hk), insert hk in next st and draw up a Ip (3 Ips on hk), yo and draw through all 3 Ips. Petal = Ch 7, working in back ridge of chs, sl st in 2nd ch from hk, hdc in next ch, dc in next 3 chs, sl st in last ch. Beg Join = Join yarn with sl st to chosen hdc of Rnd. 6, ch 1, insert hk in unworked ch at tip of chosen Petal and back into same hdc, yo and draw through st and Petal, complete a sc. Sc Join = Insert hk in unworked ch at tip of next Petal and in hdc indicated, yo and draw through st and Petal, complete a sc. There are two options for the flower center. Option #1 is a simple, flat center. Option #2 - seen in the sample photo - provides a more realistic, 3D effect, but may prove a bit fiddly.
Option #1 - FLAT:
With Color A work a Magic Ring, or ch 4, join with sl st to form a ring. Tip: When using the ch-4 method, pull the yarn tail to the left and work sts over it. The tail will be wound around the ring back to its beg. When Rnd. 1 is complete, pull the tail and the center holewillclose. Rnd. 1: (RS) Ch 2 (count as hdc here and throughout), work 7 hdc in ring, join with sl st to beg hdc, finish off. Pull center ring closed. (8 hdc) Rnd. 2: With RS facing and working in FLO this Rnd., join Color B with sl st to any hdc of Rnd. 1, work Petal, (sl st in next hdc, work Petal) around, join with sl st to beg sl st, finish off. (8 Petals) Rnd. 3: Working in BLO this Rnd. and behind Petals, join Color C with sl st to any hdc of Rnd. 1, ch 3 (count as dc here and throughout), 2 dc in same st, work 3 dc in each hdc around, join with sl st to top of beg ch-3. (24 dc) SKIP RND.4AND CONT TO RND. 5 ON PAGE 3.
Option #2 - 3D:
With Color A work a Magic Ring, or ch 4, join with sl st to form a ring. See Tip listed in Option #1. Rnd.1: (RS) Ch 3 (count as dc here and throughout), work 15 dc in ring, join with sl st to top of beg ch-3. Pull center ring closed. (16 dc) Rnd. 2: (RS) Ch 1, sc2tog in same and next st, [sc2tog] 7 times, join with sl st to beg sc2tog, finish off. (8 sc) Note: Motif will cup and resemble a thimble. Be sure that the RS is outside and the WS is inside. For next Rnd., hold motif like a little cup with the 8 sc from Rnd. 2 facing upwards. Rnd. 3: With RS facing and working in FLO this Rnd. (the Ips facing the outside of the cup), join Color B with sl st to any sc of Rnd. 2, work Petal, (sl st in next sc, work Petal) around, join with sl st to beg sl st, finish off. (8 Petals) Note: At this point it is best to weave in all your ends before proceeding, as it may prove moredifficultlateron. Rnd. 4: Working in BLO this Rnd. (the Ips facing the inside of the cup) and behind Petals, join Color C with sl st to any sc of Rnd. 2, ch 3, 2 dc in same st, work 3 dc in each sc around, join with sl st to top of beg ch-3. (24 dc) Rnd. 5: Ch 3, 1 dc in same st, work 2 dc in each rem st around, join with sl st to top of beg ch-3. (48 dc) Rnd. 6: Ch 2, work 1 hdc in each rem st around, join with sl st to beg ch-2. Finish off. (48 hdc) Note: At this point lay your motif flat and gentlypress outPetals toedge of Rnd. 6. In the next Rnd., you will be joining the Petal tips to Rnd. 6. Choose any Petal tip and select the corresponding hdc behind it from Rnd. 6 to attach it to. This hdc is where you will begin Rnd. 7. Rnd. 7: With Color C, work Beg Join in chosen hdc, sc in next 5 sts, [work Sc Join in next st, sc in next 5 sts] around, join with sl st to beg sc. (48 sc) Rnd. 8: Ch 1, sc in same st and in next 2 sts, [hdc in next 2 sts, dc in next st, in next st work (2 dc, 1 tr, 2 dc) - corner made, dc in next st, hdc in next 2 sts, sC in next 5 sts], 4 times omitting last 3 sc, join with sl st to beg sc. (64 sts) Note: At this point, measure your square. If you are almost at 6", then you may want to end with Rnd. 9. If ending with Rnd. 9, you can work it in Color D. If you need the additional Rnd.10 to achieve your gauge, then just continue withpatternaswritten. Rnd. 9: Ch 1, sc in same st, sc in next 7 sts, [in next tr work (sc, hdc, sc) - corner made, sc in next 15 sts] around omitting last 8 sc, join with sl st to beg sc. Finish off. (72 sts) Rnd. 10: Join Color D with sl st to any hdc, ch 1, in same st work (1 sc, 1 hdc, 1 sc) - corner made, sc in each of next 17 sts, [in next hdc work (1 sc, 1 hdc, 1 sc) - corner made, sc in each of next 17 sts] around, join with sl st to beg sc. Finish off. (80 sts) Weave in all ends, block.


