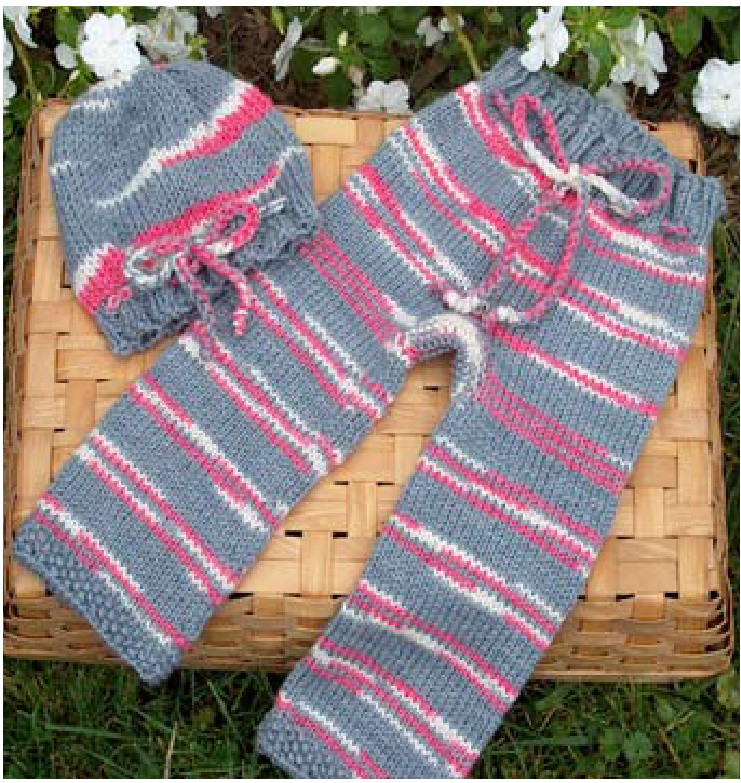
Burgh Baby Gear Child's Matching Hat Pattern
From the book "Knitting Wool Diaper Covers from Start to Finish" by Maggie Broderick www.burghbabygear.com burghbabygear@yahoo.com Copyright 2008 - Be Sharp, LLC
This is a very basic hat pattern that is perfect for you to make a matching hat with the yarn left-over from knitting your woolies. You can use the variations at the end to make it as fancy as you like, and it can be adjusted to any yarn-weight. First, use a tape measure to measure around the largest part of your child's head, and write that number here. (If you're guessing the size, a typical size range for babies is between 10 and 14 inches.)
Gauge
For worsted weight yarn: 4.5 stitches per inch, 7 rows per inch For Aran/bulky weight yarn: 4 stitches per inch, 6 rows per inch
Materials
Worsted or Aran/bulky weight yarn - between 40 and 100 yards, depending on the desired size of the hat) Set of four size-6 double-point needles (size-7 is better for Aran/bulky weight yarn) Tapestry needle
Casting on:
If using Worsted weight yarn: Multiply the head measurement by 4.5. Round to the nearest number that is divisible by 4. If using Aran/bulky weight yarn: Multiply the head measurement by 4. Cast on stitches (see formulas above) onto 3 of your double-point needles, and distribute the stitches evenly. I use the "knitting on" cast-on method, but any stretchy cast-on is fine. For a "Rolled Brim" hat: Knit in the round for 6 rounds. Your stitches will roll to form the rolled brim. For a "Ribbed Brim" hat: K2 P2 for 8 rounds (Note: If desired, use smaller needles (two sizes smaller) for the ribbing, and then change to the larger needles for the body of the hat. This will make the ribbing tighter. I don't usually bother, but it's a nice touch if you prefer.) Knit in the round until your hat measures $4.5–6^{\prime\prime}$ fromtop to bottom, depending on desired size. For a typical hat for a young toddler, $5.5^{\prime\prime}$ Works great. Do the following set of decreases until only 4 stitches remain on your needles. K2T all the way around. Knit 2 rounds Stop after you have knit two together and you end up with 4 stitches left (do not knit 2 rounds with the last 4 stitches). If you happen to end up with "extra stitches" at the end (a number not divisible by 4), simply decrease only some of the stitches evenly around until you end up with 4 stitches. To finish, cut your yarn, leaving a long tail, and thread it through the tapestry needle. Run the yarn with the needle through your remaining 4 stitches, bring it to the inside of your work, and Weave in the end very securely through the top of the hat.
Optional Touches:
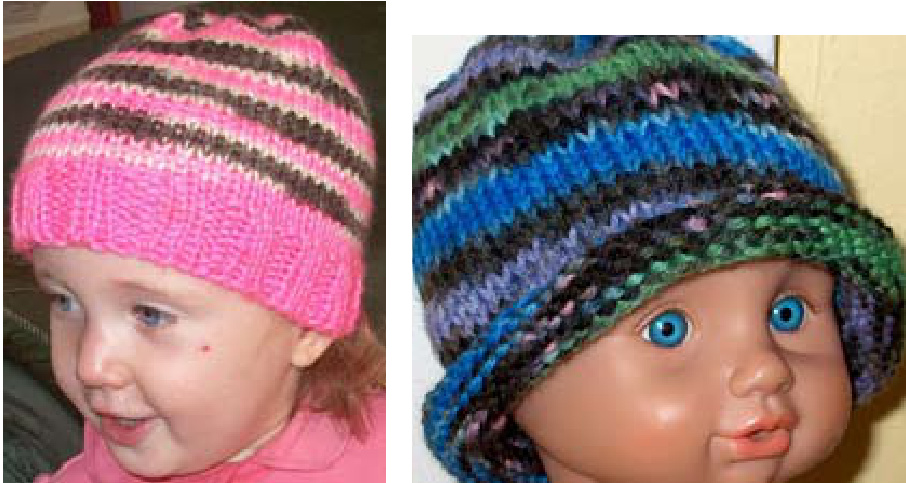
If you have even more leftover yarn, you can create a pompon for the top of your hat and stitch it on using yarn and a tapestry needle. Simply wrap some yarn around a $2^{\prime\prime}$ piece of cardboard until it's nice and ful. Then, carefully remove your wrapped yarn from the cardboard and tie some yarn tightly around the middle to cinch it. Cut apart the top and bottom ends to create a fluffy pompon. For an adorable variation, try making a "Sprout Hat." Instead of running your yarn through the final 4 stitches at the top, place them on one double-point needle and create and I-cord. You can either make a tiny I-cord that will stick straight up in the air once you weave in the end, or you can make a long one and tie it in a knot to look like an umbilical cord, and then weave in the end. So cute! Another great tip is to use larger needles, such as size 10 just be sure to adjust your gauge!) to make your hat. This will result in a looser, stretchier hat, which will fit your child longer. It will also knit up very quickly! You can add ties to this simple hat in several ways. One very easy Way is to create two simple long braids with leftover yarn, and use a tapestry needle to thread them through the sides of the hat (one braid on each side). Double each braid over, and make a double knot at the end of each braid. Please use extreme caution when using strings around your child's head, however. I personally err on the side of caution and avoid them entirely, but if you supervise your child while he or she is wearing the hat, you may want to include ties in order to keep the hat from falling off. Other possibilities for variations on this simple pattern are endless. Try some cheerful stripes, embroidery, or fancy colorwork to match your woolies. Maybe you could add some simple ear flaps, 3D crocheted embellishments, or even a drawstring in the brim of a ribbed-brim hat (as in the picture below). Be creative, and have fun! Happy knitting! Maggie Broderick