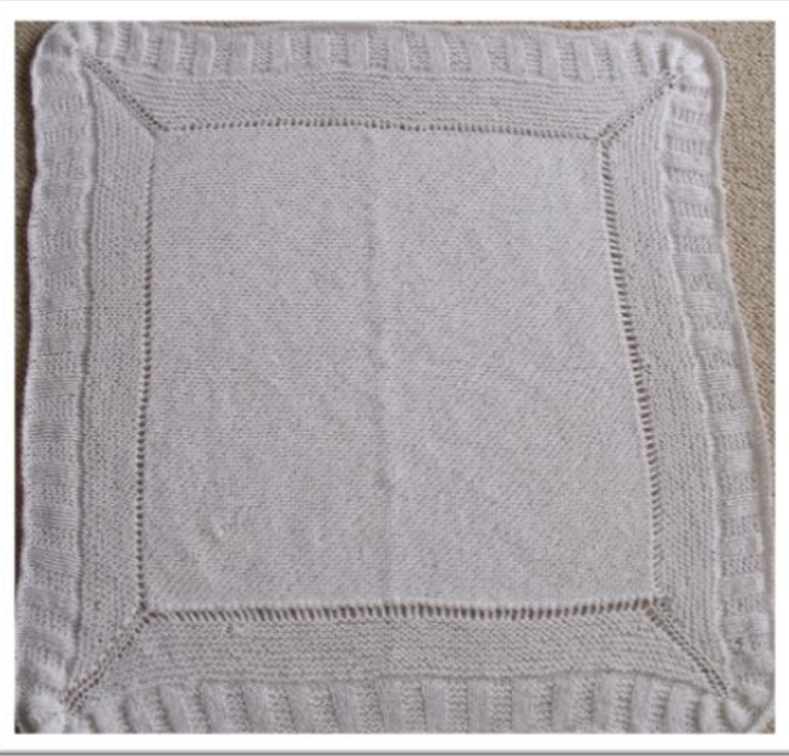
Simple Soft Baby Blankie Part of my 'simple soft' range of baby items, this classic blankie is a $30^{\prime\prime}$ square with lots of scope for a smaller or larger item. Knit in baby 4ply (l used Fairytale 4ply), 2 skeins will be enough for the $30^{\prime\prime}$ with spare yarn too. The techniques used are a great introduction to knitting in the round (even though you'll make a square!) and the simplest increase to standard increases and decreases. Tools 5mm 30cm straight needles 5mm at least 80cm circular needles ?Darning Needle to weave in ends 4 Stitch Markers (preferably at least one a different colour/style to the rest) Abbreuiations
NNL PPurl YF Yarn Forward (simplest increase, leaves a loop at start of work or a hole if in the centre of your work). When knitting as in this pattern you will start the row with your yarn in front of your right hand needle prior to inserting into the first stitch on the left so increasing. KFB Knit into the front and back of the same stitch to increase your total number of stitches by 1 K2TOG Knit the next 2 stitches together to decrease stitches by 1 K3TOG Knit the next 3 stitches together to decrease your total number of stitches by 2 PM Place Stitch Marker Central square: Using your 5mm straight needles Cast on 1 stitch Row1 Yarn Forward (YF), Knit 1 (K1) - 2 stitches on needle Row2 YRN, K to end of row - 3 Stitches on needle Rows3on YRN, K to end of row. Continue in this way until you have 60 loops down either side of your triangle (this is a great way to make a simple right angled shawl and you could just keep on going as long as you wanted and cast off when at desired size). When you have 60 loops along each edge begin decreasing Row1 YF, Knit the next 3 stitches together (K3TOG), K to end Row2 YF,K3TOG,K to end
Continue in this way until you have 3 stitches on your needle Row 1 YF, K3TOG (2 stitches on needle) Row2 K2TOG You can end your blanket here if you wanted to make a car seat blankie as the simple square looks great on it's own - all you now do is thread your yarn end through the final stitch and weave in the tail. Border: Using your 5mm Circular Needles Round 1, Side 1 Pick up and knit the 60 loops down 1 side of your square. To do this I simply insert my needle (right handed one which already has one stitch on it) into the loop, yarn around, through and off as a normal knit stitch. When you get to the corner, Yarn Forward (YF), pick up the thread between the last and first loops of the sides that meet at the corner and knit this, Place a stitch marker on your right hand needle(PM). Side 2 and 3 YF, Pick up and knit the 60 loops down the side as before and work the corner as above. Side 4 YF, Pick up and knit the 60 loops down the side as before, work the corner as above, when you place the stitch marker this time, ensure you use a different one so that it will show you where your new rounds begin. (252 stitches on needle) Round 2 YF, Knit 1 Stitch, \*Purl down side until 1 stitch remains before first marker, YF, K1, move marker, YF, ${\sf K1^{*}}$ , repeat between stars until back at first marker. (260 stitches on needle) Round 3 YF, K1, $^{*}\mathsf{K}$ until 1 stitch remains before first marker, YF, K1, move marker, YF, $\mathsf{K}1^{*}$ , repeat between stars until back at first marker. (268 stitches on needle) Repeat Rounds 2 and 3 until you have worked 15 more rows (372 stitches on needle), again you could end here by casting off all stitches but we won't for this pattern. Ribbed border Increase rows

Between markers you should have 108 stitches, 432 in total. Ribbing Round 1 $^{*}\mathsf{P}3$ ,$K3^{*}$ repeat to end Round 2 Knit all stitches Repeat rounds 1 and 2 until you have completed 15 rows. Cast off all stitches and weave in yarn ends. You could if you wanted, continue the ribbed border until the work is as large as you want bearing in mind that without increasing in the corners this will eventually start to curl. Or, to simplify the pattern you could just knit all stitches and not have any ribbing at all, again you could do this in the first part of the border too.

Good luck with the pattern please be aware that this is my own pattern and whilst I am happy for it to be used for personal or charitable purposes I would appreciate it if not sold on for other financial gain. Please report any errors through Ravelry. Out for test knit at the moment too x @Clobell.blogspot.com


