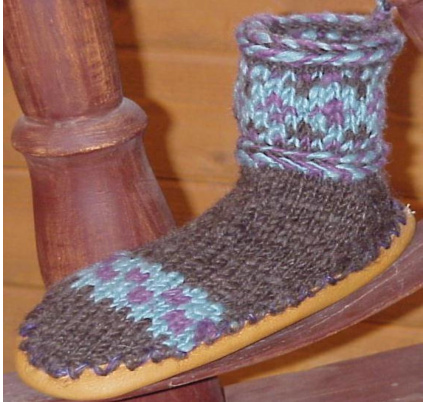
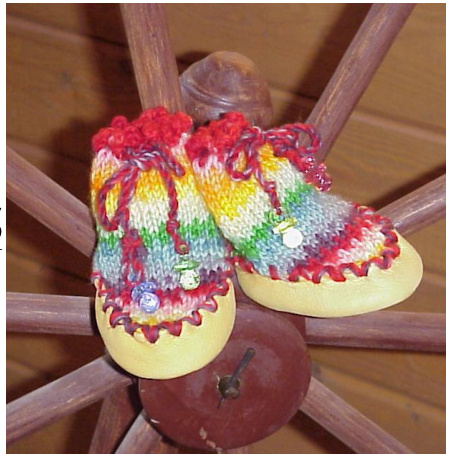
ShoRty Curr Mukluks By Anne CarRoll GilmouR
Feacuring Latvian Braid crim
Materials:
·1 skein of Brown Sheep Lamb's Pride Bulky for main color(MC), & small amounts of 2 coordinating colors (cc1 and cc2) for accents About 3 yards of Brown Sheep's Wildfoote Luxury Sock yarn to reinforce lashing to leather bottoms One large blunt-end yarn darner 2 small st holders (Opt- you can substitute waste yarn or 2 empty needles). Double-point needles in size 7 (or size needed to obtain 4 sts per inch in stst). The 3 sizes offered in this pattern will produce sock tops for adult sizes small, medium, and large. For children's sizes, see gauge tricks at the end of this pattern. One pkg of knitter's marking pins One pair fleece-lined suede soles in desired size from Somerset Designs (Can be ordered on-line from: somersetdesigns.com) Pattern is written in adult small with larger sizes following in parenthesis. Begin at the top of the cuff, using MC and long-tail co, cast on 32(36, 40)sts. Divide evenly on 3 needles and being careful not to twist, join in a circle by crossing 1st st &last st from ndl #3 on to ndl#1 & vice/versa (this is known as a cross-over join & helps to make a smooth circular join with less jog"). This join will mark the center back of your sock top and the beginning of each new rnd (place a split marker on the knitting here if desired). Now, leave main color hanging on inside of work follow the Latvian Braid trim instructions (See page 3) using your 2 contrasting colors. Upon completing your top braid, bring your 2 accent colors back inside your work (leaving them attached) and k 2 rnds even in MC. Then work chart #1 (page 3) for 9 rnds, then k 2 more rnds even in MC. Follow braid instructions again, but this time work your braid in the alternate direction, to mirror the top braid, as discussed in the braid directions on page 3. After you have completed your lower braid, break off both cc's on the inside of your work. K a final 2 rnds of MC before dividing for heel flap.
Divide for heel flap-
With MC and ndl #3, k the 1st 8(9,10)sts from ndl#1. Stop knitting. Shuttle the next 16(18,20)sts to a piece of waste yarn, divided on 2 holders or 2 empty ndls until needed to work the instep. The other 16(18,20)sts should now all be transferred to ndl #3. The heel flap will be worked in MC, back and forth on 2 needles over these sts. Work the heel flap in heel stitch as follows: Important note here- sl all p's as to p and all k's as to k, and make sure to wk the last st of each row and sl the 1st, or heel flap edge chain will not form properly. Heel flap-Row 1: (Wrong side facing you) [sl1, p1]. Repeat across row. Row 2: (Right side facing you) sl1, K all remaining sts across row. Repeat these 2 rows 8(9,10) times more. You should have 9(10,11) links' in your heel flap edge chain. End having completed a right side row. Still in MC, the next step is to pick up into the heel flap edge chain. Here you can use another needle or the one with the heel sts already on it. You should be ready to go up the right side edge. (Look at the sock as worn on a foot). Pick up and knit into the 9(10,11) links', then pick up 1 more st between heel flap and reserved instep sts to prevent a gap. This will be ndl #1. Then, with a 2nd needle, k across all 16(18,20) of the reserved instep sts, then with a $3^{\mathrm{rd}}$ needle, pick up 1 st at the 'gap', then pick up and k down the remaining 9(10,11) links' on the left side edge. Now BIND OFF all 16(18,20) heel flap sts as you work across them back to ndl #1. There should now be 10(11,12) sts going up the right side of the sock top (needle #1), 16(18,20) sts across the instep (needle #2) and 10(11,12)sts going down the left side (needle # 3). Now begin instep gusset shaping. Unlike a regular sock, you will now be working back and forth in rows over these 3 ndls, with shaping decreases on k rows only as follows:
Instep Gussets
Row 1: (and all right side rows) sl $1^{\mathrm{st}}$ st as to k, k to last 3 sts of ndl #1, k2tog, k1. K all sts across ndl #2. At the beginning of ndl #3, k1, ssk, k to end of row. Row 2: (and all wrong side rows) sl $1^{\mathrm{st}}$ st as to p, p even allremaining sts. Repeat these 2 rows alternately until only the 16(18,20) instep sts of ndl #2 remain. (Sl outside sts to ndl #2 for final decs). On the next right side row, re-attach cc's and begin chart #2 (page 3) for 7 rows. Break off cc's and work even in MC to desired length to toe shaping, end having completed a p side row. (About 2" from tip of toe). Toe Shaping- The toe will be shaped with a series of alternating mirror image decreases on alternating rows, similar to instep gussets, as follows: Row 1 : (and all right side rows) sl $1^{\mathrm{st}}$ st as to k, ssk, work to last 3 sts, k2tog, K1. $1^{\mathrm{st}}$ Row 2: (and all wrong side rows) sl st as to p, p even all remaining sts. Repeat these 2 rows alternately, until there are a total of 6(6,8) sts remaining. Bind off, pulling a tail about $^2\,\,^{1}\!/\!_{2}$ yards long to lash sock top to sole. If desired, wash and block your sock tops before lashing to soles, or steam block gently with an iron on the wool setting, using a damp pressing cloth.
To lash sock tops to soles
Pin sole to sock top, matching_center front of toe and center back of heel and making certain the sides are even. Tie on reinforcement yarn with tail and thread both though yarn darner. Take large bites' through sock top for a firm join, begin by bringing yarn ndl up through sock top between 2 holes, then into next hole and through sock top and out between 2 holes all the way around the edge. Reverse work and do the same thing in the opposite direction for double-stitched crosses all the way around. Anchors remaining tails firmly inside & you are Done! (For washing your new mukluks, follow washing instructions as given by the manufacturer of your soles.)
LATVIAN BRAID TRIM
This is a fun and easy trim that looks great around the cuff of a sock or mitten, necklines, sleeve cuffs or hat edges, just about anything that can be worked in the round. It does require an even # of stitches and looks best when working in 2 (or more) colors. To begin: Preparation rnd: K 1 rnd. This can be done in the 2 colors of your braid or in an entirely different color(s). Keep in mind that what you use on this rnd will form the center line of your finished braid. You can use a 1 or 2 color 2 end cast-on in place of this step to begin your project with a braid. Braid rnd 1: Bring both colors forward so they are hanging outside the circle. Pull about 2 yards free from both skeins of your braid colors.\* P 1 st cc1, then bring cc2 over cc1 and purl 1 st cc2. Repeat from star to end of rnd, always bringing the next color over the last color wked. This wil twist the 2 yarns as you p around the circle. To keep the yarn from snarling as you work, push twists back toward skeins as you purl. When the rnd is complete, a 2 color twisted cord hangs from your work. Braid rnd 2: Now, \* p 1 cc1, then bring cc2 under and p 1. Repeat from star but this time always bringing the following color under the color just wked. At the end of the rnd, the twists will be undone and you braid will be compilete! An attractive and effective way to use this traditional technique is to work more than 1 braid, either one under the other or with some patterning or ribbing in between, but altering the direction of the next braid by starting it under instead of over, if it's to go on socks or mittens, the opposite can be done on the mate so that all braids will mirror each other- sometimes the small details have the biggest impact. Have fun with this! Note- On the following charts, blank squares represent mc And the symbols represent the 2 cc's...
charts:
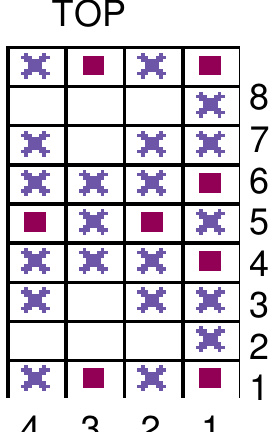
432 BOTTOM Chart #1 “Diamonds' > worked in the round ir multiples of 4 sts x 9 rounds. Read from R to L, bottom to top.
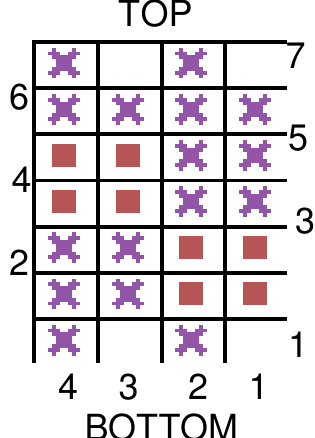
Chart #2 \*Postage Stamps' worked flat over 4 sts x 7 rows. Read R to L on K rows, L to R on P rows, from bottom to top. Remember to carry floats loosely behind active sts so your work won't bunch up.
Gauge Cricks:
Touse this pattern to make slipper socks for the little ones in your family, try the following: · #5 ndls and worsted wt yarn (the large size works up wellfor women, the smaller sizes for youth and older children) Gauge:5 sts $=$ 1” #3 ndls and dk wt yarn (such as Happy Trails or Heilo, all 3 sizes will produce a range for children of all ages)Gauge: 6 sts $=$ 1” #2 ndls and sport wt yarn (use the 2 smaller sizes for toddlers, the larger size for pre-schoolers)Gauge: 6.5 sts $,=$ 1”
Finally, heRe aRe some basic instruccions FoR using any sock parceRn CO make makluks (aka slipper socks), caken FRom my HAPPY TRAILS SOCKS book on page 15 uhere I shou the Rio Grande & Shaman's Hat sock as a slippeR sock UoRk any sock paztern to hee Flap. Complece heel Flap but do not curn heel. Pick up and k Righc heel edge sts, uk acRoss instep and pick up and k left heel edge sts just as you uould For a Regular sock, chen bind off all heel Flap sts. Cont as FoR Regular sock, uoRking che instep gusset shaping on Right side Rous only, uoRking back and FoRth in Rous oveR che 3 ndls uith a 4rh ndl, uncil alls are gone FRom ndls 1 and 3 and only che instep sts Remain. UoRk chese sts back and Forth on 2 ndis, but ocheruise as you uould FoR a Regular sock to desiRed lengch FoR toc shapin $\overbar{\boldsymbol{y}}$ chen shape che toe top che same uay you uould For just the uppeR on a RegulaR sock, doing che miRRoR-image decReases on Right side Rous only until coe shaping is complere, bind off Rem sts and leave a 2 yard tail For lashing sock top' to leazheR sole. (l aluays add an exrRa ReinfoRcing yarn heRe as the lashing is the highest ueaR aRea on a slippeR sock.)
An exerpt From:HAPPY TRAILS SOCKS By Anne Carroll (Gilmour) copyrighz 1996 Used by permission


