
Athleisure Socks
BY SPILLYJANE HTTP://SPIllYJanE.BLOGSPOT.COm
THE SOCKS
PATTERN NOTES
Please note that these socks are offered in two different sizes - Ladies' Medium and Gentlemen's Large. The instructions for both are the same except for the gauge. Please take the time to ensure that the socks being worked are being worked to the correct desired gauge. Where instructions differ between sizes, those for the larger size (Gentlemen's Large) will be written in parentheses.
SIZE
Women's Medium - 8" (20 cm) foot/leg circumference (Gentlemen's Large - 9-10" [24 - 25.5 cm] foot/leg circumference)
GAUGE
Women's Medium - 8 stitches = 1" (2.5 cm) in Stockinette st (Gentlemen's Large - 7 stitches = 1" [2.5 cm] in Stockinette st)
YARN
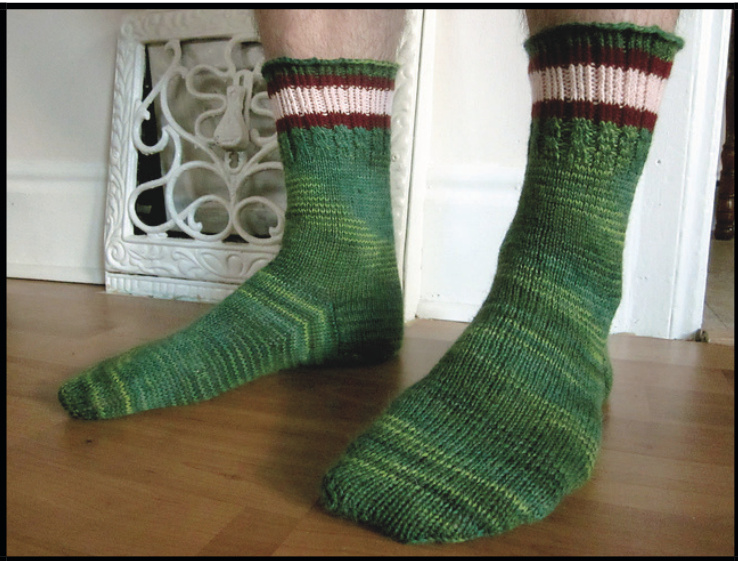
For both sizes: ≥ 440 yards (402 m) of fingering weight yarn (Main Colour - MC) Small amounts (about 20 yards - 18 m) each of fingering weight yarn in two contrasting colours - Contrast Colour1-CCl and Contrast Colour 2-CC2. Socks shown are size Gentlemen's Large and are modelled by a gentlemen with US size 12 feet.
NEEDLES
One set of five (5) double pointed needles in US 1 (2.25 mm) (Us 2 [2.75 mm]) or size necessary to obtain gauge. NOTIONS A stitch marker to mark beginning of round (optional.) a cable needle (optional) and a sewing needle to weave in ends.
STITCH GUIDE
2/2 LC = Slip 2 stitches to cable needle, hold in front. knit 2 stitches from left-hand needle, knit 2 stitches from cable needle. 2/2 LC is complete.
THE PATTERN
CUFF
With MC yarn, cast on 64 stitches using the Long Tail Cast On, or any other stretchy cast on. Distribute stitches evenly across four (4) needles - 16 stitches on each. The needles will now be known as Needles 1, 2, 3 and 4 respectively. Being careful not to twist the stitches, join in the round by moving the first stitch cast on on Needle 1 to Needle 4. Pass the last stitch cast on Needle 4 over this stitch and onto Needle 1. Thus the first and the last stitches have switched places. Prepare to begin to work in the round, working from the Chart.
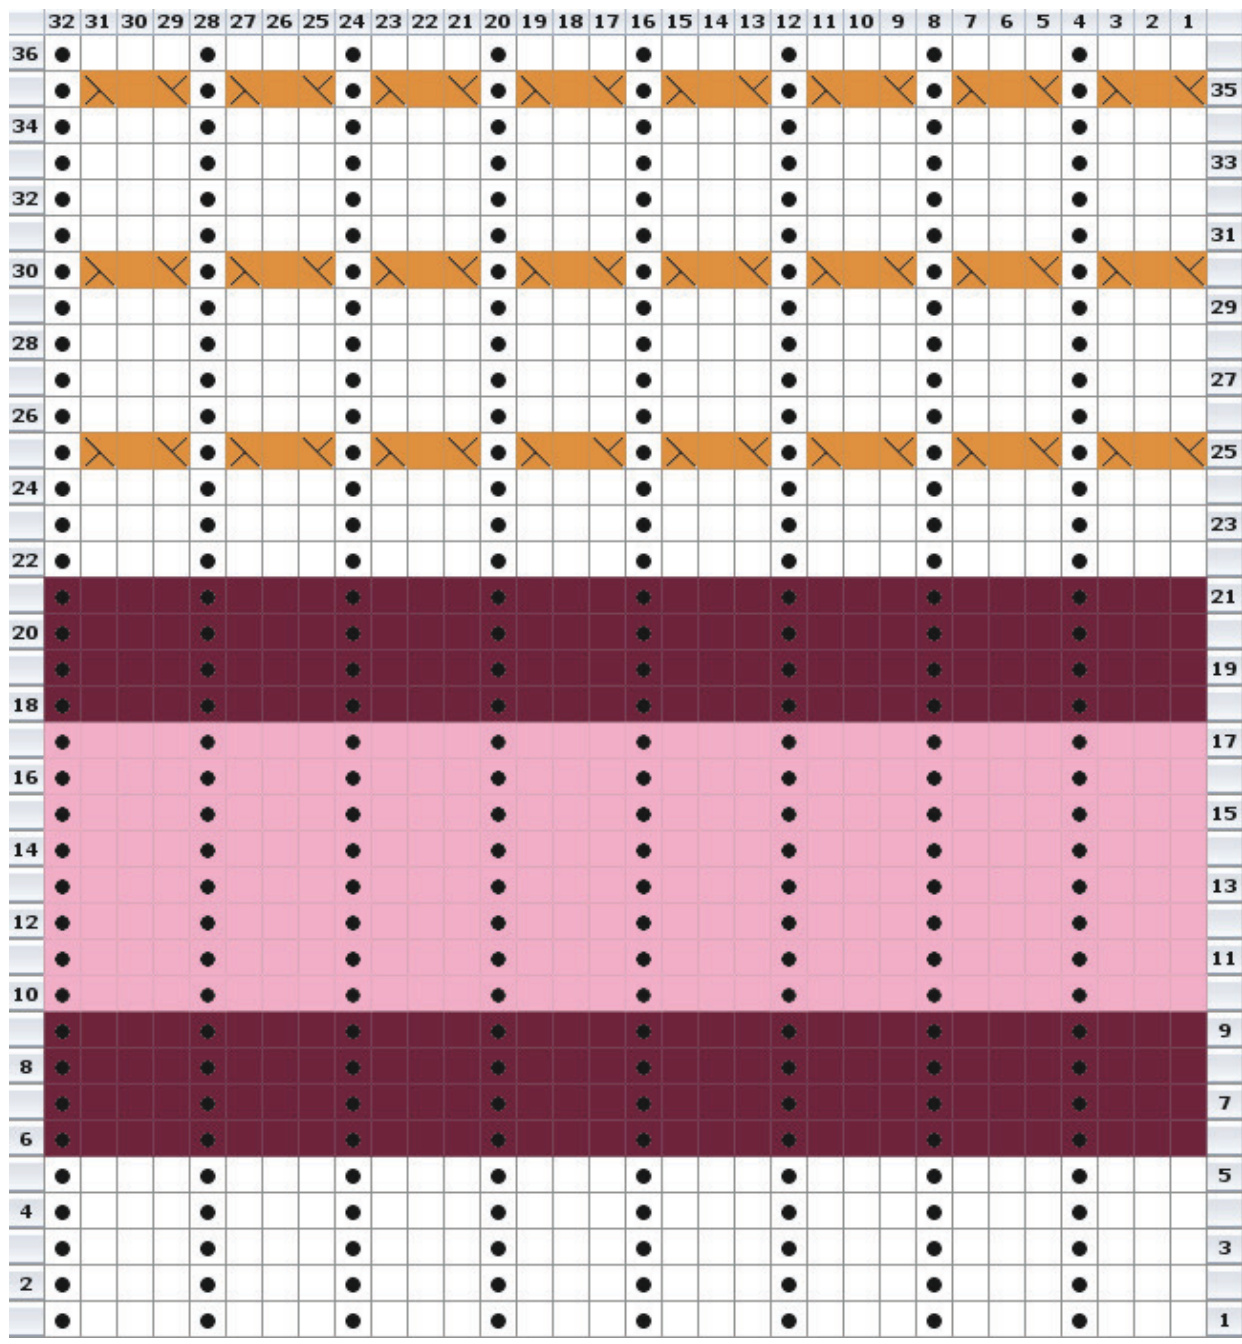
CHART-CUFF
Each row of the Chart will be worked twice per round. Work Chart in its entirety (Rounds 1 - 36) once. When Round 36 has been worked across Needle 4, Chart is complete. Prepare to continue working leg with MC only.
LEG
With MC only. work leg in Stockinette stitch - that is. knitting all stitches in every round --until piece is desired length from the cast-on edge. Prepare to set up to begin working the heel flap.
HEEL FLAP
The heel flap is worked in Stockinette stitch over 32 stitches with the MC yarn only. Begin by knitting across all stitches on Needle 1. Now, knit across all stitches on Needle 2 onto this same Needle (36 stitches total on what is now known as Needle 1.) Set the remaining 32 instep stitches (on what are now known as Needle 2 and Needle 3. respectively.) aside for the time being. Turn work, slip the first stitch on Needle 1 purlwise, and purl across all stitches. Turn work and proceed as follows: Row l: Slip first stitch purlwise, knit all stitches. Row2: Slip first stitch purlwise, purl all stitches. Repeat Rows1 and 2until theheel flap is 2"square(or desired length -- higher insteps will require a longer heel flap. and lower insteps a shorter one.) When the heel flap is complete, finish at the end of Row 2. preparing to knit across the right side of the heel flap. There should still be 32 stitches on Needle 1. Prepare to turn the heel.
TURN HEEL
Proceed as follows, turning work after each completed row: Row l: Slip first stitch purlwise, kl8, ssk, kl. Turn work. Row 2: Slip first stitch purlwise, p7. p2tog. pl. Turn work. Row 3: Slip first stitch purlwise, k across until there is only 1 stitch before the gap. ssk across gap, kl. Turn work. Row 4: Slip first stitch purlwise. p across until there is only 1 stitch before the gap. p2tog across gap. pl. Turn work. Repeat Rows 3 and 4 until all heel stitches have been used up, stopping at the end of the final Row 4 (20 stitches remain). Knit across all stitches and prepare to work gusset.
GUSSET
Using another needle. pick up one stitch in each of the slipped stitches along the side of the heel flap leading towards the instep stitches. The number of stitches that will be picked up will vary with the length of the heel flap. Knit these stitches through the back of the loop to tighten them. Pick up I stitch between this needle (now known as Needle 1.) and Needle 2. There should still be 32 instep stitches divided across Needles2and 3with16stitches on each Needle. On this and every round from here on, work across all instep stitches in plain Stockinette stitch. Now, pick up 1 stitch between Needle 3 and what will be the picked-up stitches on Needle 4. Proceed to pick up these stitches, attempting to match the number of stitches that were picked up on the opposite side of the heel flap. Knit these stitches through the back of the loop to tighten them. Knit the first ll stitches from Needle 1 onto this same needle (Needle 4.) Prepare to begin the gusset decreases. To decrease for the gusset proceed as follows:
Round 1:
> Needle I - knit to the last 3 stitches, k2tog, kl. > Needle 2 - work across instep in Stockinette stitch. > Needle 3 - work across instep in Stockinette stitch. > Needle 4 - kl, sk, knit all other stitches.
Round 2:
> Needle I - knit all stitches. > Needle 2 - work across instep in Stockinette stitch. > Needle 3 - work across instep in Stockinette stitch. > Needle 4 - knit all stitches. Repeat these two (2) Rounds as many times as necessary until the number of stitches is back down to 64 with 16 stitches on each Needle. Prepare to begin working foot.
FOOT
Continue working in Stockinette st until piece is approximately 2" less than the desired length of sock. Knit to the end of Needle 4. Prepare to begin to set up for the toe decreases. TOE Ensure that there are 16 stitches distributed evenly across all 4 Needles. Proceed to the toe decreases, working with MC yarn only. Decrease for the toe in the following manner:
Round 1:
> Needle 1 - knit all stitches to the last 3 stitches, k2tog. k1. >Needle 2 - kl, ssk, knit across all stitches. > Needle 3 - knit all stitches to the last 3 stitches, k2tog. k1. >Needle 4 - kl, ssk, knit across all stitches.
Round 2:
>Needles I-4 - knit across all stitches. Repeat these two rounds until there are 5 stitches remaining on each needle (20 sts.)Knit across the stitches on Needle 1 with Needle 4 and slip the stitches from Needle 3 to Needle 2. Graft stitches together using Kitchener stitch.
FINISHING
Weave in ends. Block lightly if desired.
THE CHART
@ Jane Dupuis, 2012. Please only copy these instructions for your own personal use, and do not sellfinished objects made from this pattern. Find more great patterns on the SpillyJane website (spillyiane.blogspot.com). on Etsy (spillyiane.etsy.com). and on Ravelry (www.ravelry.com/designers/spillyiane).


