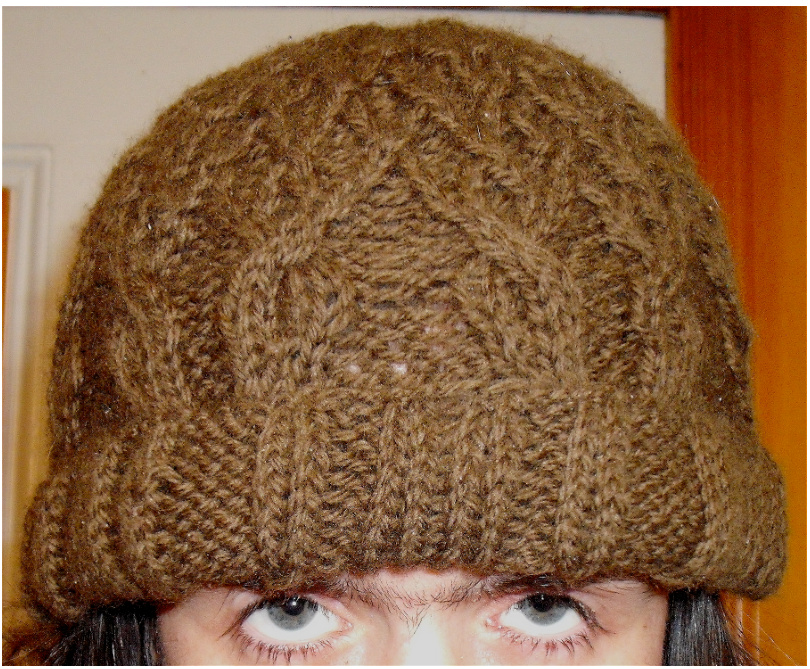
Dogwood Cabled Hat
This pattern makes a relatively light toque. The cabling and decreases around it introduce some holes, smaller than yarn overs, but making the hat less wind- and cold-resistant than a hat of the same size knitted in stockingette or kip1 rib.
Requirements
Circular needle and/or 5 double pointed needles. The double-pointed needles will be used, at very least, to finish the top of the hat. Approximately 15om of worsted weight yarn. Stitch markers
I knit this hat on mm circular nedes, with a gauge of2 stitches and 3 rounds per centimetre in stockingette, but the pattern is easily sized.
Instructions
Cast on a multiple of 16 stitches, marking sets of 16 as you go. The pattern is 16 stitches long, so each marked section will be one panel. Knit teufn,usng ta ul 2 t 2, pul , kit 4, pul , kit . The ribbing can be longer or shorter, and ifa rolled brim is desired, purl one round and then repeat the ribbing. Alternately, picking up stitches around the brim and knitting more ribbing later on will give you extra length if needed. I. pl, pfb, sk, ptog, kI,kfb, kfb, kI, pi, sI,pso, kztog, pfb, pi What this series of decreases and increases accomplishes is that it ends the 2-stitch-wide ribs as points and expands the $4$ stitch-wide ribs to 6 stitches each, preparing them to be split into two 3-stitch-wide cables. 12. P5, k6, pP5 13. P4, c3r, c3l,Pp4 14. P4, k3, p2, k3, P4 15. P4, k3, p2, k3, P4 16. p4, c3l, c3r, P4 17. P5, c3x3l, P5 18. p5, k6, p5 At this point,the ribbing has split into two cabls, which spread apart and then came back together, crossing each other. 19. P4, c3r, c3l, P4 20. P3, c3r, P2, c3l, P3 21, P3, k3, P4, k3,P3 2. pl, patog, kn,kfb, kI, P4,k, kfb,s,p,pso,p This expands the 3-stitch-wide cables into $^{4}$ stitch-wide ones, in preparation for splittng them in half. 23. P2, k4, P4, k4, p2 24. P1, c2r, cl,p2, c2, cl,p 25. P1, k2,p2, k, p2, k, p2,k,p 26. p1, k2,p2,k2,p2,k2,p2,k, 27. Pl, c2l, c2r,p2, c2l, cr,p 28. p2, c2x2r, p4, c2x2l, p2 29. p2, k4, P4, k4, p2 Here, t2-stit-wicablhaeind aod eachthrand are prardtlit I-stitch-wide cables, which will wrap with the cablesfrom other panels. 30. p1, c2r, c2l, p2, c2r, c2l,p 31. p, k2, p2,k,p2,k2,p2,k, 32. c,cil,c,cil,c,cil,, 33. kI, p2, k2, p2, k2, p2, k2, p2, ki Do not knit thlast stitch of this rou. The next rud twists stithesfrm adjacent paels together, suse thelst stith as a partofthrght twist at theining froud4 itea. 34. rt, p2, t, p2, rt, p,It,p Knit the last stitch of this round. 35. K,p2,k2,p2,k,p2,k2,p, 36. cl, c, cl cr, cl, cr, cl 37. P1, k2, p2, k2, p2, k2, p2, k,p 38. p1, rt, p2, It,p2, rt, p2, It,p 39. p, k2,p2, k2, p2, k2,p2, k2,p 40.cIr, cil cr, cl cr, cl,cr, l 41. KI, p2, k2,p2, k2, p2, k2,p2, k Donot knit thlaststitchofthis rou. Lke roud3 use th last stith as a part of th t round's twists instead. 42. rt, p2tog, It, p2tog,rt, Sl, pl, psso, It, sl, pl, psso (12 stitches per panel) Knit the last stitch of this round. 43. kl, p1, k2, p1, k2, p1, k2, p1, k1 44. cil, kztog, pl, rt, pl, sk, cir (10 stitches per panel) 45. p1, k2, p1, k2, pi, k2, p1 46. p1, kztog, pl, rt, pl, ssk, pi 47. SI, pl, psso, pl, k2, pI, ptog 48. sl, pl, psso, rt, p2tog 49. p1, k2, pI 50. sI, pl, psso, p2tog Finishydrawing theworking yarn through thermaning stithes, pulling tight and then weaving it in.
Notes
Charting
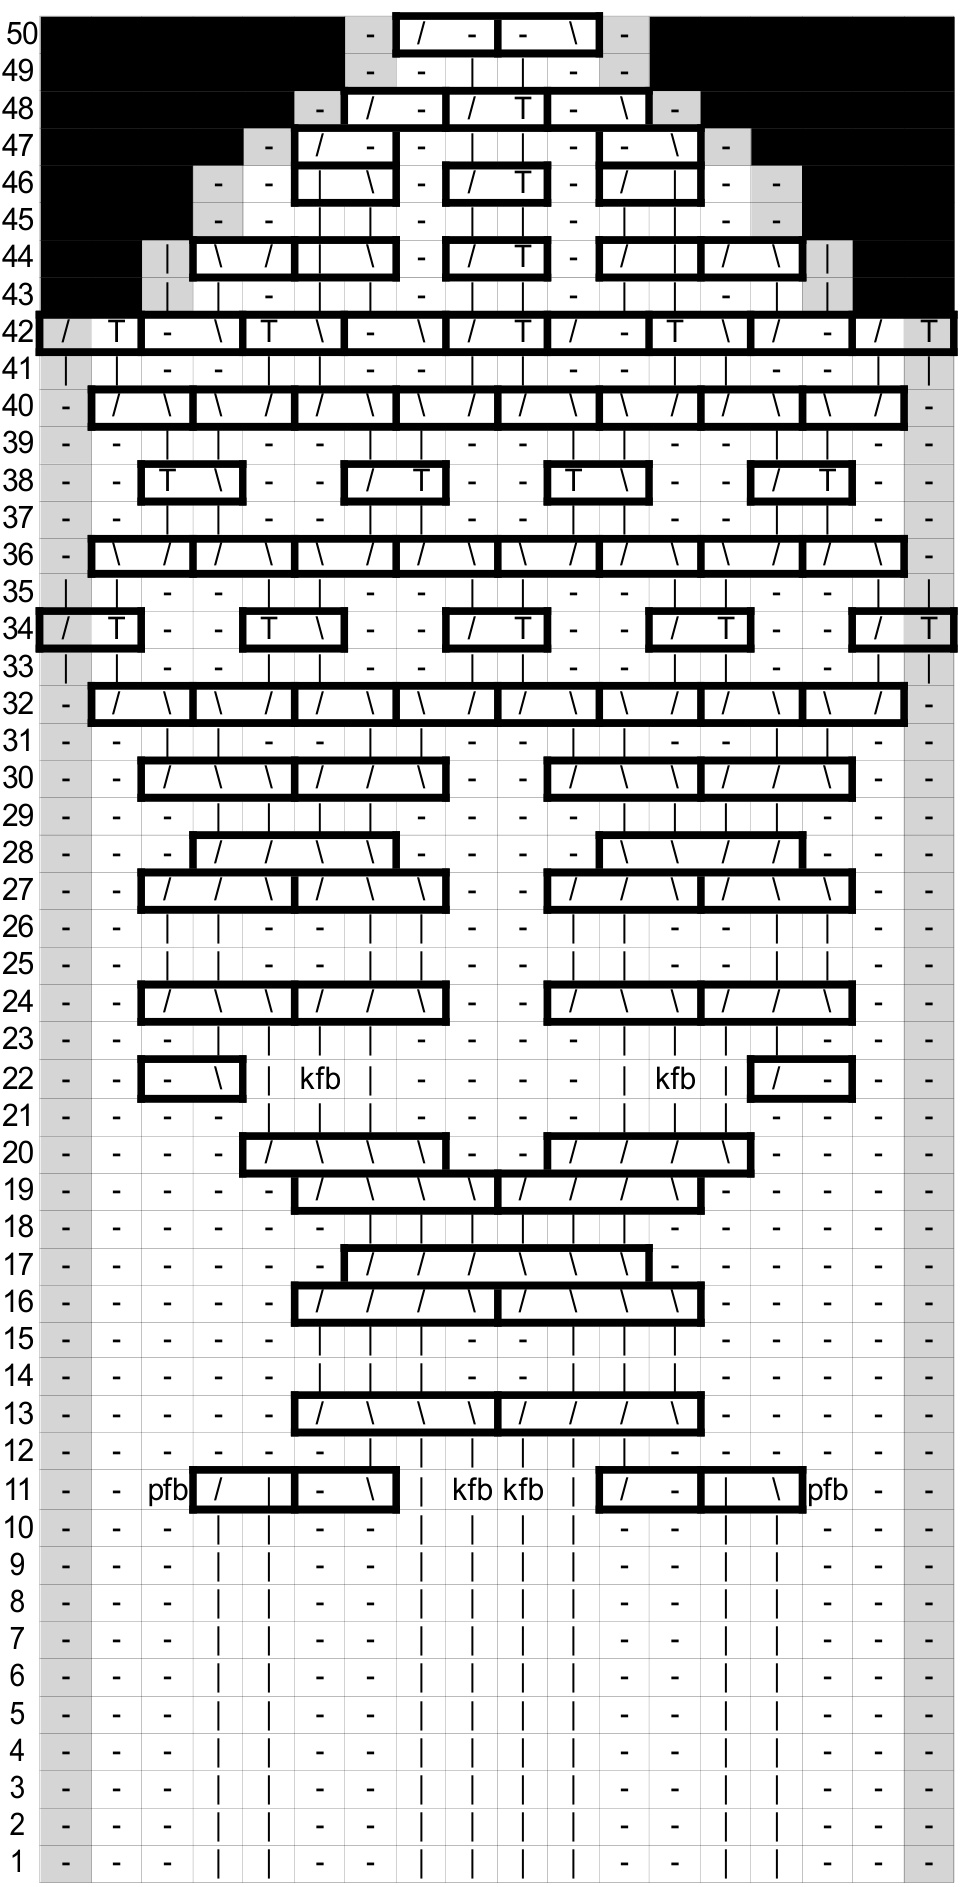
All stitches marked in grey on the chart are from the next panel over and are largely included for illustration of how the pattern interacts with the surrounding panels. The exceptions are rounds 33-34 and 41-42. In both of those, the last stitch in the first round should be twisted with the first stitch in the next. The last stitch in the second round should simply be knit.
Twists
The twists may be accomplished by knitting the stitches out oforder as described in the legend, or they can be done by cabling one by one as follows: Right Twist: Slip one stitch to cabling needle, held in back. Knit the next stitch on the left needle, then knit the stitch on the cabling needle. Left Twist: Slip one stitch to cabling needle, held in front. Knit the next stitch on the left needle, then knit the stitch on the cabling needle.
Sizing
While thecircumference of thehat canbe controlled bychoosing howmany stitches tocast on, thre are four places on the hat where it can be deepened with simple repeats of a set of rows. The first, and simplest, is to add rows of ribbing. While this doesn't extend the pattern, it does permit you to deepen after the fact, by picking up stitches and knitting extra rows of rib. The second is torepeat rows 12-17, 228 orboth. This makes the trunk or branches of the treelonger without sigifcantlyaltering the pat. Aloinitsfavour is that there aronlyfourrouds ofcablng in that set of rows, and none of them are particularly fnicky. (Gain: 6 per repeat.) Third yuould reeat row-39.hishas theadvantagofrepeatng aninteresting partfth patt, e tbra r ewiig acosawsi that yuea most cable-heavy part of the hat. (Gain: 8 per repeat.) Finally, you could repeat every row that is only knit and purl. That has a few catches, though. Rows I 10, 14-15, 21, 23, 25-26, 29, and 31 should repeat as normal. However, to make the twisted stitches not look incredibly anomalous, rows 33-34 and $37{\cdot}38$ should be repeated together, knitting 35 and 39 as normal. 41-42 should also be repeated together, once with purls between the knit and twisted stitches, once with the decreases as charted. (Gain: 16 rounds.)
Chart
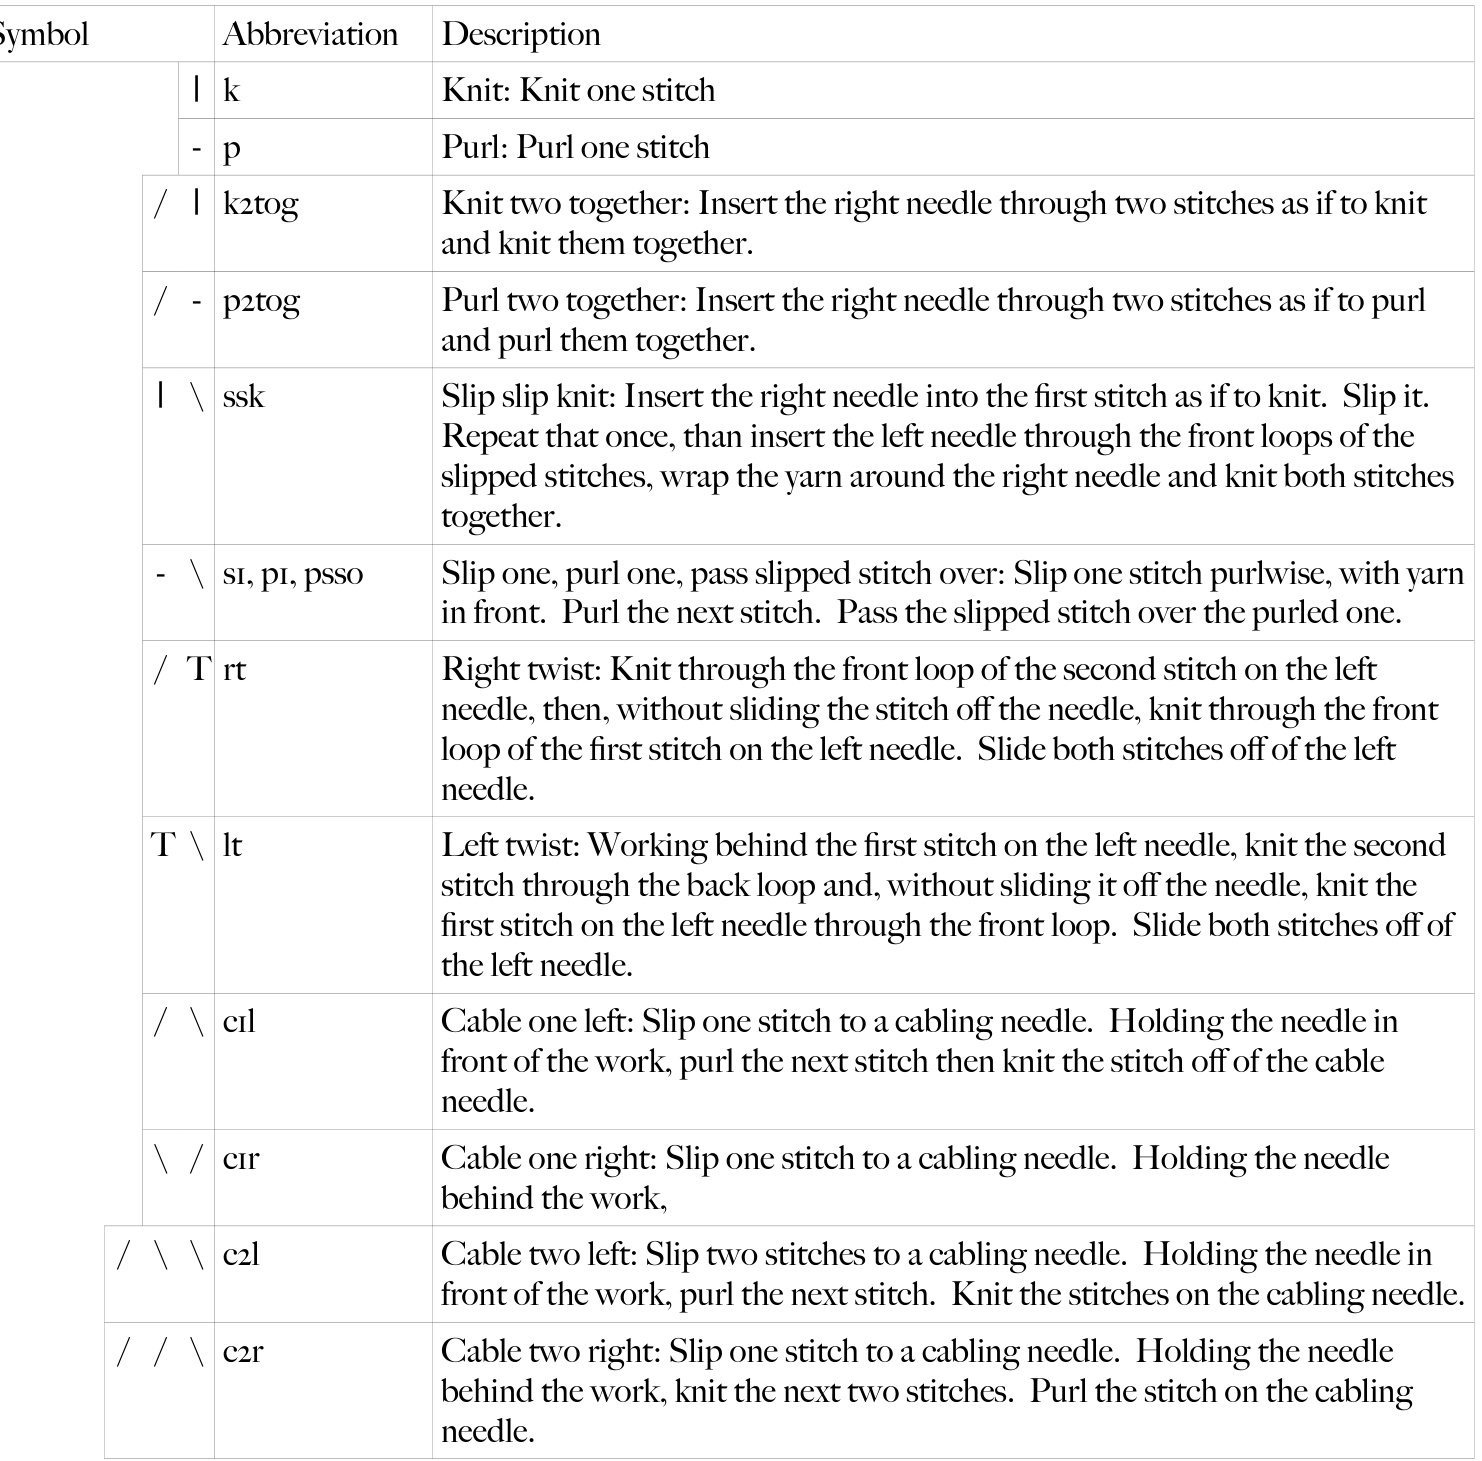
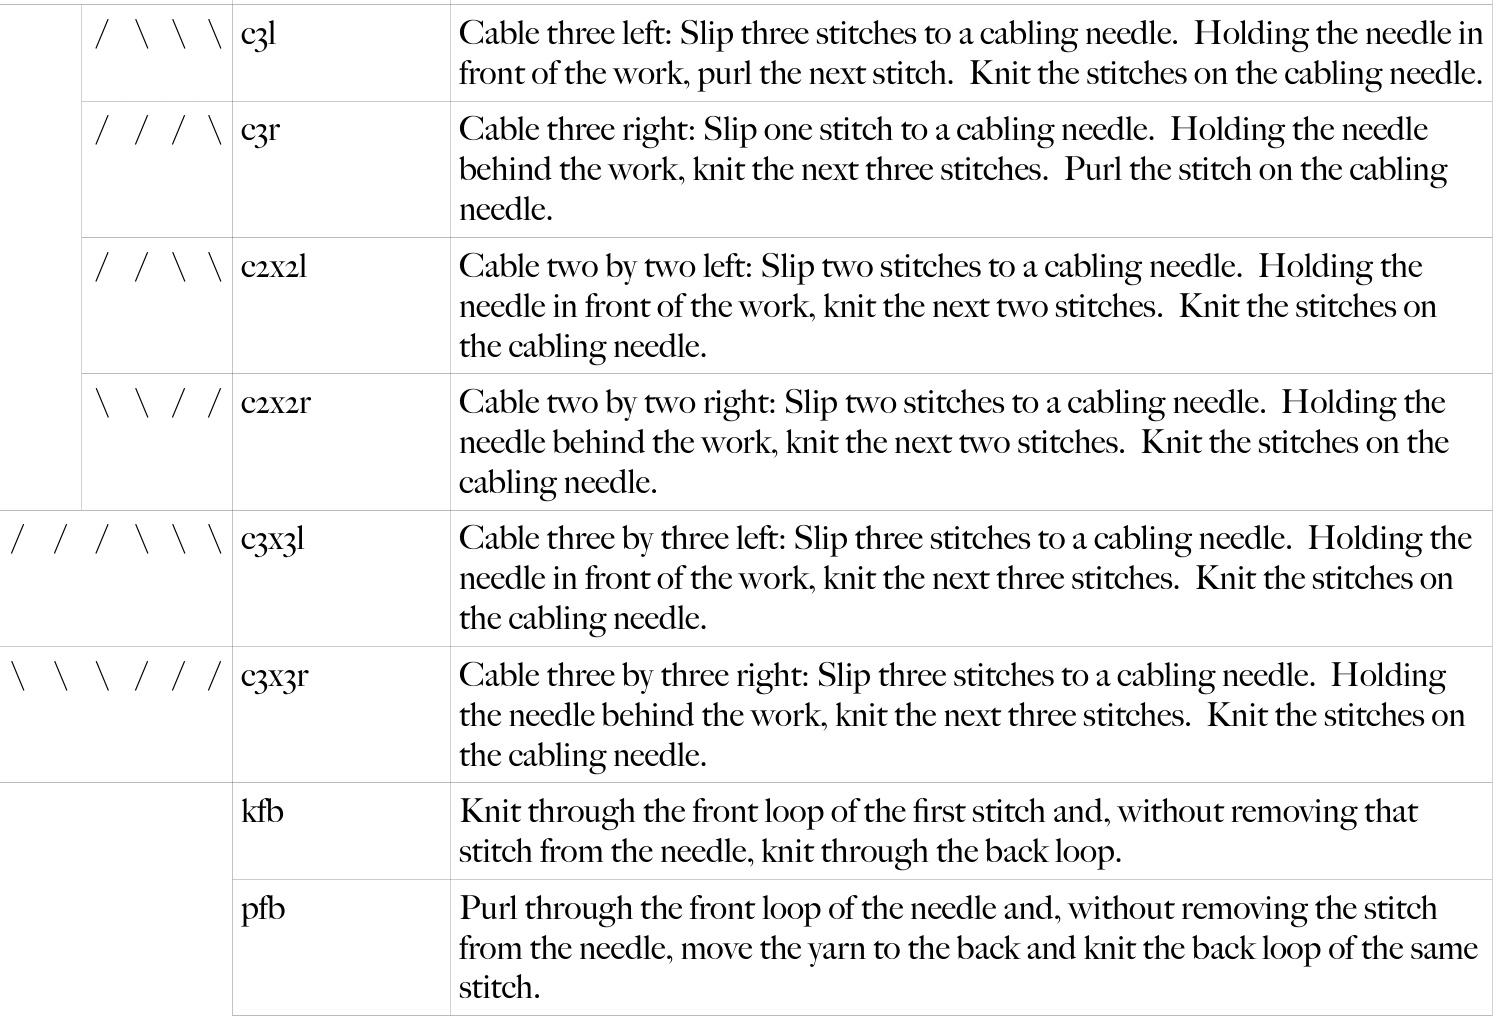
Legend and Glossary