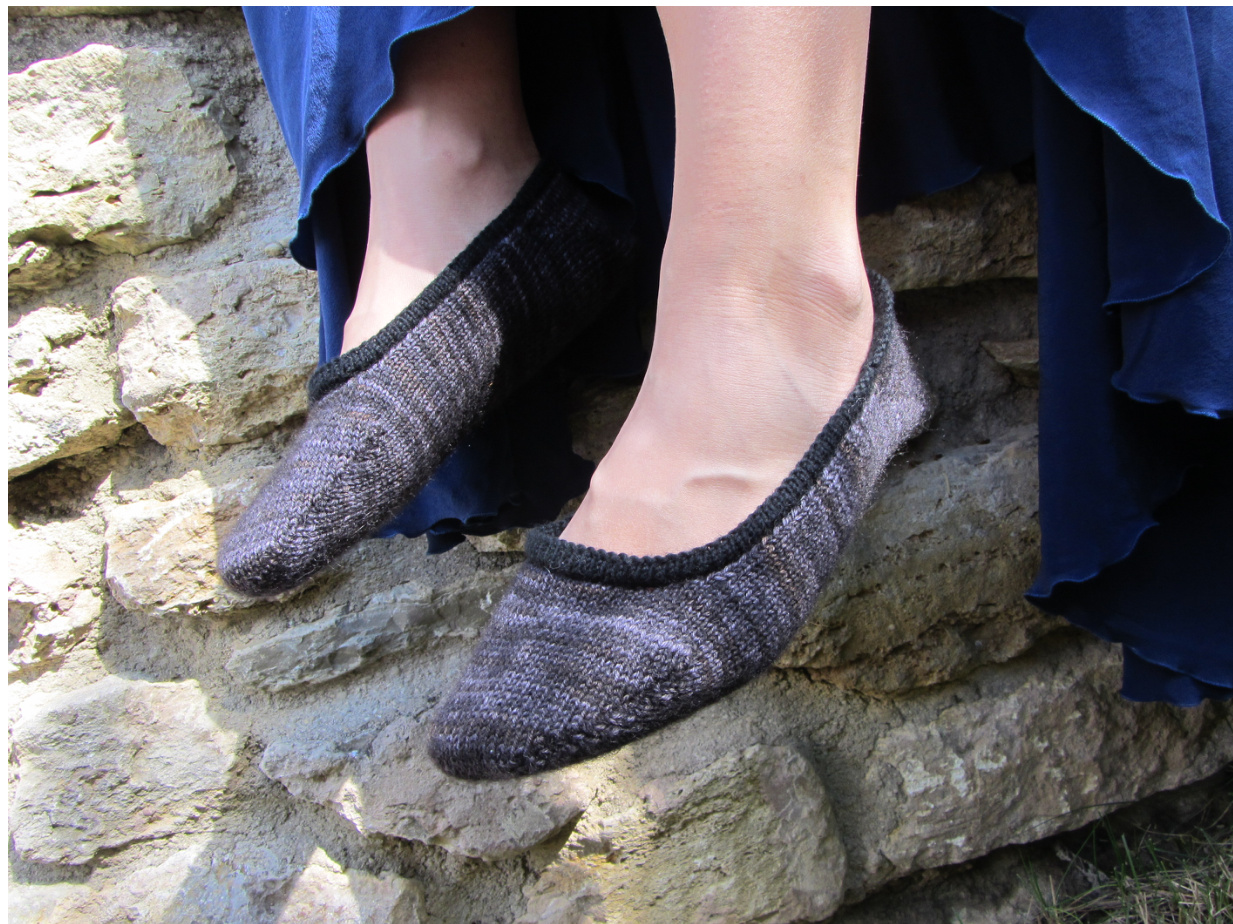
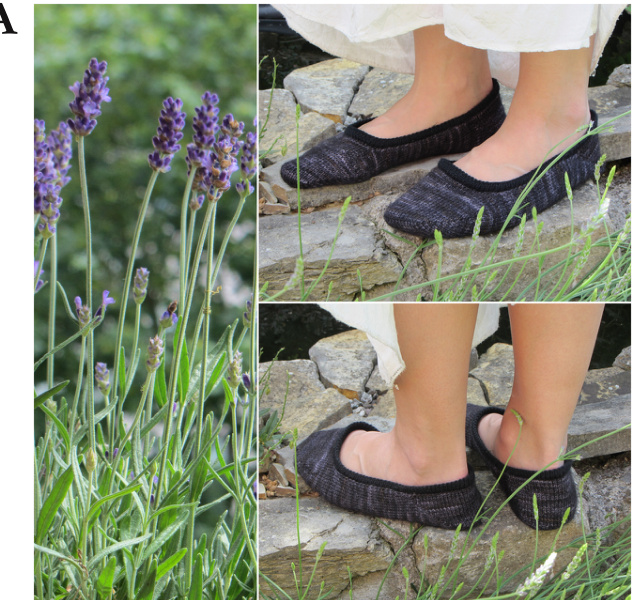
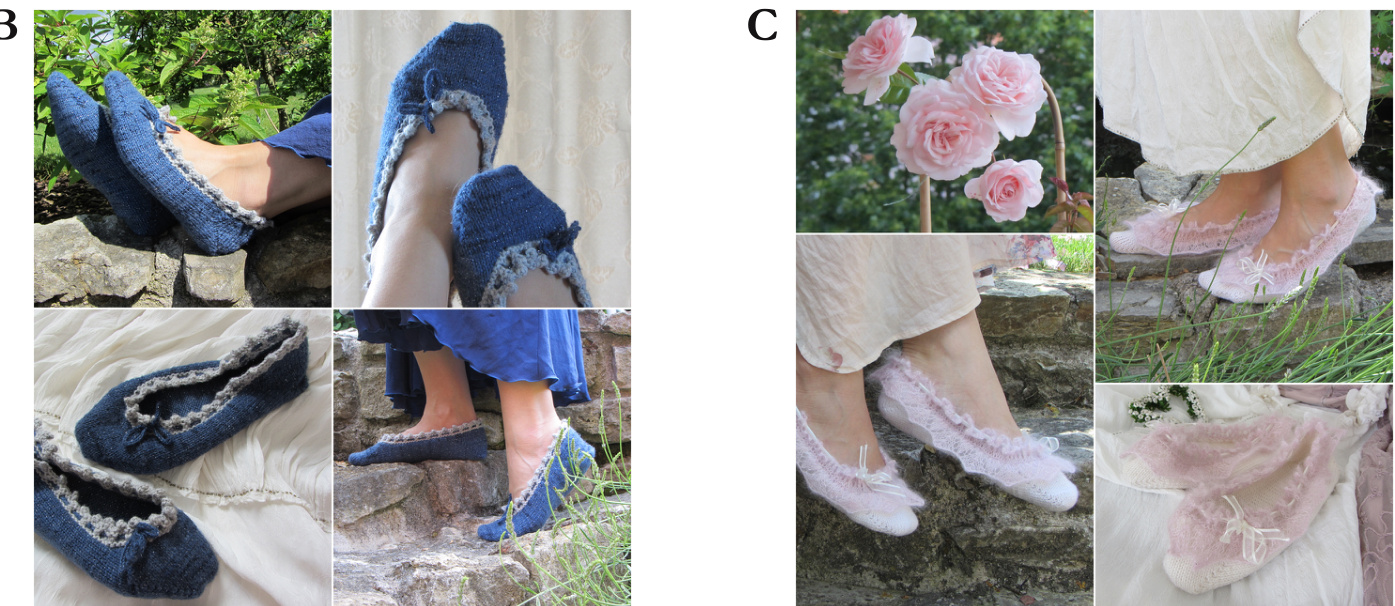
These cute slippers can be everything from a beautifully plain giveaway to an elaborate artwork for your feet. With the help of different edgings and embellishments this simple pattern can be easily customized. I show three alternatives here: A unisex: 'raven slippers' B moderately feminine 'starligbt slippers' with a picot & drawstring edging C cupcake-sweet wedding preparation slippers’ with an additional lace border
SIZE: FINIsHED length 22 [24, 27] cm (9 [9.5, 11] inches) corresponding to European shoe sizes 35-37 [38-40, 41-43]: shoe size comparison chart YARN \~ 130-160 yard DK weight or 250-300 yard fingering weight held double: wool or wool blends : Hedgebog Fibers - Blue Faced DK (100% wool), 146 yards/100 g, 1 skein, colorway rave: B: Dornrischen-Wolle - Sockenwolle mit Glitzereffekt (71% wool, 24% nylon, 5% metallic), 437 yards /100g, 1 skein colorway dunkelblau (dark blue) + remnant yarn in a contrast color C: OnLine - Linie 170 Kim (75% wool, 25% silk), 142 yards/50 g, 1(2,2) balls, colorway 1 (white) and contrast color for edging and border Garnstudio Drops Kid-silk (75% mohair, 21% silk), 220 yards/ 25 g, 1(1,1) ball colorway 03 (light pink) NEEDLEs 2.5 mm (size 1.5) set of double pointed needles (dpns) or one ≥80 cm circular needle or two shorter circular needles (or size to get gauge) and a set of smaller dpns for version A. Adjust needle size if necessary to obtain gauge. NoTIoNs a blunt tapestry needle, crochet hook, waste yarn, 2 yards of ribbon for C, 2 stitch markers GAUGE 28 sts = 4" /10 cm (26-30 sts is ok), row gauge is not critical as you will measure the length as you go - the most important thing is to get a sufficiently tight fabric to hold up to continued wear. ① Monika Gelker 2014 PROVIsIONAL CAsT ON I like to use the crochet chain cast on: With a piece of contrasting waste yarn and a crochet hook work a crochet chain. It should have at least as many loops as the number of stitches to cast on. Insert the knitting needle into the first of the bumps at the back of the chain and pull your working yarn through to form the first stitch. Repeat this until you have the desired number of stitches on your needle. DS - \*DoUBLE STITCH’ Work immediately after turning your work: Slip the first stitch purlwise with yarn in front. To get the double-stitch pul the yarn over the right needle to the back and around (either keep in the back on a RS row or pull further to the front on a WS row). This way you will pull the stitch from the previous row over the needle resulting in two strands of yarn for one stitch - a double-stitch. This is somewhat hard to picture in the beginning but actually very simple once you've seen it. So go ahead, check a video on the internet (like this one) or just try it out! If nothing helps, you can also do short row shaping with wraps (not to be further explained here). DDS - DoUBLE Ds Work exactly the same as for the normal double stitch: The difference is that if you knit (or purl) a DS and immediately afterwards turn and work a DS (again), this will result in four instead of two strands of yarn wrapped around the needle for this single stitch - a DDS. At the tight gauge used here it will not be possible to pull those four strands all around the needle - so just pull as far as is comfortable. PICOT BIND-OFF Bind off two stitches. \*Slip the stitch from the right to the left needle and cast on two stitches (I like to use the knitted cast on for this (tutorial link), but others work as well). Bind off five stitches. Repeat from \* until all stitches have been bound off.
Abbreviations
CO cast on BO bind-off st(s) stitch(es) RS right side WS wrong side PM place marker sl1 slip one stitch (knitwise on RS rows, purlwise on WS rows if not stated otherwise) wyif with yarn in front wyib with yarn in back p2tog purl two sts together ssk slip two sts as if to knit then knit them together through the back loop k2tog knit 2 sts together p2tog purl 2 sts together YO yarn over
Pattern
ToE
CO 30 [32, 34] stitches with a provisional method. Row 1 (RS) Knit and PM after 10 [10, 11] stitches and after 20 [22, 23] stitches Row 2 wyif work a DS, purl to end Row 3 wyif work a DS, knit to before the next DS, turn Row 4 wyif work a DS, purl to before the next DS, turn Repeat rows 3 and 4 until all stitches right and left of the markers have been worked into a DS ending with a RS row (knit to before the first DS, do not turn. You should now have a blunt triangle shape that forms the top half of the toe section. 10 [10, 11] DS have been worked on both the right and left side. For the second half of the toe section: Knit the first DS as one stitch, turn. (Ws) Work DDS, remove marker, purl to next DS (right side of toe), remove marker, purl one DS as one stitch, turn. Monika Gelker 2014 \*(RS) Work DDS, knit to next DS (working the DDS as one st), knit one DS, turn. (WS) Work DDS, purl to next DS (working the DDS as one st), purl one DS, turn.\* Repeat between \* \* until all DSs have been worked (one DDS remains on either side). Now slip the piece on your foot—slightly stretching it—and measure the length of the toe section. This measurement will later be needed to determine the point of starting the heel section.
FooT
In the last RS row of the second half of the toe section do not turn. Place a marker which now determines the beginning of a round, pick up 30 [32, 34] sts from the provisional CO and join in the round. For A/B: Knit 2(B) to 7(A) or more rounds depending on how much toe coverage you want. For all: At the beginning of the next round: knit 6 sts, bind off 18 [20, 22] sts, knit to end of round, knit 6 sts. You should have 42 [44, 44] sts on the needle, working flat. \*Turn. (WS) Sl1 wyif, p2tog, purl to end. Turn. (Rs) Sl1 wyib, ssk, knit to end.\* Repeat between \* \* 2 times more: 36 [38,40] sts. Knit flat in stockinette st until the piece measures the desired finished length of 22 [24, 27] cm minus the measurement of the toe section (see above) ending with a RS row. If you have the possiblity to measure the recipients foot: total length of the slipper should be: foot length minus 2 cm unless the feet are very broad)
HEEL
Turn, (WS) purl to last three sts. Put 3 sts on either side on holders or waste yarn or remember not to knit (and count) them anymore for now. You should have 30 [32,34] sts on the needle. Repeat instructions for toe from row 1 until both halves are complete, ending with a RS row (one DDS remaining on either side). At the end of this RS row knit the last DDS, put the 3 sts back on the needle, k2tog, knit 1 st, turn. (Ws) Sl1 wyif, p2tog, purl to end, put the 3 sts back on the needle, p2tog, purl 1 st, turn. (RS) sl1 wyib, k2tog, knit to last 3 sts, k2tog, knit 1 sts, turn. BO until 3 sts remain, p2tog, BO.
EDGING
With contrast color pick up sts around the slipper edge (see light blue line in schematic) as follows: Pick up and knit one st for each BO st of the heel [30, 32, 34], then pick up and knit 3 sts for every 4 rows along the foot. Pick up and knit one st for every BO st at the toe and again 3 sts for every 4 rows along the foot. Join in the round. For A: Knit 4 rounds, purl one round (turning round). Knit 3 rounds. With spare needles (smaller size) pick up sts from the edging pick up round. BO with a three needle BO: BO always knitting a st together with the corresponding sts from the pick up_ round before binding_ it off. Alternative for sensitive bands: Instead of the three needle BO, just BO normally and sew the BO edge to the inner side of the slipper. For B: Round 1 Purl Round 2 Knit Round 3 (eyelet round) YO, k2tog around Rounds 4,5 Knit BO using the picot bind-off. Make two crochet chains of 60 cm length[2 inches] in chain stitch and thread one through the eyelets of each slipper, starting and ending at the toe section. For C: Count the sts picked up for the edging Y), round up to the nearest decade (= Y+X) and with a separate strand of (contrast color) yarn CO Y+X+20 sts (e.g. 160). Join in the round and knit the 9 rounds of the lace chart. In the last round decrease X+20 sts evenly to get an equal number of sts for the lace border and the picked-up sts around the slipper. Join the lace border to the slipper (left side of border against right side of slipper) by p2tog one st from the border with one stitch from the slipper around. Continue with directions for B from round 2.
FINISHING
Weave in loose ends with the blunt tapestry needle. Wash in warm water with mild soap. For version A: If the slippers are too loose you can feed a lenght of elastic or a drawstring (see instructions for version B) through the tube formed by the edging.
LACE CHART
If you have comments or questions fel free to contact me at dimoni.design@gmail.com or on facebook (www.facebook.com/dimonidesign) or ravelry (http:/ /www.ravelry.com/people/-dimoni-) And now ...