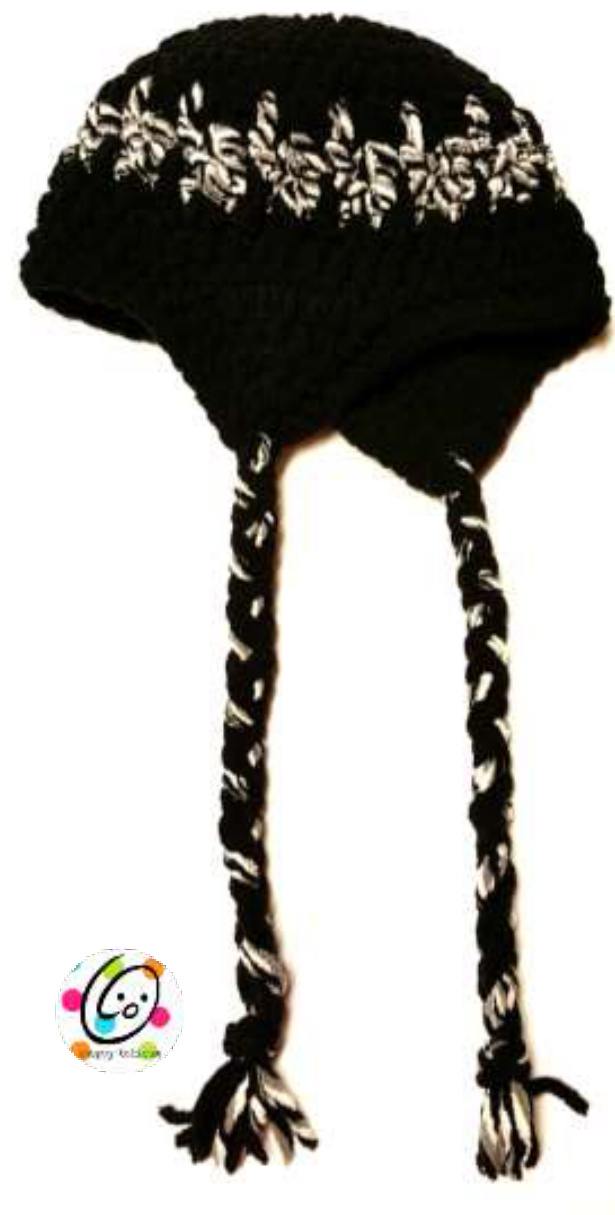
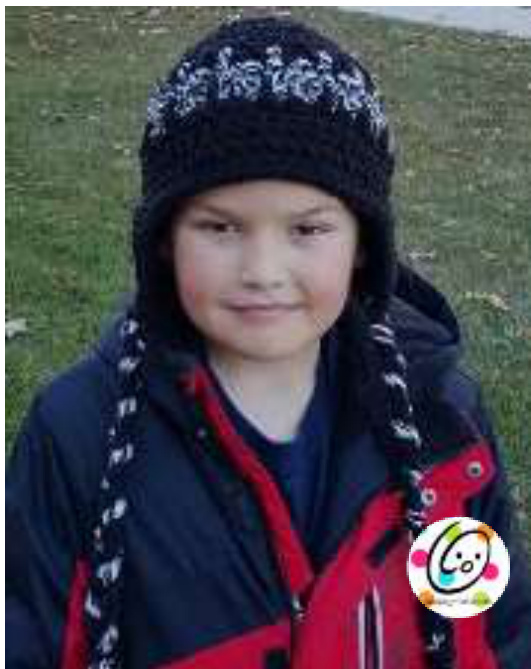
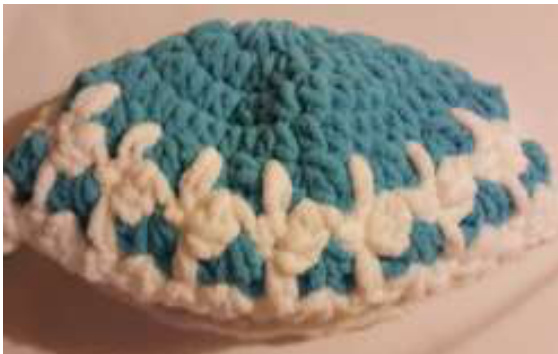
Hayden's Boarder Beanie
Materials
Yarn: Bernat Baby Blanket Yarn in two colors (150 yards total). Substituting Yarn: Other super bulky weight yarns may be used, but be aware it may affect finished size. Check gauge. \~ Check yarn labels when buying Bernat Blanket Yarn. There is a difference between Bernat BABY Blanket and Bernat Blanket yarns. They both are labeled size 6 yarn, but baby is a little lighter weight. Crochet Hook: K, N (optional) Miscellaneous: yarn needle Gauge: 4" = 9.5 hdc and 5.25 rows Sizes: small child to adult Special Stitch: Long double crochet (LDC) YO, insert hook in designated stitch, pull up a loop so it is the height of current row, YO and pull through 2 loops on hook, YO and pull through 2 loops on hook.
Tips For All Sizes
Beginning chain is NOT counted as a stitch. Sl st in first st of round to join. Change colors as desired. For a loose fitting beanie, use an N hook
Directions: Child (4-8)
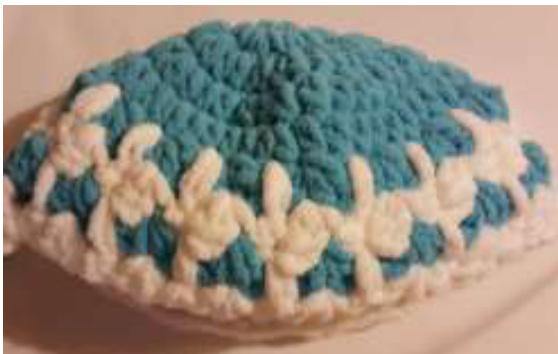
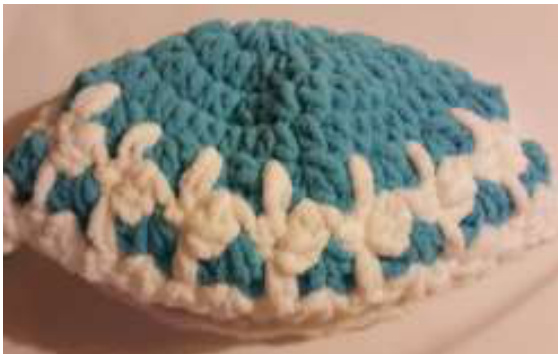
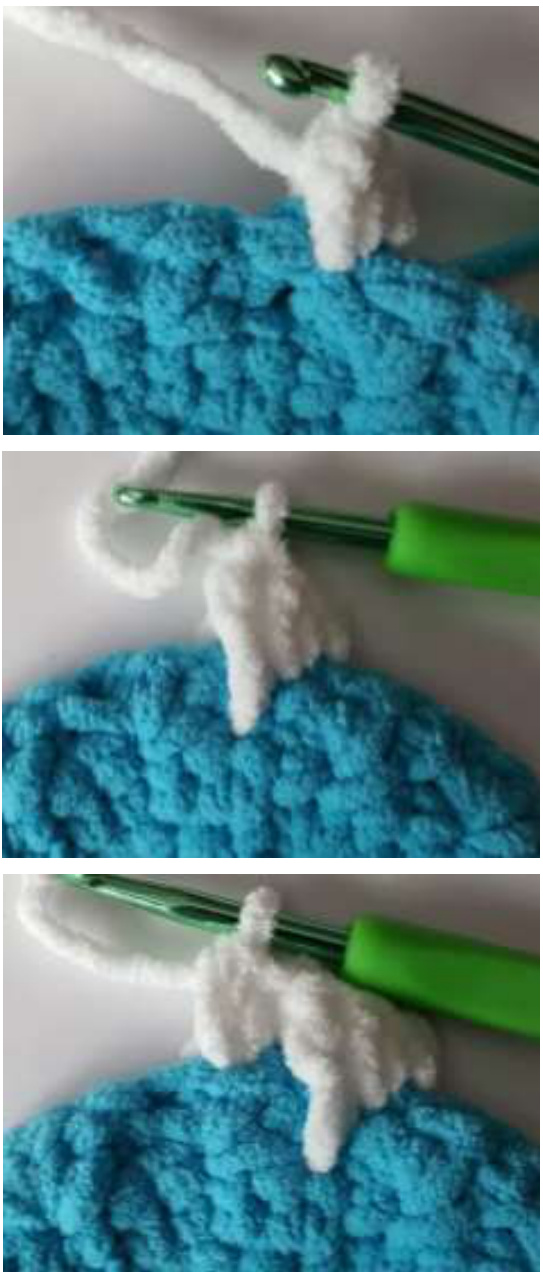
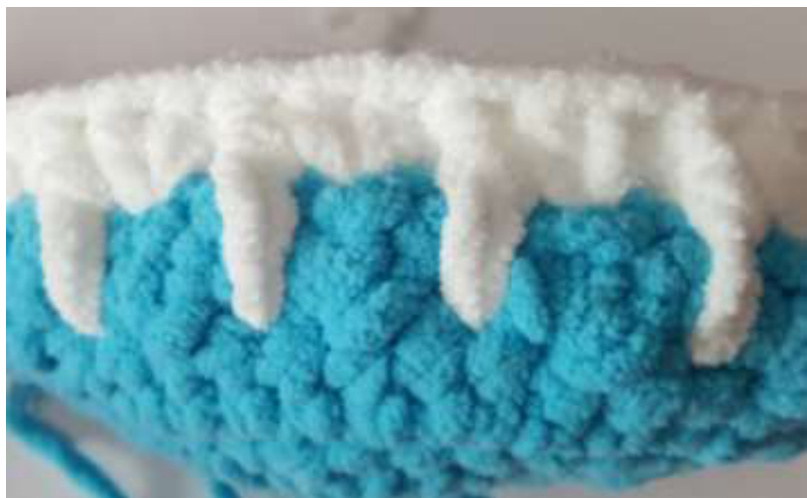
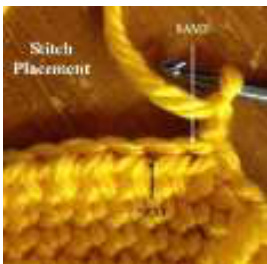
1. With K hook, start with a magic circle of 8 sts (or preferred method for starting a circle of 8 sc sts), pull closed and sl st to join. (8sts) 2. Ch 1, 2 sc in each stitch to end of round, sl st to join. (16sts) 3. Ch 2, 2 hdc in each st to end of round, sl st to join. (32sts) 4. Ch 2, \*hdc 3, 2 hdc in next st\*, repeat to end of round, sl st to join. (40sts) 5" across 5. Ch 2, hdc in each st to end of round, sl st to join. 6. Ch 1, (sc, hdc, dc) in same st as chain, sk 2, \*(sc, hdc, dc) in next st, sk 2\*, repeat to end of round, sl st to join. 7. Note: See tutorial for this step at end of pattern. Ch 1, turn, (sc, hdc) in same st as chain, LDC in 2nd skipped st from previous round, sk 1, \*(sc, hdc) in next st, LDC in 2nd skipped st from previous round, sk 1\*, repeat to end of round, sl st to join. 8-11. Repeat steps 6-7, turning at the beginning of each round. Photo at right is after round #10. 12. Ch 2, hdc in each st to end of round, sl st to join. Options: for a regular beanie (non-earflap version), repeat step 12 two more times, or until hat is desired length, finish off and weave in ends.
For earflap version, continue to step 13. 13. It is a good idea to check the length at this point. Lay the hat on a flat surface and measure from top to bottom (current spot). It should be approximately 2"shorter than desired length (check size chart at end of pattern if needed). Two more rounds will be added after the earflaps are made. If more length is needed, add before continuing. This step starts the first earflap. Ch 1, sc 8. (8sts) 14.Ch 2, turn, hdc2tog, hdc 4, hdc2tog. (6sts) 15. Ch 2, turn, hdc2tog, hdc 2, hdc2tog. (4sts) 16. Ch 2, turn, hdc2tog, hdc2tog. (2sts) Finish off and weave in ends. Fold hat in half to find placement for 2nd earflap. It can start exactly across from the first flap OR over 1" to create a larger opening across the front of the hat. Starting on the RS of the hat, attach yarn and repeat steps 14-18, but do not finish off when complete. 17-18. Ch 1, sc around bottom edge of hat (including earflaps), working 2sc in each earflap tip, SI st to join. Finish off and weave in ends. Braids: Cut 4 strands of main color (black in sample) and 2 strands of contrast (variegated in sample), 20" long or desired length. Use a yarn needle or crochet hook to pull ends through tip of one flap. Pullthrough until even with other ends. Divide strands in three sections, either mixing colors or grouping by color. Braid the strands. Tie a knot in the braid, approximately 1.5" from end. Repeat for other side.
Directions: Large Child (10-12) -Small Adult
1. With K hook, start with a magic circle of 8 sts (or preferred method for starting a circle of 8 sc sts), pull closed and sl st to join. (8sts) 2. Ch 1, 2 sc in each stitch to end of round, sl st to join. (16sts) 3. Ch 2, 2 hdc in each st to end of round, sl st to join. (32sts) 4. Ch 2, \*hdc 3, 2 hdc in next st\*, repeat to end of round, sl st to join. (40sts) 5" across 5. Ch 2, \*hdc 4, 2 hdc in next st\*, repeat to end of round, sl st to join. (48sts) 6.25" across 6. Ch 2, hdc in each st to end of round, sl st to join. 7. Ch 1, (sc, hdc, dc) in same st as chain, sk 2, \*(sc, hdc, dc) in next st, sk 2\*, repeat to end of round, sl st to join. 8. Note: See tutorial for this step at end of pattern. Ch 1, turn, (sc, hdc) in same st as chain, LDC in 2nd skipped st from previous round, sk 1, \*(sc, hdc) in next st, LDC in 2nd skipped st from previous round, sk 1\*, repeat to end of round, sl st to join. 9-12. Repeat steps 7-8, turning at the beginning of each round. Photo at right is after round #10. 13. Ch 2, hdc in each st to end of round, sl st to join. Options: for a regular beanie (non-earflap version), repeat step 13 two more times, or until hat is desired length, finish off and weave in ends.
For earflap version, continue to step 14. 14. It is a good idea to check the length at this point. Lay the hat on a flat surface and measure from top to bottom (current spot). It should be approximately 2"shorter than desired length (check size chart at end of pattern if needed). Two more rounds will be added after the earflaps are made. If more length is needed, add before continuing. This step starts the first earflap. Ch 1, sc 10. (10sts) 15. Ch 2, turn, hdc2tog, hdc 6, hdc2tog. (8sts) 16. Ch 2, turn, hdc2tog, hdc 4, hdc2tog. (6sts) 17. Ch 2, turn, hdc2tog, hdc 2, hdc2tog. (4sts) 18. Ch 2, turn, hdc2tog, hdc2tog. (2sts) Finish off and weave in ends. Fold hat in half to find placement for 2nd earflap. It can start exactly across from the first flap OR over 1”" to create a larger opening across the front of the hat. Starting on the RS of the hat, attach yarn and repeat steps 14-18, but do not finish off when complete. 19-20. Ch 1, sc around bottom edge of hat (including earflaps), working 2sc in each earflap tip, sl st to join. Finish off and weave in ends. Braids: Cut 4 strands of main color (black in sample) and 2 strands of contrast (variegated in sample), 22" long or desired length. Use a yarn needle or crochet hook to pull ends through tip of one flap. Pull through until even with other ends. Divide strands in three sections, either mixing colors or grouping by color. Braid the strands. Tie a knot in the braid, approximately 1.5" from end. Repeat for other side.
Directions: Adult
1. With K hook, start with a magic circle of 8 sts (or preferred method for starting a circle of 8 sc sts), pull closed and sl st to join. (8sts) 2. Ch 1, 2 sc in each stitch to end of round, sl st to join. (16sts) 3. Ch 2, 2 hdc in each st to end of round, sl st to join. (32sts) 4. Ch 2, \*hdc 3, 2 hdc in next st\*, repeat to end of round, sl st to join. (40sts) 5" across 5. Ch 2, \*hdc 4, 2 hdc in next st\*, repeat to end of round, sl st to join. (48sts) 6.25" across 6. Ch 2, \*hdc 11, 2 hdc in next st\*, repeat to end of round, sl st to join. (52sts) 7.25" across 7. Ch 1, (sc, hdc, dc) in same st as chain, sk 2, \*(sc, hdc, dc) in next st, sk 2\*, repeat to end of round, sl st to join. 8. Note: See tutorial for this step at end of pattern. Ch 1, turn, (sc, hdc) in same st as chain, LDC in 2nd skipped st from previous round, sk 1, \*(sc, hdc) in next st, LDC in 2nd skipped st from previous round, sk 1\*, repeat to end of round, sl st to join. 9-12. Repeat steps 7-8, turning at the beginning of each round. Photo at right is after round #10. 13. Ch 1, (sc, hdc, dc) in same st as chain, sk 2, \*(sc, hdc, dc) in next st, sk 2\*, repeat to end of round, sl st to join.
14. Ch 2, hdc in each st to end of round, sl st to join. Options: for a regular beanie (non-earflap version), repeat step 14 two more times, or until hat is desired length, finish off and weave in ends. For earflap version, continue to step 15. 15. It is a good idea to check the length at this point. Lay the hat on a flat surface and measure from top to bottom (current spot). It should be approximately 2"shorter than desired length (check size chart at end of pattern if needed). Two more rounds will be added after the earflaps are made. If more length is needed, add before continuing. This step starts the first earflap. Ch 1, sc 10. (10sts) 16. Ch 2, turn, hdc2tog, hdc 6, hdc2tog. (8sts) 17. Ch 2, turn, hdc2tog, hdc 4, hdc2tog. (6sts) 18. Ch 2, turn, hdc2tog, hdc 2, hdc2tog. (4sts) 19. Ch 2, turn, hdc2tog, hdc2tog. (2sts) Finish off and weave in ends. Fold hat in half to find placement for 2nd earflap. It can start exactly across from the first flap OR over 1" to create a larger opening across the front of the hat. Starting on the RS of the hat, attach yarn and repeat steps 14-18, but do not finish off when complete. 19-20. Ch 1, sc around bottom edge of hat (including earflaps), working 2sc in each earflap tip, SI st to join. Finish off and weave in ends. Braids: Cut 4 strands of main color (black in sample) and 2 strands of contrast (variegated in sample), 22" long or desired length. Use a yarn needle or crochet hook to pull ends through tip of one flap. Pullthrough until even with other ends. Divide strands in three sections, either mixing colors or grouping by color. Braid the strands. Tie a knot in the braid, approximately 1.5" from end. Repeat for other side. Ch 1, turn, (sc, hdc) in same st as chain, LDC in 1st skipped st from previous round, sk 1, \*(sc, hdc) in next st,
LDC in 1st skipped st from previous round, sk 1\*, repeat to end of round, sl st to join.
| CommonCrochetAbbreviations | |
| Ch - chain | Sc2tog-decrease,single crochet 2 sts together |
| St - stitch | Dc2tog - decrease, double crochet 2 sts together |
| Sp - space; sps-spaces | Fp -front post |
| Sc - single crochet | Bp - back post |
| Hdc-half doublecrochet | Fpdc-front post double crochet |
| Dc - double crochet | Bpdc-backpost doublecrochet |
| Beg - beginning | BLO-back loop only |
| Sl st - slip stitch | FLO-front loop only |
| Yo - yarn over | ** - repeat instructions between, as many times as indi- cated |
If you have any questions, comments or suggestions please email heidi@snappy-tots.com. Items made from Snappy Tots' patterns MAY be sold. Please include a link to snappy-tots.com if selling online. Please do not use any photos or text from this pattern online or elsewhere without written consent from Heidi Yates. This pattern is copyrighted to snappytots and may not be copied for resale in part or whole. It is illegal to post this pattern online or share with others without written consent from Heidi Yates. Please be aware the lengths in the chart below are a little longer than some prefer their hats.
| HEADANDHATSIZECHART new babies to adult men prefer to make hats approximately1"smaller than thehead circumference so theywill stretch and not be too big.Note:All measurements are approximate and based on“averagehead sizes according to several online sources.Hatheight”is the measurement from top of crown to |
| bottom edge. Brand new babies |
| Head Circ:12"-13"Hat Circ:11-12"Hat Height:5"-5.5" Newborn |
| Head Circ:13"-14"Hat Circ:11.5"-13"Hat Height:5.5”to6" Baby-3to 6months Head Circ: 14"-17"Hat Circ: 13"-16"Hat Height:6.5" |
| Baby-6 to12months |
| Head Circ:16"-19"Hat Circ:15"-18"Hat Height:7" Toddler (1-3years) |
| Head Circ:18"-20" Hat Circ: 17”-19"Hat Height:7.5" |
| Child (3-10 years) Head Circ:19"-20.5"Hat Circ:18"-19.5"Hat Height:8" |
| Preteen/Teen |
| Head Circ:20.5"-22"Hat Circ:19.5"-21"Hat Height:8.5" Adult Woman |
| Head Circ:21.5"-22.5"Hat Circ:20.5"-21.5"Hat Height:9" Aduit Man Head Circ:23"-24"Hat Circ:22"-23"HatHeight:10" Snappy-tots.com |
Visit Snappy Tots online for giveaways,newrelease announcements, events and fun. Facebook: http://www.facebook.com/snappytots Pinterest: http://www.pinterest.com/snappytots Blog: http://snappy-tots.com Instagram: http://www.instagram.com/snappytots Twitter: http://www.twitter.com/snappytots Shop: http://shop.snappy-tots.com


