Lam6's Ears, A Knit Houseplant by Karen Fenlason
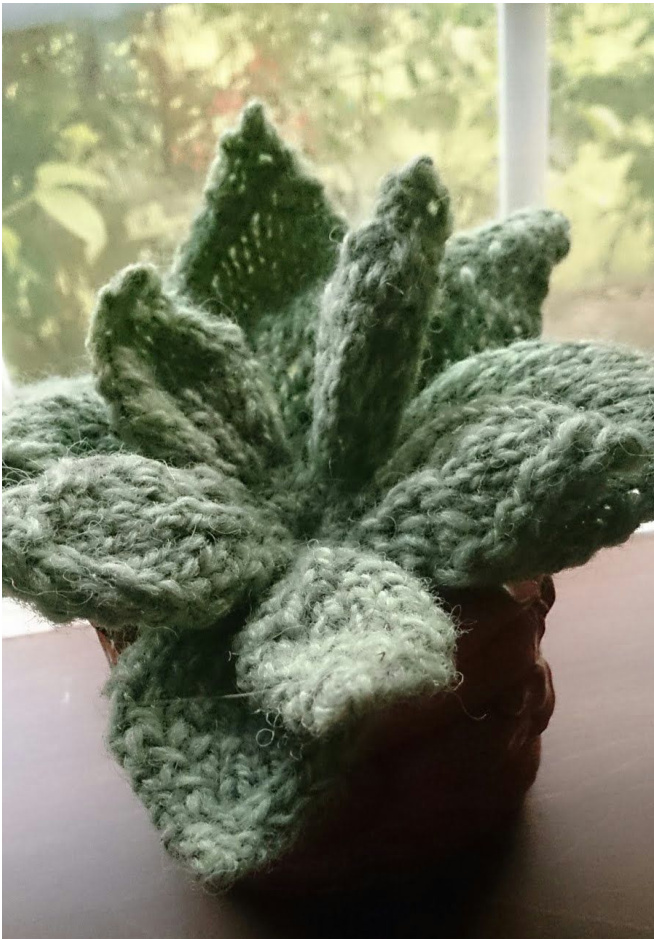
Even people with a green thumb can use a houseplant that doesn't need much care. This knitted plant needs almost none. The most you have to do to your knitted houseplant is find it a pretty pot to live in and shake the dust off of it once in a while. My small plant lives in a coiled clay pot my kid made in 2nd grade. This quick and easy project is perfect to take along and knit on the go. Like socks, it isn't big and heavy and is good to knit in the summer time. You can use up small bits of yarn, as long as the yarn is green. Even yarn that isn't green isn't too big a problem. I knit my houseplant out of ancient beige and blue marled rag wool. The label on the yarn is from a department store that went out of business 30 years ago. I dyed the finished plant in food coloring. Since you aren't going to be wearing the project, you can color it with food coloring and not worry about the colors running. The basic unit of the plant is either single leaves or rosettes of leaves. Both single leaves and rosettes are made of small, medium, and large leaves. There are lots of ends to deal with, but this is a good thing, because the ends become the plant roots. Guage is not important. You can use pretty much any wool yarn you like. I wouldn't use cotton or acrylic, but I wouldn't rule it out. I recommend using double pointed needles that are a bit too small for the yarn you are using so the leaf is nice and dense and has some structure. You also need a tapestry needle. You might need green food coloring and a measuringcup.
Small leaf:
Cast on 5 stitches. Knit an inch of I-Cord. Knit across the five stitches. Don't turn the work. Slide the work back to the right side of the needle. Bring the yarn behind the work from the left side to the right and knit across the row. Repeat until you have an inch. If you tug on the I-Cord, the gap where you brought the yarn around the back of the work should close up. Bring the yarn from the left of the work, behind to the right again. From now on you will be knitting the leaf body flat. For the body of the leaf: Cut the yarn leaving about 10 inches of tail and pull the yarn through the remaining stitch fastening it off. Thread a tapestry needle onto the 10 inch tail of yarn and weave it down along one side of the leaf until you reach the place where the leaf meets the stem. Thread the end down through the center of the I-Cord stem and out the bottom. Un-thread your needle and leave the tail dangling. Make five small leaves, although really, you can make as many as you want.
Medium Leaf
To knit a medium sized leaf, follow the instructions for knitting the stem of the leaf. For the body of the leaf: 1. K2, YO, K1, YO, K2 2. Purl 3. K3, YO, K1, YO, K3 4. Purl 5. K4, YO, K1, YO, K4 6. Purl 7. K5, YO, K1, YO, K5 8. Purl 9. K6, YO, K1, YO, K6 10. Purl 11. SSK, K11, K2tog 12. Purl 13. SSK, K9, K2tog 14. Purl 15. SSK, K7, K2tog 16. Purl 17. SSK, K5, K2tog 18. Purl 19. SSK, K3, K2tog 20. Purl 21. SSK, K1, K2tog 22. Purl 23. Make a centered double decreas Cut the yarn leaving about 10 inches of tail and pull the yarn through the remaining stitch fastening it off. Thread a tapestry needle onto the 10 inch tail of yarn and weave it down along one side of the leaf until you reach the place where the leaf meets the stem. Thread the end down through the center of the I-Cord stem and out the bottom. Un-thread your needle and leave the tail dangling. Make five medium leaves, or as many as you want.
Large Leaf
To knit a large sized leaf, follow the instructions for knitting the I-Cord stem of the leaf. For the body of the leaf: 1. K2, YO, K1, YO, K2 2. Purl 3. K3, YO, K1, YO, K3 4. Purl 5. K4, YO, K1, YO, K4 6. Purl 7. K5, YO, K1, YO, K5 8. Purl 9. K6, YO, K1, YO, K6 10. Purl 11. K7, YO, K1, YO, K7 12. Purl 13. K8, YO, K1, YO, K8 14. Purl 15. SSK, K17, K2Tog 16. Purl 17 SSK, K15, K2Tog 18. Purl 19. SSK, K13, K2Tog 20. Purl 21. SSK, K11, K2Tog 22. Purl 23. SSK, K9, K2Tog 24. Purl 25. SSK, K7, K2tog 26. Purl 27. SSK, K5, K2tog 28. Purl 29. SSK, K3, K2tog 30. Purl 31. SSK, K1, K2tog 32. Purl 33. Make a centered dot Cut the yarn leaving about 10 inches of tail and pull the yarn through the remaining stitch fastening it off. Thread a tapestry needle onto the 10 inch tail of yarn and weave the tail down along one side of the leaf until you reach the place where the leaf meets the stem. Thread the end down through the center of the I-Cord stem and out the bottom. Un-thread your needle and leave the tail dangling. Make five large leaves, or as many as you want.
Making a Rosette:
Cast on 15 stitches and knit four or six rows of stockinette stitch. In the first three stitches of the rosette, work K1, YO, K1, YO, K1. Leave the rest of the stitches on the left needle. Turn the work and purl back the stitches you just worked. Follow the directions for working a single leaf on the first stitches. After you break of your tail of yarn, rejoin the yarn and work in the next three stitches of the rosette. Continue working leaves until you have five. Weave the ends of yarn down the work until they dangle out the bottom. To finish the rosette, sew the edges of the rosette base into a tube.
Assembling a Plant From Single Leaves:
Gather together your small leaves and make a bouquet with them. Take a piece of scrap yarn and wind it around the base of your bouquet and tie it off. Arrange your medium sized leaves around your small leaves and tie them off · Place the large leaves around the bundle of small and medium leaves and tie them off.
Assembling a Plant From Rosettes:
Take your small rosette and thread the roots through the tube of the medium sized rosette. Take the roots from the small and medium sized rosettes and thread them through the tube of the large rosette. · Secure the rosettes together by taking one of the root strings and sewing through the base of the plant.
Making a Smaller Plant:
make a smaller plant by using only small leaves or small and medium leaves
Caring for Your Plant:
You now have a plant with a leafy top and a bunch of roots at the bottom. Find a flower pot or teacup, or anything that appeals to you. The pot doesn't need a drainage hole, but it also doesn't need to hold water, so you could use anything that strikes your fancy. Arrange the leaves in a natural way Take your plant out of the pot and shake it when it looks dusty.
Alternate Leaves:
Leaves come in many different shapes and sizes. To make a serrated edge leaf, cast on one stitch at the beginning of every knit and every purl row using a cable cast on or backward loop. Immediately cast the stitch back off and continue with the leaf pattern. To make a rounded leaf follow the directions for a small, medium or large leaf up to the point where it is time to narrow the leaf. Decrease on both the knit and the purl row and then finish the leaf as usual. To make a longer leaf, add rows of plain stockinette between the increase rows and the decrease rows of the leaf. · To make a smoother leaf without YO holes, substitute a M1 for the YO. ·To make even bigger leaves, knit three or four more increase rows. Really big leaves get a bit floppy. You can make your plant bigger by adding a layer of even bigger leaves, or putting two or three plants into a pot.
Making a flower:
You can also decorate your plant with flowers. To make a flower, cast on 6 stitches and knit three rows of I-Cord. Bring the yarn around behind from the left to the right side of the work. 1. Knit into the front, then back, then front of the first stitch. Leave the remaining stitches on the left needle. 2. Bring the yarn around behind to the right side like making I-Cord and knit the three stitches. 3. Bring the yarn around again and knit the three stitches again. 4. Bring the yarn around behind one more time and K3Tog. 5. Knit the next stitch and bind off the previous stitch. 6. Repeat steps 1 through 5 on the remaining 5 stitches. 7. When you finish the sixth petal, break the yarn and pull the end through the last loop. 8. Thread a tapestry needle with the end and fasten it off. 9. Sew the flower onto your plant.
Dying your plant:
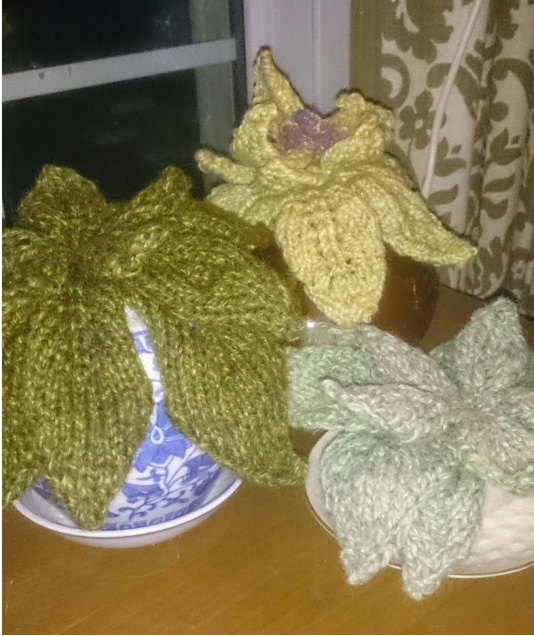
If you use yarn that isn't green, you might want to make a test leaf and dye it to see if you like the result. Lighter natural colored yarns, or yarns with light blue or yellow will work better than say, orange purple or red. For my houseplant I wanted something you had to look more closely at to figure out. From a distance, I wanted it to look almost like a real plant. A technicolor plant could look fabulous too though. · Put 2 or so cups of boiling water in a measuring cup or sauce pan. Drop in some green food coloring, or blue and yellow mixed. I like to make the color quite saturated. Wiltons paste dyes are good because they come in so many different colors, but easter egg dye will work fine. ·Turn your plant foliage side down and dip it in the colored water. I try not to dip the roots. Wait until the water is cool and take out your plant. Squeeze out the liquid and let your plant dry upside down over the sink, not over a nice white towel... not that I learned that the hard way... nope... When your plant is damp, arrange the leaves in a natural way. Keep in mind that on real plants, leaves curve and curl, so perfectly flat leaves look odd. If the color isn't dark enough, you can dye the plant again with even more food coloring. The bigger plant on the left is make of the same beige rag yarn as the one on the lower right. I used different concentrations and shades of food coloring. The bigger plant is dyed with an avocado color, and the smaller is dyed with easter egg dye. The plant in the upper right is knit out of light yellowish green handspun.