Murrell's Row
By Ouisi Hamilton for Chattanooga Yarncrafters Contact on Ravelry: OuisiH
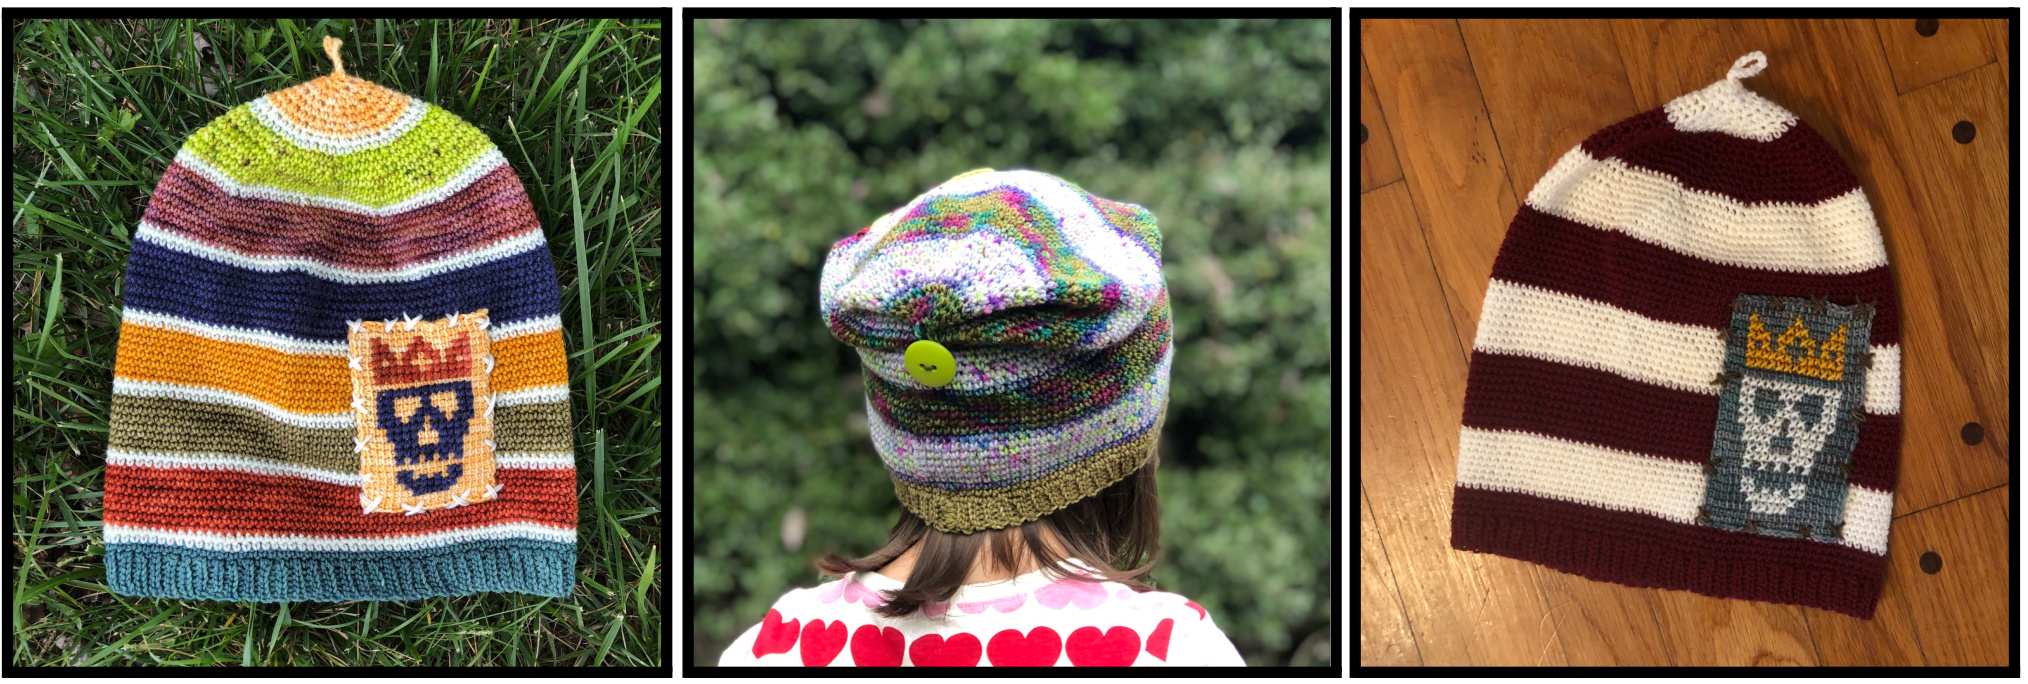
John Murrell was a land pirate from the small Cumberland town of Pikeville, Tennessee, whose crew of highwaymen terrorized southern Appalachia in the early 19th century. So murderous and thieving were they, that Atlanta's 19th-century red-light district was named Murrel's Row. This pirate king-inspired striped hat features a crowned skull motif cross-stitched over a Tunisian patch, and an extended crown folded over and secured with a button. Tips are included for color arrangement and modifications. Chattanooga Yarncrafters is an inclusive social stitching group based in the Tennessee Valley. Patterns released for Chattanooga Yarncrafters are designed to educate and engage while celebrating Southern Appalachia, past and present.
Skill Level
Adventurous beginner crocheters who are comfortable counting their stitches and learning new techniques Sizes Child (Teen/Adult, Adult Large),to fit head circumference 18-20"/46-51cm (21-22"/53-56cm, 23-24"/58-61cm)
Finished Measurements
Circumference: 18"/46cm (20"/51cm, 22"/56cm) Height (unfolded): 10.5"/26.5cm (11.5"/29.25cm, 13"/33cm) Height (folded): 7.25"/18.5cm (8"/20.5cm, 8.75"/22cm) Gauge 22 stitches and 24 rows over 4"/10cm in sc with larger hook
Materials
Yarn: Fingering weight/sock yarn, 260yds/240m (350yds/320m, 430yds/400m) total 30yds/25m for patch Pinstripe option: 70yds/65m (8oyds/75m, 90yds) $\mathrm{^{85m}}$ single color for pinstripes Stripes x8: 20yds/19m (30yds/28m,40yds/37m) each for option with pinstripes Stripes x8: 30yds/27m (40yds/37m, 50yds/47m) each for option without pinstripes
Hooks:
$3{\cdot}5\mathrm{mm/E}$ or size required to meet gauge, for hat body 2.5mm or 2.75mm/C Tunisian or standard non-ergonomic hook for patch
Notions:
One 1.25"/32mm button Stainless steel T-pins or quilting pins Yarn needle and scissors or snips
Abbreviations
blo back loop only ch chain sl st slip stitch dec decrease SC single crochet
Special Techniques
Tunisian simple stitch Cross-stitch on Tunisian simple stitch Slip stitch ribbing Standing single crochet Invisible join See last page for suggested tutorials
Notes
If you don't have a Tunisian hook, the patch can be worked with a standard crochet hook (with a straight shaft; no enlarged handle, but a flattened thumb rest is acceptable). Ergonomic hooks with wide handles cannot be used for this. When finishing a round that will be followed bya round of the same color, sl st to join and chi to begin the next round. When finishing the last round in a particular color, use an invisible join and then begin the next round with a standing single crochet in the new color. Allthreehat sizehaveigt stripThhatbandcts as strihdiffet higts thhat sizes are achivdbyworking t stripesthicker as the sizeinrease. orthe pinstrie ption tripes are6 7,rouds and pinstripes are 2oundsFrthoptn without pinstripes, work 8 (9, 10) rounds in each stripe color.
Yarn Selection Tips
Thisis a great scrap yarn projct, but you can also buy yarn in small quantities to make up some or all of the colors. Do not mix superwash yarns and non-superwash yarns, but for this project, it's okay to mix plied yarns with single-ply yarns. Check the yardage vs. weight on the ball band or measure the wraps per inch to see if the yarns are similar in thickness; some products are marked fingering or sock yarn but are much finer or much puffier than standard. Non-superwash yarn willfelt if treated roughlyDo not attmpt tmachine wash or dry non-superwash prjects uperwah ya strethesutw soakdlinfusinuewah, thnaft presing hewaeut andin thhatwel utht through a machine dryer on low heat for a few minutes until the hat is barely damp and has returned to its original shape. Recommended yarns that come in minis: Holly Dyeworks: Mini Skein Sets Emma's Yarn: Practically Perfect Sock Smalls Kim Dyes Yarn: Sourdough Sock Half Skeins Kelbourne Woolens Perennial Madeline Tosh: Tosh Merino Light Unicorn Tails Knit Picks Stroll Mini Packs
Color Arrangement Tips
The patch and pinstripes need high contrast with the other yarns. Select semi-solids that are either very dark or very light. The more uniform the color, the better. If the shade changes alot within the yarn, there willbe areas where the pinstripes and the skull mtif disappear when the shade comes tooclose to the shade of the other yarn. Put your yarns on a table and step back a fewfeet. Which ones pop the most? Which ones provide the most dramatic depth? Take a picture and desaturate it. Which grays look the same? Arrange your selected stripe yarns tolook for an even color balance. Can you make one group of dark and one of light? One of greens and yellws and one of blues and purples? One of speckles and one of solid? Once you've got two distinct groups, aternate one yarn from each group to see how the stripes look in order. Is there too much visual "weight” grouped together in one part of the hat? Rearrange the stripes until they look balanced.
Stripe Customization Tips
Toadapt thti thn rfstipcallatwstiarrangnt hatadsutthird tta at ighto the hatbandas4roudTrytoavoideduing thtotal hatheight bymore thanacoule of roudsheheight careasedby to 10 rounds to accommodate stripe adjustments;the folded portion willbe longer, so the button willned to be placed lower. To alter the hat from a folded-over stocking cap into a tailored beanie fit, reduce the total height to match the folded-over height in the Finished Hat Size description. Both the stocking and beanie style use the same number of crown rounds. Rounds required for crown: 18 (20, 22) Total rounds in pinstripe hat: 62 (7o, 78) Total rounds, no-pinstripe: 64 (72, 80) Total beanie rounds: 44 (48, 52)
Instructions
Hatband: With 3.75mm hook and first stripe color, ch6. Ribbing row: ch 1 to turn. sl st blo across row (6 sts). Repeat ribbing row until you have worked 120 (132, 144) rows: 60 (66, 72) ribbing columns. Sl st the last row to the cast-on row, working through the entire stitch. Do not break yarn.
Hat Body Transition:
Working around circumference of hatband, ch1, \*[sc into ribbing column, sc into channel between columns] twice, sc into ribbing column, skip channel. Repeat from \* around, working 5 sc for every 6 hatband rows. sl st to first sc. 100 (110, 120) sts.
Hat Body (Pinstripe Option):
Work1 (2 3) more rouds in first stripe color. Cut yarn and work an invisible join.These rounds plus thehatband count as the first stripe. Following the patets andseparating allstripes with tw-roud pinstripe, work formore stripe, each6 , rouds deep: ive stripes total. Sixth stripe: work the first 4 (5, 6) rounds as normal, then move on to hat crown instructions. Continue the stripe and pinstripe sequence and joining instructions throughout the crown.
Hat Body (Without Pinstripes):
Work 3 (4,5more rounds infirst strpe color Cut yarn and work an invisible jin.These rounds plus thehatband count as thefirst stripe. Following the pattern notes, work four more stripes, each 8 (9, 10) rounds deep: Five stripes total. Sixth stripe: work the first 6 (7, 8) rounds as normal, then move on to hat crown instructions. Continue the stripe sequence and joining instructions throughout the crown. Hat crown Size Adult XL only: Round 1: [sc in the next 10 sts, dec] around (110 sts). Round 2: sc around. Sizes Teen/Adult and Adult XL: Round 1: [sc in the next 9 sts, dec] around (1o0 sts). Round 2: sc around. All sizes: Round 1: [sc in next 8 sts, dec] around (90 sts). Round 2 and following even-numbered rounds: sc around. Round 3: [sc in next 7 sts, dec] around (80 sts). Round 5: [sc in next 6 sts, dec] around (70 sts). Round 7: [sc in next 5 sts, dec] around (6o sts). Round 9: [sc in next 4 sts, dec] around (50 sts). Round 11: [sc in next 3 sts, dec] around (40 sts). Round 13: [sc in next 2 sts, dec] around (30 sts). Round 15: [sc, dec] around (20 sts). Round 17: dec around (10 sts). Create button loop Round :d, d, sc, ch, sts, stbmloopfxtchsts , d, d6sts)ekya, fastf, anet close hole at top of crown. You can adapt thebutton loopfora different-sized buttonby increasing or decreasing the number ofskipped stitches. Try thebutton loop over your selected button as you work it.
Finishing:
Weave in ends. Soak hat in water for 2o minutes, then pres water out and rllin a hand towel to remove more excess water. Lay on a clean surface and gently smooth it flat. Leave it until it is completely dry. To place button in correct location, fold hat to 7.25"/18.5cm (8" /20.5cm, 8.75"/22cm) high. Use scrap yarn to attach the button to the center back. Weave in ends. Patch: With smaller hook and selected patch color, ch19. First row Outward pass: working into bottom loop of chain stitches, pick up a loop in each stitch (2o loops on hook). Return pass: ch1, then Lyarn over, draw through two loops] across (19 sts). Secondrow Outward pass: skip the first vertical bar at the beginning of the row. Insert hook into next vertical bar and draw up a loop. Continue drawing up a loop in each vertical bar across the row (2o loops on hook). Work a return pass to complete the row. Repeat the second row instructions until you have 26 rows. Work a bind-off row by drawing up a loop in the second vertical bar from the hook and pulling it through the loop already on the hook. Repeat in each vertical bar across the row. Break yarn and fasten off. Weave in ends and block the patch. Soak the patch in water for 20 minutes, then pressthe water out and roll in a hand towel to remove more excess water. Lay a clean washcloth onto a surface that you can stick pins into, such as a matress, carpet, foam blocking tile, or folded bath towel. Smooth the patch out on top of the washcloth. Use the pins to keep the patch's edges square and prevent them from rolling. Allow to dry completely.
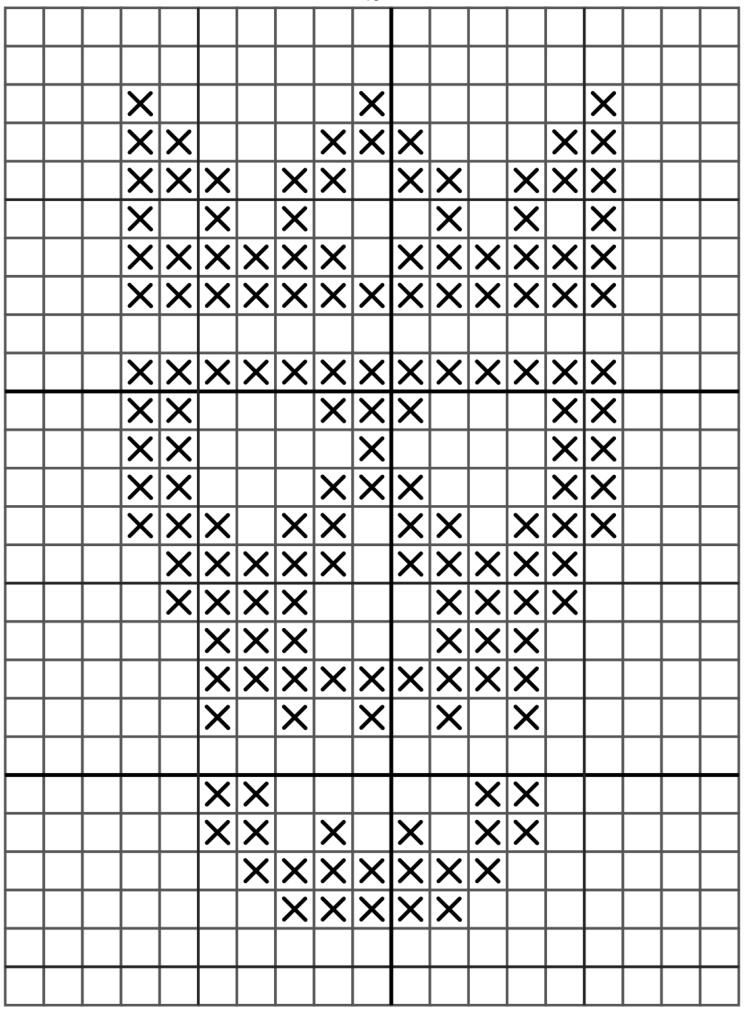
Patch motif:
Cut apiof themtif olrasnasouram.Withaa edning at thtpt,wrk crostthnt tht sth indicatedin thechart. Continue downthis colun of stitches. At thebottom ofthe chart, reverse direction and work back upthe ext column. Repeat across all columns of the motif, cutting more yarn as needed. Weave in ends.
Attach patch to hat:
Fold hat in half so crease falls at center front and center back. Align patch 6 (8, 10) sts infrom the center front. Hold your selected color doubled. Work large cross-stitches at irregular intervals, keeping the edges of the patch aligned to a row/column of hat body stitches so that the patch stays square. On the reverse side, pass the yarn through the bottom loop of a hat body stitch between cross-stitches so that the float isn't long enough to snag. Weave in ends, jam hat onto your head, and go forth to waylay unwary travelers.
Suggested Tutorials for Special Techniques:
Tunisian simple stitch B.Hooked Crochet: How to Tunisian Simple Stitch (Tss) For Beginners https://bhookedcrochet.com/2016/09/16/tunisian-simple-stitch/ Cross-stitching on Tunisian simple stitch TL Yarn Crafts: How to Cross Stitch on Tunisian Crochet https: //www.youtube.com/watch?v=mekpdBoxlTw Slip stitch ribbing Marly Bird: How to Crochet Stretchy Slip Stitch Ribbing https: //www.youtube.com/watch?v=3XVQqDhSk1A Standing single crochet Edie Eckman: How to Work Standing Single Crochet https://www.youtube.com/watch?v=0xo8yzkhmBw Invisible join The Yarn Shelf: How to End with an Invisible Join in Crochet https: //youtu.be/PcMYhZVr MM?si=VDwMJrgFEr5ideXV