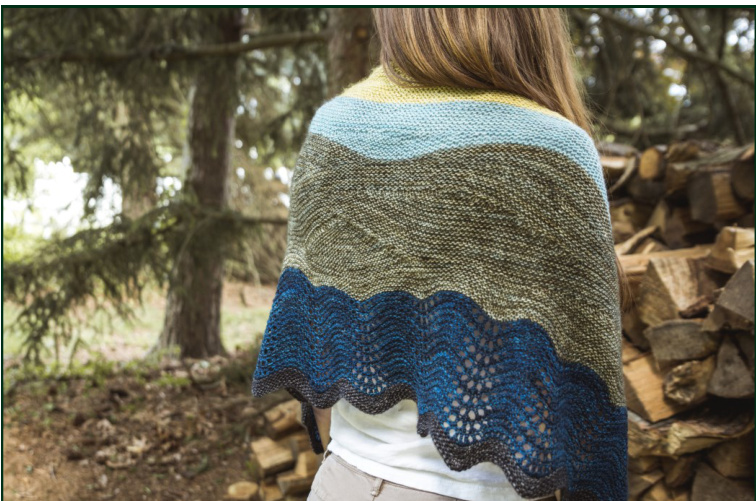
Photos by Jack Ciardullo @jackciardullo on Instagram A River Runs ThroughItiz afunto knit shawl that was inspired by the beautiful Hudson Valley, New York . Itza basic crescent shawl done in garter stitch with fun short row sectionz thrown into create shape within the color stripez that represent the sun, sky, mountains, rich earth, and, of course, the majestic Hudson River. The riwer is done in a feather andfanlaceto create waves and add softness to- the garter ridgez. YARN: I used the following yarn but you can use any fingering weight yarn in colors that say sun , sky, mountains, river, and rich earth to you. I thought of a summer day but imagine the fall sky and mountains or sunset colors, the moon? Sun: (A): Madeline Tosh Merino Light, Winter Wheat, approx. 40 yds. (10 gms.) Sky (B): Madeline Tosh Merino Light, Mica, approx. 80 yds. (20 gms). Mountains (C):Madeline Tosh Merino Light, Terrarium, approx. 255yds. (65 gms.) River (D): Madeline Tosh Merino Light, Deep, approx. 230 yds. (60 gms.) Earth (E): Madeline Tosh Merino Light, Thunderstorm, approx. 80 yds. (20 gms.) GAuGE: Gauge is not important as long as you like the fabric that you've created after blocking your swatch. I used a size 6, 32" circular to get 21 sts. x 50 rows = 10x1 0cm/4x4" in garterstitch after blocking.
ABBREVIATIONS:
K: Knit, P: Purl Y/O: yarn over, this is a 1 st increase. Bring yarn from back to front between the needles, bring yarn from front to back over the right hand needle, increasing 1 st. KFB: This is a 1 st increase. Knit into the front, then into the back of the following stitch Inc2: This is a 2 st increase. Knit into the front, then the back, then the front of the following stitch (3 stitches created) W/T: Wrap & Turn: Bring yarn to the front, slip one stitch from left hand needle to right, bring yarn to the back and slip stitch back to left hand needle. Turn work and bring yarn to the back (or the w/T method of your choice). PM: Place marker, SM: Slip marker K2tog: This is a 1 stitch decrease. Knit 2 stitches together NOtes: All rows will be worked repeating the following two basic rows. All Right Side Rows (RS): K2, Inc2, work to last 3 stitches, Inc2, K2 All Wrong Side Rows (wS): K2, Y/O, work to last 2 stitches, Y/O, K2 Short row sections will be added to the sky and mountains and a version of feather and fan lace will be used for the river but you will still follow the same beginning and end of each row. You don't need to hide wraps. Change colors Only on RS rows.
Sun
Using color A, long tail cast on 7 stitches. Set up row: K2, KFB 3 times, K2 (10 sts.)
Basic garter stitch rows (see notes)
Right Side Rows (RS): K2, Inc2, knit to last 3 stitches, Inc2, K2 Wrong Side Rows (ws): K2, Y/O, knit to last 2 stitches, Y/O, K2 Beginning with a ws row, repeat these two rows until you have 17 ridges, ending with a ws row. Cut color A, leaving a tail long enough to weave.
Sky
Attach color B. Repeat the two basic garter stitch rows (see Sun) until you have 10 ridges ending with a ws row. On the next row you will insert two short row sections, as follows: K2, Inc2, insert Sky Short Row Section 1, insert Sky short row Section 2, K to last 3 sts, Inc 2, K2.
| Sky Short RowSection 1 (RS)K45, W/T, (WS)K3, W/T (RS)K6, W/T, (WS)K9, W/T (RS)K12, W/T, (WS)K15, W/T (RS)K18, W/T, (WS)K21, W/T |
| SkyShort RowSection2 (RS)K75,W/T, (WS)K5, W/T (RS)K9, W/T, (WS)K12, W/T (RS)K15, W/T, (WS)K18, W/T (RS)K21, W/T, (WS)K24, W/T (RS)K27, W/T, (WS)K30, W/T |
Next row: (wS) K2, Y/O, knit to last 2 stitches, Y/O, K2 Cut color B, leaving a tail long enough to weave.
Mountains
| Mountains Short Row Section 1 (RS)K100, W/T, (WS)K50, W/T (RS)K48, W/T, (WS)K46, W/T (RS)K44, W/T, (WS)K42, W/T Continue to decrease 2 sts.per turn until you have worked a (ws)K2, w/T | Mountains Short Row Section 2 (RS)K100, W/T, (WS)K64, W/T (RS)K60, W/T, (WS)K56, W/T (RS)K52,W/T,(WS)K48,W/T Continue to decrease 4 sts. per turn until you have worked a (ws)k8, w/T | MountainsShortRow Section 3 (RS)K50,W/T,(WS)K45,W/T (RS)K40, W/T, (WS)K35, W/T (RS)K30,W/T,(WS)K25,W/T Continue to decrease 5 sts.per turn until you have worked a (ws)K5, w/T |
| Mountains Short Row Section 4 (RS)K40, W/T, (WS)K3, W/T (RS)K4, W/T, (WS)K5, W/T (RS)K6, W/T, (WS)K7,W/T Continue to increase 1 st per turn until you have worked a (ws)K35, w/T | Mountains Short Row Section5 (RS)K120, W/T, (WS)K7, W/T (RS)K10, W/T, (WS)K13, W/T (RS)K16, W/T, (WS)K19, W/T Continue to increase 3 st per turn until you have worked a (ws)K55, w/T | Mountains Short Row Section 6 (RS)K30, W/T, (WS)K5, W/T (RS)K7, W/T, (WS)K9, W/T (RS)K11, W/T, (WS)K13, W/T Continue to increase 2 st per turn until you have worked a (ws)K47, w/T Mountains Short Row |
| Mountains Short Row Section 7 (RS)K75,W/T, (WS)K5,W/T (RS)K7, W/T, (WS)K9, W/T (RS)K11, W/T, (WS)K13, W/T Continue to increase 2 st per turn until you have worked a (ws)K47,w/T | Mountains Short Row Section8 (RS)K80,W/T,(WS)K3,W/T (RS)K4, W/T, (WS)K5, W/T (RS)K6, W/T, (WS)K7, W/T Continue to increase 1 st per turn until you have worked a (ws)K35,w/T | Section 9 (RS)K95, W/T, (WS)K5, W/T (RS)K8, W/T, (WS)K11, W/T (RS)K14, W/T, (WS)K17, W/T Continue to increase 3 st per turn until you have worked a (ws)K53,w/T |
Attach color C. Repeat the two basic garter stitch rows inserting short row sections as follows: (RS)Row1: K2, Inc2, insert Mountains Short Row Section 1, insert Mountains Short Row Section 2, knit to last 3 sts, Inc 2, K2 (WS)Row 2: K2, Y/O, knit to last 2 stitches, Y/O, K2 (RS)Row 3: K2, Inc2, Insert Mountain Short Row Section 3, knit to last 3 sts, Inc2, K2 (WS)Row 4: K2, Y/O, knit to last 2 stitches, Y/O, K2 Rows 5 - 16: Repeat the two basic garter stitch rows (see Sun) until you have 6 more ridges, ending with a ws row. (RS)Row 17:K2,Inc2, insert Mountains Short Row Section 4, insert Mountains Short Row Section 5, knit to last 3 sts, Inc2, K2 (ws) Row 18: K2, Y/O, knit to last 2 stitches, Y/O, K2 Rows 19 - 30: Repeat the two basic garter stitch rows (see Sun) until you have 6 more ridges, ending with a ws row. (RS)Row 31: K2, Inc2, insert Mountains Short Row Section 6, insert Mountains Short Row Section 7, insert Mountains Short Row Section 8, Insert Mountains Short Row Section 9, knit to last 3 sts, Inc2, K2 (Ws)Row 32: K2, Y/O, knit to last 2 stitches, Y/O, K2 Rows 33 - 44: Repeat the two basic garter stitch rows (see Sun) until you have 6 more ridges, ending with a ws row. Cut color C, leaving a tail long enough to weave.
River
Attach color D. The feather and fan lace pattern is a multiple of 18 sts. At this point you should have 294 sts. If you are off, work 2 rows of basic garter st pattern, increasing or decreasing within the edge sts. to get to the correct nbr. (RS) Set up row:k2, Inc2, PM, knit to last 3 sts, PM, Inc2, K2 Beginning with Row 2 repeat the following 4 rows 9 times. At the same time, your edge increases will eventually create another 18 sts on each end. This will happen after every 3, 4-row repeats. You should move your markers 18 sts to toward each edges as soon as you have 18 sts between the marker and the edge stitches. Hint: It's easiest to add the new marker before removing the old one. Be sure not let the old markers mess up your pattern before you can remove them. Just work to them, remove them and keep going affer the new markers have been added. You will only have to do this twice in the 9 repeats.
Feather and Fan Lace Pattern
(RS)Row 1: K2, Inc 2, SM, Knit to marker, SM, knit to last 3 sts, Inc2, K2 (WS)Row 2: k2, Y/O, knit to marker, SM, knit to marker, SM, knit to last 2 sts, Y/O, K2 (RS)Row 3: K2, Inc2, knit to marker, SM, \*K2tog 3 times, (Y/O, K1) 6 times, K2tog 3 times, repeat from \* to marker, SM, knit to last 3 sts, Inc2, K2 (Ws)Row 4: k2, Y/O, knit to marker, SM, knit to marker, SM, knit to last 2 sts, Y/O, K2 Cut color D, leaving a tail long enough to weave.
Rich Earth
Attach color E. Repeat the two basic garter stitch rows (see Sun) until you have 6 ridges, ending with a Ws row. Cast off LoosELY. Cut color E, leaving a tail long enough to weave. ve all ends and block aggressively. wear proudly and post


