MISSION DISTRICT CABLED CROSSBODY BAG
Created by Patty Thomas, San Francisco Knit Designer & Owner of Daisy Yarns of San Francisco and MatureRoommates LLC “a better way to find a roommate". This pattern is for individual use (not to be copied or published without permission, www.daisyyarns.com),August-2012.
Finished Size: 15 inches width by 10.5 inches height
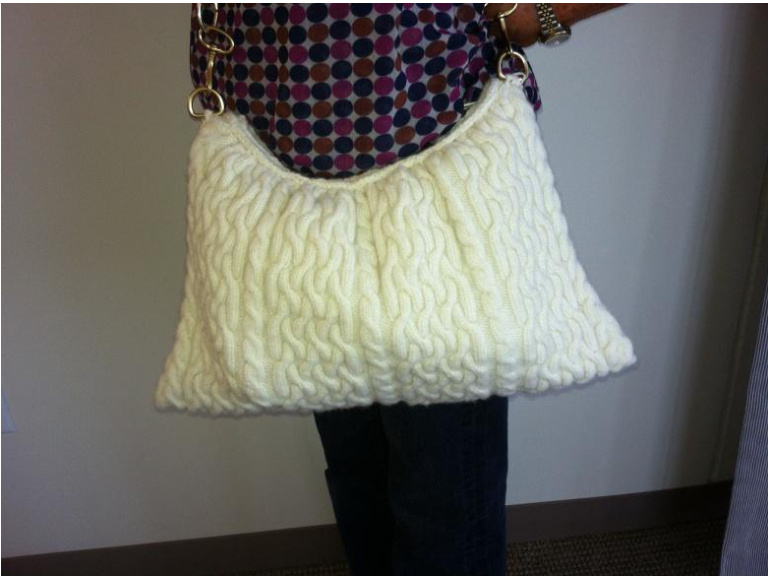
Materials: 350 yards of Legacy DK Organic Merino Wool by O-Wool in Natural, US Size 5 knitting needles at least 12 inches, US Size 5 double pointed needles, Cable Hook, Row Counter, Stitch Markers, 12 inch zipper, 2 Brass O or D-Rings (1/2 inch) and a companion swivel snap hook/clip, 24-30 inches of chain (Ace Hardware), length of chain depends on you. Optional: 5/8 yard fabric for inside bag lining. Level: Intermediate (must be comfortable with cabling and cabling variances) and some sewing. Stitch Information: 4 inches = 24 stitches x 8 rows
Definitions:
K = Knit P = Purl K2 TOG = Knit 2 stitches together as one stitch \* \* = Set of instructions to be repeated C4F = Put 2 stitches on Cable Hook, hold in front, knit next 2 stitches, then knit 2 stitches from cable hook. C4B = Put 2 stitches on Cable Hook, hold in back, knit next 2 stitches, then knit 2 stitches from cable hook. C2F = Put 1 stitch on Cable Hook, hold in front, knit next 1 stitch, then knit 1 stitch from cable hook. C2B = Put 1 stitch on Cable Hook, hold in back, knit next 1 stitch, then knit 1 stitch from cable hook.
Start Bag
Using Size 5 US needles & O-Wool Legacy DK Organic Merino Wool, cast on 162 sitches. Below is the stitch marker placement guide. Stitch Marker Placement: 48306 306 30 6 30 8 4 =162 Stitches Cast On
Knit Bag Body
ROW 1 (Right Side): P4, (C4F C4B), (\*P2, slip 3 stitches on cable hook & hold in front, K3, K3 from Cable Hook\* for 3 times, to last 6 stitches and P2, K2, P2 = 30 stitches), [Purl 1, slip 2 on cable hook & hold in front, K2, then K2 from Cable Hook, Purl 1 = 6 stitches.] (\* P2, slip 3 on cable hook & hold in front, K3, K3 from Cable Hook\* for 3 times, to last 6 stitches and P2, K2, P2 = 30 stitches), [Purl 1, slip 2 on cable hook & hold in front, K2, then K2 from Cable Hook, Purl 1 = 6 stitches], (\*P2, slip 3 stitches on cable hook & hold in front, K3, then K3 from Cable Hook\* for 3 times, to last 6 stitches and P2, K2, P2 = 30 stitches), [Purl 1, slip 2 on cable hook & hold in front, K2, then K2 from Cable Hook, Purl 1 = 6 stitches], (\* P2, slip 3 on cable hook & hold in front, K3, K3 from Cable Hook\* for 3 times, to last 6 stitches and P2, K2, P2 = 30 stitches), (C4F C4B), P4
ROWS 2 (Wrong Side):
K4, (P8), \*K2, P2\* 7 times then K2, [K1, P4, K1], \*K2, P2\* 7 times then K2, [K1, P4, K1], \*K2, P2\* 7 times then K2, [K1, P4, K1], \*K2, P2\* 7 times then K2, (P8),K4
ROWS 3 (Right Side):
P4, (K8), \*P2, K2\* 7 times then P2, [P1, K4, P1], \*P2, K2\* 7 times then P2, [P1, K4, P1], \*P2, K2\* 7 times then P2, [P1, K4, P1], \*P2, K2\* 7 times then P2, (K8), P4
| ROWS 4 (Wrong Side): K4, (P8), *K2, P2* 7 times then K2, [K1, P4, K1], *K2, P2* 7 times then K2, [K1, P4, K1], *K2, P2* 7 times then K2, [K1, P4, K1], *K2, P2* 7 times then K2, (P8),K4 |
| ROW5:(RightSide): P4, (K8), *P2, K2* 7 times then P2, [P1, K4, P1], *P2, K2* 7 times then P2, [P1, K4, P1], *P2, K2* 7 times then P2, [P1, K4, P1], *P2, K2* 7 times then P2, (K8), P4 |
| ROWS 6 (Wrong Side): K4, (P8), *K2, P2* 7 times then K2, [K1, P4, K1], *K2, P2* 7 times then K2, [K1, P4, K1], *K2, P2* 7 times then K2, [K1, P4, K1], *K2, P2* 7 times then K2, (P8),K4 |
| ROWS 7(RightSide): P4, (K8), *P2, K2* 7 times then P2, [P1, K4, P1], *P2, K2* 7 times then P2, [P1, K4, P1], *P2, K2* 7 times then P2, [P1, K4, P1], *P2, K2* 7 times then P2, (K8), P4 |
| ROWS 8 (Wrong Side): K4, (P8), *K2, P2* 7 times then K2, [K1, P4, K1], *K2, P2* 7 times then K2, [K1, P4, K1], *K2, P2* 7 times then K2, [K1, P4, K1], *K2, P2* 7 times then K2, (P8),K4 |
| P2 and you cable in the back with the last 2 stitches as P2! Watch your chatter knitters! |
| ROW9(RightSide): P4, (C4F C4B), (P2, K2, P2 *Slip 3 stitches on cable hook & hold in BACK, K3, then K3 from Cable Hook, P2* for 3 times = 30 stitches), .[Purl 1, slip 2 on cable hook & hold in front, K2, then K2 from Cable Hook, Purl 1 = 6 stitches], (P2, K2, P2 *Slip 3 stitches on |
| cable hook & hold in BACK, K3, then K3 from Cable Hook, P2* for 3 times = 30 stitches), [Purl 1, slip 2 on cable hook & hold in front, K2, then K2 from Cable Hook, Purl 1 = 6 stitches], (P2, K2, P2 *Slip 3 stitches on cable hook & hold in BACK, K3, then K3 from Cable Hook, P2* for 3 times = 30 stitches), [Purl 1, slip 2 on cable hook & hold in front, |
| K2, then K2 from Cable Hook, Purl 1 = 6 stitches], (P2, K2, P2 *Slip 3 stitches on cable hook & hold in BACK, K3, then K3 from Cable Hook, P2* for 3 times = 30 stitches), (C4F C4B), P4 |
| ROWS 10: K4, (P8), *K2, P2* 7 times then K2, [K1, P4, K1], *K2, P2* 7 times then K2, [K1, P4, K1], *K2, P2* 7 times then K2, [K1, P4, K1], *K2, P2* 7 times then K2, (P8),K4 |
| ROWS 11: P4, (K8), *P2, K2* 7 times then P2, [P1, K4, P1], *P2, K2* 7 times then P2, [P1, K4, P1], *P2, K2* 7 times then P2, [P1, K4, P1], *P2, K2* 7 times then P2, (K8), P4 |
| ROWS 12: K4, (P8), *K2, P2* 7 times then K2, [K1, P4, K1], *K2, P2* 7 times then K2, [K1, P4, K1], *K2, P2* 7 times then K2, [K1, P4, K1], *K2, P2* 7 times then K2, (P8),K4 |
| ROWS 13: P4, (K8), *P2, K2* 7 times then P2, [P1, K4, P1], *P2, K2* 7 times then P2, [P1, K4, P1], *P2, K2* 7 times then P2, [P1, K4, P1], *P2, K2* 7 times then P2, (K8), P4 |
| ROWS 14: K4, (P8), *K2, P2* 7 times then K2, [K1, P4, K1], *K2, P2* 7 times then K2, [K1, P4, K1], *K2, P2* 7 times then K2, [K1, P4, K1], *K2, P2* 7 times then K2, (P8),K4 |
P4, (K8), \*P2, K2\* 7 times then P2, [P1, K4, P1], \*P2, K2\* 7 times then P2, [P1, K4, P1], \*P2, K2\* 7 times then P2, [P1, K4, P1], \*P2, K2\* 7 times then P2, (K8), P4 K4, (P8), \*K2, P2\* 7 times then K2, [K1, P4, K1], \*K2, P2\* 7 times then K2, [K1, P4, K1], \*K2, P2\* 7 times then K2, [K1, P4, K1], \*K2, P2\* 7 times then K2, (P8),K4
iCord Top Bag Trim
Using Double Strands of Yarn cast on 3 stitches onto double pointed needles (always knit through the back loop). Make sure you slide the stitches (and never turn the stitches around from the knitting needle as in normal knitting). Knitting through the back of the loop keeps the iCord from curling and is a cleaner look. I always pull on it as I go to prestretch it as much as possible before felting and placement. knit 2 pieces that are 30 inches each (the top bag trim)
Felt the Pieces (Bag body & 2 iCords for trim)
Wash machine level hot level or you may drop in a deep pan of boiling water that has the heat turned off. Dry in dryer tilldry.
Assembly - Stitch after Felting to Avoid Puckering
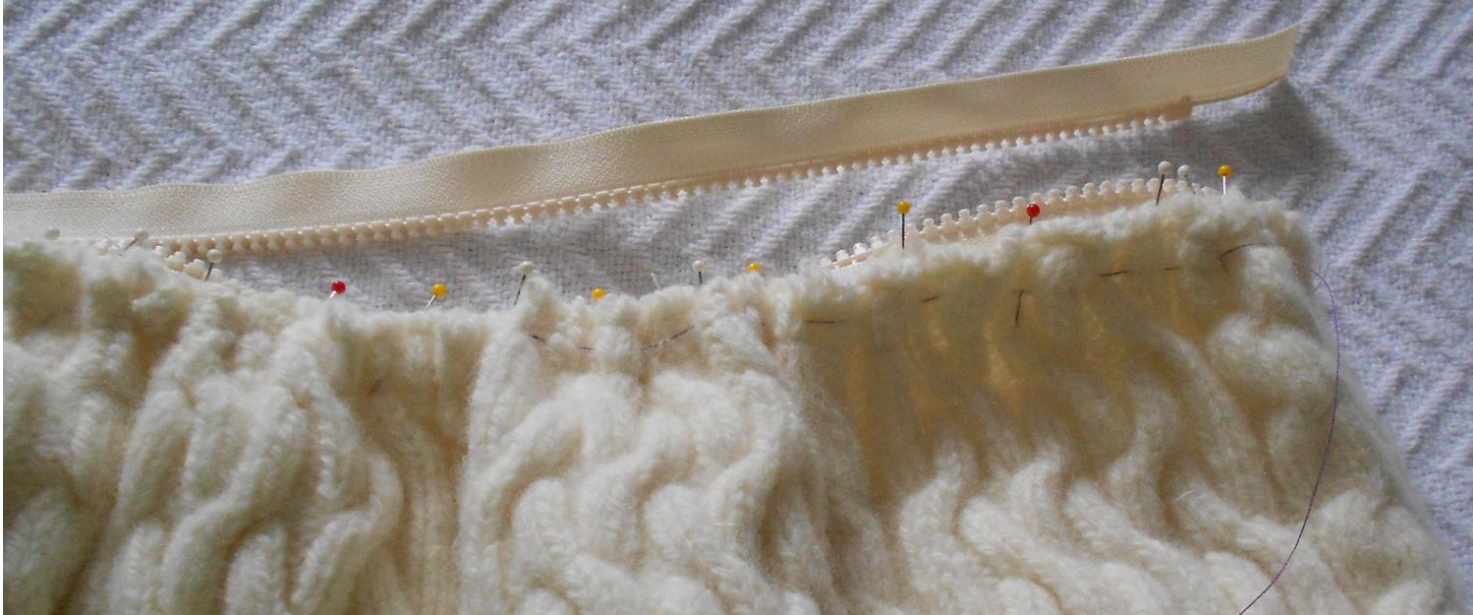
1.Sew the sides of the bag up with a sewing machine or by hand. 2. Top stitch with sewing machine or by hand very close to the top edges of the bag. You willtop stitch a 2nd row about 1/8 inch from the first top stitch row at the top. a. Now CUT OFF the cast on row. The reason for cutting off the cast on row is due to some gathering needed (see finished photo). You will not be able to properly gather and sew the zipper in without removing the edge due to the bulk. 3. Thread a sewing needle with a contrasting color and loosely hand stitch in between the two top stitched rows. You will use the ends of this thread to pull and make the gathers. 4. Open zipper, pin both ends of zipper to the inside of the bag to each side. Yes, the bag is much bigger than the zipper in length! I advise putting a straight pin in the middle to gauge your gathers for next step below in 5. 5. Now pull on the edges of the thread as you gather the bag and pin those edges onto the zipper. Make sure it is evenly gathered (see below photo).
6. Stitch with sewing machine or by hand the zipper to the bag, but DO NOT STITCH over the top ends of the zipper. You willeave both ends open for now. 7. Stitch O or D-Rings to the outside of the bag top using yarn and yarn needle. 8. Optional Bag Lining - Prewashed: Cut one piece of fabric slightly larger than the bag. Sew up the sides, fold top over and hem the lining top edge. Drop the lining into the bag with the "right side" visible and stitch into bag. Make sure to sew this inside at the top of the bag, using the center of the 2 top stitch rows. 9. Pin the 2 iCord trims to the top of the bag on the outside. Make sure the raw edges are not visible. Hand stitch the 2 iCords in place. As you hand stitch around the bag, now stitch over the outside ends of the bag. 10. Add the swivel snap hook/clips and chain...viola tout...you should be proud!


