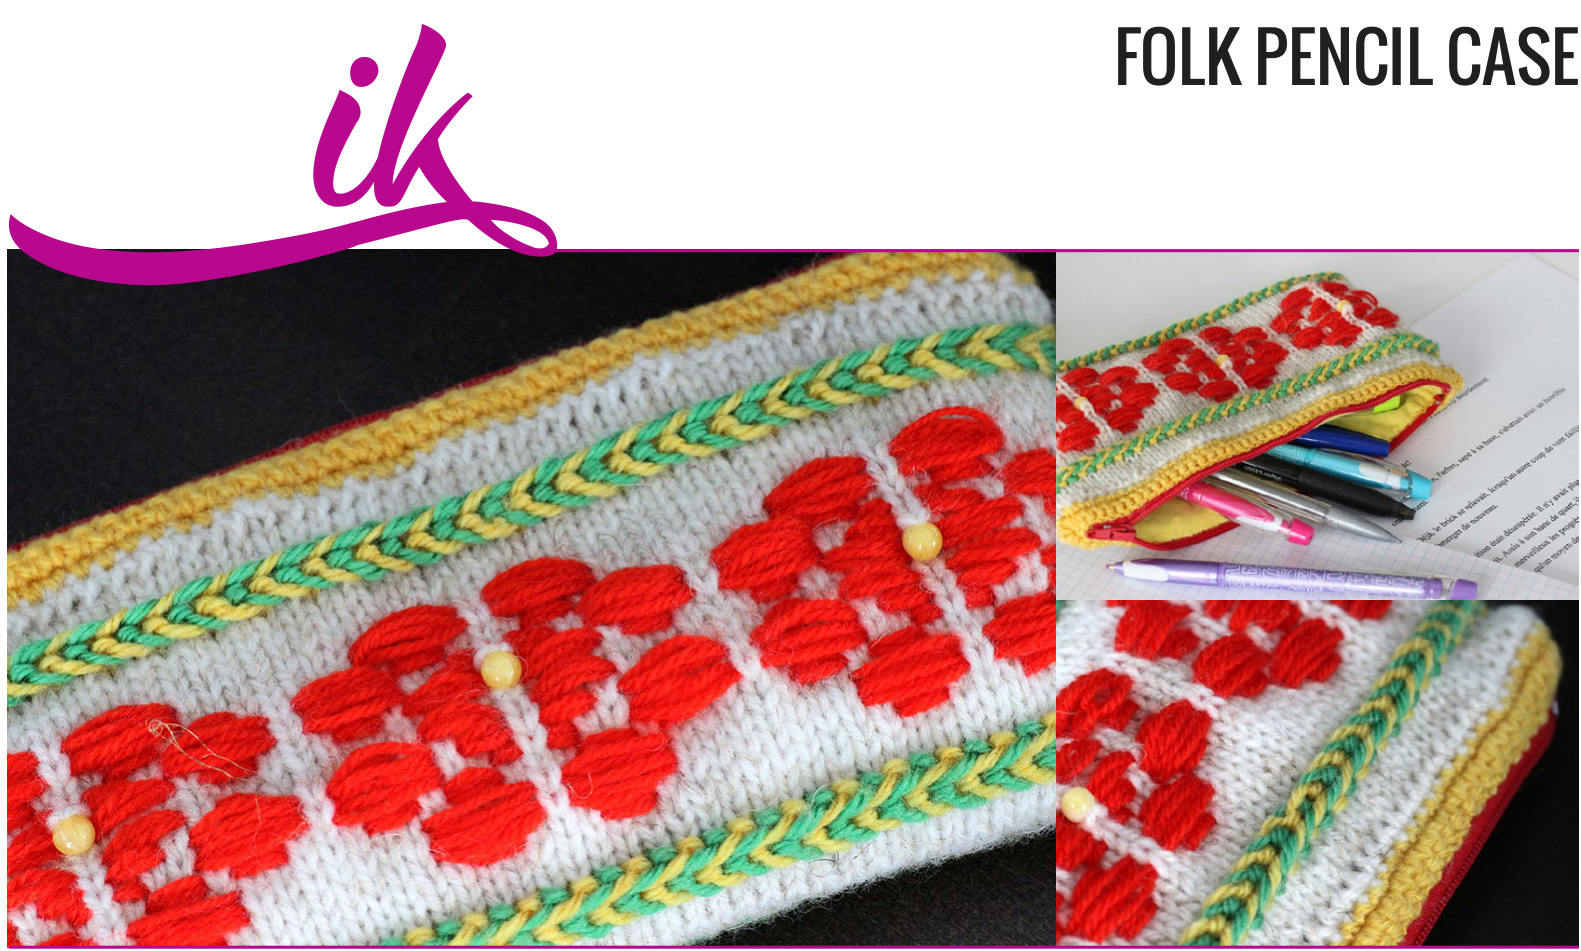
Designer: Intensywnie Kreatywna (2014) www.intensywniekreatywna.pl In this project three main techniques are used: https://www.youtube.com/watch?v=1pmxRDZ-cwo - There are two Latvian Braids. The technique is shown here (the video by Emma Welford): http://www.yarn.com/videos/video/how-to-knit-a-latvian-braid/ - The Roositud Technique is used to create the flowers. The technique is shown here (the video by Interweave Craft): https://www.youtube.com/watch?v=wAA56UWu4Ps The following description is the step by step tutorial to create a pencil case similar to this presented in the pictures (about 12 x 11 cm). But it can be easily modify to change the measurements according to your needs.
Necessary "Ingredients":
- about 40g of the yarn in the main colour (choose something what has about 300m in 100g, so medium to thick yarn); - about 10g of colourful yarns to create all the embellishments; choose the same or very similar yarn (thickness) for braids as the main yarn; for Roositud technique you can choose anything as usually the yarn is used doubled or even tripled; - circular knitting needles, the size depends on the thickness of your yarn, I was using 3.25; as the magic loop technique is going to be used remember to have enough length of the cable; - beads to put one into every flower center (in my case 6 of them); be careful and choose beads that can be put onto the thick yarn we are going to use; - crochet hook; something to help you put the beads onto the stitches (small crochet will be perfect); - a short zipper; - some fabric (about 25 x 25 cm) as lining (it is necessary as in the Roositud Technique there are a lot of loose yarn left on the wrong side); - sewing needle and yarn (tapestry) needle. Cast-on 100 stitches using Judy's Magic Cast-On Technique (50 stitches on every knitting needle). Then use the following chart. All the used colours are shown there and the rounds where you should create Latvian Braids or Roositud Technique. Be careful - do not cut off the yarn unless there's such a suggestion in the following description. Rounds 1 - 4 - knit using the main colour Rounds 5 -7 - Latvian Braid, remember that you in the first round here (5th) you knit using the colours in turns, in the next two rounds you still use the colours in the same way but you purl and the yarn is left in front - everything is explained in the video tutorial mentioned above). (After Round 7 you can cut off the yarn used for the Braid, both colours.) Rounds 8 - 11 - knit using the main colour Rounds 12 - 18 - creating the bottom part of the flower using the Roositud Technique When you have 100 stitches on your needles knit like this (for one needle): 2 stitches in the main colour to separate the flowers - 15 stitches of the flower pattern - 1 stitch to separate the flowers - 15 stitches of the flower pattern - 1 stitch to separate the flowers - 15 stitches of the flower pattern - 1 stitch to separate the flowers Repeat this on the other needle. Round 19 - beads put on the stitches being the centre of every flower (the best way to do it is to bead the stitch straight from the left needle, without knitting it, then slip the beaded stitch on the right needle still without knitting it, leaving the yarn behind the stitch - this way the bead is on the right level, really in the middle of the flower) :ounds 20 - 26 - the top part of the flower pattern using again the Roositud Techniqu (You can cut off the yarn used for Roositud Technique if you do not plan to use it for finishing the top of the pencil case.) Rounds 27 - 30 - knit using the main colour Rounds 31 - 33 - Latvian Braid 1 used for the Braid if you do not plan to use it for finishing the top of the pencil case. Rounds 34 - 37 - knit using the main colour Cast-off using any technique you prefer. Now you have to finish the top of the pencil case. Use the crochet hook and crochet two or three rows of crochet single stitches. Do it in rows, not in rounds - to create to two separate pieces that we are going to use to attach the ziper. (lf you do not want to put any zippers and have an open top - work in rounds, to create strong, not too elastic finishing of the top of your case for a laptop or your mobile.) Weave in the ends of the yarn. Sew the zipper in, attaching it to the crocheted edges at the top. Then prepare the lining. Remember that the measurements of the pencil case are going to be a little bit bigger than the measurements of the interior of it (the yarn thickness is the reason for it). So make the lining slightly smaller (2 or 3 mm). And sew it to create the rectangular. Leave the upper part of the lining as it is. It is going to be folded inside on attached to the zipper inside the pencil case. Put the lining (wrong side of the pencil case touching the wrong side of the lining), fold the lining at the top in such a way that the folded edge touch the seam on the zipper and hand sew it together.
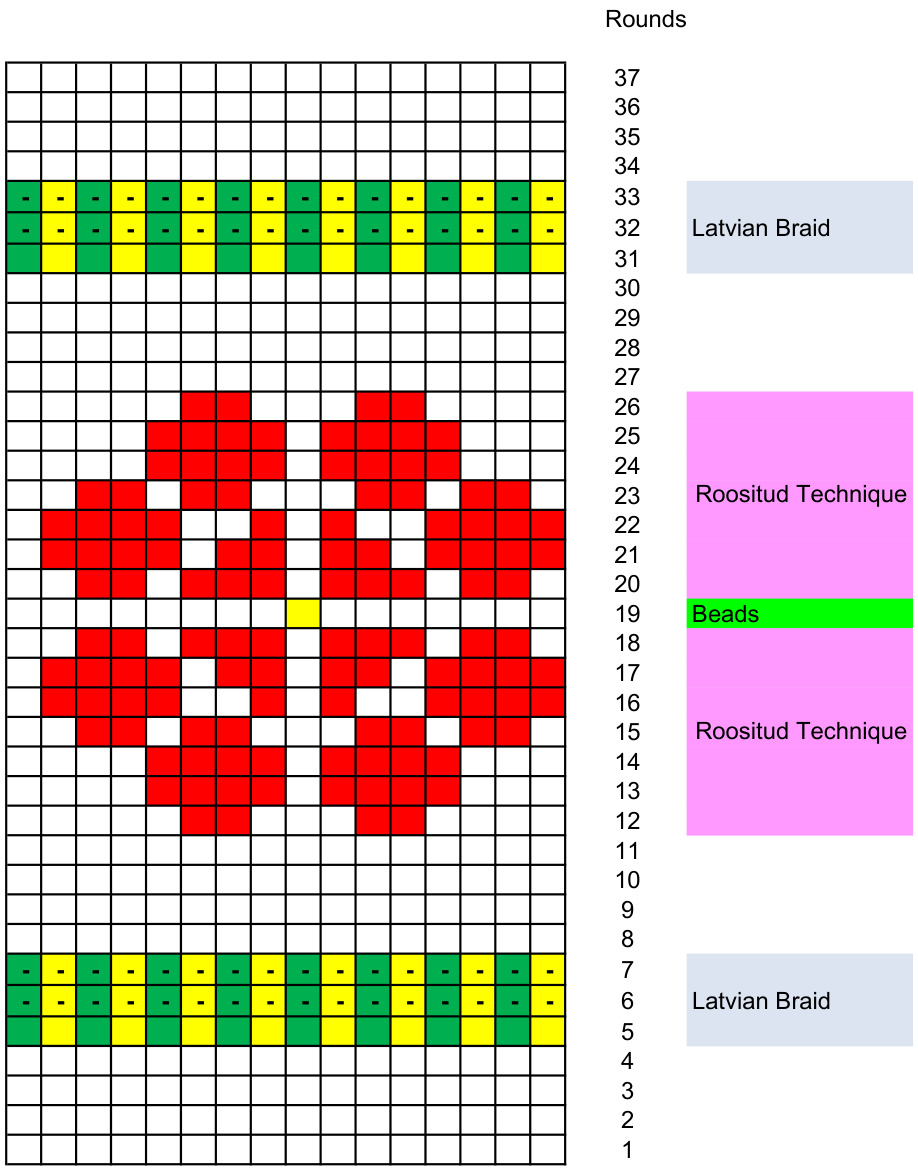
All the stitches are knitted. The only exceptions are the stitches in the Latvian Braids marked(-). They are purled.


