centerstreetenits
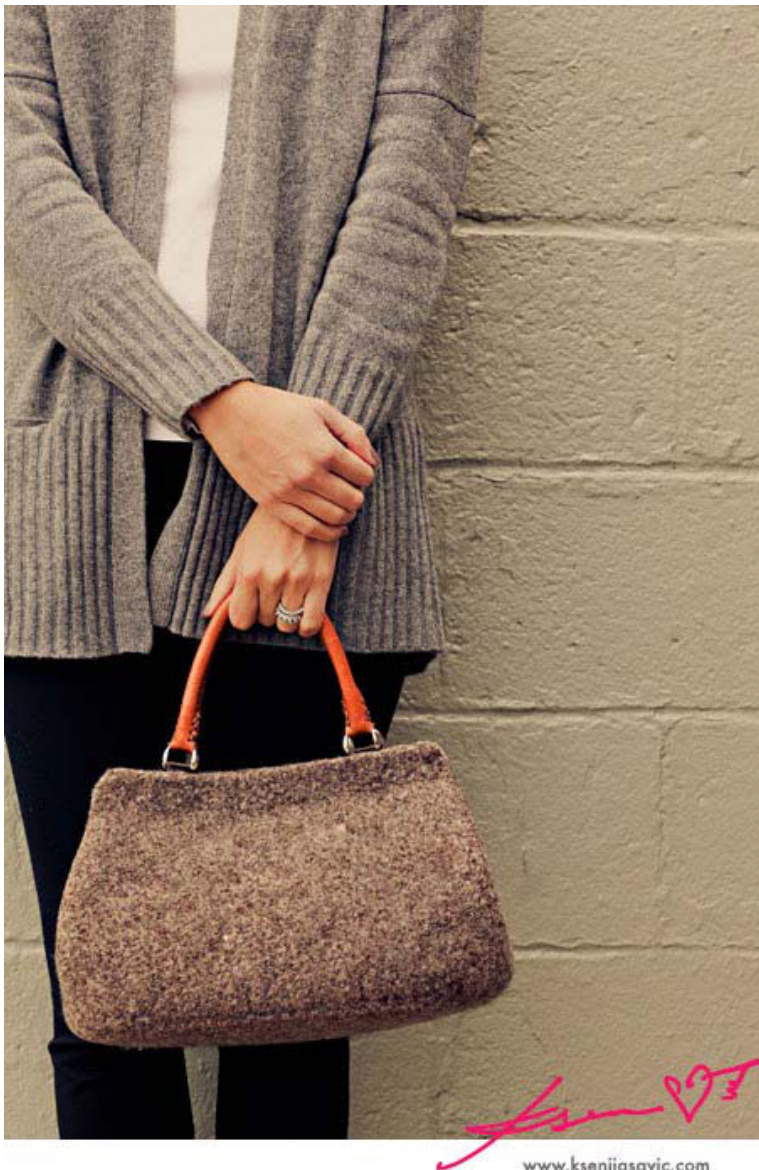
Mrs.Knitsallday's Felted Bag
Mrs. Knitsallday is Center Street Knits' shop owner, NancyBasch,who designed this classicbag.The pattern is suitable for any knitter --from beginners who know how to knit, purl, and do basic shaping - - to advanced knitters. You can purchase bag handles or reuse some from a bag you no longer use.
Materials Needed
880 yards of feltable, worsted weight yarn US 13 24" or 32" circular knitting needle 4 stitch markers-one a differentcolor to denote end of round Extra needle or stitch holder Tapestry needle Bag handles Two large snaps to keep the bag closed Embroidery floss and sharp needle to attach the bag handles and snaps. Grosgrain ribbon or optional knitted tabs to attach handles to purse. If choosing knitted tabs, you will need three US 3 knitting needles (for three-needle join) Photo shown:Cascade 220 #9539 Chocolate Tweed -4 hanks. Also shown: Grayson-E short rolled bag handles in Amber. Not shown: Dritz 30mm Sew-On Snaps in Antique Brass.

Approximate Finished Measurements
Before felting: 15%" h x 14" w x 8%4" d After felting : 8" h x 13" w x 6 %" d
Gauge
With yarn held double, 14 stitches and 15 rows = 4" in stockinette stitch on US 13 needles, knitted in the round.
Abbreviations
KKnit PPurl K2tog Knit 2 together K3tog Knit 3 together RS Right side WS Wrong side PM Place marker Rnd(s) Round(s) RM Remove marker St(s) Stitch(es) SM Slip marker SSK Slip, slip, knit
Bag Bottom
The bottom of the bag is knitted flat, starting at the outside . As you knit, you will see a rectangle emerge, with two short sides and two long sides. You will be decreasing on every RS row.It maybe helpful toplace a pin on the Rs row so you know when to do your decreases. With yarn held double throughout, cast on 144 sts. Row 1 (RS): Knit. Row 2: K43, PM, K29, PM, K43, PM, K29 Row 3 (RS): Decrease row: K2tog, \*K to 2 sts before marker, K2tog, SM, K2tog, repeat from \* twice more. K to last 2 sts, K2tog. [136 sts]
Row 4 (WS): Knit.
Repeat rows3 and 4 twelve more times, or until there are 3 stitches remaining on the short sides. [40 sts] Next row (RS): K3tog, SM, K2tog, K to 2 sts before marker, K2tog, SM, K3tog, SM, K2 tog, K to last 2 sts, k2tog. [32 sts] Next row: Bind off knitwise, removing markers as you go. Using a tapestry needle and one strand of yarn, sew the center and mitered corner seams, using a flat seam. Weave in each of the two strands of all ends separately.
Bag Sides
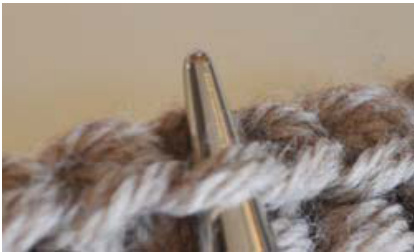
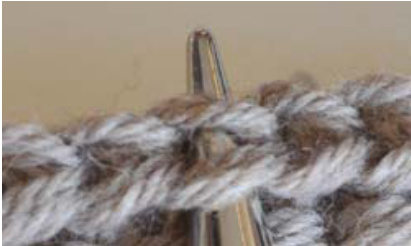
The bag sides will be knitted in the round after picking up and knitting stitches along the short and long sides. When picking up and knitting, pick up only the front-facing leg of the stitches, as shown in the following pictures:
Correct:
Incorrect:
Whenever any shaping is needed, the shaping will either be done on both short sides, or both long sides. With the RS of the bag bottom facing and yarn held double throughout, pick up and knit 29 sts along a short side, PM, pick up and knit 43 sts, PM, pick up and knit 29 sts, PM, pick up and knit 43 sts, PM and join for working in the round. [144 sts] 1st Rnd: K all sts on the long sides, but decrease on both short sides as follows: K4, SSK, K4, SSK, K5, K2tog, K4, K2 tog, K4. [136 sts: 43 on each long side; 25 on each short side] Knit all rounds until the bag sides measure 8 % inches high. Decrease Rnd: Decrease one stitch at each end of both short sides as follows: SSK, K to 2 sts before marker, K2tog. [132 sts total: 43 sts on the long sides, and 23 sts on the short sides] Continue knitting all rounds, decreasing one stitch on each end of both shortsides every5th row,asset above, until there are 17 sts on each of the short sides. [120 sts total: 43 on each long side and 17on each short side] Next Rnd: Knit, removing all markers except the end of round marker. Next Rnd: \*Bind off 17 sts, K until 6 sts on right needle, SSK, K6, SSK, K11, K2tog, K6, K2tog, K6, repeat from \* one more time. [Total of 39 sts remaining on each long side.] To make tabs for the snaps and handles, continue working each long side of the bag separately. Your working yarn should be ready to knit a Ws row on one of the long sides. Place the side opposite your working yarn on a stitch holder. Working the first side flat, work in moss stitch for 6 rows as follows: \*K1, P1, rep from \* to last st, K1. Bind off in pattern and break yarn. Join yarn to opposite long side, with the WS facing. Work 6 rows in moss stitch.Bind off in pattern and break yarn. Weave in each strand of ends separately and felt according to instructions that follow.
Felting Instructions
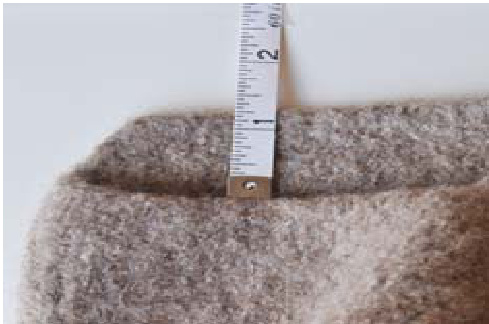
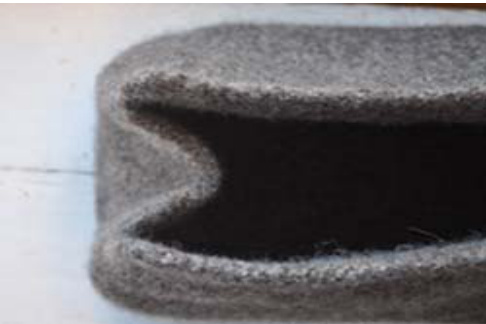
Felting is accomplished by using hot water, lots of agitation and a little laundry soap. It is much easier if you have a toploading washing machine with an agitation arm.If you don't have a top-loading machine, you can still felt - - just make sure that you know what you have to do to interrupt the wash cycle to check progress and, if the agitation is too gentle, you may need to add tennis balls or an old pair of jeans toincrease agitation. Here are the felting instructions: To protect your washing machine from the fiber that will shed during the wash cycle, place the bag in a zippered pillow case, keeping it as flat as possible. Set your washing machine on the lowest water level, the hottest water temperature, and the highest agitation possible. Add about 2-3 teaspoons of laundry detergent. There is no need to be precise - a good guess is fine. Begin the wash cycle. Caution: don't let the rinse or spin cycles start. You will probably have to reset your machine to the beginning of the wash cycle more than once. If you put the bag through the spin cycle, you may create creases that can't be removed. Check your bag's progress at 5 to 10- minute intervals by pulling it out of the zippered pillowcase and opening the purse, then placing it back in the pillowcase and laying it as flat as possible. This redistributes the bag within the pillowcase and reduces the chance that the bag will crease. Check your seams early to make sure that they are holding. If not, use some spare yarn and a tapestry needle to make quick repairs. Your bag is finished felting when it no longer has stitch definition and has reached the approximate sizes outlined in this pattern. In particular, measure the height of the moss-stitch area at the top of the two long sides. This should be 1 % to 1 % inches tall. Here's a picture showing how to measure:
When your bag is finished felting, rinse it in cool tap water and squeeze by hand to remove as much excess water as possible.
Shaping
Shape the bottom of the bag into a rectangle. Pull the tops of the long sides so that they are even. Stuff the bag with clean paper. Use enough paper to really fill the bag - don't let the long sides cave in! Make an indentation in each of the short sides of the bag near the top by folding as shown here:
When folding the sides of the bag, make sure that the fold between the long and short sides lines up with the ends of the moss-stitch tabs. Correct:
Incorrect:
Be sure to examine the bag from many angles so that you can smooth out any bumps. Let air-dry completely.
Bag Handles and Closures
For all of our bag models, we used the Grayson-E bag handles from Muench Yarns. The handles come with tabs for attaching the handles to the outside of the bag, but we cut the tabs off and used grosgrain ribbon or our own knitted tabs to attach the handles to the inside of the bag.
Grosgrain Ribbon
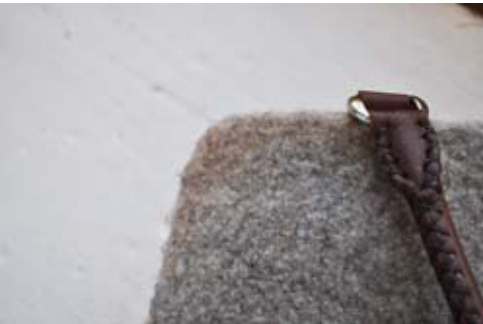
We use 1 % inch wide grosgrain ribbon, folded in half, for some of our bags:
Knitted Tabs
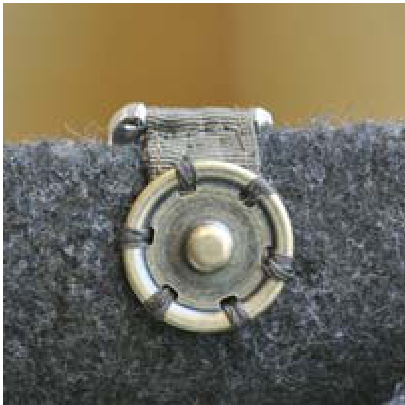
For other bags, we knitted our own tabs out of leftover yarn we had from knitting the bags. The following instructions are for the Grayson E handles. If your bag handle rings are larger or smaller, you will need to cast on a different number of stitches. Don't be afraid to experiment. It won't take long because you are casting on only a few stitches. Using two US 3 knitting needles, and a single strand of leftover yarn from your bag, loosely cast on 5 or 7 stitches, (or any odd number). Work 4 rows of moss stitch as follows: Rows 1-4: K, \*P, K, repeat from \* to end of row. Keeping the knitting on your needle, wrap the cast-on edge around the bag handle ring as shown in the next picture.
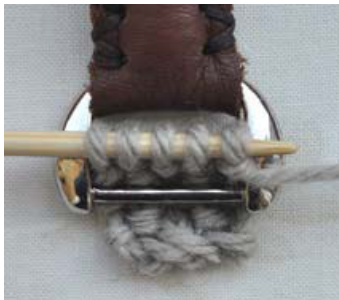
Working with a 3rd needle along the cast-on edge, pick up the same number of stitches you cast on and, keeping your work wrapped around the bag handle ring, work a threeneedle join in moss stitch. Finish by working in moss stitch for 6-8 rows, or until the tab is the desired length. Weave in ends, and sew to bag insides.
Additional Finishing
The bag can be lined, if desired. Also, for a less fuzzy finish, use a disposable razor in swift, firm strokes to shave the excess fuzz for a more finished look. We recommend placing a firm piece of cardboard or other material in the bottom of the bag for support.

Cascade 220 #2425 Provence - 4 hanks. Also shown: Grayson-E short rolled bag handles in Brown. Not shown: Dritz 30mm Sew-On Snaps in Antique Brass. www.ksenijasavic.com Copyright @ 2011, Mrs.Knitsallday and Center Street Knits, LLC. All rights reserved. This pattern and photos contained in this document are the property of Mrs.Knitsallday and Center Street Knits, LC. For personal use only. Unauthorized reproduction, in whole or in part, or distribution via copier, fax, or e-mail is prohibited. Sale of finished bags created from this pattern is strictly prohibited. Contact info@ centerstreetknits.com or visit www.mrsknitsllday.com.


