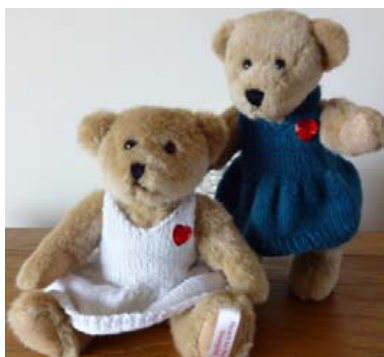
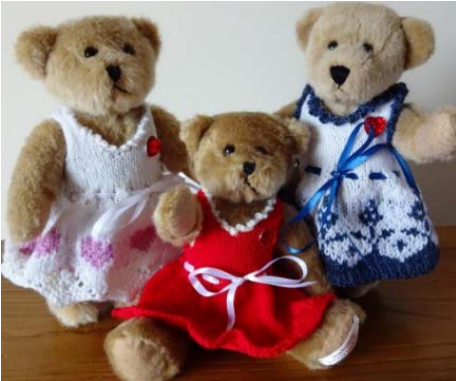
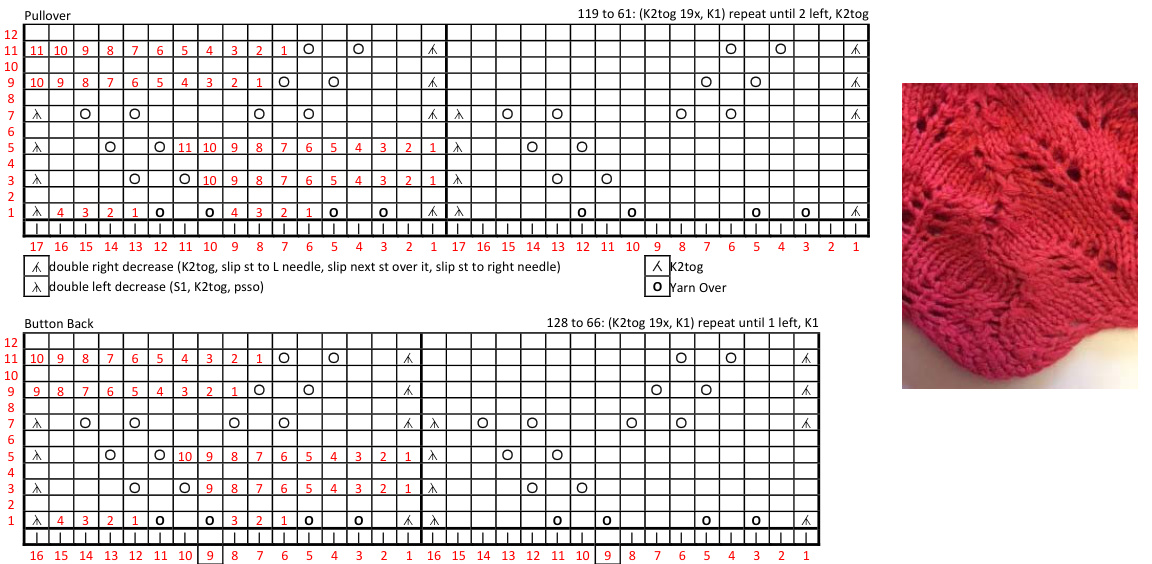
This was designed for the Heart to Heart Bears, sold for the Heart to Heart group in Shanghai China which raises funds for surgeries for Chinese children with congenital heart disease. These directions are free for your personal, individual use. Please do not distribute or reformat them for commercial use, or sell them. Items made from these directions should only be sold if all profits go to charity. A dress with a single back seam for the Heart to Heart bears. Variations are included to make a different neckline or hemline, add belt loops, give it an empire waist, and to add a button up back. Yarn: Needles: Gauge: Notions: DK yarn (UK: 8ply, US: 3-Light) Bamboo or silk works very nicely 4mm/Us 6 circular or straight (or size to give gauge) plus 1 needle 20sts = 8cm/3in Stitch holders This dress will fit a teddy bear about 25-30cm/10-12in tall with a waist of about 29cm/11%in. See diagram for approximate finished measurements.
ABBREVIATIONS
.K..... Knit. ?P.. Pur St. St.... stockinette stitch (K RS row, P WS row) YO. ..... Yarn Over K2tog .. knit 2 sts together BO.... Bind Off S1... Slip Dress is knit in 1 piece from the bottom up. FRONT: Cast on 120 sts Row 1-3; Work 3 rows in St.St Row 4: Next row: K1; \*\*YO, K2tog; Repeat from \*\* until 1 st left, K1
SKIRT:

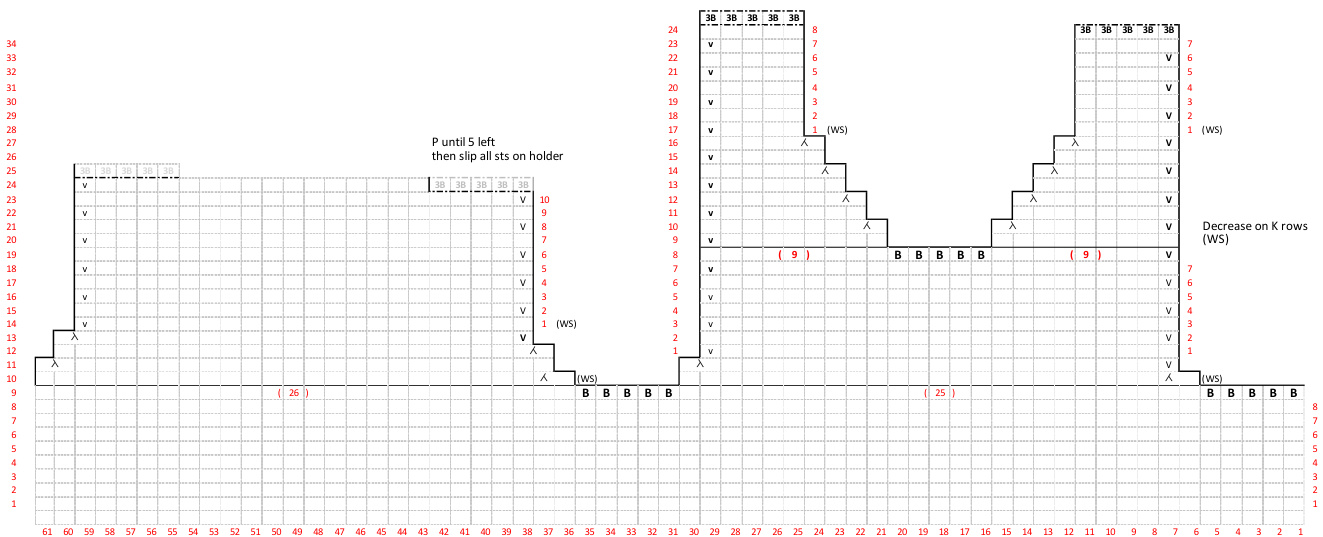
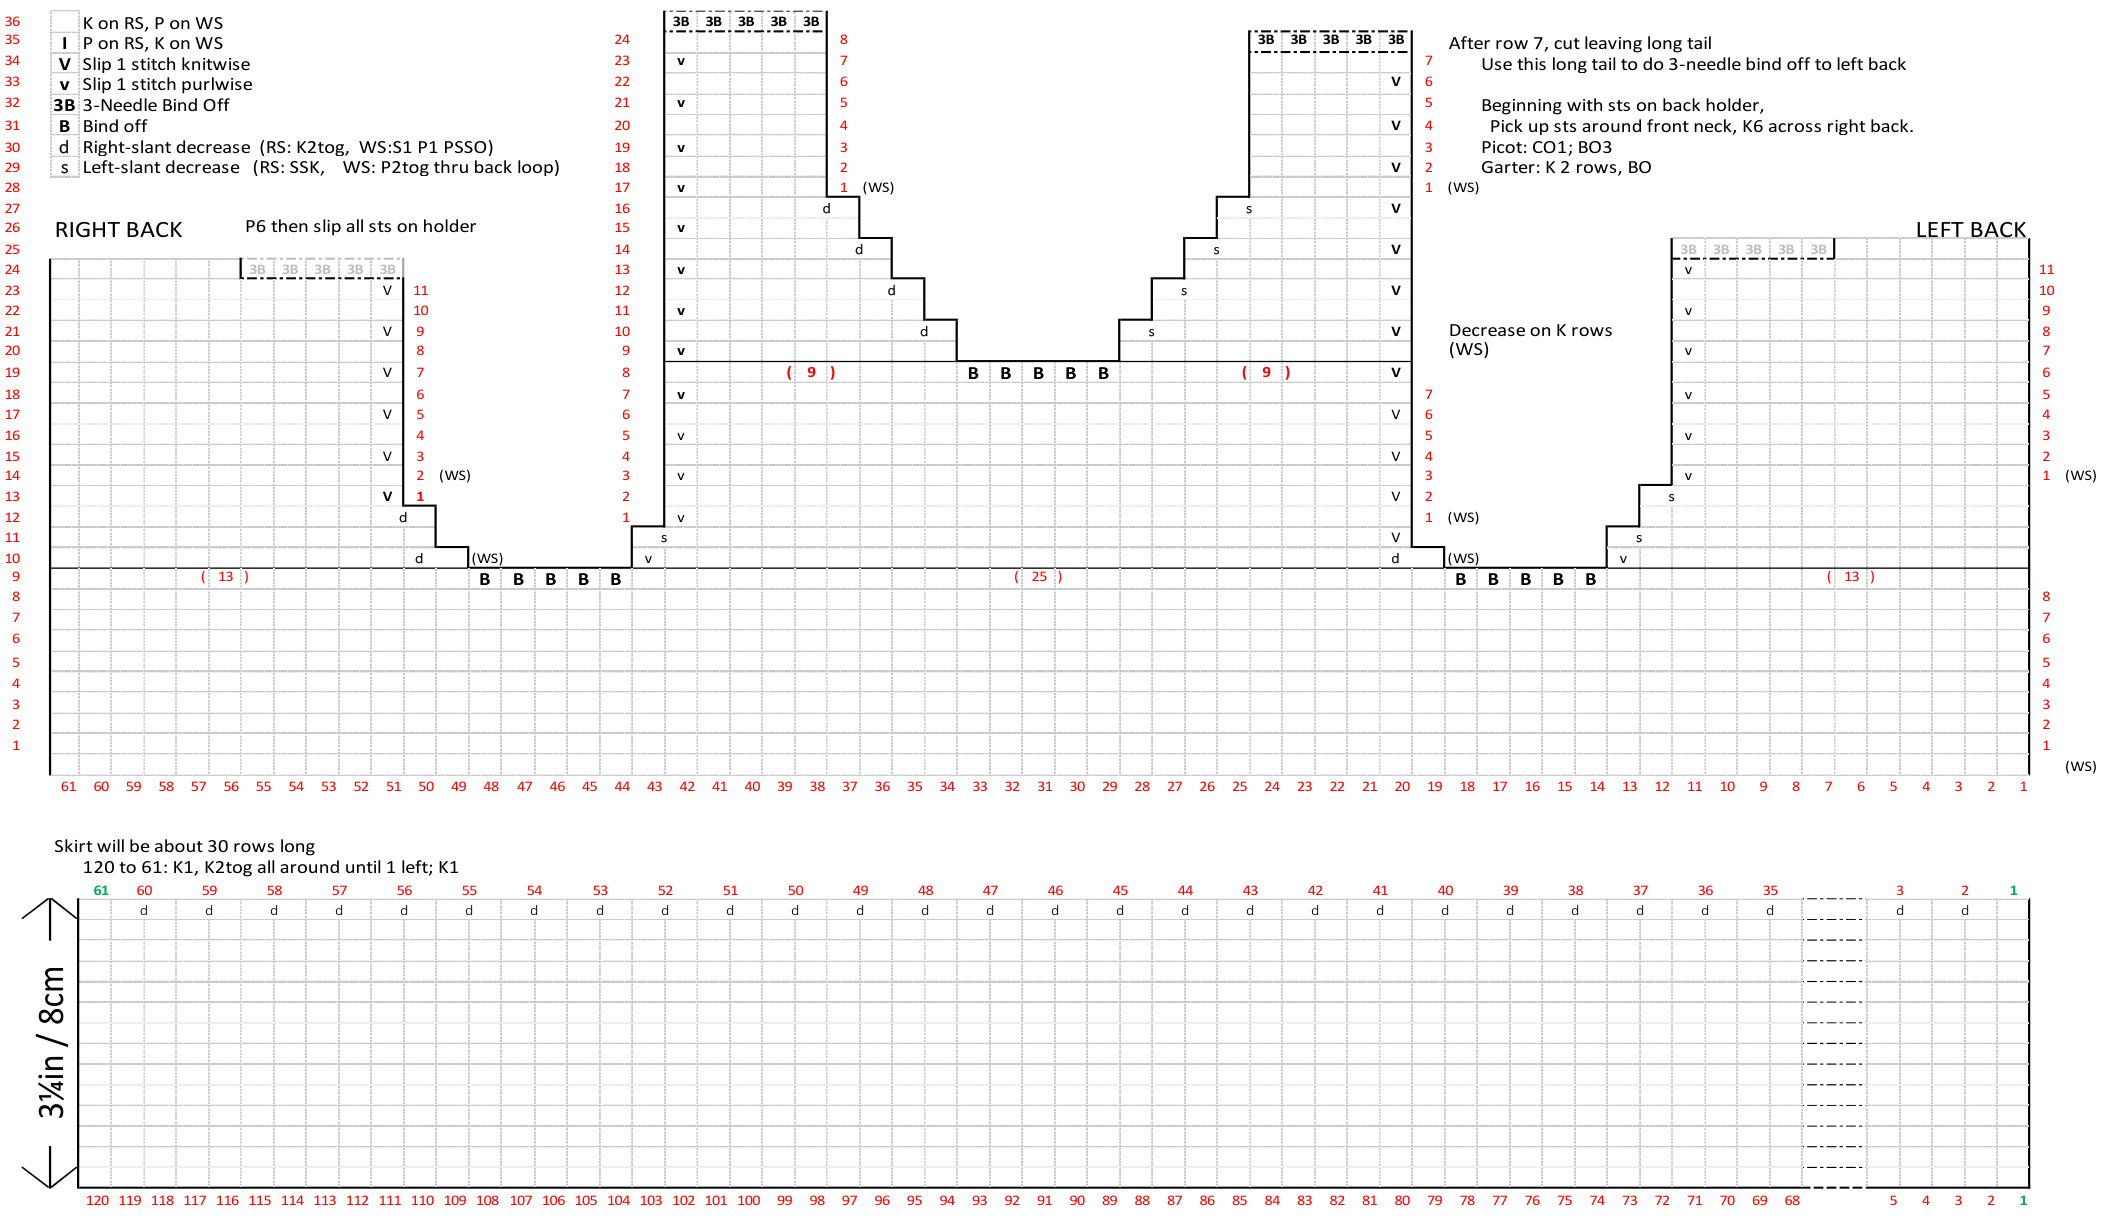
Continue in St.St. until piece measures 8cm/3%in (about 30 rows) from (Row 4: Y0) row, ending with a RS row Next row: K1, \*\* K2tog, repeat from \*\* until 1 st left; K1 (61 sts) Next row (WS): P BEGIN BODICE Row 1-8: Work in St.St. as follows: Odd Rows: K Even Rows: P Row9: K13; BO5;K25; BO5; K13 RIGHT BACK (Center back to left armhole): Row 10: P until 2 left; S1, P1, PSSO Row 11: S1 knitwise; K to end Row 12: Repeat row 10 Row 13: S1 knitwise; K to end Row 14:P SSK....slip slip knit: slip 1 st knitwise, slip 2nd st knitwise, insert needle in back and K these 2 sts together PSSO...Pass slipped St over last stitch worked

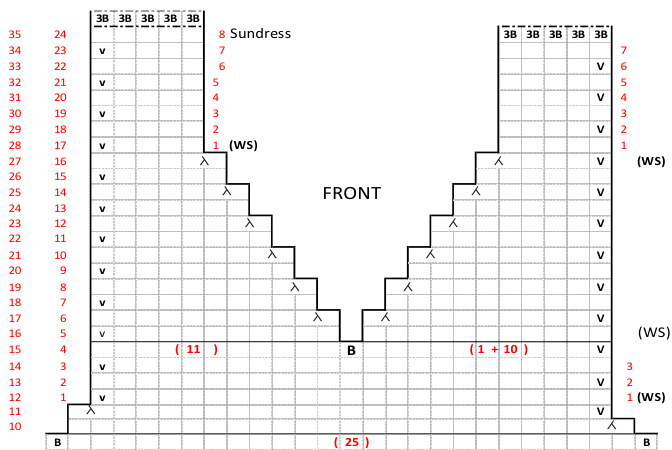
Row 15-23: Repeat rows 13-14 Row 24: P6 Transfer Sts onto holder, cut yarn FRONT: Join yarn to WS of center group of Sts. Row 10: S1 purlwies, P until 2 Sts left; S1, P1, PSSO Row 11: S1 knitwise; K until 2 Sts left; SSK Row 12-18 (7 rows): Work in St.St, slipping 1st St: Even rows: S1 purlwise; P to end Odd rows: S1 knitwise; K to end Row 19: S1 knitwise; K8; BO 5; K to end Right Front Strap Row 20: S1 St purlwise; P to end Row 21: SSK; K to end Rows 22-27 (6 rows): Repeat rows 20-21 until 5 Sts remain. Rows 28-35 (8 rows): Work in St.St., slipping 1st St of armhole edge as follows: Even rows: S1 purlwise; P to end Odd rows: K Row 36: With right sides together, using 3-needle bind-off, join to last 5 sts of right back. Cut yarn. More Heart to Heart patterns may be found on RAVELRY.COM by searching for 'heart to heart bear' Left Front Strap Join yarn to WS of remaining front Sts. Row 20: Pto end Row 21: S1 knit wise; K until 2 sts left; K2tog Rows 22-27(6 rows): Repeat rows 20-21 until 5 Sts remain. Rows 28-34 (7 rows): Work in St.St., slipping 1st St of armhole edge as follows: Even rows: S1 purlwise; P to end Odd rows: K Transfer Sts to holder; cut yarn, leaving about a 10"/25cm tail (which will be used to join to left back) LEFT BACK (Left armhole to center back) Join yarn to Ws of final group of sts. Row 10: S1 purlwies, P to end Row 11: K until 2 Sts left; SSK Row 12-13: Repeat rows 10-11 Row 14: S1 purlwise; P to end Row 15:K Row 16-24 (9 rows): Work in St.St., slipping 1st St of armhole edge as follows: Even rows: S1 purlwise; P to end Odd rows: K Row 25: K6 (these 6 sts will be the beginning of the neckline). Then with right sides together, using 3-needle bind-off and long tail yarn from front strap, join first 5 sts to left front strap. NECKLINE: Row 1: Continuing with 6 sts from left back, Pick ur about 40 Sts from left shoulder to the right shoulder; K6 sts across right back. Row 2: K Row 3: K Row 4:Bind off Finishing: To sew the back seam neatly, from the Right Side, use a darning needle and insert in into the horizontal bar between the first and second stitches, Insert the needle into the corresponding bar on the other side. Continue alternating from side to side.
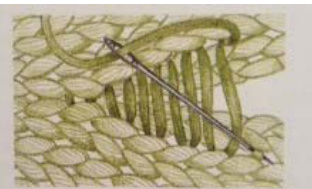
Sew up hem, then sew in all loose ends.

Decorations can be knit into this skirt. The simplest embellishment is to work stripes into the skirt, in either plain or a frilly decorated yarn. A lace skirt also works well. If using a repeated lace or color pattern, keep the skirt width between 100-122 sts total for a pullover, 0r 100-132 for the button-back version, always decreasing the skirt to 61 sts (66 for button-back versiondescribed later in the pattern). A regular stockinette bottom edge of the skirt will tend to roll up, and it seems no amount of blocking will completely stop this. Below are some suggestions for alternate hemlines which will eliminate or minimize the roll.
Let it Roll: This is the hem described in the original pattern. A row of K2tog YO will allow the bottom rows to roll, but stop the roll from going further up the skirt. Begin counting rows for length with the K2tog YO row.
Picot Hemmed Edge: Worked as above, but the bottom of the skirt is folded up at the K2tog YO row and sew as a hem.
Garter Stitch Edge:
This pairs nicely with 5 rows of garter stitch at the waist (just after the decrease row). K 1 row, then begin with next row as 'row 1' (Rs) of the pattern.
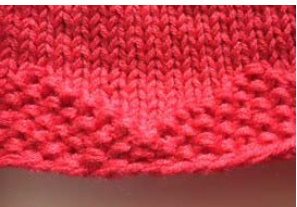
Diamond Moss Stitch:
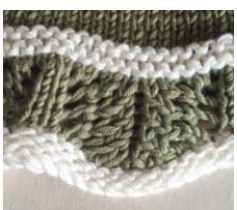
This works by tapering the end of the moss stitch up into the skirt. The remainder of the skirt or dress can be worked in plain stockinnette stitch (as shown in the photo) or with P1 stitches every 4th row (as shown in chart). Cast on 120 (or if you want, 132 for the button-back version) stitches. Decrease as follows: 120 to 61: K2tog 29 times, K1, then repeat. 120 to 61: (K2tog 4x, K1) until 4 left; K2tog 2x 132 to 66: K2tog all around
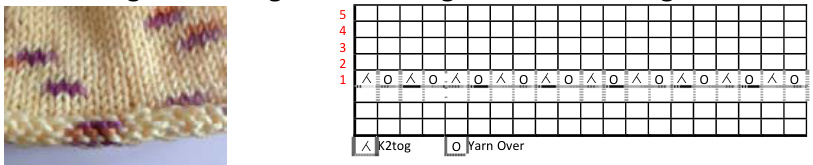
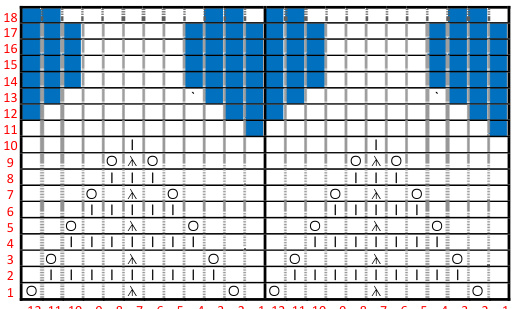
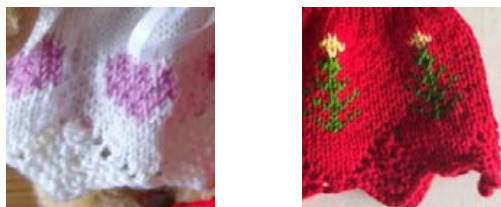
callop Lace Work skirt above lace in one color, or add a pattern of hearts or Christmas trees. Cast on 120 (or if you want, 132 for the button-back version) stitches. Decrease as follows: 120 to 61· K2too 29 timec K1 then reneat
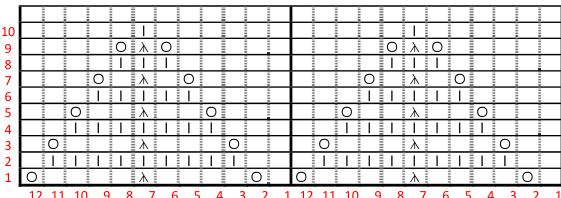
double lft decrease(s1, KZtog psso)
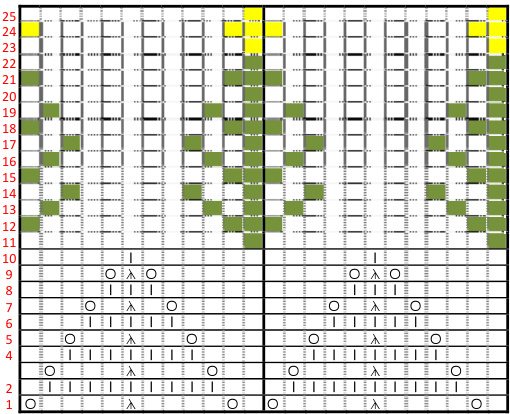
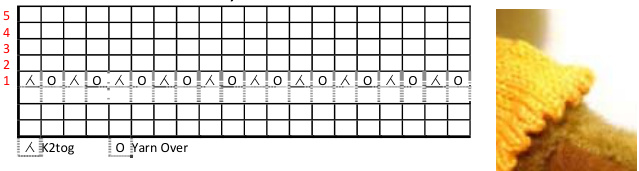
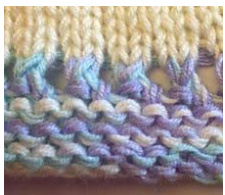
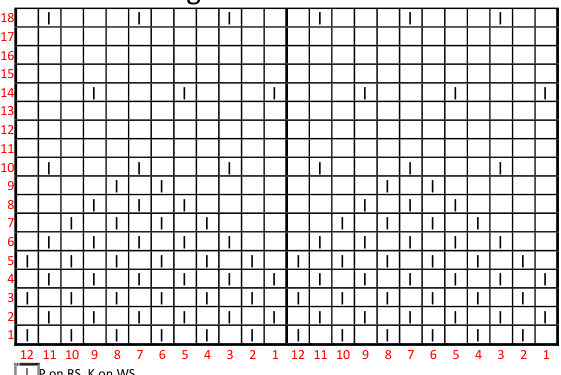
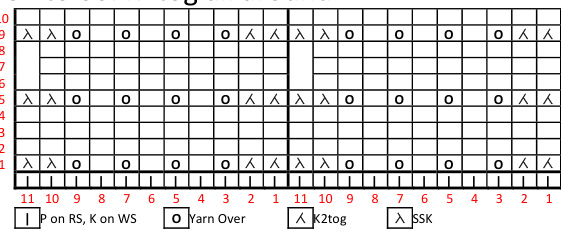
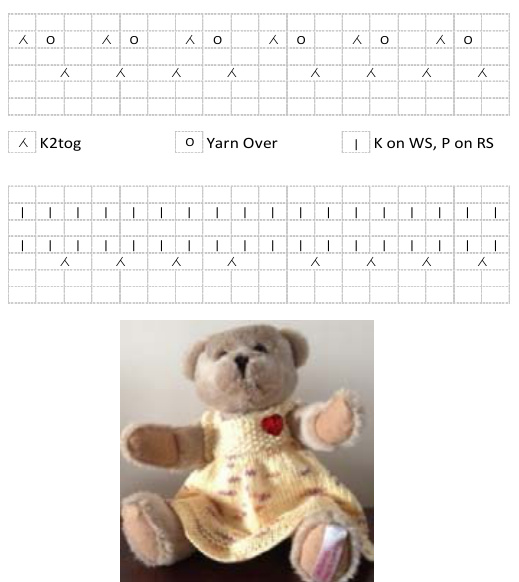
Wave Crest:
K 1 row, then begin with next row as 'row 1' (Rs) of the pattern. Cast on 120 (or if you want, 132 for the button-back version) stitches. Decrease as follows: 120 to 61: K2tog 29 times, K1, then repeat. 120 to 66: (K2tog 4x, K1) until 4 left; K2tog 2x 132to 66:K2tog all around
| 4 | ||||||||||||||||||||||||||||
| 1 | ||||||||||||||||||||||||||||
| 2 | 1 | 1 | 1 | 1 | 1 | 1 | 1 | 1 | 1 | 1 | 1 | 1 | 1 | 一 | 1 | 1 | ||||||||||||
| 1 | 入 | 人 | 入 | |||||||||||||||||||||||||
| 0 | 入 | 人 | 入 | 人 | 人 | |||||||||||||||||||||||
| 入 | 入 | 人 | 人 | 入 | 入 | 人 | 人 | |||||||||||||||||||||
| 入 | 入 | O | O | 人 | 人 | 入 | 入 | 人 | 人 | |||||||||||||||||||
| 入 | 入 | yy | 入 | 入 | 人 | 人 | ||||||||||||||||||||||
| m | ||||||||||||||||||||||||||||
| D | 1 | |||||||||||||||||||||||||||
| 12 | 1110 | 6 | 8 | b | 3 | 12 | 11 | 10 | 9 | 8 | 7 | 6 | 5 | 432 | 1 |
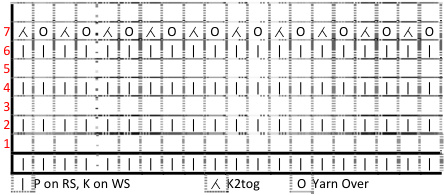
Ridged Feather Stitch
K 1 row, then begin with next row as 'row 1' (Rs) of the pattern. Cast on 121 (or if you want, 132 for the button-back version) stitches. Decrease as follows: 121 to 61: K2tog until 1 left, K1 121 to 61: (K2tog 4x, K1) until 2 left; K2tog 2x 132to 66:K2tog all around
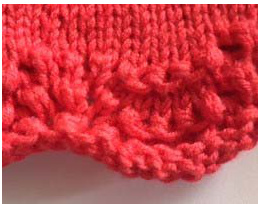
Fern Lace A nice lace worked for the entire skirt. Skirt will need light blocking when done. In order to give it maximum fullness, the pullover and button-back version are worked slightly differently. Cast on 119 for the pullover and 128 for the button-back dress. Decrease as indicated.
WAISTVARIATIONS
Belt Loops After decrease row (61 sts), P 1 row Next row, \*\* K1, YO, K2tog, Repeat from \*\* until 1 St left. K1
Waistband
After decrease row (61 sts), work 3 rows in Garter Stitch (K on wrong side, P on right side) or Moss Stitch (K1 P1, next row P the K stiches and K the P stitches).
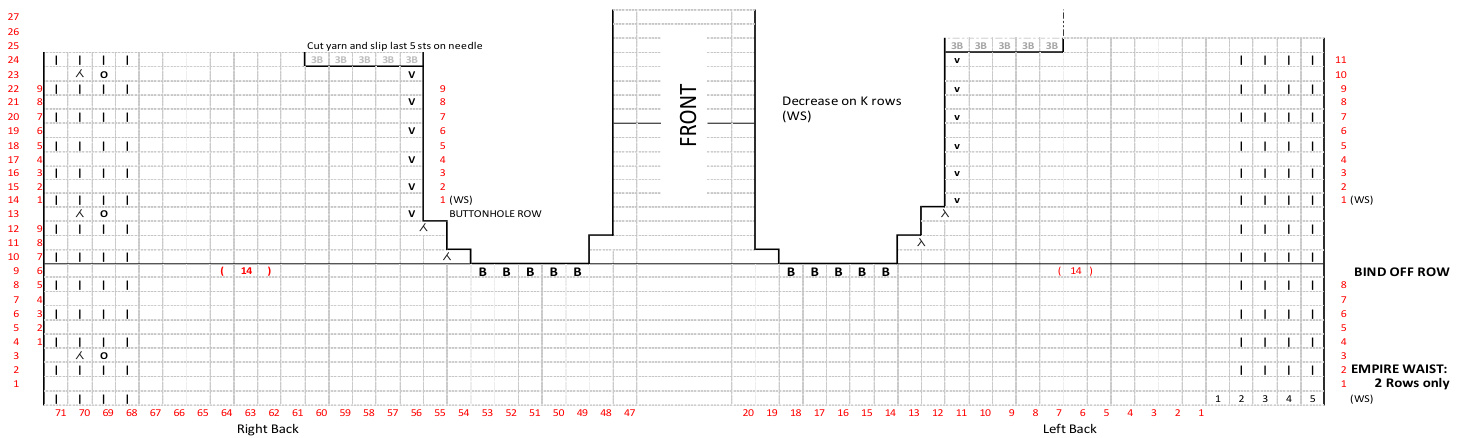
Empire Waist
Work skirt for a length of 5% inches / 14 cm from Row 4 Y0 row. Work gather row, then 3 more rows in St.St. Then, beginning at row 9 of the bodice, finish the top of dress. BUTTON-BACK DRESS Work skirt until desired length. Next row: \*\* K2tog 4 times, K1; repeat from \*\* until 4 Sts left, K2tog, K2tog (66 sts) Next row: K4, P until end of row; Cast on 5 (71 Sts) BEGIN BODICE Row 1: K Row 2: K4; P until 4 Sts left; K4 Row 3: K until 4 Sts left; K1; YO; K2tog; K1 (this will make the first buttonhole) Rows 4-8: (5 rows): Work first and last 4 Sts in garter stitch, and rest of row in St.St. as follows: Even rows: K4; P until 4 Sts left; K4 Odd rows: K Row 9: K18; Bind off 5, K25; Bind off 5; K18 to finish row. Right Back: Row 10: K4; P until 2 left; S1, P1, PSSO Row 11: S1 knitwise; Kto end Row 12: Repeat row 10 Row 13: S1 knitwise; K until 4 Sts left; K1; YO; K2tog; K1 (this will make the 2nd buttonhole) Row 14-22: Work in St.St. with garter stitch buttonhole band as follows: Even Rows: K4; P to end Odd Rows: S1 knitwise; K to end Row 23: S1 knitwise; K until 4 Sts left; K1; YO; K2tog; K1 (this will make the 3rd buttonhole) Row 24: K4; P until 5 Sts left; Row 24: P6 Transfer Sts onto holder, cut yarn Row 17: S1 knitwise; K until 4 Sts left; K1; YO; K2tog; K1 (third buttonhole) Transfer Sts onto holder, cut yarn FRONT: Work as indicated in original pattern LEFT BACK (Left armhole to center back) Join yarn to Ws of final group of sts. Row 10: S1 purlwise; P until 4 Sts left; K4 Row 11: K until 2 Sts left; SSK Row 12-13: Repeat rows 10-11 Row 14-24 (11 rows): Work in St.St. with garter stitch button band as follows: Even Rows: S1 purlwise; P until 4 left; K4 Odd Rows: K Row 25: K6 (these 6 sts will be the beginning of the neckline). Then with right sides together, using 3-needle bind-off and long tail yarn from front strap, join first 5 sts to left front strap. NECKLiNE: Work as indicated in original pattern FINISHING: Sew bottom of left button band under bottom of right button band, then sew center back skirt seam. ALTERNATE NECK SHAPES:Work Front as follows: V- Neck: Row 10: S1 purlwies, P until 2 Sts left; S1, P1, PSSO Row 11: S1 knitwise; K until 2 Sts left; SSK Row 12: S1 purlwise; P to end Row 13: S1 knitwise; K to end Row 14: S1 purlwise; P to end Row 15: S1 knitwise; K10; BO 1; K to end Right Front Strap Row 16: S1 purlwise; P to end Row 17: SSK; Kto end Rows 18-27 (10 rows): Repeat rows 16-17 until 5 Sts remain. Rows 28-35 (8 rows): Work in St.St., slipping 1st St of armhole edge as follows: Even rows: S1 purlwise; P to end Odd rows: K Row 36: With right sides together, using 3-needle bind-off, join to last 5 sts of right back. Cut yarn. Left Front Strap Join yarn to WS of remaining front Sts. Row 16: P to end Row 17: S1 knit wise; K until 2 sts left; K2tog Rows 18-27 (10 rows): Repeat rows 16-17 until 5 Sts remain. Rows 28-34 (7 rows): Work in St.St., slipping 1st St of armhole edge as follows: Even rows: S1 purlwise; P to end Odd rows: K Transfer Sts to holder; cut yarn, leaving about a 10"/25cm tail (which will be used to join to left back)
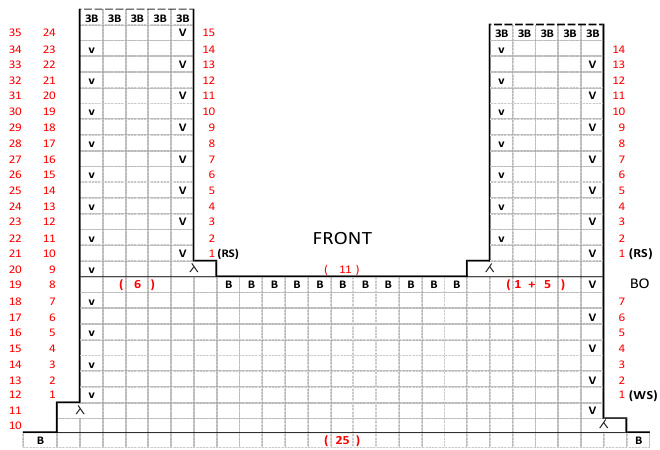
Square Neck:
The square neck version does not need a finished neckline. Bind off neck edge of right and left back as described below: Right Back: Row 24: BO 6; transfer remaining 5 Sts to holder. Front: Row 10: S1 purlwise, P until 2 Sts left; S1, P1, PSSO Row 11: S1 knitwise; K until 2 Sts left; SSK Row 12-18 (7 rows): Work in St.St, slipping 1st St: Even rows: S1 purlwise; P to end Odd rows: S1 knitwise; K to end Row 19: S1 knitwise; K5; BO 11; K to end Right Front Strap Row 20: S1 St purlwise; P to end Row 21: SSK; Kto end Rows 22-35 (15 rows): Work in St.St., slipping 1st St of every row as follows: Even rows: S1 purlwise; P to end Odd rows: S1 knitwise; K to end Row 36: With right sides together, using 3-needle bind-off, join to last 5 sts of right back. Cut yarn. Left Front Strap Join yarn to WS of remaining front Sts. Row 20: P2tog, P to end Rows 22-34 (14 rows): Work in St.St., slipping 1st St of each row as follows: Even rows: S1 purlwise; P to end Odd rows: K Transfer Sts to holder; cut yarn, leaving about a 10"/25cm tail (which will be used to join to left back) Left Back: Row 25: B0 6. Then with right sides together, using 3- needle bind-off and long tail yarn from front strap, join first 5 sts to left front strap.
Picot Neck Edging
Use instead of the garter stitch neck described in the original pattern. To start, pick up/knit sts along neck edge as described in pattern, then P 1 row. With the RS facing you, cast on 1 st using the cable cast on described here: Insert needle between the last 2 sts on theleft needle Pull a loop through as in making a K st. (First picture) Slip st from right needle onto the left needle (2nd picture shows a 2 sts cast on - but only do 1) Bind off 3 sts (K2, bind off right st, K1, bind off right st, K1, bind off right st.) Slip last St knit onto the left-hand needle. (3rd picture) Repeat from \*\* NOTE: This can also be used on the armholes, but when making the dress you should not slip the first stitch on the armhole edge - simply K or P. Pick up about 30-38 Sts from each armhole to start.
CIRCULAR KNITTING:
Decrease skirt to 61 Sts and work beginning of bodice as indicated. Underarm bind-off row: B05, K25, B05, K26.