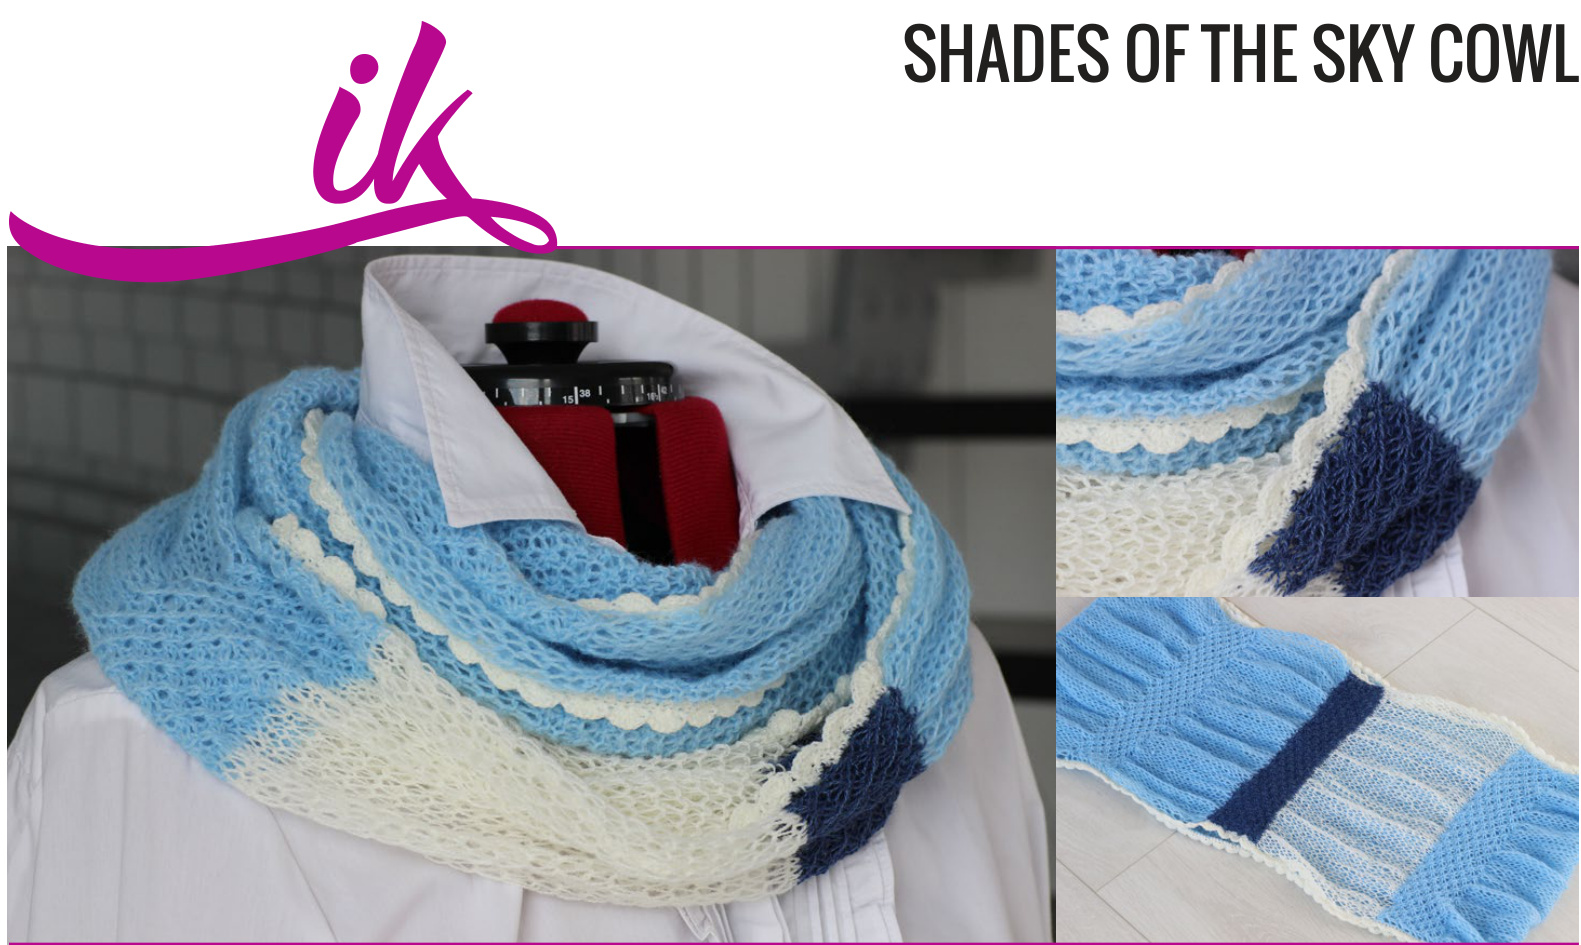
Designer: Intensywnie Kreatywna (2014) www.intensywniekreatywna.pl Size: app. 30 x 150 cm sily adjustable. It can be wider, narrower, longer or shorter. But remember that th vill change. The amounts below are given to create the cowl shown in the photos. What you need: 1. Yarn in 3 colours. The suggested yarn weight is 600-800 m in 100 g (so think about lace yarn). Any soft, mohair yarn will be perfect for this project. Do not be afraid of mixing different kinds of yarn: mohair, silk, cotton, alpaca etc. You can even use yarns of slightly different weights - your Shade of the Sky Cowl will only be more unique. You need app. 70 g of yarn: - 50 g of the main colour (A) 10-15 g of the first additional colour (B - one stripe in the cowl, plus the crochet edge - 5-10 g of the second additional colour (C - one stripe in the cowl) 2. Needles of 2 sizes. The Star Stitch is created using 4.00 needles (US - 6). The Stockinette Stitch is created using 8.00 needles (US - 11) 3. Crochet hook that allows you to work comfortably with yarn B to create the crochet edges. 4. Tapestry needle and scissors.
STEP 1. Cast on 69 stitches using 4.00 needles.
You can change the size of your cowl casting on a different number of stitches. But remember that it should be divided by 4 plus 5 stitches (incl. 2 border stitches). The way you choose to cast your stitches on determines the way you are going to use to join the edges of your cowl at the end. There is an easy way and a more advanced way.
Version I - An Easy Way
Cast your stitches on using any traditional method that you prefer. It means that at the end you are going to simply sew the edges together.
Version Il - A More Advanced Way
Cast your stitches on using the provisional crochet cast-on technique. It means that at the end you are going to use grafting (Kitchener stitch) technique to join the edges.
STEP 2. Creating 2 stripes of colour.
The rows of Star Stitch should be created using colour C and 4.00 needles. The rows of Stockinette Stitch should be created using colour B and 8.o0 needles. Remember - Knitting your cowl you always slip the first stitch of every row as if to purl with your yarn in front of the needles. The last stitch of every row is always knitted. Do not be surprised - The Star Stitch Pattern is created on the wrong side (WR) of your cowl. The short video tutorial how to create the Star Stitch Pattern is available here (it is in Polish but even watching it will help you to understand the idea): http://intensywniekreatywna.blogspot.com/2014/01/mam-gwiazdki-przed-oczami.html STEP 3. Creating the rest of the Shades of the Sky Cowl. Change your colour into the main one (A) and start repeating the Pattern Chart. Remember about changing your needles: 4.00 for Star Stitch, 8.00 for Stockinette Stitch. The Pattern Chart should be repeated 6 times to reach the length of app. 150 cm. But by changing the number of repetitions you can make your cowl shorter or longer - according to your needs.
STEP 4. Joining the edges.
After finishing the last repetition of the Pattern Chart you have your cowl on 8.00 needles. You have to knit one more row using 4.o0 needles. What you do next depends on the way you have chosen to cast on at the beginning.
Version I - An Easy Way
Bind off loosely. Sew the edges together using the tapestry needle.
Version Il - A More Advanced Way
The stitches protected by the crochet provisional chain should be put onto an additional needle. Join the edges using grafting (Kitchener stitch) technique.
STEP 5. Crochet mini-borders.
You need colour B yarn. To create the first row of single crochet stitches (sc) you are going to use the knitted border stitches of your cowl as the base. Make 2 single crochet stitches in every border stitch of the Star Stitch parts. Make 4 single crochet stitches in every border stitch of the Stockinette Stitch part of your cowl. What you do next depends on the effect you want to have - simple or romantic.
Simple Effect - even edge
Using the first row of single crochet stitches make 2 more crochet rows using single or double crochet stitches (sc or dc). Using double crochet stitches you will create wider border.
Romantic Effect - mini-fans shown in the photos.
Using the first row of single crochet stitches as the base you create the second row of them. In the third row you create mini-fans using double crochet stitches and slip stitches (sl st) - look at the Mini-Fans Pattern Chart (you have all three rows shown there). When you finish one edge, repeat the same at the second edge of your cowl. Weave in the ends of the yarn. Soak and slightly block. Enjoy! Mini-Fans Pattern Chart slip stitch (sl st) single crochet stitch (sc) double crochet stitch (dc)
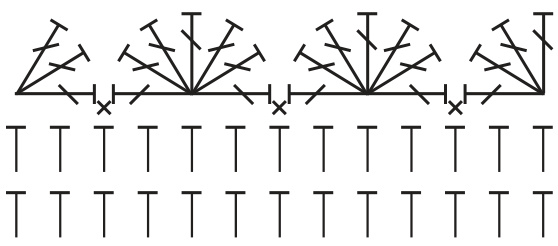
fans created with double crochet stitches = 3rd row single crochet stitches = 2nd row single crochet stitches on the knitted border stitches of the cowl = 1st row
Pattern Chart
| o | 0 | 36 35 | 34 33 32 31 30 29 28 27 26 25 24 23 22 21 11 10 9 8 7 9 5 | |||||||||||||||||
| 0 | ||||||||||||||||||||
| 0 | ||||||||||||||||||||
| 0 | o | |||||||||||||||||||
| 0 | 0 | |||||||||||||||||||
| 0 | 0 | |||||||||||||||||||
| 0 | o | 0 | ||||||||||||||||||
| 0 | 0 | |||||||||||||||||||
| o | 0 | |||||||||||||||||||
| 0 | ||||||||||||||||||||
| 0 | 0 | |||||||||||||||||||
| 0 | Stockinette - 8.00 Needles | |||||||||||||||||||
| 0 | 0 | |||||||||||||||||||
| 0 | ||||||||||||||||||||
| o 0 | o | 20 19 18 | ||||||||||||||||||
| 0 | 0 | 17 | Star Stitch - 4.00 Needles 0 4 0 3 0 2 1 | |||||||||||||||||
| 0 | 0 | |||||||||||||||||||
| 0 | 0 | |||||||||||||||||||
| o | 0 | 16 15 | ||||||||||||||||||
| 0 | 0 | 14 13 | ||||||||||||||||||
| 0 | 0 | 0 0 0 0 0 0 o | 12 | |||||||||||||||||
| 0 0 o o 0 0 o |
borderstitch knit (k) purl (p) Purl 3 together and make 3 purl stitches (p3togm3) - purl 3 stitches together but keep them on the left needle, yarn over, purl once more through the same 3 stitches on your left needle, for a total of 3 new stitches, drop the original 3 stitches from your left needle


