moore
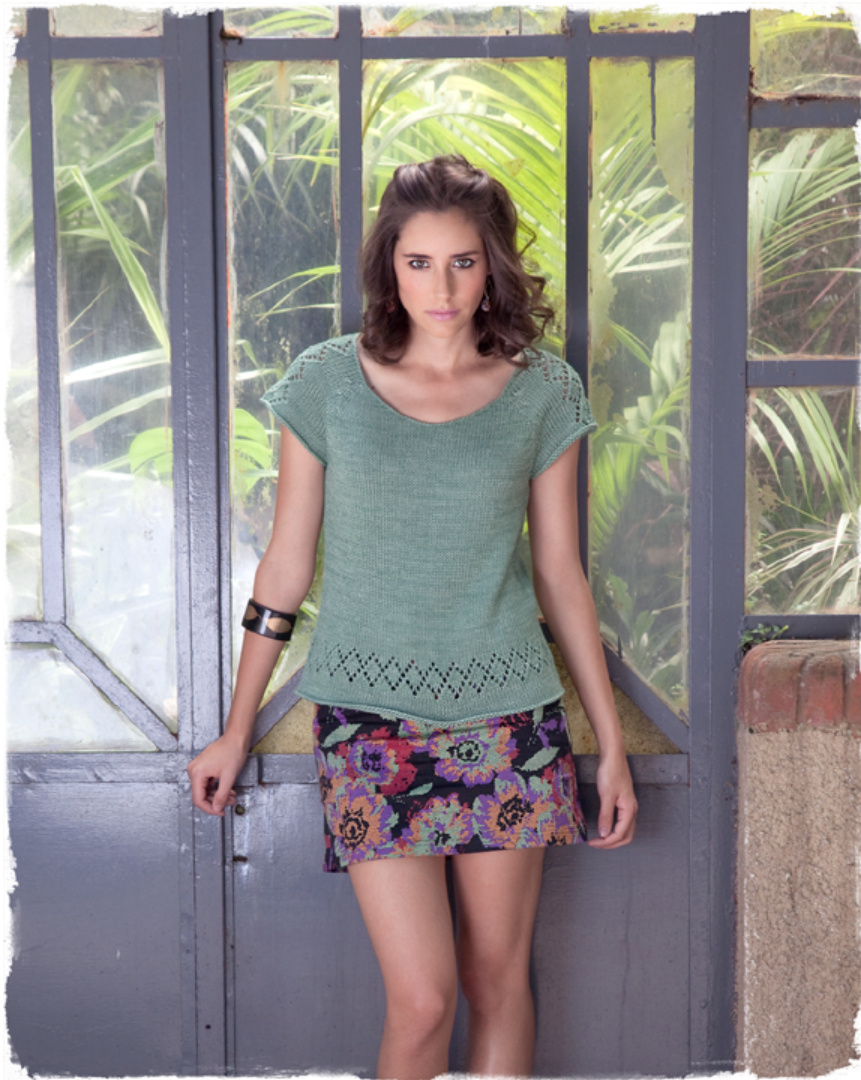

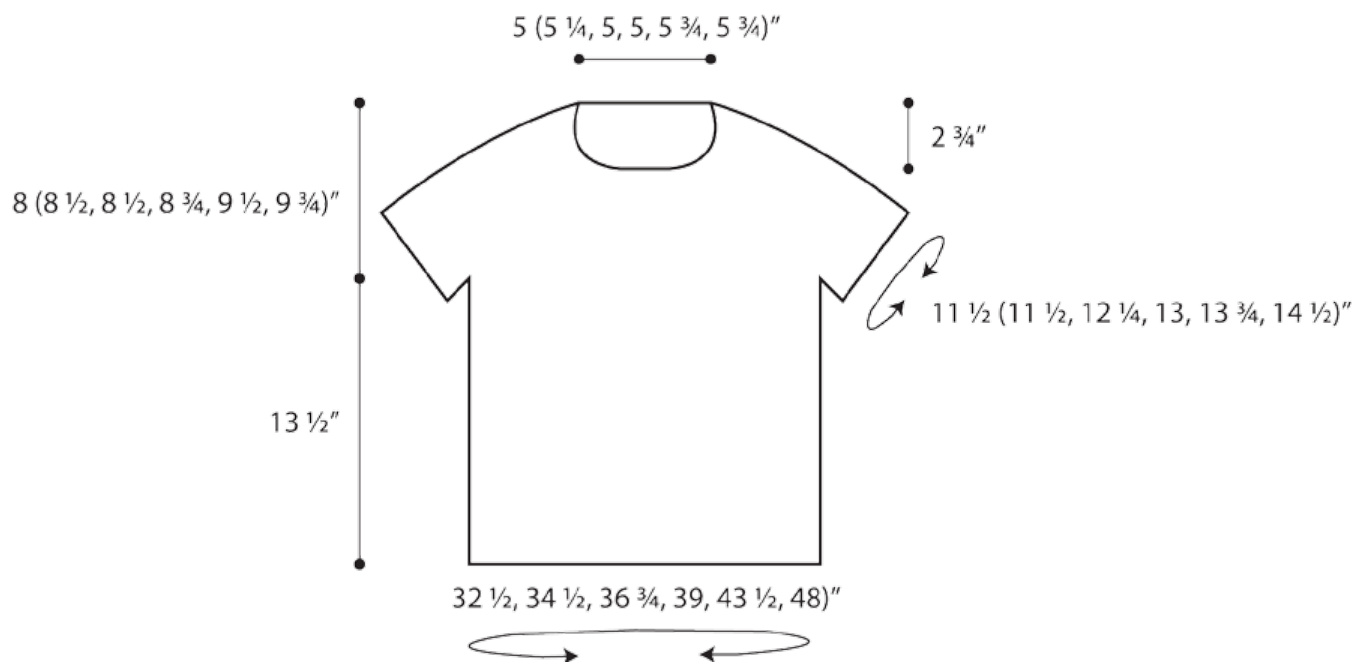
SIZES Finished bust circumference: 32 1% (34 %2, 36 %, 39, 43 %2, 48)" Length: 211%2 (22,22,22 1%, 23, 23 %)" Sweater shown measures 32 1%"
MATERIALS
Manos del Uruguay SERENA (60% baby alpaca, 40% pima cotton; approx. 50g, 170 yds), 6 (6, 7, 7, 8, 9) skeins. Shown in S2302 English. 24" or 29" circular and spn, US 6/4mm, or size needed to obtain gauge 8 ring markers: 4 in one color, 3 in another, and one unique color cable needle 6 stitch holders crochet hook, US G/4mm
GAUGE
21 12 sts and 28 rounds/rows = 4"/10 cm over St st with yarn held double
ABBREVIATIONS
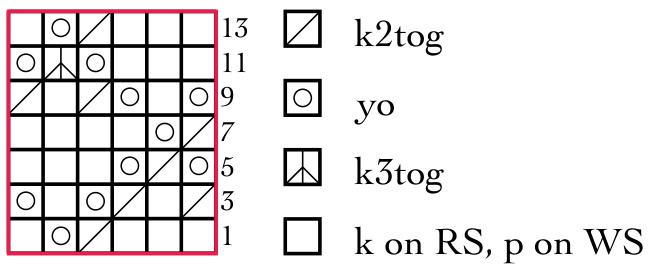
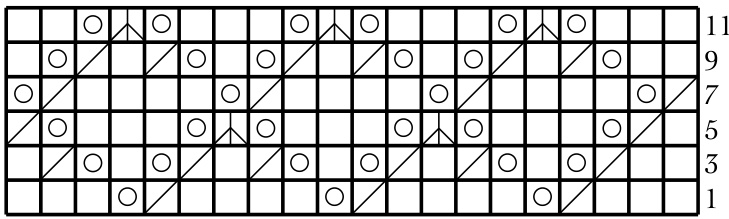
RDD (right double dec): To work on RS, sl next 2 sts to cn and hold behind LH ndl; k tog next st on LH ndl with first st on cn; k tog next st on LH ndl with last st on cn. To work on WS, sl next 2 sts to cn and hold behind LH ndl; p tog first st on cn with next st on LH ndl; p tog last st on cn with next st on LH ndl. 2 sts decreased. LDD (left double dec): To work on RS, sl next 2 sts to cn and hold in front of LH ndl; k tog first st on cn with next st on LH ndl; k tog last st on cn with next st on LH ndl. To work on WS, sl next 2 sts to cn and hold in front of LH ndl; p tog next st on LH ndl with first st on cn; p tog next st on LH ndl with last st on cn. 2 sts decreased. DIAMOND LACE ROW (multiple of 6 sts) Rnd 1: \*K3, k2tog, yo, kl; rep from \* to end of rnd. Rnd 2 and all even rnds: K. Rnd 3: \*K2tog, k1, k2tog, yo, k1, yo; rep from \* to end of rnd. All eforts were made to make this patern error-free. For questions or support,please email: info@fairmountfibers.com Fairmount Fibers Ltd. 2011 Not to be reproduced or re-knit for profit Rnd 5: \*Yo, k3tog, yo, k3; rep from \* to end of rnd. Rnd 7: \*K2tog, yo, k4; rep from \* to end of rnd. Rnd 9: \*Yo, kl, yo, k2tog, k1, k2tog; rep from \* to end of rnd. Rnd 11: \*K3, yo, k3tog, yo; rep from \* to end of rnd. Rnd 13: Repeat Rnd 1. DIAMOND LACE PANEL (worked over 20 sts) Rnd 1: K1, (k2, k2tog, yo, k2) 3 times, k1. Rnd 2 and all even rows/rnds: Work in St st. Rnd 3: K1, (k1, k2tog, yo, kl, yo, k2tog) 3 times, k1. Rnd 5: K1, k2tog, (yo, k3, yo, k3tog) twice, yo, k3, yo, k2tog. Rnd 7: (K2tog, yo, k4) 3 times, k2tog, yo. Rnd 9: Kl, (kl, yo, k2tog, k1, k2tog, yo) 3 times, k1. Rnd 1l: K1, (k2, yo, k3tog, yo, k1) 3 times, k1. Rep rnds 1 - 12 for Diamond Lace Panel.
NOTES
1. Sweater shown in photo is knit with yarn held double. For a lighter, more drapey garment, yarn may be used singly at the same gauge. Yarn requirements given are for doubled version. 2. Body is worked in the round to armholes, sleeves are knit flat and then joined to body, yoke is knit in the round.
3. Only RS rows of Lace Row and Lace Panel are charted.
BODY
Using circular ndl, CO 174 (186, 198, 210, 234, 258) sts. Join, being careful not to twist, and pm to show beg of rnd. Work in St st until piece measures 2", then work 12 rnds of Diamond Lace Row. Cont in St st until piece measures 131/2" from CO, ending 4 (4, 4, 5, 5, 5) sts before end of rnd. Divide for Front, Back, and Armholes: Remove beg-of-rnd marker as you come to it. \*K next 8 (8, 8, 10, 10, 10) sts and place on holder; k 79 (85, 91, 95, 107, 119); rep from \* once to end of rnd. Do not break yarn. Put work aside and begin Sleeves.
SLEEVES (both alike)
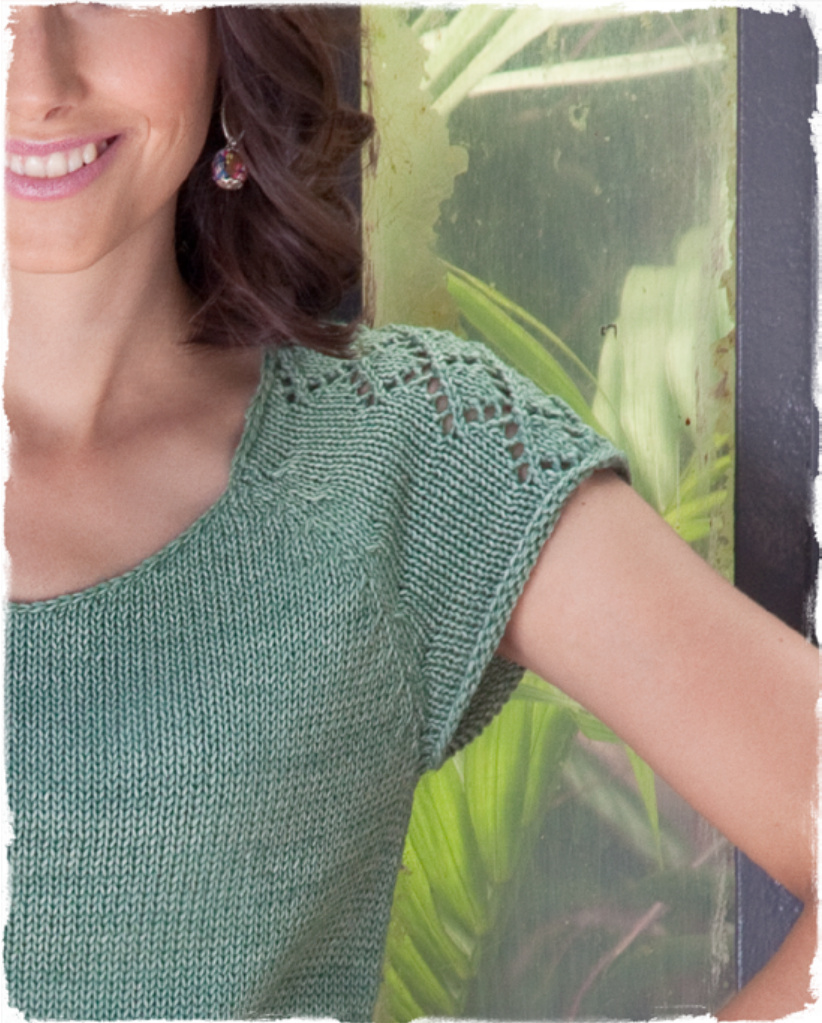
Using spn, CO 62 (62, 66, 70, 74, 78) sts. Row 1 (RS): K 21 (21, 23, 25, 27, 29), place one of the 4 matching markers, work Row/Rnd 1 of Diamond Lace Panel, place second matching marker, k to end. Row 2: P. Cont to work in St st outside ms and Diamond Lace Panel within. When piece measures /2" (or desired length to underarm), end with a WS row. Shape cap: Work 4 (4, 4, 5, 5, 5) sts and place on holder; work in patt as est to end of row. Next row: Work 4 (4, 4, 5, 5, 5) sts and place on holder; p to end of row. 54 (54, 58, 60, 64, 68) sts.
JOIN BODY AND SLEEVES
With RS facing, beginning where yarn is attached at edge of Body sts, place unique-color marker to show beg of rnd. Work across 54 (54, 58, 60, 64, 68) sts of one sleeve in patt as est; this is now Left Sleeve. Place one of 3 rem markers to show Left Front “seam"; work across 79 (85, 91, 95, 107, 119) Body sts; pm to show Right Front "seam"; work across 54 (54, 58, 60, 64, 68) sts of other sleeve in patt as est (this is now Right Sleeve); pm for Right Back “seam"; work across rem 79 (85, 91, 95, 107, 119) Body sts for Back, fnishing at beg-of-rnd marker. 266 (278, 298, 310, 342, 374) sts. Shape Raglan seams: Please read this section all the way through before beginning to knit. The next paragraph tells HOW to work the raglan decreases; the paragraph following it tells WHEN to work the raglan decreases; and the sentence following that tells when to shape the Front Neck. , or Sleeve, (sl m, kl, work RDD, k to 5 sts before next m, work LDD, k1) For Left Sleeve, dec at beg of sleeve every 6 (7, 6, 6, 6, 5) rnds 8 (8, 9, 9, 10, 12) times, and at end of sleeve every 7 (8, 6, 6, 5, 6) rnds 5 (5, 6, 7, 8, 8) times. For Front, dec at each marker every 0 (0, 2, 2, 2, 2) rnds 0 (0, 4, 5, 7, 12) times, then every 4th rnd 9 (10, 8, 8, 8, 6) times. For Right Sleeve, dec at beg of sleeve every 7 (8, 6, 6, 5, 6) rnds 5 (5, 6, 7, 8, 8) times, and at end of sleeve every 6 (7, 6, 6, 6, 5) rnds 8 (8, 9, 9, 10, 12) times. For Back, dec at each marker every 0 (0, 2, 2, 2, 2) rnds 0 (0, 4, 5, 7, 12) times, then every 4th rnd 13 (14, 12, 12, 12, 10) times. AT THE SAME TIME, when 59 (61, 59, 59, 63, 63) sts rem between Front markers, begin to shape Front Neck: work across Left Sleeve, work across Front to center 7 (9, 7, 7, 11, 11) sts; BO center 7 (9, 7, 7, 11, 11) sts, cont to end of rnd. On next rnd, when you come to the gap at the bound-off sts, turn and purl back: piece will now be worked back-and-forth, in rows. Continuing to dec at markers as given above, BO 3 sts from neck edge at beg of next 4 rows, then 2 sts at beg of next 10 rows. Then dec 1 st at each side of neck edge on next 2 RS rows. There are now few or no sts remaining at Front, and the Sleeve decs worked near the Front should be complete. (If they aren't, keep going for a few rows.) Cont to work decs on Back, and on Sleeves near Back, as given above; and AT THE SAME TIME, BO 4 sts from neck/sleeve edge at beg of next 14 rows. There are now few or no sts remaining at Sleeves, and Back decs should be complete. (If they aren't, keep going for a few rows.) BO rem 27 (29, 27, 27, 31, 31) sts.
FINISHING
Sew short sleeve seams. Join underarm sts with graft or 3-needle BO. Work 1 rnd single crochet around neck edge. Weave in ends. Block lightly.
DIAMONDLACE ROW
DIAMONDLACE PANEL
All eforts were made to make this patern error-free. For questions or support,please email: info@fairmountfibers.com Fairmount Fibers Ltd. 2011 Not to be reproduced or re-knit for profit


