This pattern was inspired by the character Brienne of Tarth from George R. R. Martin's A Song of Ice and Fire series. Despite being a high-born lady and heiress to the Sapphire Isle, Brienne is a fierce and determined fighter who longs to serve as a knight. Plain faced and abnormally tall and strong for a woman, she is sometimes mockingly referred to as Brienne the Beauty... but most would never be brave enough to say it to her face!
Yarn:
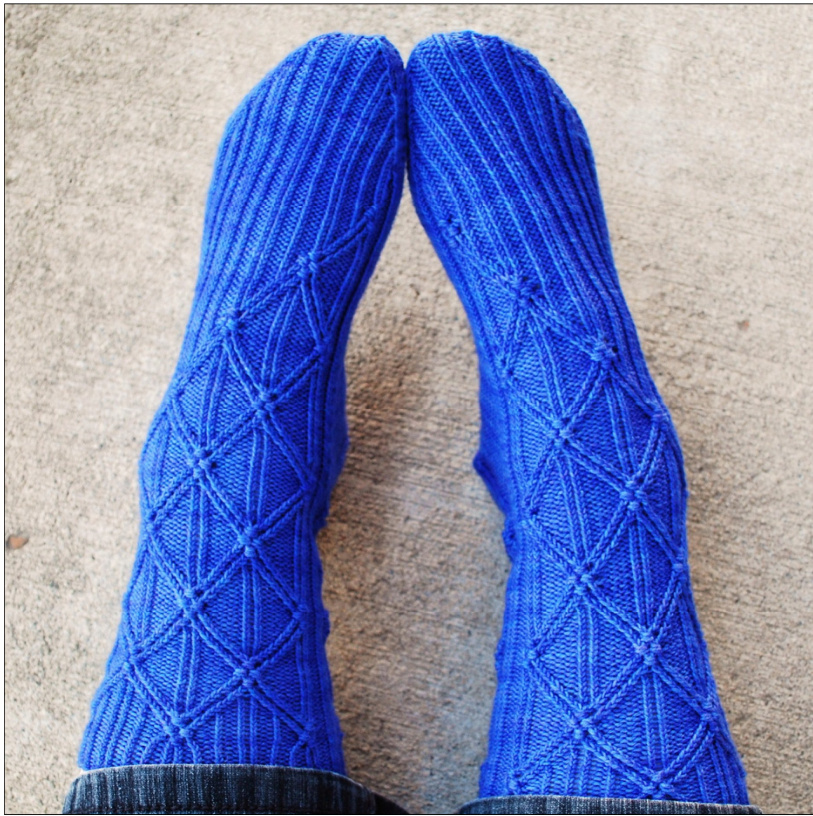
Approx. 350-450 yards of solid or semi-solid fingering wt yarn. The sample was knit with Wollmeise Twin in Hortensie (80% merino, 20% nylon, 510 yds/150 g) Other Materials: 2.50mm needles (or size required for gauge), darning needle Gauge and Sizing: 8 stitches per inch in plain stockinette. Three sizes are provided: S (M, L) with circumferences of approx. 6.25 (7.0, 7.75) unstretched inches around the leg
Abbreviations:
Cuff:
Cast on 64 (72, 80) sts using the long-tail method and distribute the stitches as follows: sts stitches sl slip kknit ppurl k tbl knit through back loop p tbl purl through back loop k2tog knit 2 together p2tog purl 2 together ssk slip slip knit Magic loop: Front needle: 32 (36, 40) sts Back needle: 32 (36, 40) sts
DPNs:
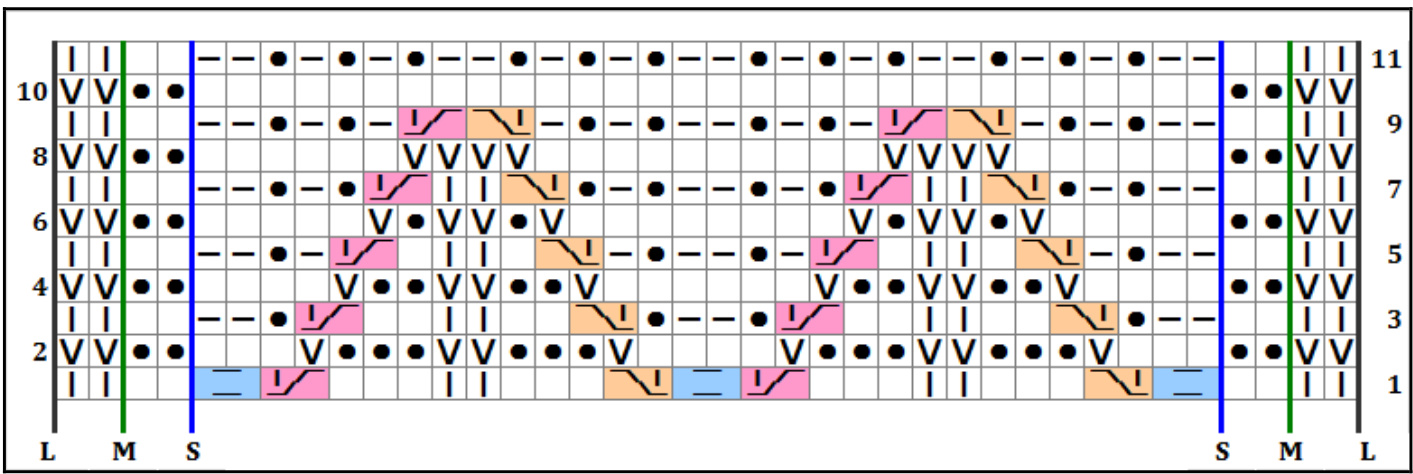
Needles 1 & 2 (front of leg): 16 (18, 20) sts each Needles 3 & 4 (back of leg): 16 (18, 20) sts each Work row 1 of the leg chart twelve times: Small: Work the 32 stitches between the blue lines twice per round. Medium: Work the 36 stitches between the green lines twice per round. Large: Work all 40 stitches twice per round.
Leg:
Continue working the entire leg chart through to row 37 once. Rows 1-9 are set-up rows and should be skipped the second time through. Instead, continue at row 10 (marked with a red line on the chart) and finish the leg after working row 34 for the second time. Do not knit across the back portion of the leg on the final row worked.
Heel Flap:
The heel flap is worked back and forth over the next 32 (36, 40) stitche: RS: sl1, work heel chart, k1 WS: sl1, work heel chart, p1 Complete the entire heel chart in this manner and then continue on by repeating rows 10 & 11 an additional 9 (10, 11) times or until the flap reaches your desired length. Work row 10 a final time before proceeding to the heel turn.
Heel Turn:
Row 1: (RS) sl1, k18 (20, 22), ssk, k1, turn Row 2: (WS) sl1, p7 (7, 7), p2tog, p1, turn Row 3: (RS) sl1, k to 1 stitch before gap, ssk to close gap, k1, turn Row 4: (WS) sl1, p to 1 stitch before gap, p2tog to close gap, p1, turn Repeat rows 3 & 4 until all heel stitches have been worked. 20 (22, 24) heel stitches remain.
Gusset & Foot:
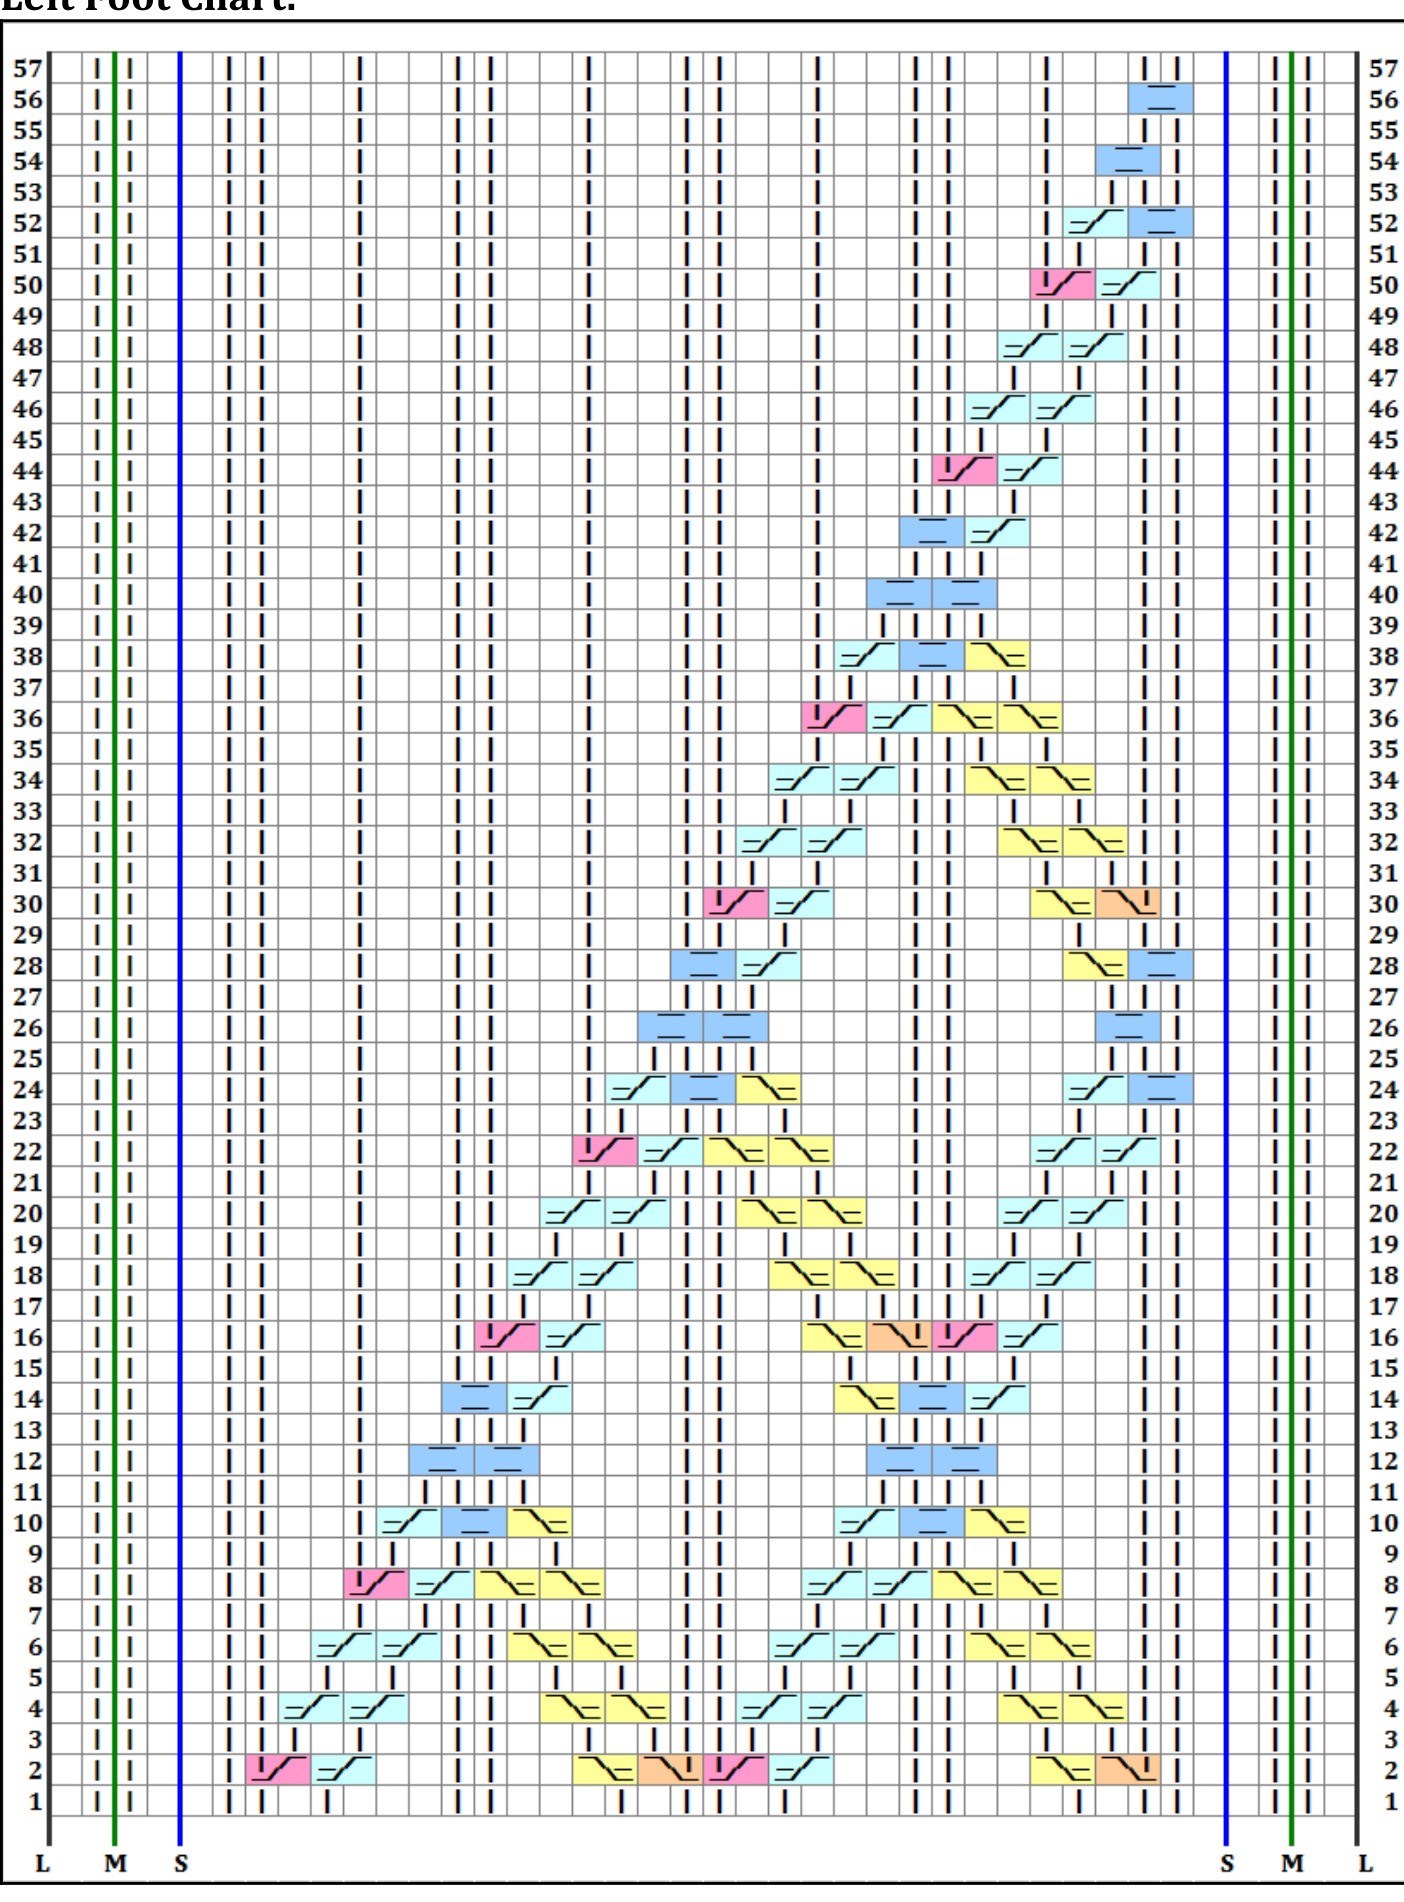
Knit across the heel and then pick up one stitch in each chain stitch along the edge of the heel flap to form one side of the gusset. In order to prevent a hole from forming, you may find it useful to pick up an extra stitch at the junction of the gusset/instep on either side of the foot. Continue across the instep stitches by following the first row of the left or right foot chart. Pick up stitches along the remaining edge of the heel flap and knit across the remainder of the heel and gusset stitches to the instep. This point will become the new end of round. Be sure the stitches are arranged on the needles as follows: Magic Loop: Needle 1: Instep sts Needle 2: All gusset and heel sts
DPNs:
Needles 1 & 2: Instep sts Needles 3 & 4: All gusset and heel sts Work the gusset decreases as follows: Row 1: work instep sts according to chart, k1, ssk, k to 3 sts before end of round, k2tog, k1 Row 2: work instep, k to end of round Repeat these two rows until 32 (36, 40) sole stitches remain. At this point, continue by working only row 2 until you reach the end of the foot chart. Repeat the final row of the chart until you are 2.0 (2.25, 2.5) inches from your desired final length.
Toe:
Row 1: Instep: k1, ssk, work instep sts in established pattern to 3 sts before end, k2tog, k1 Sole: k1, ssk, k to 3 sts before end, k2tog, k1 Row 2: work instep in established pattern, k all sole stitches Repeat these 2 rows until 32 stitches are left. Continue repeating row 1 only until 16 stitches remain. Graft the toe closed with the kitchener stitch and weave in your ends. This knitting pattern, including allinstructions, charts and photographs are ? 2012 by Kimberly Pieper. This pattern may not be copied or offered for sale without the permission of the designer. Please feel free to contact me as purrlescent on Ravelry or at kimberlypieper@gmail.com with any questions or problems you may encounter with the pattern. Many thanks to my lovely test knitters: houghmary, jlrdomom, knits-n-purls, kwelch, ladylime, midnight27, miekes and stellabone!
Leg Chart:
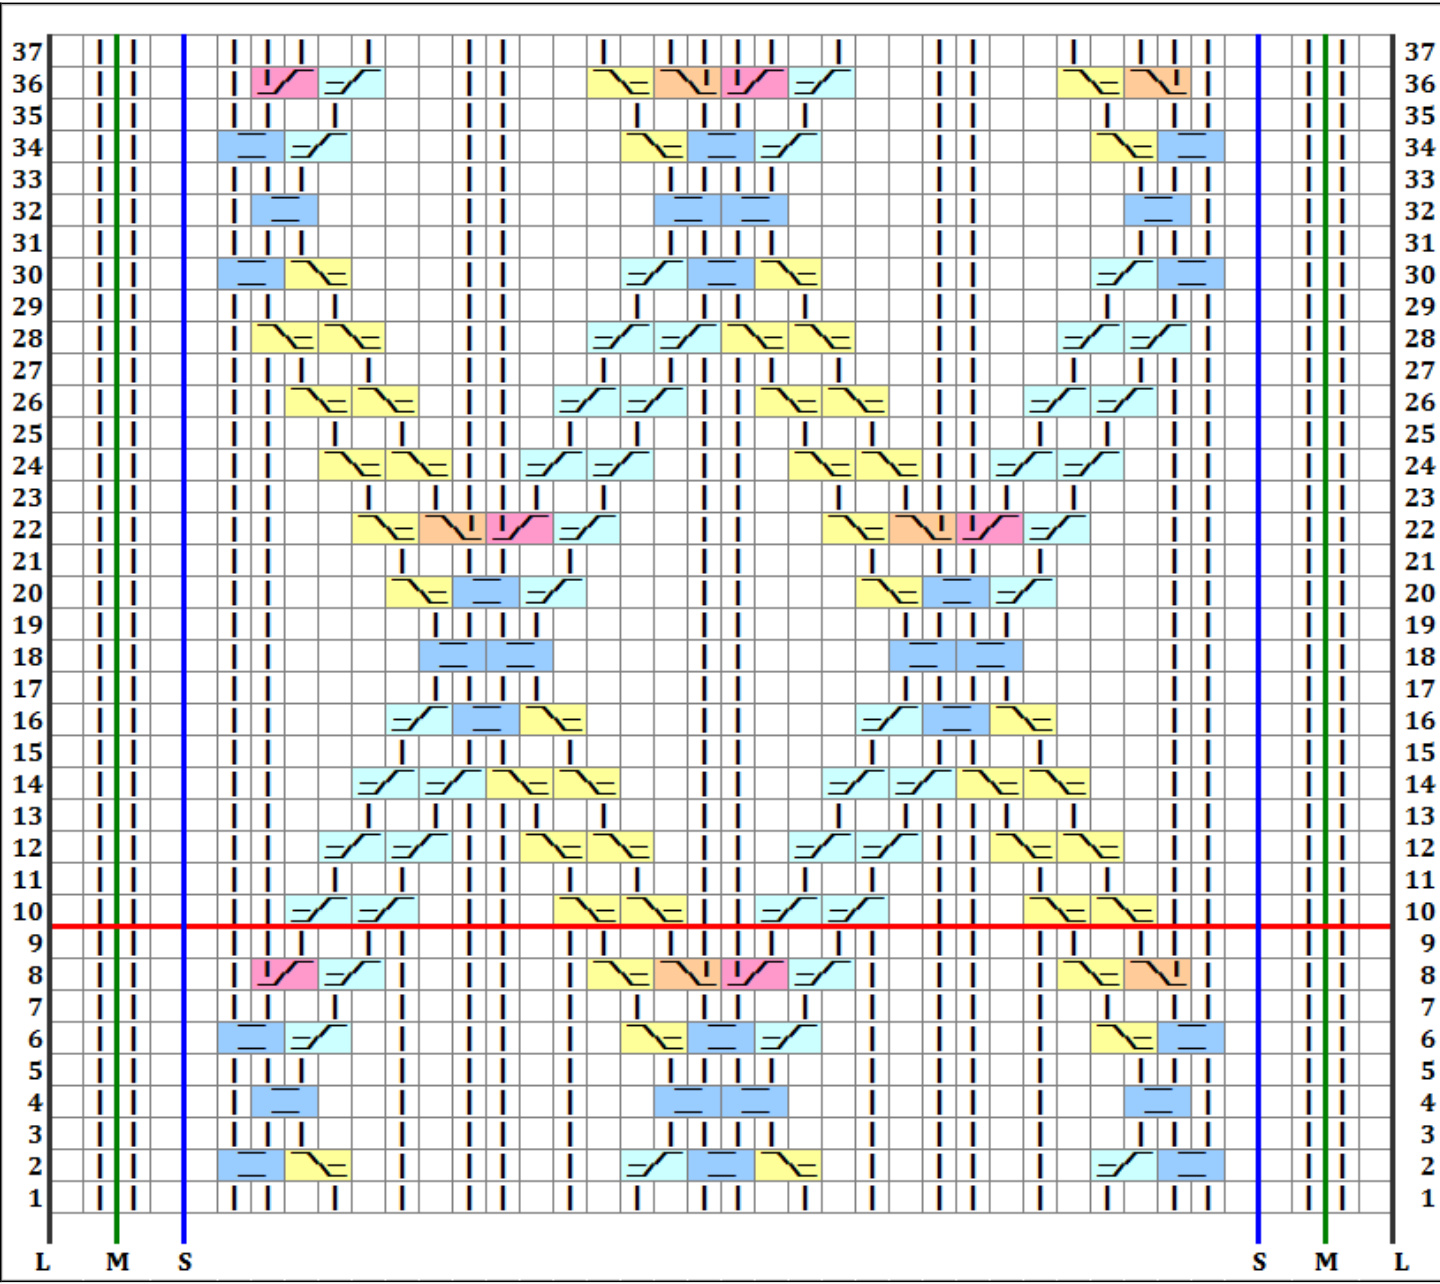
Please refer to legend on next page.
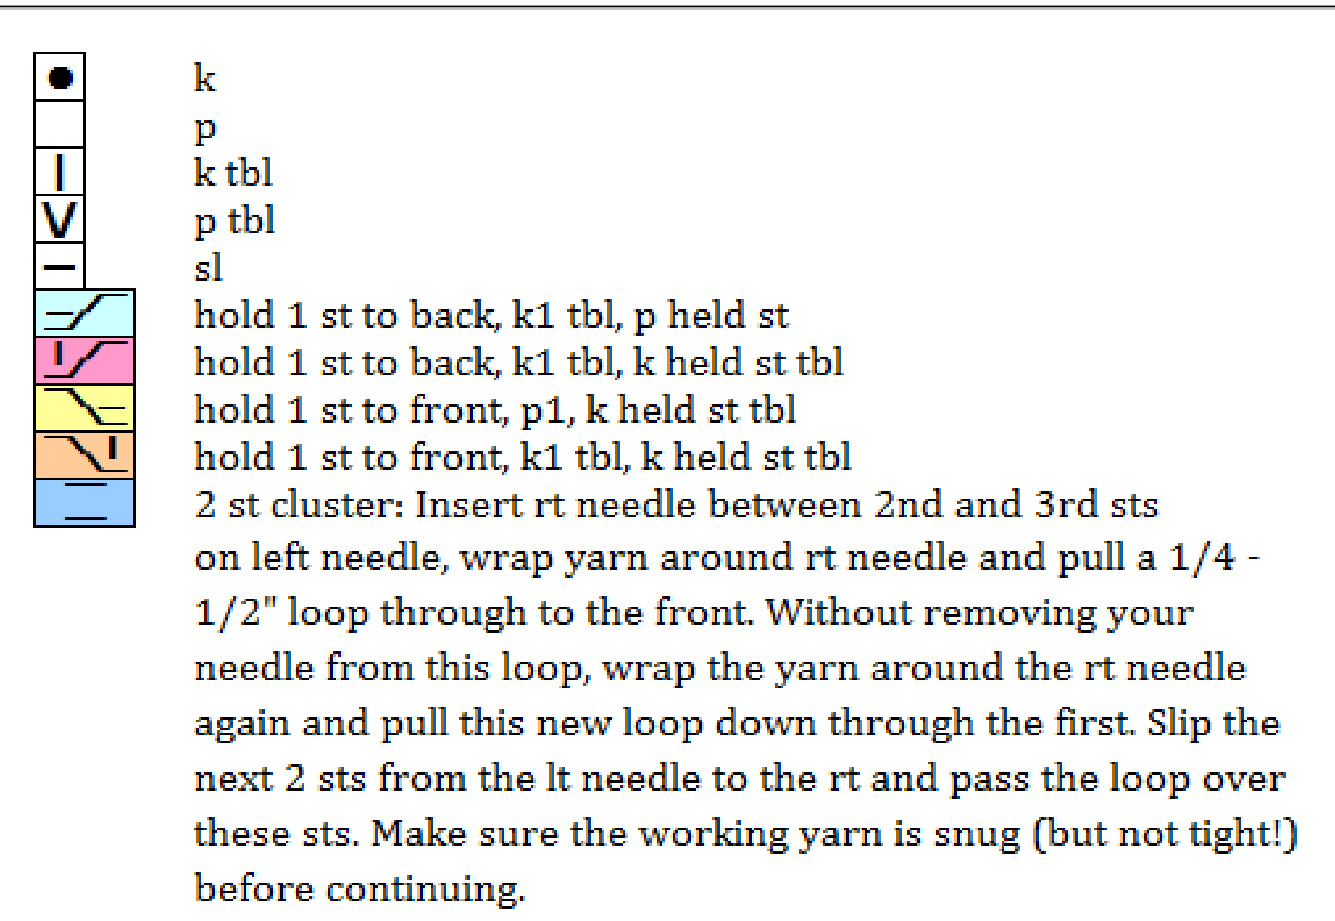
Legend:
Heel Chart:
Left Foot Chart:
Right Foot Chart:


