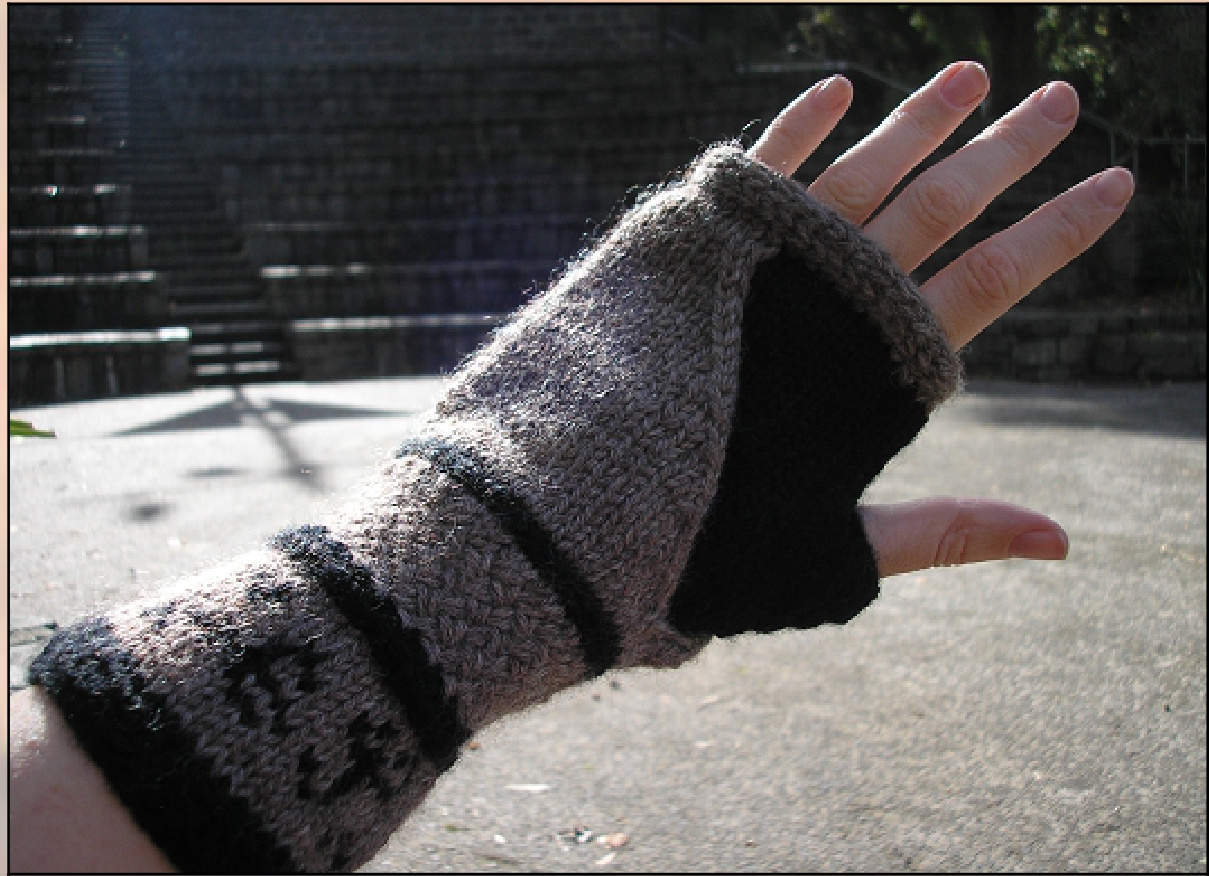
JU Pixelated Mushroom
"There, down the roofless wall did glow The zun upon the grassy vloor, An' weakly-wandren winds did blow, Unhinder'd by a door" (The Castle Ruins - William Barnes) For more patterns and updates from Pixelated Mushroom please visit: http://pixelatedmushroom.blogspot.com http://www.ravelry.com/designers/nyss-parkes
Materials
3.5mm long circular needle (or needle to get gauge) A spare circular needle or waste yarn Bendigo Woollen Mills Rustic 8 Ply (DK) Earth 50 grams / 99 meters Bendigo Woollen Mills Classic 8 Ply (DK) Raven 50 grams / 99 meters A good substitute - Cascade 220 wool (although not DK, this yarn has been tested and knits up well for this pattern)
Gauge
8rows x 5sts = 1 inch over stockinette
Sizes
Small [Medium, Large] width across knuckles Small 16.5cm 6.5" Medium 19cm 7.5" Large 21cm 8.25"
Rights
Techniques / Abbreviations
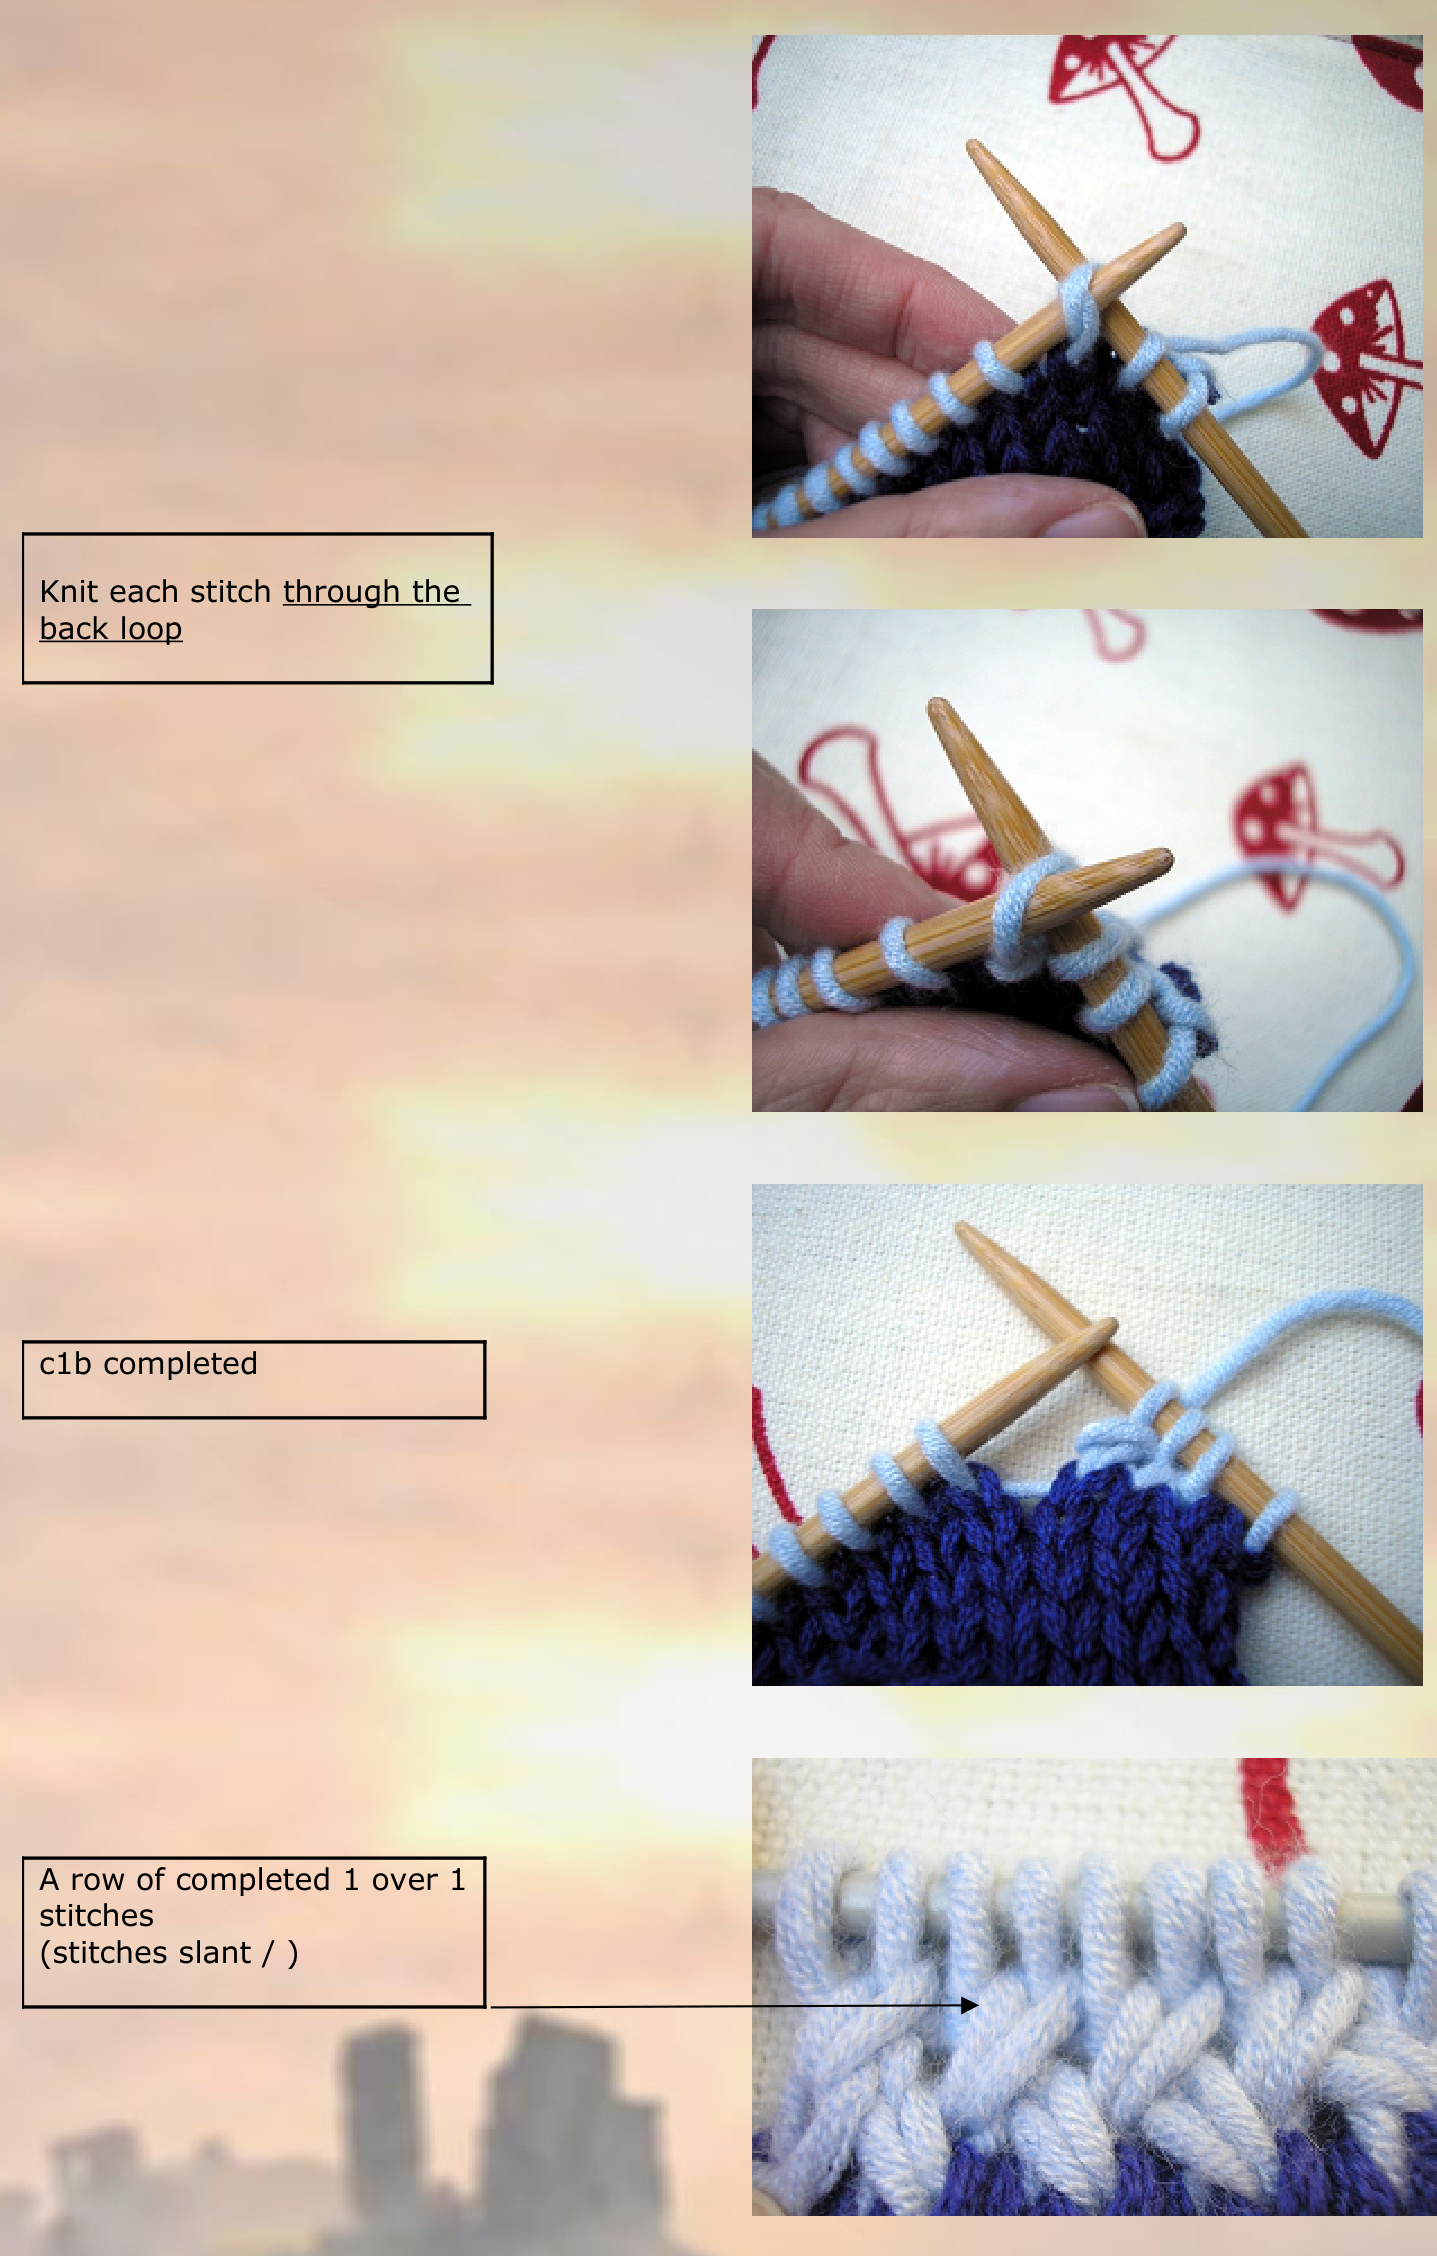
Pattern copyright @ 2011 Nyss Parkes. Please do not distribute. k - knitp - purlst - stitchLC - light colour DC - dark colour Watermark and banner image: Corfe Castle, Dorset by d a vidb u n tin g on flickr: http://www.flickr.com/photos/hirezima ges/3232250360 (CC BY 2.0) inc - knit into front and back of stitch to increase ssk - slip, slip, knit k2tog - knit two sts together \*\* - repeat directions between \*\* as many times as indicated Please contact pixelatedmushroom@gmail.com if you have any questions c1f = cable 1 front (see page 7) c1b = cable 1 back (see page 9)
Cast on
DC cast on 40 [44, 48] Arrange sts on magic loop so that there are 20 [22, 24] on front needle, and 20 [22, 24] on back needle, join for working in the round knit into the back of each stitch purl 1 round knit 1 round
Horizontal band
horizontal stitch as follows: k1, \*shift 1 stitch back to left needle, c1f repeat to end (arrange 20 [22, 24] sts on each needle)
Colour stranding section
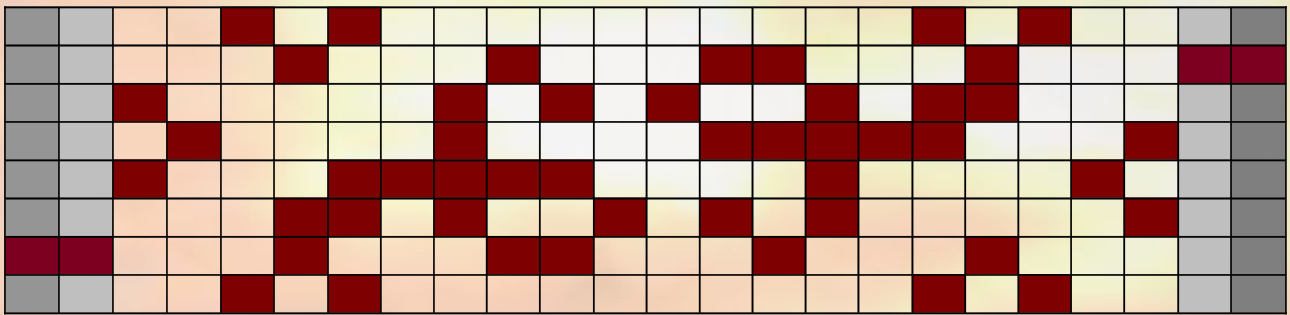
LC knit 2 [3, 4] rounds Knit chart row twice per each round until chart is complete start at the bottom right corner of the chart Ouse DC for the dark brown sections Oextra sizes are indicated by chart columns: [light grey, darkgrey] if you're having too much trouble with the colour work, knit the rows of the chart in LC and duplicate stitch the design on later in DC
LC knit 2 [3, 4] rounds
Horizontal band
DC knit 1 round horizontal stitch as follows: k1, \*shift 1 stitch back to left needle, c1f\* repeat to end (arrange 20 [22, 24] sts on each needle)
Basket weave section
This section is made up of An increase round to accommodate the lack of stretch in the basket weave Two mini cable rounds that are repeated to make up a Basket Weave A decrease round to return to the normal stitch count [f you find basket weave too hard, you can replace this section with knitting 10 rounds with LC, or repeating the small-size stranded section. TIP: Try not to pull sts too tight, add an extra little tug to each loop you pull through to give yourself some extra yarn to work with. See images at end of pattern for the easiest way to do these mini cables increase round LC inc1, k17 [19, 21] increase4, k16 [18, 20], increase2 = 47 [51, 55] (arrange 23 [25, 27] sts on front needle, and 24 [26, 28] on back needle) basket weave c1f until one st remains in round, slide this last st along to the start of the next round c1b once, slide first st of current round back to become last st of previous round again, c1b to end (arrange 23 [25, 27] sts on front needle, and 24 [26, 28] on back needle) Repeat these last two rounds three more times decrease round DC ssk1, k17 [19, 21], k2tog twice, ssk twice, k16 [18, 20], k2tog twice = 40 [44, 48] (arrange 20 [22, 24] sts on each needle)
Horizontal band
horizontal stitch as follows: k1, \*shift 1 stitch back to left needle, c1f\* repeat to end (arrange 20 [22, 24] sts on each needle)
Creating two layers
knit into the front of each stitch with LC, and the back of each stitch with DC - doubling stitch count shift LC working yarn to the outside of work \*slip LC stitch onto spare circular needle/waste yarn, knit DC stitch with DC\*, repeat to end of round
Inside layer - increasing for thumb
DC knit 1 round Right k22 [24, 26], inc1, place marker1, k2, place marker2, inc1, k14 [16, 18] = 42 [46, 50] knit 2 rounds Continue as above, increasing before marker1 and after marker2, then knitting two plain rounds, until stitch count has reached 50 [56, 62], (finish with the two plain rounds) = (12 [ 15, 18] further rounds) k23 [25, 27], knit into the back of the next 2 sts, \*knit into the back of the next stitch, then lift the second st on the right needle over the first (casting it off)\* repeat 10 [12,14] times, knit into the back of the next st, knit to end = 40 [44, 48] k23 [25, 27], knit 1 over 1 once to join thumb sts, k15 [17, 19] to end (arrange 20 [22, 24] sts on each needle) Remove markers Left k14 [16, 18], inc1, place marker1, k2, place marker2, inc1, k22 [24, 26] = 42 [46, 50] knit 2 rounds Continue as above, increasing before marker1 and after marker2, then knitting two plain rounds, until stitch count has reached 50 [56, 62], (finish with the two plain rounds) = (12 [ 15, 18] further rounds) k15 [17, 19], knit into the back of the next 2 sts, \*knit into the back of the next stitch, then lift the second st on right needle over the first (casting it off)\* 10 [12, 14] times, knit into the back of the next st, knit to end = 40 [44, 48] k15 [17, 19], knit 1 over 1 once to join thumb sts, k23 [25, 27] to end (arrange 20 [22, 24] sts on each needle) Remove markers
Both hands
knit 7 [8, 9] rounds transfer DC sts to a spare needle or waste yarn and break off DC leaving long tail for finishing
Outside layer
transfer LC sts back onto working needle knit 3 rounds k19 [21, 23], knit 1 over 1 once, k19 [21, 23] to end (arrange 20 [22, 24] sts on each needle) k20 [22, 24], turn work next rows will be worked back and forth from this point p40 [44, 48], turn work slip 1, ssk, knit until 3 sts remain, k2tog, k1, turn work = 38 [42, 46] slip1 purlwise, purl to end, turn work repeat these two rows until 20 LC sts remain (10 sts on each needle) = 18 [22, 26] further rounds Using LC, slip1, k9 [10, 11]
Joining the layers
\*knit first LC stitch on needle together with DC st from spare needle/waste yarn\* repeat until the 10 [11, 12] LC sts are used up, then knit along until 10 [11, 12] DC sts remain, \*knit LC stitch together with DC st from spare needle/waste yarn\* until end = 40 [44, 48] ssk1, knit16 [18, 20] k2tog1, ssk1, k16 [18, 20], k2tog1 = 36 [40, 44] k1, \*shift 1 stitch back to left needle, knit 1 over 1\* repeat until 1 remains, k1 (arrange 18 [20, 22] sts on each needle) k1, \*shift 1 stitch back to left needle, knit 1 over 1\* twice, then \*shift 1 stitch back to left needle, lift last st on right needle over the first (casting it off), knit 1 over 1\* repeat until end, cast off second remaining stitch, then pick up one extra stitch at the start of following and knit it to close the gap in row heights. Cast off second remaining stitch again, and then break yarn leaving a long tail for finishing.
Finishing
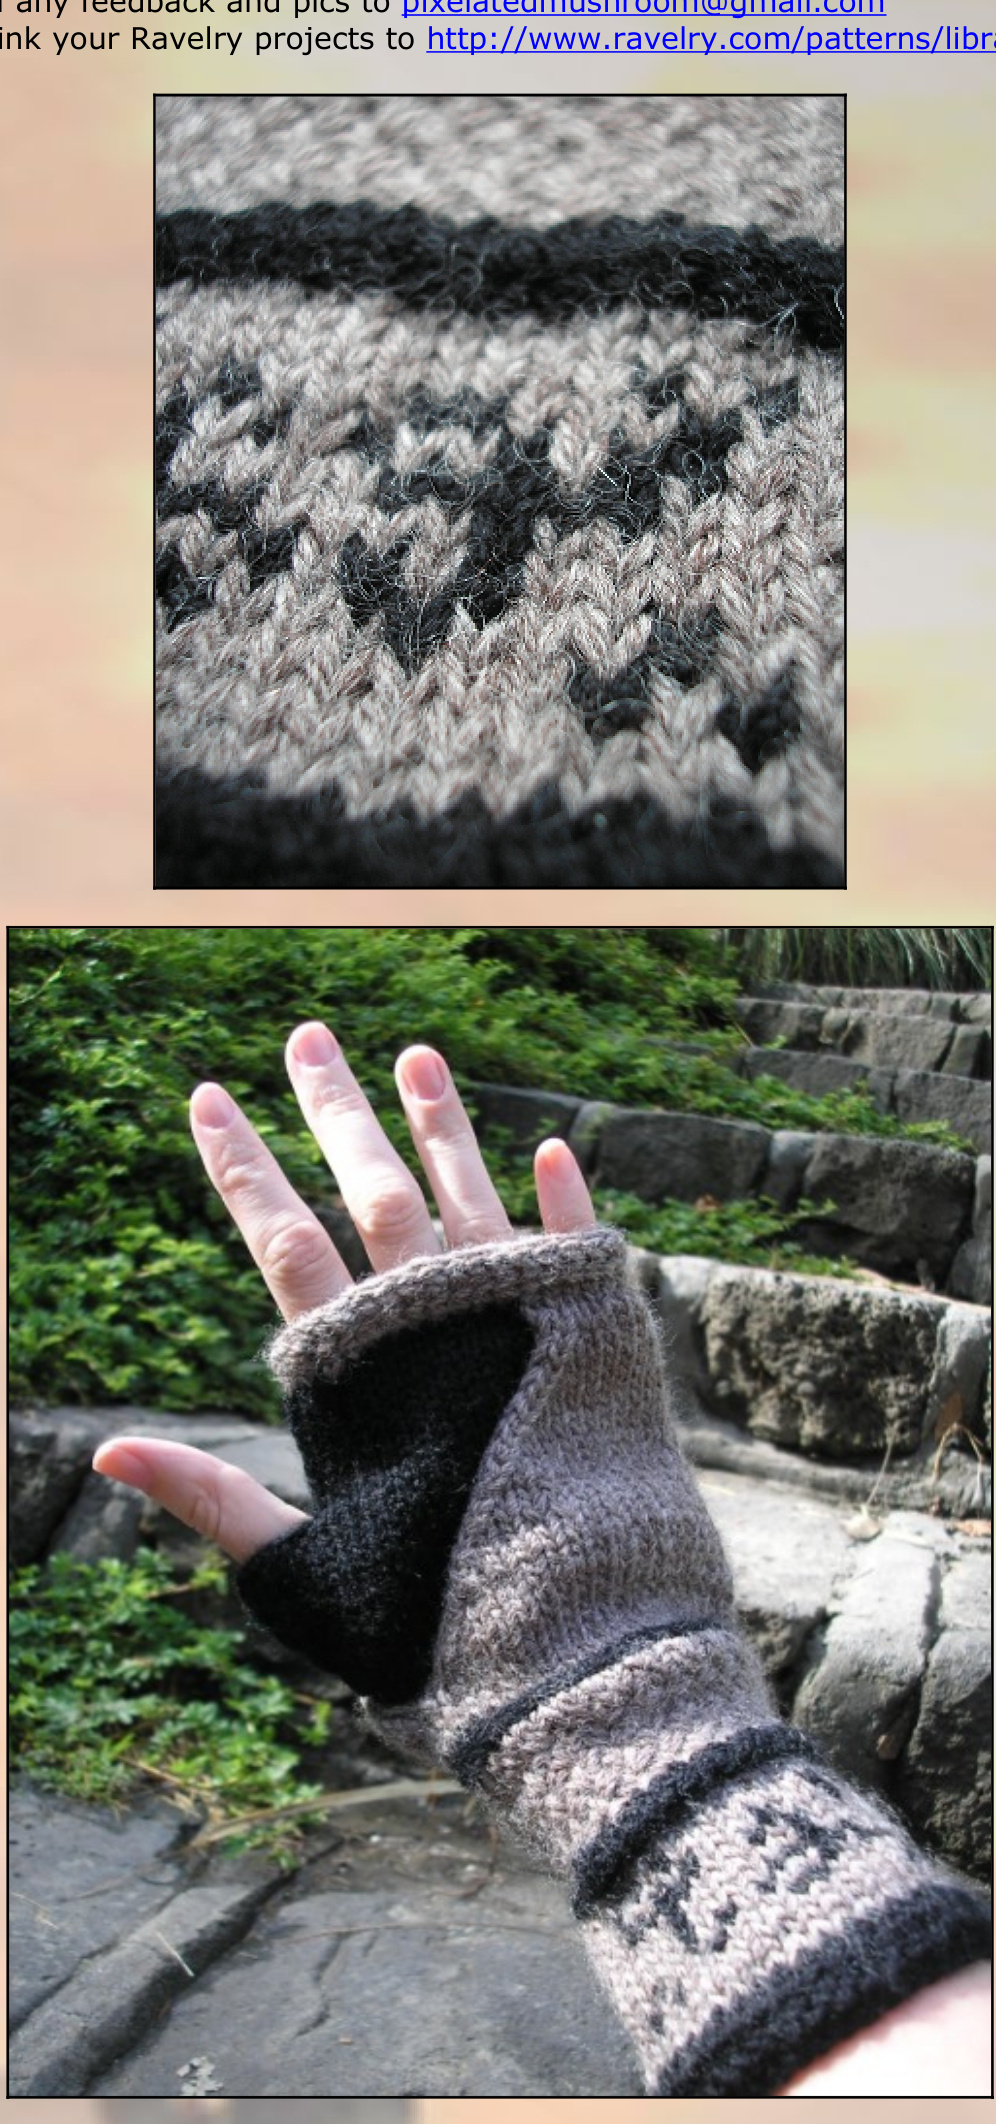
Weave in loose ends and block carefully in slightly warm water. Dry flat. I would love to see how your projects turn out and hear how your knitting went Email any feedback and pics to pixelatedmushroom@gmail.com
Stitches Help Section
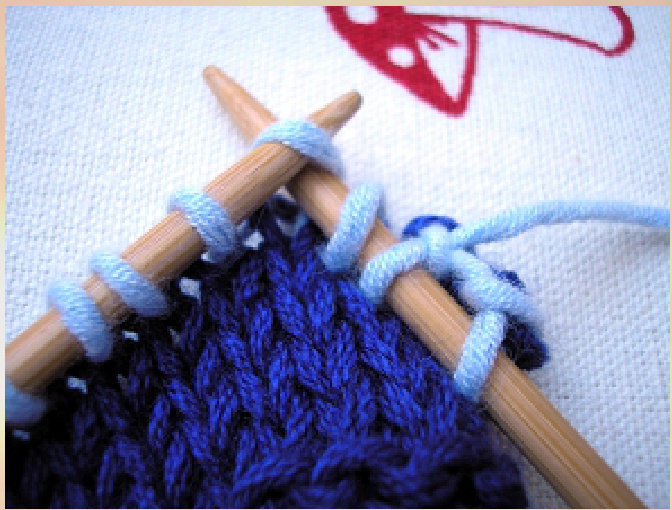
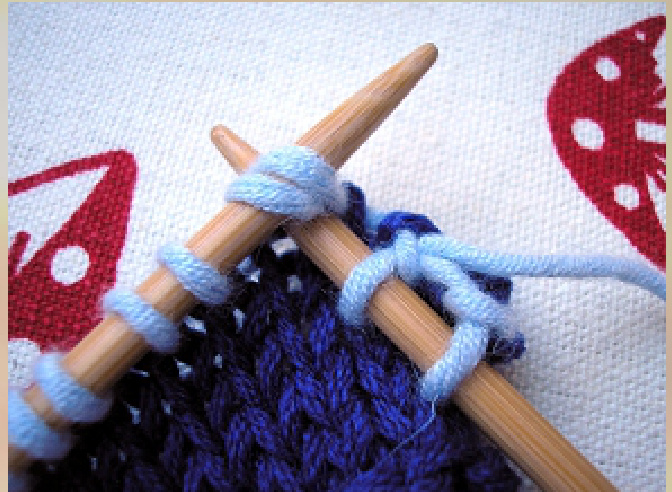
Cable 1 Front (c1f)
This is holysimian's (on Ravelry) technique for a fast and non-painful mini cable. As you will be doing this stitch across several rows I suggest doing it this way, as it doesn't pull your stitches out of shape Youtube vid (1:10): http://www.youtube.com/ watch?v=nKQxVHuuGmc Slip second stitch as if to knit

Slip first stitch as if to knit Insert left needle into the front of the slipped sts and lift them onto left needle (they have now been reversed)
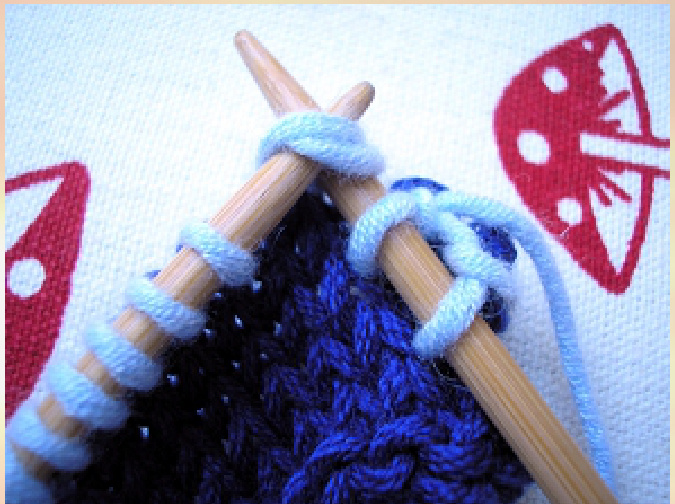

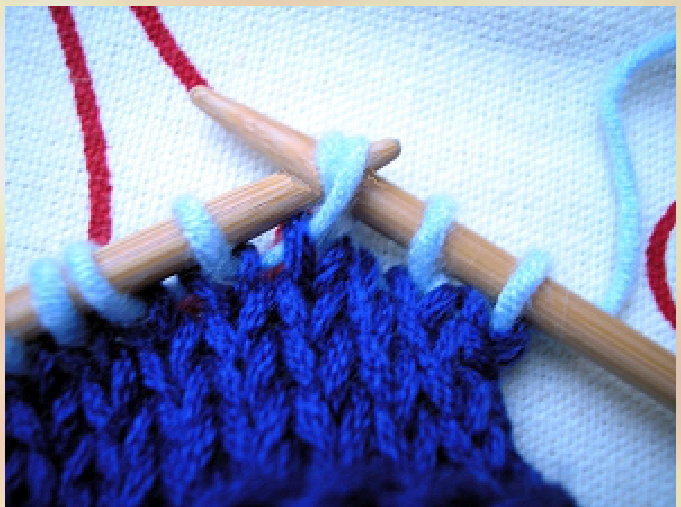
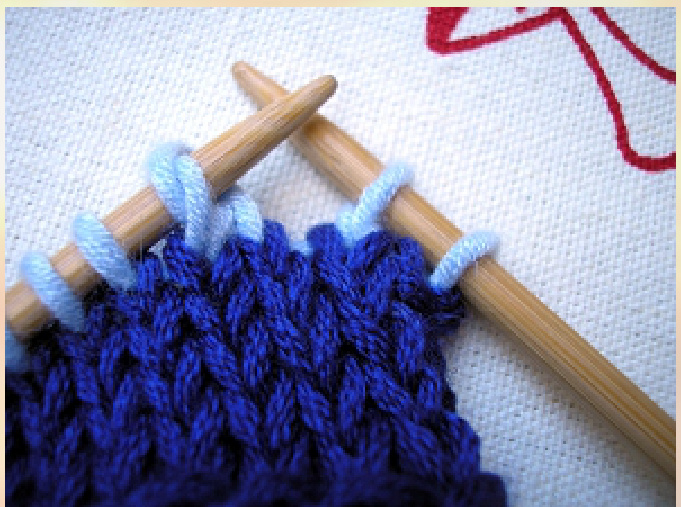
Cable 1 Back (c1b)
This is holysimian's (on Ravelry) technique for a fast and non-painful mini cable. As you will be doing this stitch across several rows I recommend doing it this way, as it doesn't pull your stitches out of shape Youtube vid (1:48): http://www.youtube.com/w atch?v=nKQxVHuuGmc
Slip 2 stitches as if to knit two together
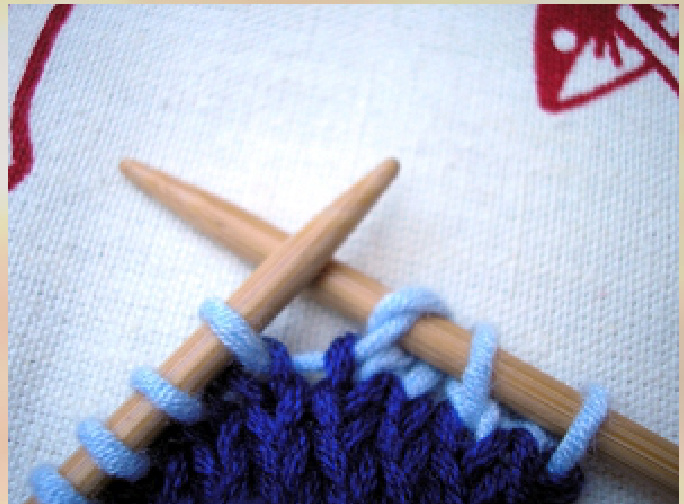
Insert left needle into back of slipped sts, and lift them back on the left needle (they have now been reversed)