Sinmply Made By Erin
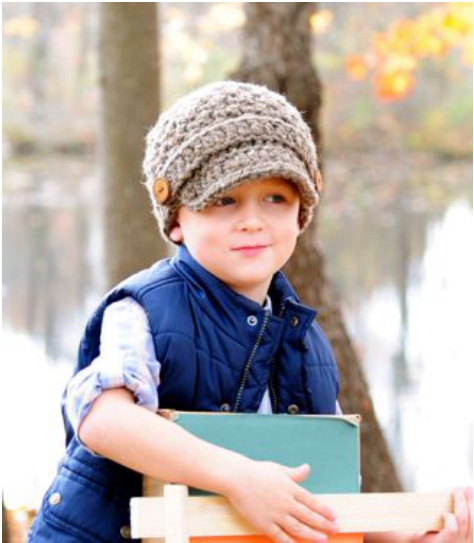
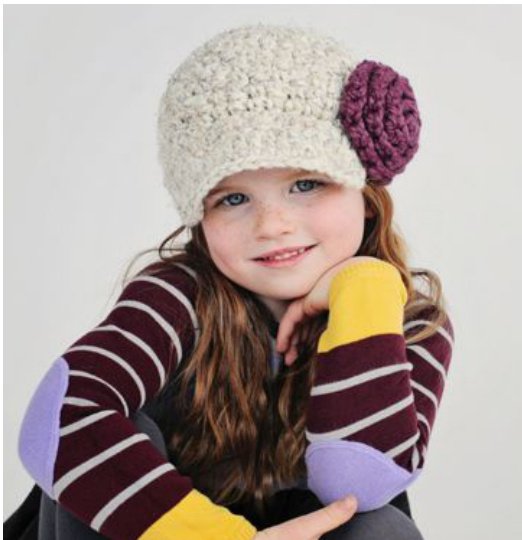
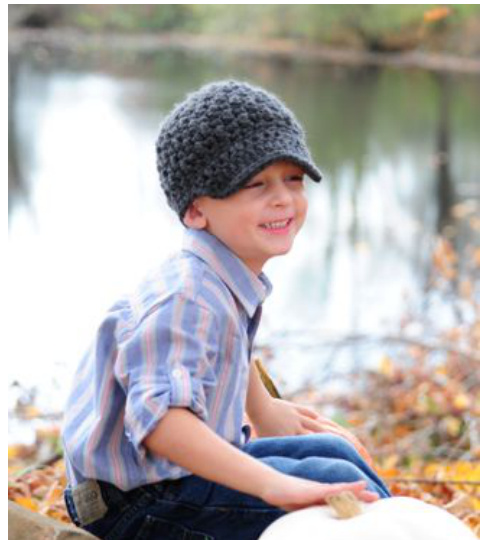
Square Brimmed Unisex Newsboy Hat Size 1-3 Years, 3-10 Years, & Adult
With Strap
With Flower
Without Strap
Pattern and images are copyright protected and the sole property of Simply Made By Erin. The written pattern is for personal use only, please do not redistribute, transfer, or sell the pattern. Feel free to do what you like with the finished product, but please credit me as the designer. If you intend to sell the finished product, I ask that you please notify me beforehand at simplymadebyerin@gmail.com to obtain permission. I also ask that you please do not sell finished items on larger venues such as Etsy, EBay, etc. Skill Level: Beginner/Advanced Beginner Abbreviations: (Standard American Crochet Terms) ch(s) - chain/chains sl st - slip stitch sC - single crochet hdc - half double crochet dc - double crochet st(s) - stitch/stitches rnd(s) - round/rounds
Materials:
Size 6, super bulky yarn (4.5oz./127g (90 yd/82 m), approximately 60-90 yards (depending on hat size), 10 yards for rose. Iprefer Lion Brand Wool Ease Thick & Quick or Michaels Brand Loops & Thread Cozy Wool. (results wil vary depending on yarn used) N15/10mm Crochet Hook (or size to meet gauge) J10/6mm Crochet Hook (or size to meet gauge) Tapestry Needle Stitch Marker
Gauge Working in the Round:
1-3 Years - First 3 Rounds in Pattern = 4 %4 Inches with N Hook 3-10 Years - First 3 Rounds in Pattern = 4 % Inches with N Hook Adult - First 3 Rounds in Pattern = 4 % Inches with N Hook Please be sure to check your gauge before starting, as tension can vary greatly from person to person and depending on the yarn used. Adjust hook size up or down in order to obtain proper gauge. Ialso give many measurements throughout the pattern so you can see if you're on track for the proper size.
Hat Sizes:
1-3 Years, Fits Head Circumference 18-19 Inches & Height 6 %2 -7 Inches 3-10 Years, Fits Head Circumference 19-20.5 Inches & Height 7-7 %2 Inches Adult Medium/Large, Fits Head Circumference 22-23 Inches & Height 7 %2 - 8 Inches Sizes are approximate based on the average for each age. When available, please use head measurements, rather than age, as children and adult heads tend to vary quite a bit. If your child is between sizes I recommend going with the larger size to allow the most room for growth.
Size 1-3 Years, Fits Head Circumference 18-19 Inches & Height 6 / -7 Inches
Using N Hook Rnd 1. Ch 3 (counts as 1st st), 7 hdc in 3rd chain from hook, join with sl st to top of ch 3. (8 hdc) Alternatively, you may use the magic circle method as follows: Create a magic circle, ch 2 (counts as 1st hdc) 7 hdc in circle, join with sl st to top of ch 2. (8 hdc) Rnd 2. Ch 1 (does not count as 1st st now & throughout unless otherwise noted), 2 hdc in same st as ch 1, 2 hdc in next st and remaining sts around, join with sl st to beginning hdc. (16 hdc) Rnd 3. Ch 1, hdc in same st as ch 1, 2 hdc in next st, \*hdc in the next st, 2 hdc in next st\*, repeat from \* to \* in remaining sts around, join with sl st to beginning hdc. (24 hdc) (diameter should measure about 4 % inches across) Rnd 4. Ch 1, hdc in same st as ch 1, hdc in next st, 2hdc in next st, \*hdc in the next 2 sts, 2 hdc in next st\*, repeat from \* to \* in remaining sts around, join with sl st to beginning hdc. (32 hdc) (diameter should measure about 5 12 inches across) Rnd 5. Ch 1, sc in same st as ch 1, dc in next st, \*sc in next st, dc in next st\*, repeat from \* to \* around, join with slip st to beginning SC. (32 sts) In the following rnds make sure the sc are worked into the dc from previous rnd, and the dc are worked into the sc from the previous rnd. Rnd 6. Ch 1, dc in same st as ch 1, sc in next st, \*dc in next st, sc in next st\*, repeat from \* to \* around, join with slip st to beginning dc. (32 sts) Rnd 7. Repeat rnd 5 Rnd 8. Repeat rnd 6 Rnd 9. Repeat rnd 5 (height should measure about 5 inches, add additional rounds here to add height, making sure to alternate between rnds 5 & 6) Rnd 10-11. Ch 1, sc in same st as ch 1 and remaining sts around, fasten off and weave in loose ends, proceed to below instructions for brim. (32 sc)
Brim
Step 1. with right side facing, using J hook, attach with sl st in the 11th st from fasten off point, ch 1 (does not count as 1st st) sc in same st as ch 1, sc in next 12 sts, turn (13 sts) Step 2. Ch 2 (counts as 1st st), dc in next 3 sts, 2dc in next st, dc in next 3 sts, 2 dc in next st, dc in next 4 sts, turn (15 sts) Step 3. Ch 2 (counts as 1st st), dc in next 4 sts, 2dc in next st, dc in next 3 sts, 2 dc in next st, dc in next 5 sts, fasten off and weave in loose ends. (17 sts) Finishing Border. With N Hook, attach with sl st to the back of hat at seam, ch 1, sc in same st as ch 1, sc in each st along perimeter of hat & brim, sl st to beginning sc. Fasten off& weave in loose ends. Continue below for strap instructions or to last page for flower instructions.
Making the Strap
Using J Hook, ch 24 (or ch until desired length of strap), dc in 3rd ch from hook, & remaining chs across, ending with a sl st in the last st. Fasten off & weave in loose ends. Sew strap and buttons onto each side of the brim using a sewing needle and coordinating thread. You're new hat is now complete, enjoy!!
Size 3-10 Years, Fits Head Circumference 19-20.5 Inches & Height 7 -7 % Inches
Using N Hook Rnd 1. Ch 3 (counts as 1st st), 8 hdc in 3rd chain from hook, join with sl st to top of ch 3. (9 hdc) Alternatively, you may use the magic circle method as follows: Create a magic circle, ch 2 (counts as 1st hdc) 8 hdc in circle, join with sl st to top of ch 2. (9 hdc) Rnd 2. Ch 1 (does not count as 1st st now & throughout unless otherwise noted), 2 hdc in same st as ch 1, 2 hdc in next st and remaining sts around, join with sl st to beginning hdc. (18 hdc) Rnd 3. Ch 1, hdc in same st as ch 1, 2 hdc in next st, \*hdc in the next st, 2 hdc in next st\*, repeat from \* to \* in remaining sts around, join with sl st to beginning hdc. (27 hdc) (diameter should measure about 4 % inches across) Rnd 4. Ch 1, hdc in same st as ch 1, hdc in next st, 2hdc in next st, \*hdc in the next 2 sts, 2 hdc in next st\*, repeat from \* to \* in remaining sts around, join with sl st to beginning hdc. (36 hdc) (diameter should measure about 5 % inches across) Rnd 5. Ch 1, sc in same st as ch 1, dc in next st, \*sc in next st, dc in next st\*, repeat from \* to \* around, join with slip st to beginning SC. (36 sts) In the following rnds make sure the sc are worked into the dc from previous rnd, and the dc are worked into the sc from the previous rnd. Rnd 6. Ch 1, dc in same st as ch 1, sc in next st, \*dc in next st, sc in next st\*, repeat from \* to \* around, join with slip st to beginning dc. (36 sts) Rnd 7. Repeat rnd 5 Rnd 8. Repeat rnd 6 Rnd 9. Repeat rnd 5 Rnd 10. Repeat rnd 6 (height should measure about 5 % inches, add additional rounds here to add height, making sure to alternate betweenrnds5&6) Rnd 11-12. Ch 1, sc in same st as ch 1 and remaining sts around, fasten off and weave in loose ends, proceed to below instructions for brim. (36 sc)
Brim
Step 1. with right side facing, using J hook, attach with sl st in the 12th st from fasten off point, ch 1 (does not count as 1st st) sc in same st as ch 1, sc in next 14 sts, turn (15 sts) Step 2. Ch 2 (counts as 1st st), dc in next 4 sts, 2dc in next st, dc in next 3 sts, 2 dc in next st, dc in next 5 sts, turn (17 sts) Step 3. Ch 2 (counts as 1st st), dc in next 4 sts, 2dc in next st, dc in next 5 sts, 2 dc in next st, dc in next 5 sts, fasten off and weave in loose ends. (19 sts) Finishing Border. With N Hook, attach with sl st to the back of hat at seam, ch 1, sc in same st as ch 1, sc in each st along perimeter of hat & brim, sl st to beginning sc. Fasten off & weave in loose ends. Continue below for strap instructions or to last page for flower instructions.
Making the Strap
Using J Hook, ch 26 (or ch until desired length of strap), dc in 3rd ch from hook, & remaining chs across, ending with a sl st in the last st. Fasten off & weave in loose ends. Sew strap and buttons onto each side of the brim using a sewing needle and coordinating thread.
You're new hat is now complete, enjoy!!
Size Adult Medium/Large, Fits Head Circumference 22-23 Inches &Height 7 %2 -8 Inches If you are an adult small or an XL try going up or down a hook
size to make the hat a little tighter or looser. Using N Hook Rnd 1. Ch 3 (counts as 1st st), 9 hdc in 3rd chain from hook, join with sl st to top of ch 3. (10 hdc) Alternatively, you may use the magic circle method as follows: Create a magic circle, ch 2 (counts as 1st hdc) 9 hdc in circle, join with sl st to top of ch 2. (10 hdc) Rnd 2. Ch 1 (does not count as 1st st now & throughout unless otherwise noted), 2 hdc in same st as ch 1, 2 hdc in next st and remaining sts around, join with sl st to beginning hdc. (20 hdc) Rnd 3. Ch 1, hdc in same st as ch 1, 2 hdc in next st, \*hdc in the next st, 2 hdc in next st\*, repeat from \* to \* in remaining sts around, join with sl st to beginning hdc. (30 hdc) (diameter should measure about 4 % inches across) Rnd 4. Ch 1, hdc in same st as ch 1, hdc in next st, 2hdc in next st, \*hdc in the next 2 sts, 2 hdc in next sts\*, repeat from \* to \* in remaining sts around, join with sl st to beginning hdc. (40 hdc) (diameter should measure about 6 inches across) Rnd 5. Ch 1, sc in same st as ch 1, dc in next st, \*sc in next st, dc in next st\*, repeat from \* to \* around, join with slip st to beginning SC. (40 sts) In the following rnds make sure the sc are worked into the dc from previous rnd, and the dc are worked into the sc from the previous rnd. Rnd 6. Ch 1, dc in same st as ch 1, sc in next st, \*dc in next st, sc in next st\*, repeat from \* to \* around, join with slip st to beginning dc. (40 sts) Rnd 7. Repeat rnd 5 Rnd 8. Repeat rnd 6 Rnd 9. Repeat rnd 5 Rnd 10. Repeat rnd 6 Rnd 11. Repeat rnd 5 (height should measure about 6 % inches, add additional rounds here to add height, making sure to alternate between rnds 5 & 6) Rnd 12-13. Ch 1, sc in same st as ch 1 and remaining sts around, fasten off and weave in loose ends, proceed to below instructions for brim. (40 sc)
Brim
Step 1. with right side facing, using J hook, attach with sl st in the 12th st from fasten off point, ch 1 (does not count as 1st st) sc in same st as ch 1, sc in next 16 sts, turn (17 sts) Step 2. Ch 2 (counts as 1st st), dc in next 4 sts, 2dc in next st, dc in next 5 sts, 2 dc in next st, dc in next 5 sts, turn (19 sts) Step 3. Ch 2 (counts as 1st st), dc in next 5 sts, 2dc in next st, dc in next 5 sts, 2 dc in next st, dc in next 6 sts, fasten off and weave in loose ends. (21 sts) Finishing Border. With N Hook, attach with sl st to the back of hat at seam, ch 1, sc in same st as ch 1, sc in each st along perimeter of hat & brim, sl st to beginning sc. Fasten off& weave in loose ends. Continue below for strap instructions or to last page for flower instructions.
Making the Strap
Using J Hook, ch 28 (or ch until desired length of strap), dc in 3rd ch from hook, & remaining chs across, ending with a sl st in the last st. Fasten off & weave in loose ends. Sew strap and buttons onto each side of the brim using a sewing needle and coordinating thread.
You're new hat is now complete, enjoy!!
Rose Embellishments
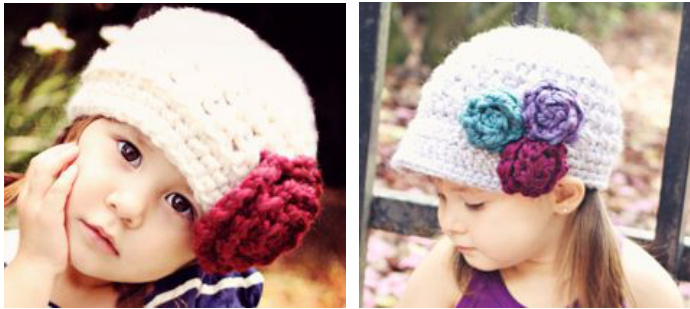
These simple rose inspired flowers can be made in any size by simply adjusting the number of beginning chain stitches. Instructions below are based on the size roses used for hats in sizes 1-3 & 3-10 years. You may want to adjust the size slightly larger for an adult size hat.
Using J Hook For Large Rose
Ch 40 leaving 10 inch beginning tail Row 1. work (hdc, dc) in 2nd ch from hook, and in each ch across, sl st in last ch, fasten off leaving a 10 inch tail. Starting at the end with the tails, curl/roll flower into a spiral shape, (the tails should be in front of flower). Using a tapestry needle weave the tail ends through the front center of the flower to the backside. Working with one tail at a time, weave in and out of the back of the flower, through the chain stitches, until the flower is completely intact and in the desired shape. Use remaining tail ends to affix to hat.
For Small Roses
Follow the instructions for the large rose above, changing the beginning chain to 20.


