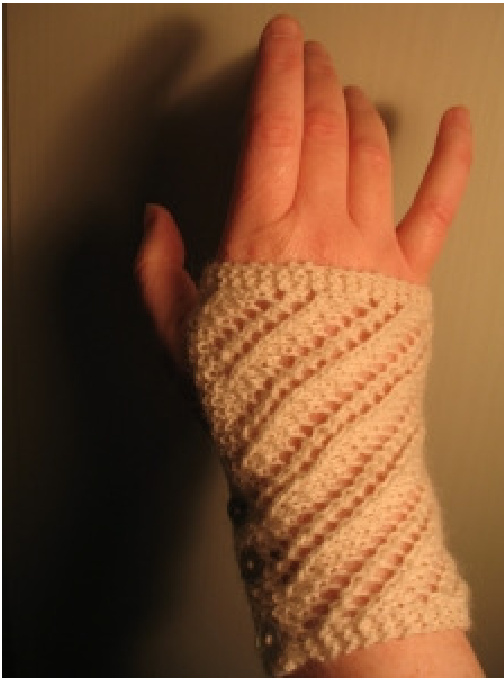
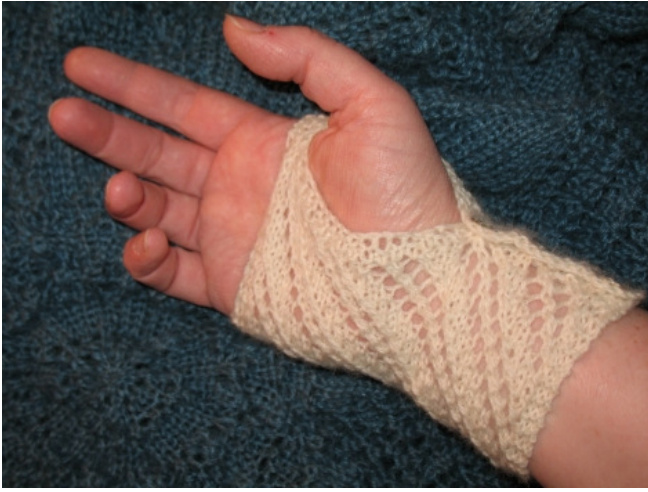
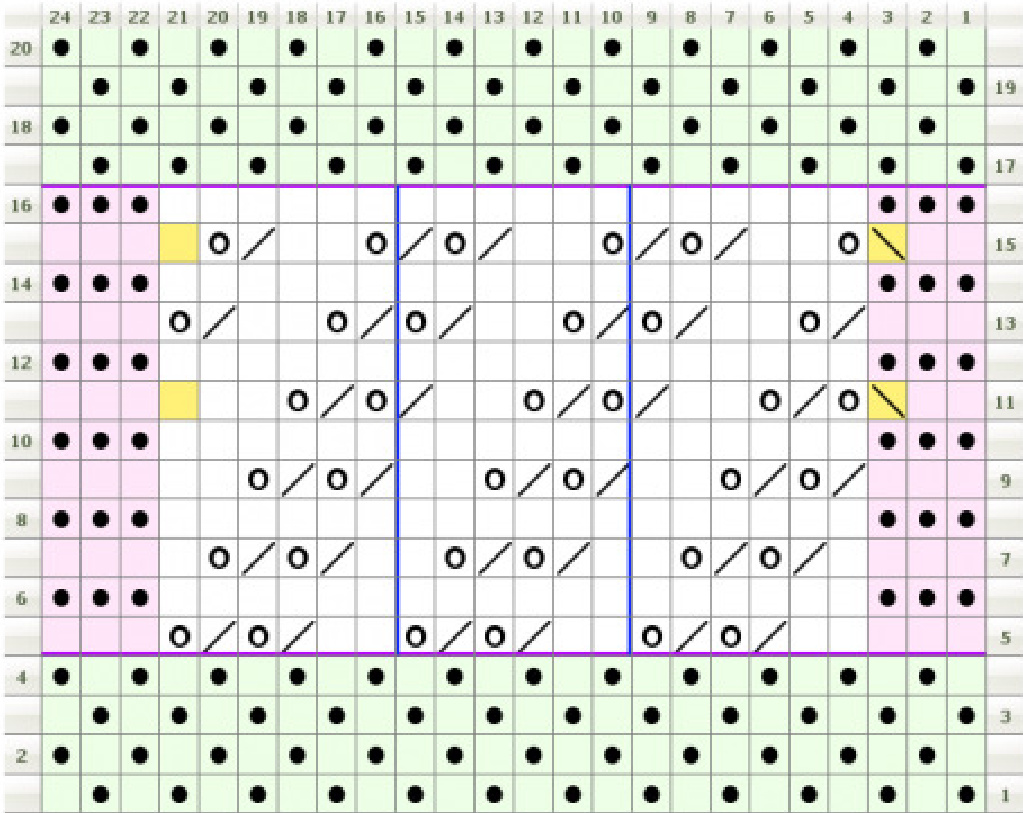
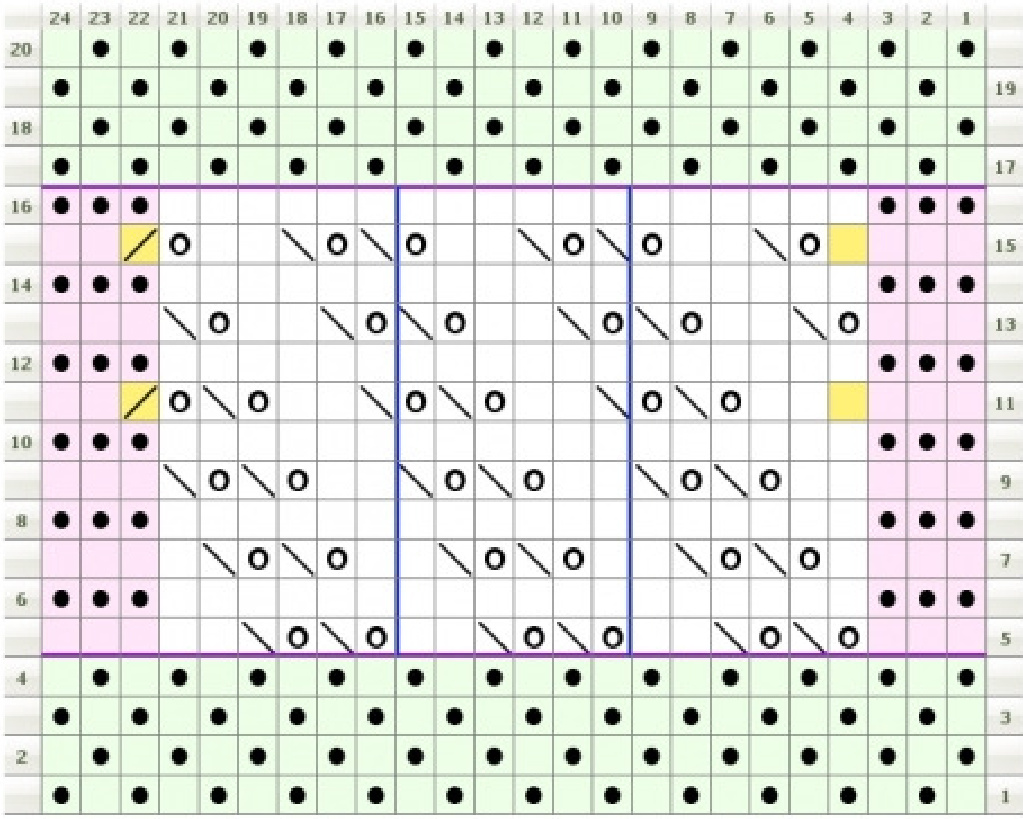
①De-De Heeter 2009 http://facefromthepast.wordpress.com INTRODUCTION: Just For You Mitts are so named for two reasons. I designed them as a gift "just for you," my knitting friends, whether I've met you or not. I deeply appreciate everything I've received from the knitting community at large and wanted to give something back. The other reason for the name is that you will be personalizing the fit and style just for you. My intention is that this pattern can be used by a beginning lace knitter successfully as a tutorial, but provide enough variety in an easy project to interest the experienced person, as well Please notify me if you find any errors in my work. Thanks! A WORD TO THE WISE: Please take a few minutes to read through everything before you start. Since the project is personalized, the pattern is constructed a bit differently than most. Also, I've added a few hints and tips that should make your knitting time faster, easier, and more fun! WHAT yOU WILL NEED: Supplies are very open ended. YARN - Your yarn choice is quite flexible. Pick something you love! You willhave the best results with weights from sock or fingering up through DK weight, as anything heavier wil tend to overwhelm the lacy pattern. My sample was knit with fingering weight (Knit Picks Palette). As I'm writing this pattern, it has only been tested in this soft bouncy wool, but if you can produce ribbing with stretch and memory with your preferred yarn, it should be fine. For most people, 100 yards should be more than enough yarn, even in the finer weights, but if you have especially large hands, you may wish to have a bit more on hand. These were designed to look nice in handdyed or patterned yarn, but they are also very attractive when knitted in a solid color, so again, choose something you love! Have you a small amount of handspun? Have you been playing with Some dyeing? This would be a nice way to show it off! NEEDLEs - Choose your needle size to make a soft and flexible fabric in your chosen yarn. Gauge is not as important as producing a fabric that you like. The mitts depend on being stretchy, so you won't want a stiff fabric, nor one that is loose and floppy. I don't think I knit either especially tight or loose, and I used a size 3 needle for my mitts, getting about 6 stitches per inch in seed stitch with the fingering weight yarn. We will be knitting flat, so you may use either straight or circular needles. Circulars will make fitting easier, but if you prefer straights, you should have some waste yarn handy so you can transfer stitches whenever you want to check the fit. BUTTONs - You wil need 6 buttons. My wrist and palm measure within one inch of each other, and I'm able to put the mitts on without opening the buttons, so if you have a similar difference in measurements, the buttons could be purely decorative if you prefer, or even replaced with ribbon rosettes or bows. If you want to open the mitts to put them on, your buttons should be of a size to fit and hold in a yO sized buttonhole. This may well be larger than you would expect. I used some flat, oval, shell buttons, which are $3/8^{\prime\prime}\times5/8^{\prime\prime}$ in size. Flat buttons tend to hold better than shank buttons on this fabric. MISCELLANEOUs - Yyou willneed a sewing-up needle, scissors, pins, a few inches of sewing thread (any kind and color), and a post-it note or other preferred method of keeping track of your pattern while knitting. You might also find a tape measure useful, but it's not absolutely necessary. THE LAY OF THE LAND (or How to Navigate the Chart): Now's the time to turn to your chart page. The basic shape of the mitts is rectangular. There is no shaping required. This chart includes both the right and wrong side rows so I could chart the seed stitch, but the picture Symbols show what it looks like from the front. There are green zones of four rows at the top and bottom of your chart. Those two areas K1P1 seed stitch. There are two pink areas flanking the chart on the right and left. They simply indicate a three stitch wide garter stitch border on each edge. The center area is white. It's worked in Stockinette stitch - knit on the front, purl on the back. There are 3 stitches on each chart that are shown in yellow. These are "danger" stitches. They are places where you willnot be working the stitch you would most likely expect to see in those spots. Watch out for them! There are two vertical blue lines. They show the area that is repeated on the rows. If you are a written instruction person, you will see those blue lines in your instructions as asterisks. There are two horizontal purple lines. These delineate the row repeat. If you are a written instruction person, that top line is when your pattern says, "repeat rows 5 thru16 until" If you aren't very familiar with charts, there is a stitch key, but I'd like to add that if you look at the symbols, you will see that they look very much like the stitches they represent.
Okay, let's get started!
STEP 1: Cast on a multiple of 6 stitches, using your favorite flexible cast on that gives a tidy edge, leaving α tail about $8-12"$ long for sewing up. I prefer a knitted cast on. I can't give you a specific number of stitches, because it willvary depending on your yarn and the size of your hand, but I needed 36 stitches. Start by casting on 24. Stretch the stitches along your needle, then hold one end of the stitches just below your knuckles running the length of your hand down to your wrist. Are you close? Cast on another 6 or 12 and check again. When you are happy with the length, stop! The important thing is that the number of stitches on your needles is evenly divisible by 6 and that you like the length. If you knit a few rows and change your mind about the length, do what I did - start over! Note for future: I cast on. stitches. STEP 2: Read this carefully, then go to your choice of written pattern or the chart - or both - to knit only your first mitt!! If you are a traditional (read: normal) knitter, you should knit the left mitt first. If you knit left-handed or are a combination knitter like me, you will probably want to knit the right mitt first. Make your decision based on whether decreases are always labeled correctly for you or not. If patterns say K2tog and that's exactly what you do, then do the left mitt first. If you always have to SSK when it says K2tog to get the proper lean, then make your right mitt first. In other words, I want you to do the "easy" one first. I recommend that you NoT slip the first stitch of each row, as the stretchiness of the garter stitch is important to the fit of the mitts. Slipping that stitch might make the edge too firm. You will be repeating rows 5-16 until the length of your knitting at the garter stitch edge almost stretches around your palm. Remember that you will have 4 rows of seed stitch and a bind off row yet. The goal is for it to just barely touch after you have cast off, but not stretch so tightly that it cuts off your circulation. My palm measures $7.5"$ and I found $6.5^{\prime\prime}$ perfect with the amount of stretch in my fabric, but yours could very well be different. NOTE: It is not necessary to complete a full pattern repeat. You may stop working the center section of the chart after any "purl back" row on the right hand and any knit row on the left. Note: I quit after row_ on the mitt. DO NOT knit your last four rows of seed stitch ye!! Stop and come back here when you are done with your repeats! STEP 3: It's time to make a decision! Do you want or need to work buttonholes? To see if you must work buttonholes, move your work to a piece of waste yarn or slide it to your cable if you are using circular needles. Thread a piece of waste yarn into your sewing up needle and use a quick basting type stitch to temporarily connect the cast on edge with your live edge of stitches for several inches, closing the wrist area into a tube. Check to see if you can slide your hand through it. If so, you don't have to make working buttonholes unless you want to do so. If it is too tight to insert your hand, you definitely want buttonholes. The buttonholes will be worked into the final seed stitch section. Remember, the area around your palm should NoT meet comfortably at this point! STEP 4: If you don't need buttonholes, remove the basting yarn, put your work back on your needles, and work your final four rows of seed stitch. Double check to be sure you like the fit across your palm, and bind off in a manner that gives you an attractive, flexible edge. I like Elizabeth Zimmermann's sewn bind off or the following: K1 loosely or with a needle a size or two larger than your working needle. Replace that stitch on the left needle. \*K2tog. Place the new stitch back on the left needle. Repeat from \* to the end of the row. If you do need buttonholes or just want them: While you have your mitt off the needles, figure out where your top buttonhole should go. I placed mine too high the first time, and when I redid them, I found that placing the top button right on the inside prominent wrist bone was the best Spot. Any higher than that made the button pull badly and looked very unsightly. Make a note of which stitch looks right. Note: I think my top buttonhole should be on about stitch Now remove the basting and put your knitting back on the needles and knit your first row of seed stitch, then we will play a little "fill in the blanks." Top buttonhole stitch number counting up from wrist edge = If that number isn't an odd number, change it by one $\underline{{\underline{{\mathbf{\Pi}}}}}$ Subtract 9 from that number $=$ Divide the new number in half $\underline{{\underline{{\mathbf{\Pi}}}}}$ This is the one to remember! For the second row of seed stitch, which should be starting from your wrist edge with either mitt: Maintaining seed stitch pattern, P1, K1, P1. \*yO, K2tog. Knit the number of stitches in that last blank you just filled in with seed stitch, which should start with a knit. Repeat from \* remembering to look to see if you need to start with a knit or purl to maintain your seed stitch this time. yO, K2tog. Complete the row in seed stitch. Work the last two rows in seed stitch and bind off by the instructions in the first paragraph of Step 4. NOTE: If you have used a heavier yarn, you might need to use your own judgment in spacing the buttonholes. The formula is based on number of stitches in from the edge (3) plus the number of buttons (3) times the number of stitches to make a buttonhole (2), equaling 9 in my equation, necessitating the odd number to start out in order to allow equal spacing between buttons. Three buttons makes two "in between" spaces, so requires an even number. With a heavier yarn, you might use only 2 stitches in from the edge or perhaps only two buttons. If you aren't familiar with spacing buttonholes, hopefully this note is enough to take some of the mystery out of the process!
STEP 5: Let's finish the first mitt!
Everyone - First sew the seam at the top - the edge around the palm. Use a ladder or mattress stitch (one stitch with two names), and just sew the first 3-4 stitches, bringing the edges together firmly, but without making an uncomfortable seam. Don't tie off yet, though, as you might decide to adjust it in a few minutes! If you have a friend near, lasso him or her to help with the next step. No Buttonholes - We'll make a mock button over flap. Place the mitt on your hand, and line up your cast on edge under the first row of your last seed stitch section. Make sure the bottom edges are even and put a pin in through both layers where the lowest button belongs. Arrange the mitt neatly on your hand,fitting around your thumb pad and such,and when you have it laying nicely, put a second pin in where you would like the top button to be placed. This might not be perfectly straight across the mitt. My "perfect fit" has the mitt skewed just a little to allow more fabric on the palm side over my thumb pad. Now center the third pin between the other two and admire your mitt for a minute while the buttonhole people catch up with you. Buttonholes - You will be doing much the same thing as the "No buttonhole people in regard to fitting. The biggest difference is that you willreach through your buttonhole with your pin in order to mark the exact spot you want the button sewn onto the under layer of the mitt. During this fitting, the pin will be acting like a button temporarily. Fuss with the fit until you are totally Satisfied. Everyone: Sewing on the buttons - I like to sew my buttons on with yarn from my project. It's quicker and easier than thread, and I don't have to worry about the polyester in the thread cutting through my preferred natural fibers. However, it can be tough to get yarn through the holes on the button. Here's a tip to help. Cut a piece of yarn ${8-10^{\prime\prime}}$ long and a piece of thread about $8"$ long. Fold the thread in half and stick those two ends together through the eye of a regular sewing needle. Put the sewing needle through the button and into your knitting where you want the button. ("No buttonhole people" will be going through both layers at once, sewing the button and securing the two layers together in one process.) Before you pullit clear through, stick the end of your yarn into the loop of thread in the needle, then pull the yarn right through to the back side of your knitting, using the loop as your fishing hook. Repeat with the other hole on your needle. There are other ways to do this, but I always have needle and thread handy, so this is my favorite. With both ends on the back of your knitting, you can tie off your yarn. Especially when I'm working with lighter yarn, if my buttonhole can handle it, I use my yarn doubled. When I'm doing a low stress project and my yarn will felt, I usually cut my ends off fairly short after tying a knot, then wet them and rub to felt them into a little ball. Otherwise, hide your ends once you've double-checked your fit. Make sure the seaming is the way you want it at the palm and secure that end, too. All done with number one! STEP 6 - Make the second mitt! Refer to your cast on number from Step 1 to get started. Be sure to use the other chart so the pattern reverses! You may either use your other numbers from the first mitt, or custom fit the second if your hands differ in size, but the cast on should remain the same for both. Now, here's the trick to make this mitt faster and easier than it looks. In order for the lace pattern to be symmetrical, the opposite decreases are used for the second mitt, meaning a lot of SSK's and slow going. However,if you are willing to try something new, you can have these be as simple as a K2tog! All you have to do is make a small change in the way you work your purls going back each row by wrapping them the opposite direction. In other words, if you usuall wrap your purls clockwise, then wrap them counter-clockwise, and vice versa. This wil reverse the way the stitches will be sitting on your needles for your knit stitches on the next row, and you won't have to slip four out of every six stitches before you work them! Watch how you make your plain knit stitches to be sure you don't twist them. Your leading leg will be on the opposite side of the needle from where you usually see it. You don't have to flip that stitch: just work in the proper leg to keep your stitch flat. If you feel uncomfortable about trying this, play with it using some Scrap yarn first. Once you get used to it, you will be just as fast doing it this way as the other, and it will save a lot of time on patterns like this, which have so many SsK's. This is one of my very favorite tricks! And if you just don't want to do it that way, you can certainly do it all with SsK's, too. :o) NOTE: Refer to Step 2 to make sure you've stopped after the proper row, or you willfind yourself figuring your buttonholes from the top edge down.
@De-De Heeter 2009 Left Mitt: (Danger stitches are highlighted. These stitches don't follow the general pattern.) Cast on according to information in Step 1 of the general directions. Row 1: K1, P1 - repeat across row Row 2: P1, K1 - repeat across row. This should produce seed stitch. Rows 3 &4: Repeat rows 1&2. Row 5: K3 for garter border. $\star\mathsf{K}z$ , K2tog, YO, K2tog, YO\* Repeat between \* until three stitches remain. K3 for garter border. Row6 and alleven rows in lace pattern section: K3 for garter border. P across row until 3 stitches remain. K3 for garter border. Row 7: K3 for garter border.\*K1, K2tog, YO, K2tog, YO. ${\sf K I^{\star}}$ Repeat between \* until three stitches remain. K3 for garter border. Row 9: K3 for garter border.\* K2tog, YO, K2tog, YO. $K2^{\star}$ Repeat between \* until three stitches remain. K3 for garter border. Row 11: K2, SSK for garter border. \*yO, K2tog, YO, K2, K2tog.\* Repeat between \* until three stitches remain. K3 for garter border. Row 13: K3 for garter border. \*K2tog, YO, K2, K2tog, YO.\* Repeat between \* until three stitches remain. K3 for garter border. Row 15: K2, SSK for garter border.\*yO, K2, K2tog YO, K2tog.\* Repeat between \* until NINE stitches remain. yO, K2, K2tog YO, K1. K3 for garter border. Repeat rows 5 through 16 until mitt meets the requirements in Step 2, Section 3. Finish by carefully following general instructions, including final four rows of seed stitch and working the optional buttonholes. Right Mitt: Cast on according to information in Step 1 of the general directions. Row 1: K1, P1 - repeat across row Row 2: P1, K1 - repeat across row. This should produce seed stitch. Rows 3 &4: Repeat rows 1&2. Row 5: K3 for garter border. \*yO, SSK, yO, SSK, $K2^{\star}$ Repeat between \* until three stitches remain. K3 for garter border. Row6 and all even rows in lace pattern section: K3 for garter border. P across row until 3 stitches remain. K3 for garter border. Row 7: K3 for garter border. $\star\mathsf{K}1$ . YO, SSK, yO, SSK, K1\* Repeat between \* until three stitches remain. K3 for garter border. Row 9: K3 for garter border. \* K2, yO, SSK, YO, SSK\* Repeat between \* until three stitches remain. K3 for garter border. Row 11: K3 for garter border. K3, yO, SSK, YO. \*SSK, K2, YO, SSK, $\forall O^{\star}$ Repeat between \* until TEN stitches remain. SSK, K2, YO, SSK, yO, K2tog. K2 for garter border. Row 13: K3 for garter border. \*yO, SSK, yO, SSK, $K2^{\star}$ Repeat between \* until three stitches remain. K3 for garter border. Row 15: K3 for garter border. K1, yO, SSK, K2, yO. \*SSK, yO, SSK, K2, yO. \* Repeat between \* until FOUR stitches remain. K2tog, K2 for garter border. Repeat rows 5 through 16 until mitt meets the requirements in Step 2, Section 3. Finish by carefully following general instructions,including final four rows of seed stitch and working the optional buttonholes. JUST FOR YOU MITTS - CHARTS @De-De Heeter 2009
Left Mitt:
purl
RS: purl stitch Ws: lnit stitch knit RS: knit stitch WS: purl stitch
RS: Knit two stitches together as one stitch WS: Purl 2 stitches together
yu RS: Yarn Over WS: Yarn Over
5sk
RS: Slip one stith as if to nit, Slip another stitch as if to Init Insert lft-hand needle into font of these 2 stitches and knit them together WS: Purl two stitches together in back: loops, inserting needle from the left, behind and into the bacls of the 2nd & 1st stitches in that order
Right Mitt:
Legend:
knit RS: Init stitch WS: purl stitch purl RS: purl stitch WS: lnit stitch yo RS: Yarn Over WS: Yarn Over ssk RS: Slip one stih as if to nit, Slip another stitch as if to nit nsert lft-hand needle into front of thee 2 stitches and Init them together WS: Purl two stitches together in back: $\Delta E O F\cong\Delta$ inserting needle from the left, behind and into the backs of the 2nd & 1st stitches in that order


