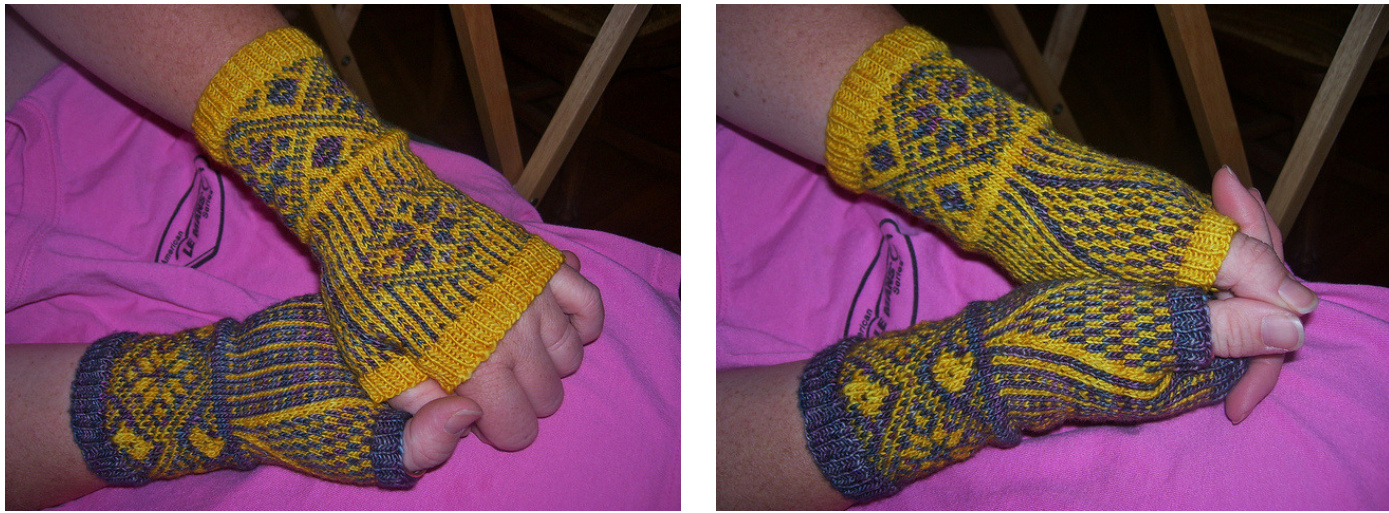
Solace Gloves By Cristi Ebersole
These gloves were actually born out of an error. I was trying to make a pair of stranded socks, but, after finishing the leg, they were too tight to fit over my ankle. To avoid having to rip out two days worth of work, I decided to change plans and make a fingerless glove instead. The result was very satisfying, to say the least. I liked them so much, I decided to write the pattern out to share.
Sizes: Medium (8"hand circ)
Supplies needed:
> Yarn: Two skeins of fingering weight yarn in two contrasting colors. (You will have plenty left over to use as heels and toes on other socks.) > Needles: US 1 40" circular needle, though you're more than welcome to use two circs or DPNs, should you prefer >Four stitch markers > Gauge: 11 stitches per inch in color stranded pattern
Abbreviations:
K, k Knit P,P Purl St, sts Stitch, stitches C/O Cast on K2tog Knit 2 together \*..\* Repeat instructions between the asterisks for the rest of the round, unless otherwise instructed. KFB Knit into the front and the back of one stitch, increasing the stitch count by one MC Main Color CC Contrasting color M1, M Increase 1 stitch by pulling up the bar from the row below from the front and then knitting it through the back loop PM Place marker EZ's sewn bind off: Cut yarn, leaving an 18" tail. Thread onto a darning needle and thread needle through first 2 stitches on the left needle, as if to purl, leaving both stitches on the needle. Then, thread needle back through the 1 stitch on left needles, as if to knit, pulling stitch off needle. Repeat until all stitches are worked. This will produce a nice and stretchy bind off.
Right Glove
C/O 60 stitches in MC loosely and join in the round, being careful not to twist. Do 9 rounds of K1P1 rib On the 10" round, increase to 72 by doing the following: \*k4, kfb on the 5th stitch\* Work chart one, you will work it three times around for each round. After completing the chart, knit one round plain with MC and then decrease 4 stitches over next round, also using MC. (\*k16,k2tog\*). Knit one more round in MC. Knit one full repeat of Chart 2A. (4 rounds) On row five, start the thumb gusset (Chart 3). Work it as follows: knit one stitch in MC, then knit into the front of the second stitch in CC, leaving stitch on left needle. PM and then knit into the back of that same stich with CC, increasing one stitch in the process (KFB). This new stitch you have made is the first stitch of Chart 3. Continue on row one of Chart 3 by knitting the next stitch in MC and then M1 with CC, increasing another stitch. Then PM and continue on with the rest of Chart 2A, noting that that center stitch of MC in between the markers will now be omitted from Chart 2A until the thumb gusset is complete. Chart 3 will be worked between the markers. \*\*NOTE\*\*: It is important that you use the CC bar for every M1 so that the border for the thumb gusset remains intact. If you use the MC bar, then the border will lose its continuity. Finish another repeat of Chart 2A (3 more rounds), continuing with Chart 3, and then start Chart 4. Work it as follows: k1 MC, k1 CC, slip marker, work row 5 of Chart 3, slip marker, knit 31 stitches of Chart 2, PM, work row 1 of Chart 4, PM. Finish chart 4 and remove its markers. Continue knitting Chart 2A around the hand and Chart 3 for the thumb until the gusset is complete. When you finish chart 3 you should have 21 thumb gusset stitches. On the next round, knit the first two stitches of Chart 2A, remove marker and then place the gusset stitches on spare yarn, backwards loop cast one once stitch in MC and continue working round 1 of Chart 2A, remembering to remove the second marker. Knit row 4 of chart 2A and then again knit rows 1-4. If you want longer mitts, continue Chart 2A until desired length - keeping in mind the ribbing will add 1 inch. Then cut CC and knit one round in MC Only. Do 7 rounds of K1P1 ribbing and then bind off loosely. (You can use EZ's sewn bind offI described in the key to ensure a loose bind off, if you choose) Pick up the 21 gusset stitches and, using MC, knit around, picking up 5 stitches from the hand to cover up the hole. Knit 5 round if K1P1 ribbing and then bind off.
Left Glove
C/O 60 stitches in MC loosely and join in the round, being careful not to twist. Do 9 rounds of K1P1 rib ne 10th round, increase to 72 by doing the following: \*k4, kfb on the 5th stitc. Work chart one, you will work it three times around for each round. After completing the chart, knit one round plain with MC and then decrease 4 stitches over next round, also using MC. (\*k16,k2tog\*). Knit one more round in MC Knit one full repeat of Chart 2B. (4 rounds) On row five, start the thumb gusset (Chart 3). Work it as follows: knit 30 stitches of row one of Chart 2B, then knit into the front of stitch 31 in CC, leaving stitch on left needle. PM and then knit into the back of that same stitch with CC, increasing one stitch in the process (KFB). This new stitch you have made is the first stitch of Chart 3. Continue on row one of Chart 3 by knitting the next stitch in MC and then M1 with CC, increasing another stitch. Then PM and continue on with the rest of Chart 2B, noting that that center stitch of MC in between the markers will now be omitted from Chart 2B until the thumb gusset is complete. Chart 3 will be worked between the markers. \*\*NOTE\*\*: It is important that you use the CC bar for every M1 so that the border for the thumb gusset remains intact. If you use the MC bar, then the border will lose its continuity. Finish another repeat of Chart 2B (3 more rounds), continuing with Chart 3, and then start Chart 4B. Work it as follows: k31 stitches of Chart 2B, SM, k5 stitches of Chart 3, SM, knit 2 final stitches of Chart 2B, PM, then knit row one of Chart 4B, PM. This will bring you to the end of the round. Finish chart 4B and remove its markers. Continue knitting Chart 2B around the hand and Chart 3 for the thumb until the gusset is complete. When you finish chart 3 you should have 21 thumb gusset stitches. On the next round, knit 31 stitches of Chart 2B, remove marker and then place the gusset stitches on spare yarn, backwards loop cast one once stitch in MC and continue working round 1 of Chart 2B, remembering to remove the second marker. Knit row 4 of chart 2B and then again knit rows 1-4. If you want longer mitts, continue Chart 2B until desired length - keeping in mind the ribbing will add 1 inch. Then cut CC and knit one round in MC Only. Do 7 rounds of K1P1 ribbing and then bind off loosely. (You can use EZ's sewn bind off I described in the key to ensure a loose bind off, if you choose) Pick up the 21 gusset stitches and, using MC, knit around, picking up 5 stitches from the hand to cover up the hole. Knit 5 round if K1P1 ribbing and then bind off.

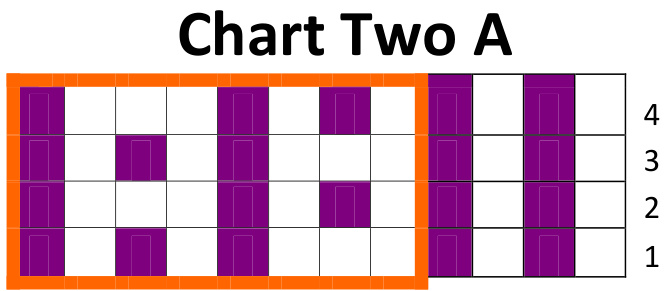
Repeat the orange boxes until the end of round
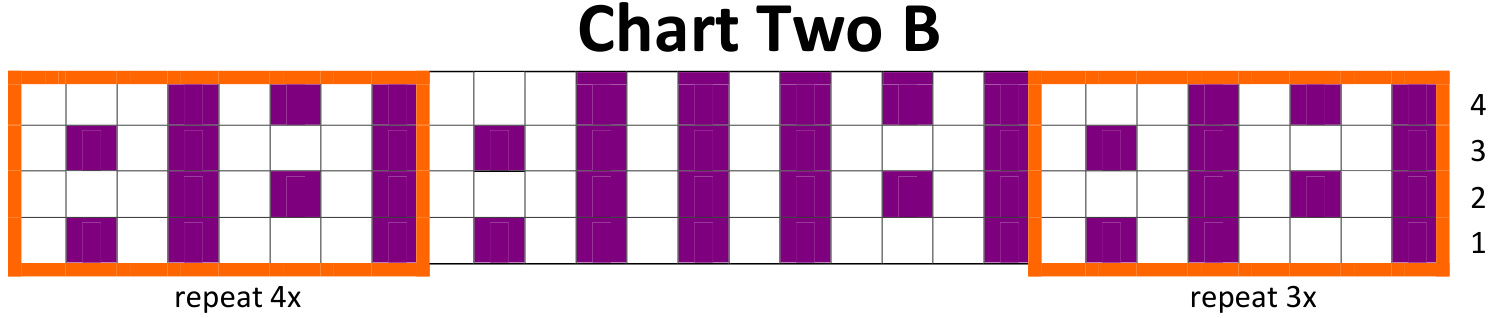
Chart Three
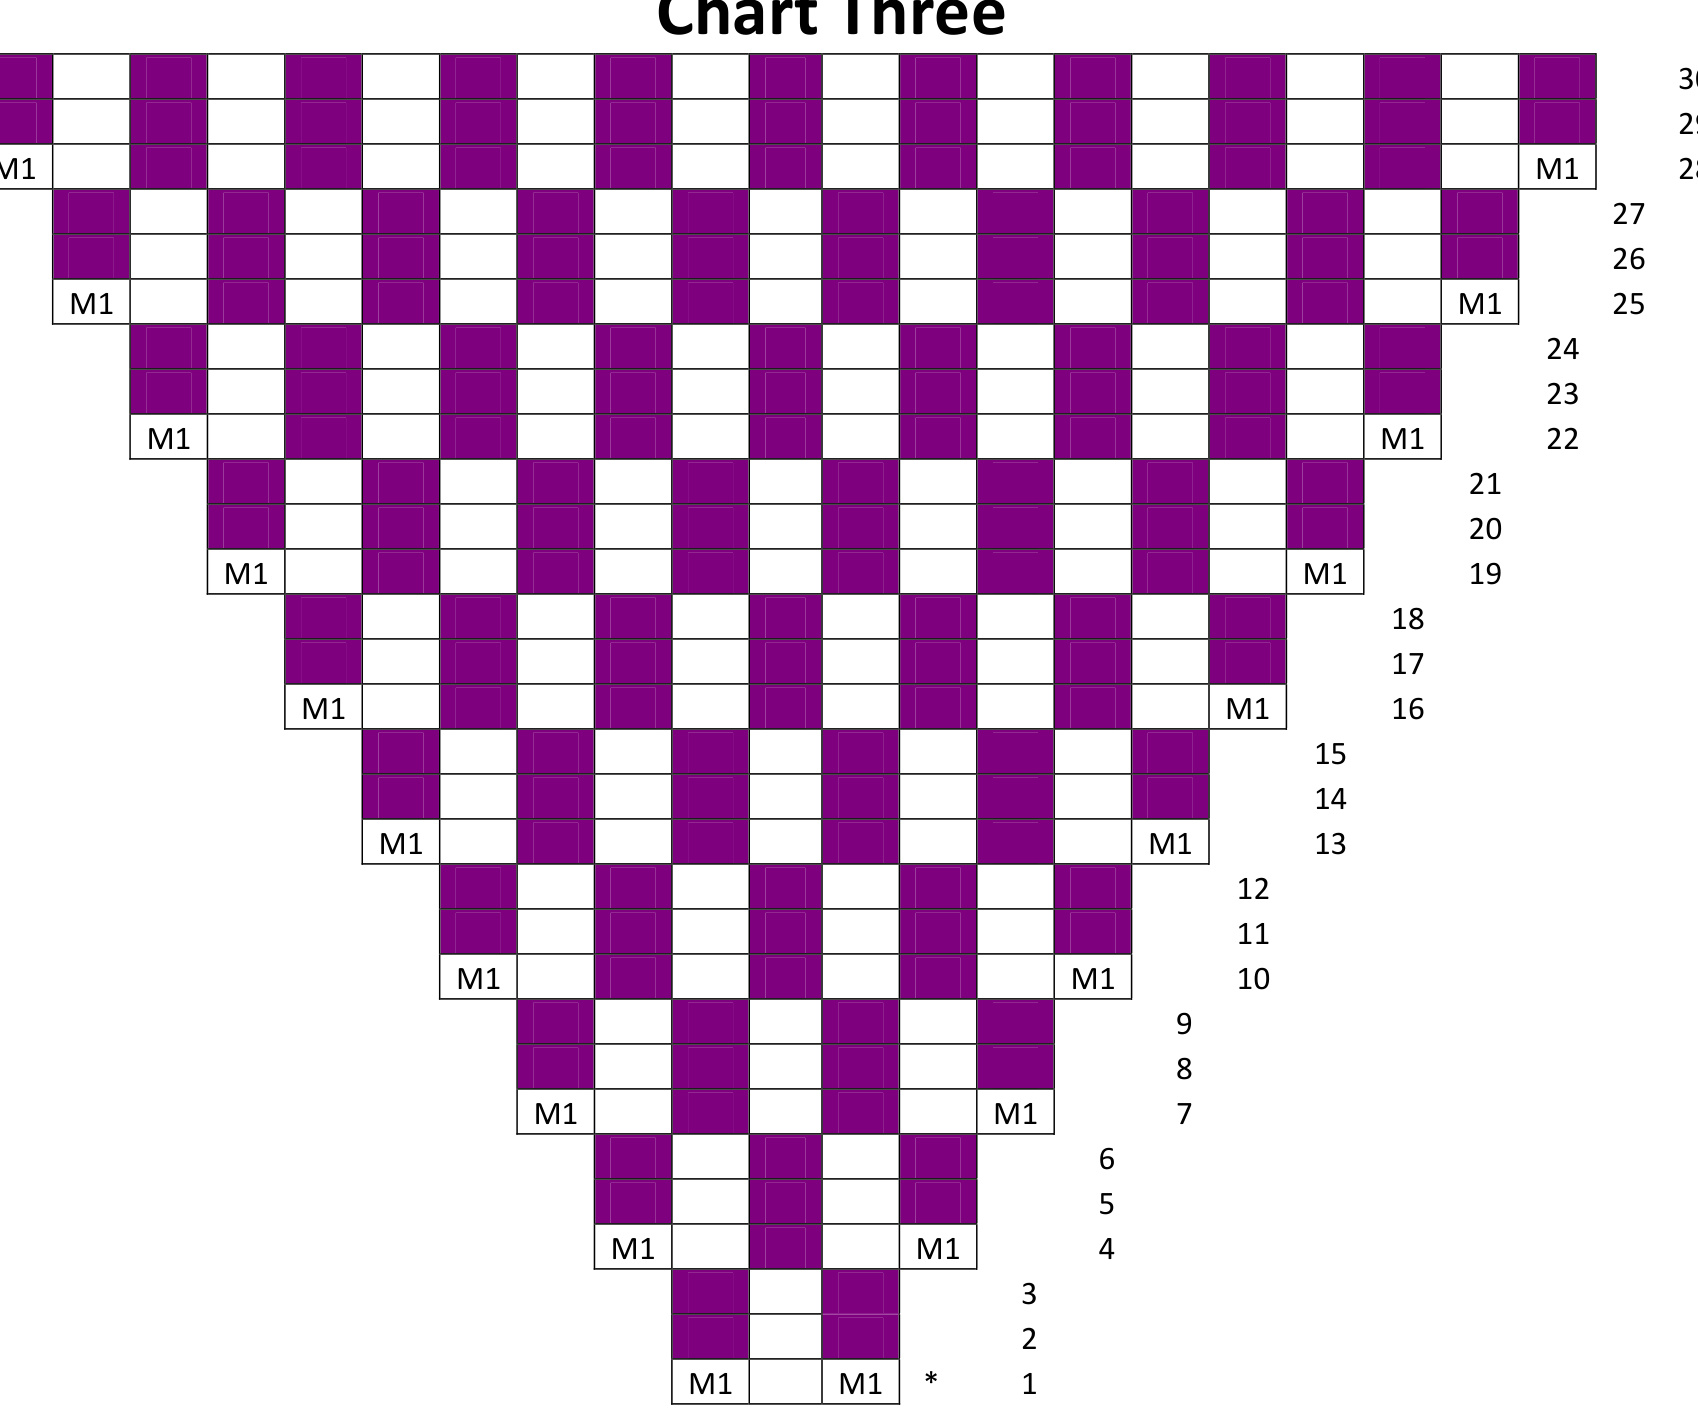
\*The first M1 is a kfb, this is the only time kfb is used for this chart
Chart Four - Right Hand
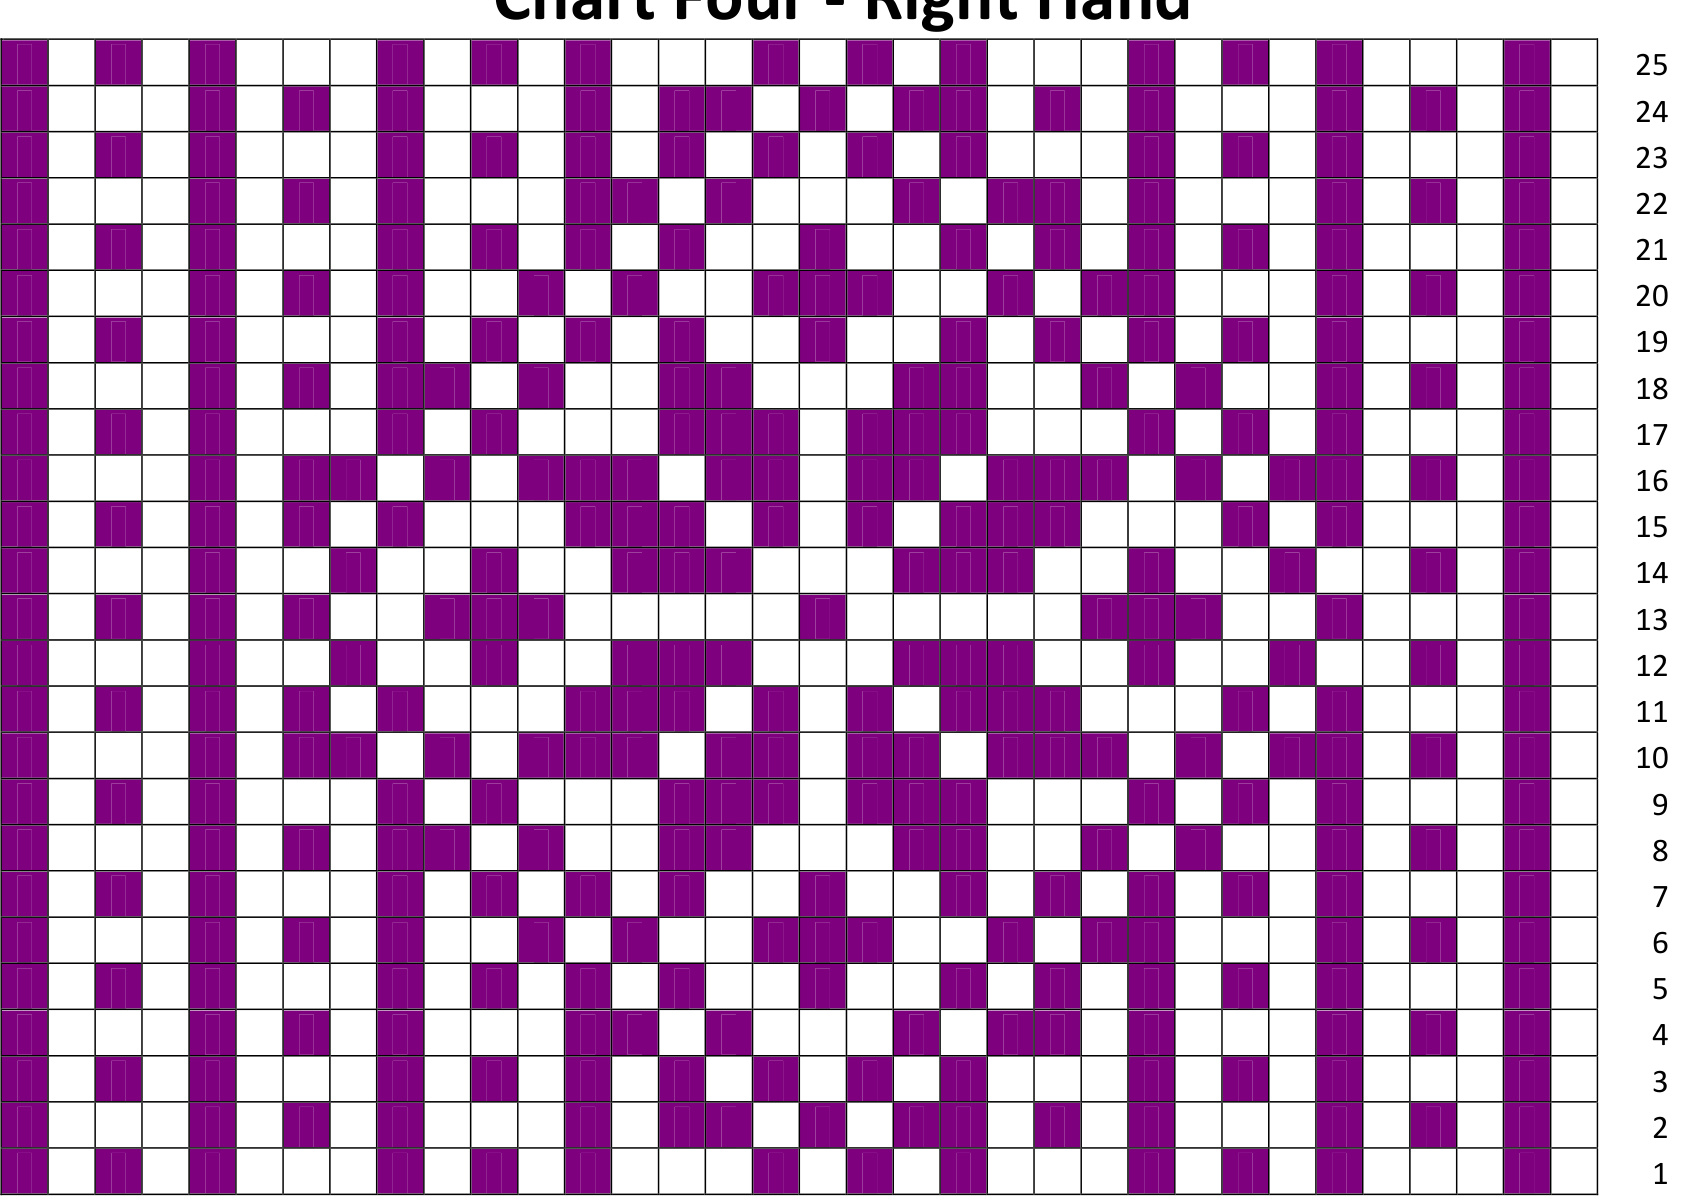
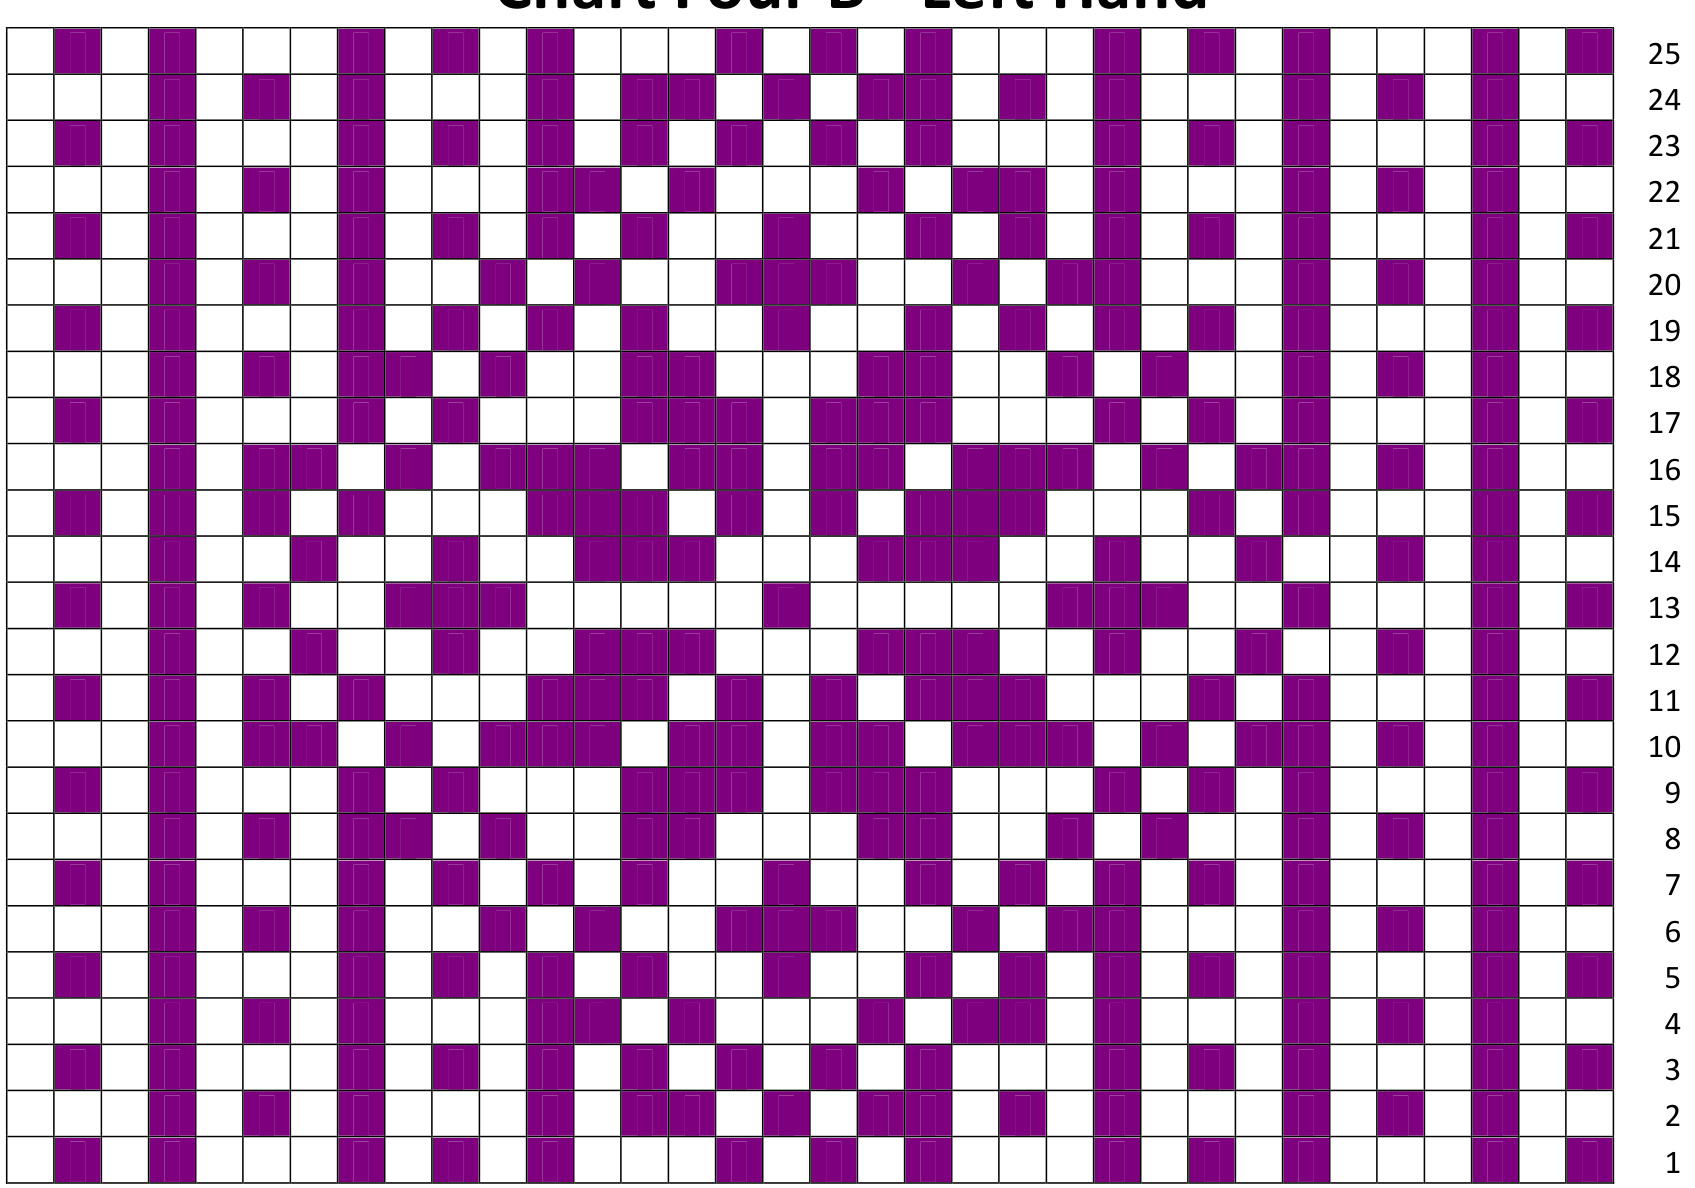
Chart Four B - Left Hand


