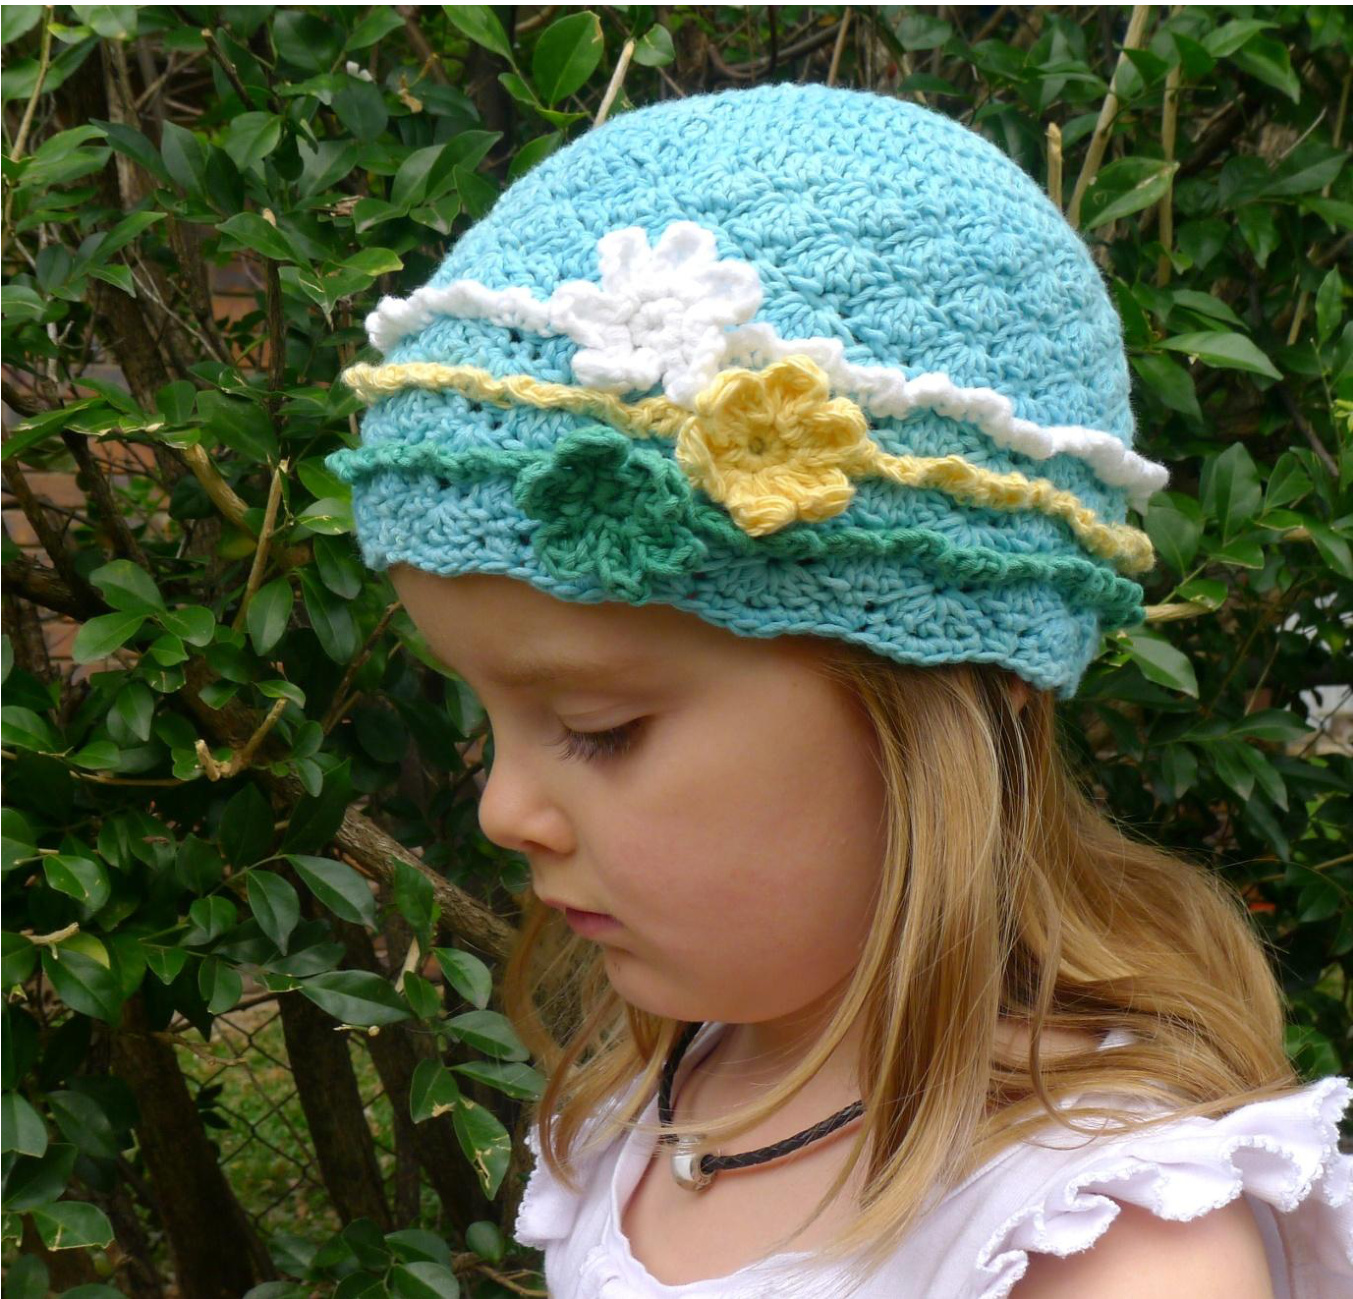
Gipsy Girl
Nn original crochet design by Φeanng Ramsay Gipsy Girl has been designed to be a matching accessory for the Mndalucia crocheted skirt. Soft girly frills and flowers make this simple design something special. For more Nddydae Designs, go to: www.addydag.com
Materials
Any fingering/4ply, DK/8ply or worsted weight/10ply yarn may be used for this pattern. Heavy worsted is not recommended.
Yardage Requirements
Exact yardage will depend on the yarn chosen and the size required. As a guide, you will need between 65 and 220 yards (60 and 200m) of DK/8ply. You will need a bit less if using worsted/10ply and a bit more if using fingering weight/4ply.
Gauge
There is no set gauge for this pattern. All of the work is done using measurements. Simply choose the hook size best suited to your yarn and crochet style. About 1 inch/2.5cm of negative ease is factored in to the pattern for a nice fitting beanie, so you just want a nice amount of spring to the fabric of it, therefore you will need to take into account the amount of stretch in the fibre chosen.
Skill Level: EASY
This is a project created using basic stitches, simple colour changes and minimal shaping and finishing. It incorporates a repetitive pattern using basic crochet stitches.
Glossary:
st/s stitch/es beg beginning yo yarn over rem remaining RS right side WS wrong side Stitches Used: (American terminology) ch chain SC single crochet dc double crochet tr treble crochet
Pattern stitches:
3dc fan work3dcintostitch indicated 5dc fan work 5 dc into stitch indicated sc inc work 2 sc into the stitch indicated dc inc work 2dc into the stitch indicated sc3tog [insert hook into the st, yo and draw up a loop] in each of the three sts indicated, yo and draw through all 4 loops to finish When instruction is given at the beginning of a round to "ch 1, sc in same st" this means to ch 1, then work a sc in the same stitch that the ch 1 originated from, not into the chain itself.
Before you begin
If you are able to take measurements from the intended wearer, please note the following: Measure around the widest part of the wearer's head, then subtract approximately 1 - 1.5 inches (2.5- 4cm) depending on how snug you would like the fit. Write the subtracted figure at Measurement A. (For this design, do not subtract any more than 1"/2.5cm if making sizes smaller than 18mths. If you are using 100% cotton, I recommend not subtracting any more than 1.5 inches given that cotton does not stretch and yourbeaniemay end uptoo small) Grab your calculator and divide Measurement A by 3.142. Note this as Measurement B. ·Calculate the length required by measuring from the crown of your head (the top towards the back of your head) to somewhere just above the eyebrows. Note this as Measurement C. Measurement A: Measurement B: Measurement C: If you don't have the intended wearer handy, the following table has been provided as a guide. It might not be as perfect a fit, but hopefully will be close enough!
| Age Range | MeasurementB | MeasurementC |
| Newborn-3 months | 4.25inches/11cm | 5inches/13cm |
| Newborn-6months | 4.75inches/12cm | 5.5 inches/14cm |
| 6-18 months | 5.25inches/13cm | 6inches/15.5cm |
| 18 months-3 years | 5.5inches/13.5cm | 7inches/18cm |
| 2 - 6 years | 6 inches/15.5cm | 7.5 inches/19cm |
| 3-8 years | 6.5inches/16.5cm | 7.75inches/19.5cm |
| 8- 16 years | 6.75inches/17cm | 8.5 inches/21.5cm |
| 16years-smalladult | 7inches/18cm | 8.75inches/22cm |
| Mediumadult | 7.25inches/18.5cm | 9 inches/23cm |
Ok, now we can get started.
Part 1: The crown
For Part 1, you only need to do as many rounds as it takes for your work to reach Measurement B in diameter. Round 1: Using MC and your chosen hook, form a magic ring, chain 2, and work 12 dc into the ring. Pull the ring closed and join by working a sl st into the top of the first dc - not into the top of the begch2.(12dc) Note: the Ch 2 at the beginning of each round for the crown is not counted as a stitch. Be sure at the end of each round that you sl st into the top of the first dc. For a video of the magic ring technique, check out: http://www.howcast.com/videos/134192-How-To-Do-the-Magic-Circle-Loop Alternatively, Ch 4, join with a slst to form a ring. Ch 2, work 12 dc into the centre of the ring. Join with a slst totopofbegdc. Round 2: Ch 2, 2 dc in same st and every dc around. (24dc) Round 3: Ch 2, 1 dc in same st, \*2dc in next dc, 1dc in next dc; Repeat from \* around. Join with a sl st to top of beg dc. (36dc) Round 4: Ch 2, 1 dc in same st, 1 dc in next dc, 2dc in next dc, \*1 dc in next 2 dc, 2 dc in next dc; Repeat from \* around. Join with a sl st to top of beg dc. (48dc) Round 5: Ch 2, 1 dc in same st, 1 dc in next 2 dc, 2dc in next dc, \*1 dc in next 3 dc, 2 dc in next dc; Repeat from \* around. Join with a sl st to top of beg dc. (60dc) Rounds 6 +: Continue increasing 12dc per round by working one extra dc between each dc inc until your work reaches a diameter of MeasurementB. You may find that you cannot quite make it to Measurement B because adding another round will make it too big. This may be more likely to happen if making a small size with worsted weight which creates greater row height. This design creates quite a firm fitting hat so don't be tempted to go under Measurement B. A few things you could try that may help: If you are only just short of Measurement B and don't want to add another round, you could try using a bigger hook for the rest of the hat. Another suggestion is to work a round of sc, but this time only increasing 6 stitches evenly around the row (ie working 2sc into the same stitch 6 times throughout the round.) This 6-stitch increase will add an extra 5dc fan to the circumference. Start again with a bigger hook to try and get the crown section as close to Measurement B as possible. Continue using the bigger hook for the rest of the hat otherwise the body section willbe too tight. This will only work if going up a hook size does not make your stitches too loose. There is no set way of getting it exact, but as long as you get pretty close to your Measurement B figure, the fit will befine.
Part 2: The body
Round 1: Ch 1, 1 sc in same st, \*skip 2 dc, work a 5dc fan in next dc, skip 2 dc, 1 sc in next dc; Repeat from \* around. Join with a sl st to beg sc. Round 2: Ch 3 (counts as dc), 4dc in same sc, \*skip 2dc, 1 sc in next dc, skip 2 dc, 5dc fan in next sc; Repeat from \* around. Join with a sl st to top of beg ch3. Round 3: Sl st into centre dc of 5dc fan, ch 1, sc in same stitch, \* skip 2 dc, work a 5dc fan in next sc, skip 2dc, sc in centre dc of 5dc fan: Repeat from \* around. Join with a sl st to beg sc. Repeat Rounds 2 and 3 until your work measures approximately 2 inches/5cm (for fingering weight/4ply) or 2.5 inches/6.5cm (for DK/8ply and worsted/10ply) LESS than Measurement C, ending with a Round 3. This is measured from the beginning of your work. DO NOT FASTEN OFF - simply keep active loop at back of your work while working the contrast colour of the ruffle. This means fewer loose ends to weave in at the end. Continue with Part 3: Ruffle.
Part 3: Ruffle
Round 1: With CC, join with a sl st to FRONT LOOP of any stitch of previous round. CONTINUE TO WORK IN FRONT LOOPS ONLY. Ch 1, [sc, ch 2, sc] in same stitch, skip 1 stitch, \* [sc, ch 2, sc] in next stitch, skip 1 stitch; Repeat from \* around. Join with a sl st to beg sc. Fasten/bind off CC only.
Round 2:
d 2: With RS facing, fold the ruffle toward you to expose the un-worked back loops of the last MC round. Pick up the live loop of MC at back of work. With RS facing and working in the back loops of the last MC round, sl st into centre dc of 5dc fan, ch 1, sc in same stitch, \* skip 2 dc, work a 5dc fan in next sc, skip 2dc, sc in centre dc of 5dc fan; Repeat from \* around. Join with a sl st to beg sc. With this round it is important to place your stitches carefully so that the "hills and valleys" of your ruffles match up on subsequent rounds. Round 3: Ch 3 (counts as dc), 4dc in same sc, \*skip 2dc, 1 sc in next dc, skip 2 dc, 5dc fan in next sc; Repeat from \* around. Join with a sl st to top of beg ch3. DO NoT fasten/bind off. Repeat rows 1-3 twice more changing colours as desired. This will give you 3 ruffles.
Part 4: Edging
Continuing with MC, sl st into next dc, ch 1, sc in same st, \* 3 sc in next dc (centre of 5dc fan), sc in next dc, work a cluster of 3sctog over the next 3 stitches, sc in next st; Repeat from \* around to last 3 sts, sc3tog over these 3 sts. Join with a sl st to beg sc. Fasten/Bind off.
Flowers
Make three.I made mineinthe same colours as theruffles. Create a magic ring as with the crown of your beanie. Ch 1, and work 6sc into the ring. Pull ring closed and join with a sl st to beg sc. \* [ch 3, 1tr, ch3, sl st] into same sc, sl st into next sc; Repeat from \* around (6 petals.) Fasten off. You can use one of the loose ends of your flower to sew it to the beanie.
Finishing:
Fasten magic ring (if used) at crown. Using a tapestry needle, weave in all loose ends. Position and sew flowers to the beanie as preferred. COpyRIGHT This pattern is offered licence free and may be used to producg items for sale provided the numbers produced remain small scale and credit for the design is given to the designer, Deanne Ramsay. It does not permit commercial manufacturing nor commercial production of the garment in any way (commercial refers to large-scale produetion - an amount beyond the capacity of one person to produce by hand.) please be respectful of the designers' rights to this pattern. No portion (text or images) may be reproduced, transmitted or distributed by any means whether for free or for sale. Thank you. deanne@addydag.com


