Z-CAP
Copyright Designs byZula 2009
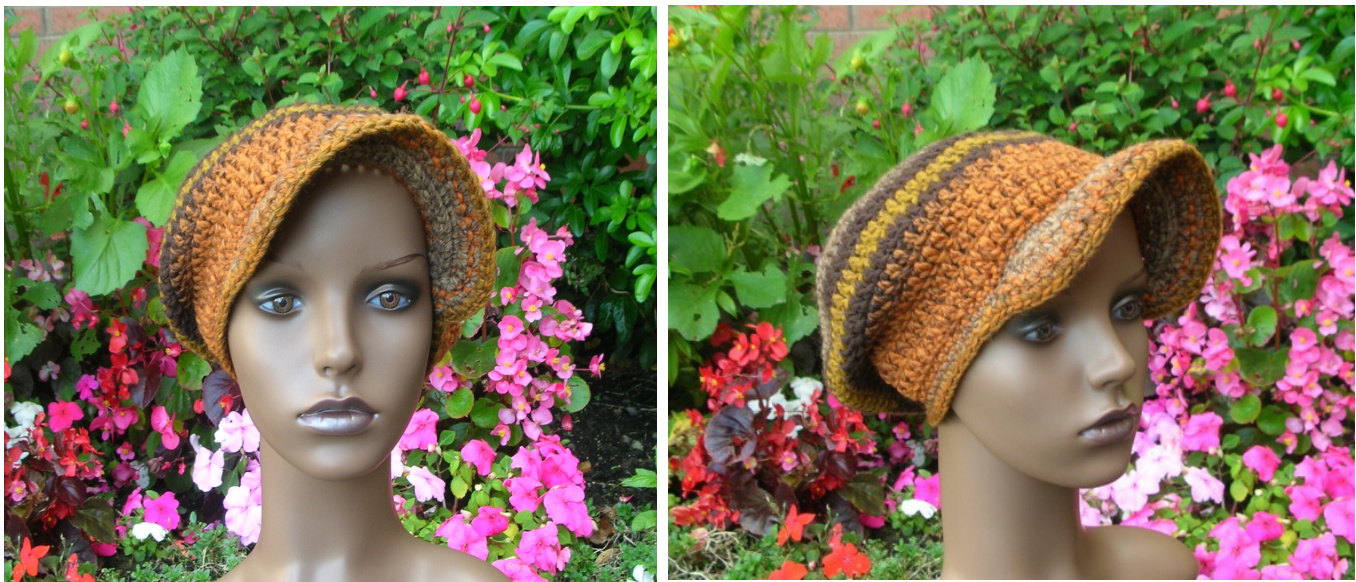
Not quite a slouch hat, not quite a newsboy hat; I present to you the Z-Cap! Use it to hold a little hair, wear it slouchy, it's up to you. This hat pattern is very versatile, and suitable for both beginners and intermediate crocheters. I've included both the US and UK stitch versions. The original design makes a lightweight cap. Ive found that substituting the aran weight for two strands of dk weight makes it more ideal for colder weather. Go down a hook size if you need to cinch the rim in a bit more.
MATERIALS
\*H hook (5mm) - for Teen/Adult \*I hook (5.50mm) - for Adult Medium/Regular About 137 metres/150 yds Aran weight yarn - OR About 274 metres/300 yds of DK weight yarn. ( Hold two strands together) Yarn needle to weave in ends.
FINISHEDMEASUREMENTS
Teen/Adult
21-22 inch circumference. 10 inches from top of hat to rim edge.
Adult Medium/Regular
22-23 inch circumference. 10 inches from top of hat to rim edge.
GAUGE
6 dc's and 3 rows = 2 inches.
SPECIALSTITCHES
2 DC-TOG Yarn over hook, insert into stitch, yarn over hook and pull up a loop, yarn over hook and pull through 2 loops on your hook. Leave these two loops on your hook. Yarn over hook insert into the next stitch, yarn over hook and pull up a loop, yarn over hook and pull through 2 loops on your hook, yarn over hook and pull through all loops on your hook.
NOTES
\*No turning after rows. \*to end refers to directions between \* \*. \*Ch 2 at beginning of rows does not count as a stitch throughout the pattern, it serves to reduce a visible seam.
US STITCH VERSION
Form a magic loop - 1.) Ch 2, 12 dc in ring, join with sl st to 1s dc. (12) 2.) Ch 2, 2 dc in same st and in each st around. Sl st to 1st dc. (24) 3.) Ch 2, 2 dc in same st, 1 dc in next st, \*2 dc in next st, 1 dc in next st\*, to end. Sl st to top of 1st dc. (36) 4.) Repeat Rnd 3. (54) 5.) Ch 2, 1 dc in same st and in each st around. Sl st to 1s dc. (54) 6.) Repeat Rnd 3. (81) 7-8.) Ch 2, 1 dc in same st and in each st around. Sl st to 1s dc. (81) 9.) Ch 2, 2 dc-tog in next 2 sts, 1 dc in each of the next 8 st, \*2 dc-tog in next 2 sts, 1 dc in each of the next 8 sts\*, to end. Sl st to 1st dc. (73) 10.) Ch 2, 2 dc-tog in next 2 sts, 1 dc in each of the next 6 sts, \*2 dc-tog in next 2 sts, 1 dc in each of the next 6 sts\*, to end. S1 st to 1st dc. (63) 11-14.) Ch 1, 1 dc in same st and in each st to end. Sl st to 1s dc. (63) - (Good place to put stripes.) 15-16.) Ch 1, 1 sc in same st and in each st around. Sl st to 1st sc. (63) Fasten off.
PEAK
strands of yarn , centre 15 sts at the front of the hat on the right side of your work 1.) Join yarn with a sl st, 2 sc in same st, and in each of the next 14 sts. (30) 2.) Ch 1, turn, skip 1"t st, sc in the back loop of each st to the end. 1 hdc into hat edge, sl st into the next 2sts. 3.) Ch 1, turn, skip 1s st, sc in each st to end. 1 hdc into hat edge, sl st into next 2 sts. 4.) Ch 1, turn, skip 1s st, sc in each st to end. Sl st in same space as last sl st and in next st. Fasten off and weave in ends. ejoin yarn at back of hat on the right side, sc in each st around the hat and the peak FASTEN OFF AND WEAVE IN ENDS.
UK STITCH VERSION
GAUGE
6 tr's and 3 rows = 2 inches.
SPECIALSTITCHES
2 TR TOG Yarn over hook, insert into stitch, yarn over hook and pull up a loop, yarn over hook and pull through 2 loops on your hook. Leave these two loops on your hook. Yarn over hook insert into the next stitch, yarn over hook and pull up a loop, yarn over hook and pull through 2 loops on your hook, yarn over hook and pull through all loops on your hook.
Form a magic loop -
1.) Ch 2, 12 tr in ring, join with sl st to 1st tr. (12) 2.) Ch 2, 2 tr in same st and in each st around. S1 st to 1st tr. (24) 3.) Ch 2, 2 tr in same st, 1 tr in next st, \*2 tr in next st, 1 tr in next st\*, to end. Sl st to top of 1s tr. (36) 4.) Repeat Rnd 3. (54) 5.) Ch 2, 1 tr in same st and in each st around. Sl st to 1st tr. (54) 6.) Repeat Rnd 3. (81) 7-8.) Ch 2, 1 tr in same st and in each st around. Sl st to 1st tr. (81) 9.) Ch 2, 2 tr-tog in next 2 sts, 1 tr in each of the next 8 st, \*2 tr-tog in next 2 sts, 1 tr in each of the next 8 sts\*, to end. S1 st to 1st tr. (73) 10.) Ch 2, 2 tr-tog in next 2 sts, 1 tr in each of the next 6 sts, \*2 tr-tog in next 2 sts, 1 tr in each of the next 6 sts\*, to end. S1 st to 1st tr. (63) 11-14.) Ch 1, 1 tr in same st and in each st to end. Sl st to 1s tr. (63) - (Good place to put stripes.) 15-16.) Ch 1, 1 dc in same st and in each st around. Sl st to 1st dc. (63) Fasten off.
PEAK
Using 2 strands of yarn, centre 15 sts at the front of the hat on the right side of your work. 1.) Join yarn with a sl st, 2 dc in same st, and in each of the next 14 sts. (30) 2.) Ch 1, turn, skip 1st st, dc in the back loop of each st to the end. 1 htr into hat edge, sl st into the next 2 sts. ) Ch 1, turn, skip 1st st, dc in each st to end. 1 htr into hat edge, sl st into next 2 sts. 4.) Ch 1, turn, skip 1s st, dc in each st to end. Sl st in same space as last sl st and in next st. Fasten off and weave in ends. 5.) Rejoin yarn at back of hat on the right side, dc in each st around the hat and the peak. FASTEN OFF AND WEAVE IN ENDS.
www.byzula.com
I have no problem with customers using my patterns to make items and sell them. I do however ask that you not pass the patterns off as your own, or sell and distribute them. Thanks so much for being an honest and valued customer. :-) Any questions, error reports or comments, please don't hesitate to contact me. All rights reserved.


