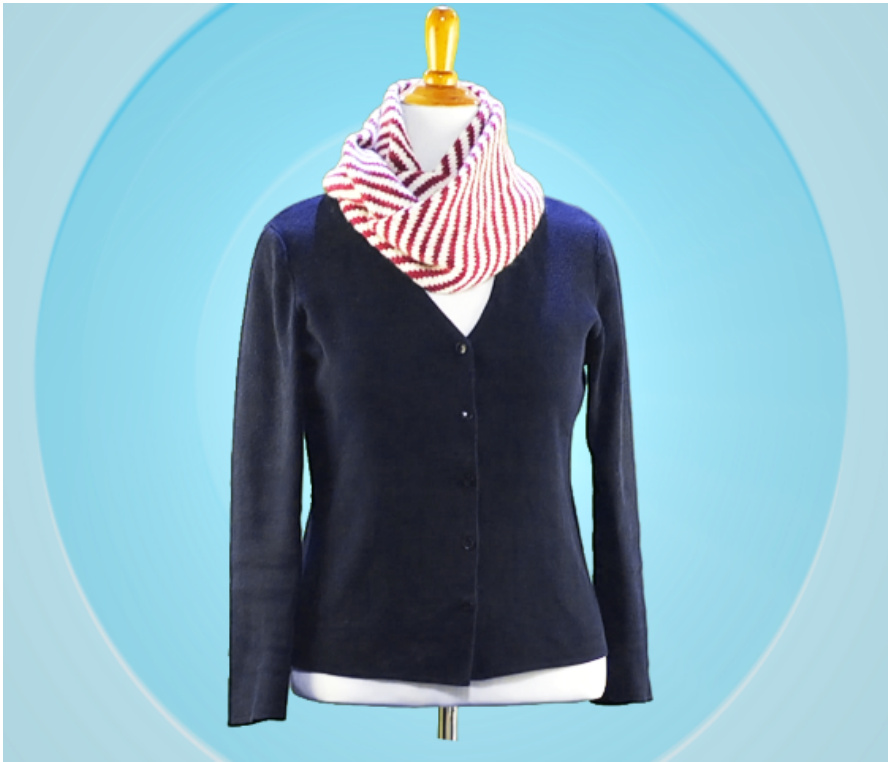
Barber Pole Cowl
A knitting pattern and video tutorial by Staci Perry, www.verypink.com
Getting Started.
Finished Size: (after blocking) 26" long when seamed Needles: Size US 6 (4mm) 16" circular needles, longer circulars if you're using the magic loop method, or a set of 4 double-pointed needles Yarn: The YarnSisters Willow, 70% merino, 30% cashmere, DK/light worsted weight; one hank each of Natural (Color A) and Pinot Noir (Color B) Additional Materials: one stitch marker, tapestry needle for seaming and weaving in ends Gauge: 7 stitches to the inch, after blocking (please see Note on Gauge, below). Note on Color-Fastness: If you are using two dramatically different colors, you may want to test for color-fastness. I did this by snipping a few inches of each color, and putting them together in a clear glass of warm water. If the colors run, try the test again with some vinegar in the water. If the colors still run - you may notwanttousethosecolorsfor thispattern! Note on Gauge: If you are using 16" circular needles and your stitches don't fit around the needles, your gauge is probably too tight. (Even if your gauge is correct, the first couple of rows are usually a little tight). Going up a needle size or two should correct that. Abbreviations: BO - bind-off CO- cast-on K - knit
Directions.
Video Part 1: Introduction- http://youtu.be/Xwbzln9qwGo
Using Color A, CO 71 stitches using the long-tail CO. Place marker and join to knit in-the-round. You can see a video on the long-tail cast-on here: http://youtu.be/sN9cNEozOLc All stitches in this pattern are KNIT. Video Part 2: Working Fair Isle Pattern from Chart - http://youtu.be/Xwbzln9qwGo?t=2m43s Starting with Color A, follow the 6-round color chart below, which will have you alternating color every 3 stitches. At the end of each round, you will be one stitch short of completing the last stitch of the chart, which creates the spiral. (In other words, you will complete the chart below 11 times, then the first 5 stitches of the chart once more.)
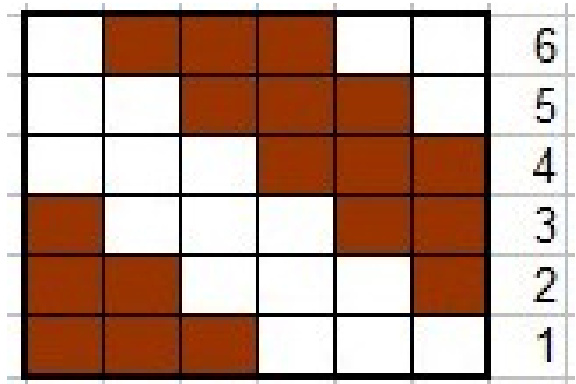
Repeat Rounds 1-6 of the chart until you're nearly out of yarn, or until your cowl is about 48". Bind-off normally. (You can coax your cowl a little longer after seaming, during blocking.)
Finishing.
Video Part 3: Seaming - http://youtu.be/Xwbzln9qwGo?t=12m27s
Before seaming, I recommend wet blocking your cowl. Fill the sink with lukewarm water and wool soap, and maybe a little white vinegar to keep the colors from running - just in case. (See Note on Color Fastness, above.) Set the piece out flat to dry. Proceed with seaming once the cowl is dry. Lining up the tail from the CO with the tail from the BO, seam the two ends together to make a tube, paying close attention to making sure the spiral lines up. Once it is all seamed, pull the ends to the inside of the "tube", since you can't weave them in. After seaming, use a steam iron to blast steam on the seam, without pressing down with the iron. Pat the seam out with your fingers as it cools, making sure the spirals all line up. Then enjoy your new cowl! Copyright 2014, Staci Perry. This pattern and pictures are the property of Staci Perry. All rights reserved. Pattern is available for personal use only. No unauthorized reproduction, in whole or in part, or distribution of this pattern or content, including text or pictures is allowed. No commercial reproduction of garments from this pattern is allowed without prior permission fromStaciPerry.


