Author Note:
While I would love to say I developed this pattern completely on my own, I cannot. The base of the plush's design originally came from one of a Legend of Zelda Link, and I loved the size and general aesthetic of the plush's body. Not to mention, the idea for a ball and socket, moveable head is simply genius. I originally came across photos of the Link pattern here: http://www.allaboutami.c0m/post/5811628981/link I would recommend having a look at these photos, as a lot of them are wip shots and provide a good idea of some of the construction elements of the pattern without even looking at the physical pattern. The pattern itself was originally created by Japanese author, Becchin. All links I've found to the original hosted Japanese pattern or to Becchin's website come up as dead links. However, the pattern was translated into English by tanoshimou, and can be found here: http://tanoshimou. wordpress.com/2010/05/27/link-legend-of-zelda-amigurumi-free-pattern/ Original "Link" Pattern by Becchin Pattern Translated by tanoshimou Pattern Altered To Make Kasumi by vampirecheetah
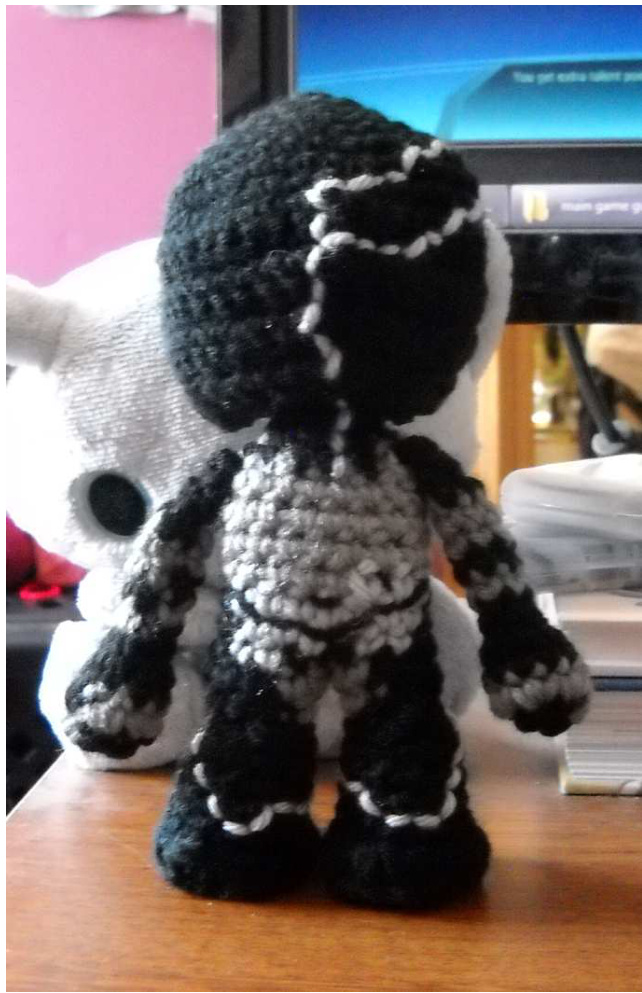
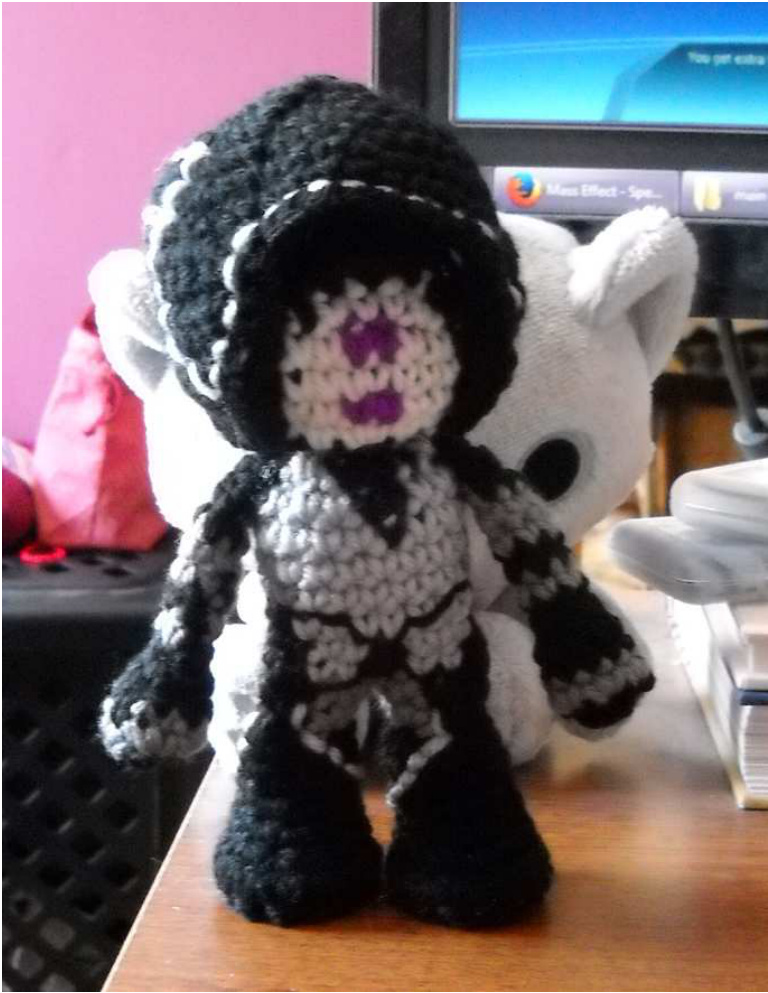
Mass Effect Kasumi
I used this pattern as my base for designing this Mass Effect plush, and so there are some significant changes from the original. However, there's no need to head to either of these links to understand this pattern, everything you need for it I'll note here. (While there is no need, please do explore both sites at your leisure!) As the original Link pattern was free and the translation was free, I am making this pattern free and spreading the crochet/fandom karma around. The original pattern had requested that the pattern not be used for profit and that items made with the pattern should not be sold for profit. Admittedly, there is also a notation requesting that the pattern not be reposted---while I admit this is a gray area, I've altered the pattern considerably, and it is no longer exactly the same. There will be elements of the pattern that are almost quoted or paraphrased (sometimes word for word) with the original. This was mostly due to the ease of explaining certain elements than it was to try and find my own words.
What you need to know:
I consider this plush to be moderate level. While you only need to know basic stitches like chaining, inc/dec, sc, and slip stitch, there's still some other things that may seem a little complicated to a beginner. You'll want to know how to make magic rings, crochet in the round, change colors in the middle of rounds, what the right and wrong side of the fabric is, stuffing techniques, being able to crochet stitches around sc posts, using yarn to stitch extra details, and sewing parts together. This pattern will not teach you these things, but the internet and youtube are excellent resources to learn as such.
Materials:
2 10mm safety eyes Black yarn Gray yarn Skin yarn Light Gray yarn Purple Yarn Stuffing Yarn/tapestry needle Pins (to hold pieces in place for attachment) F-hook Original "Link" Pattern by Becchin Pattern Translated by tanoshimou Pattern Altered To Make Kasumi by vampirecheetah
Mass Effect Kasumi
This pattern is written for American crochet, I know there is a difference between American stitches and European stitches, just a forewarning. If anyone wants to take this pattern and create a European friendly version, by all means do so. Spread the crochet love around. All parts, unless stated otherwise, will be done in rounds using an F-hook.
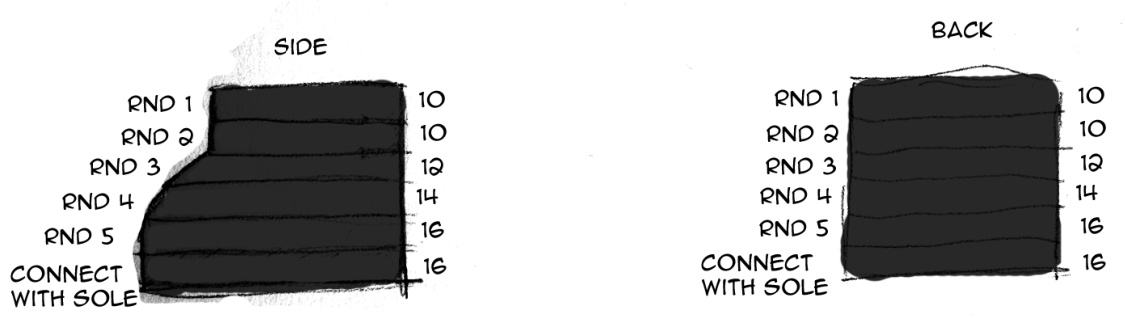
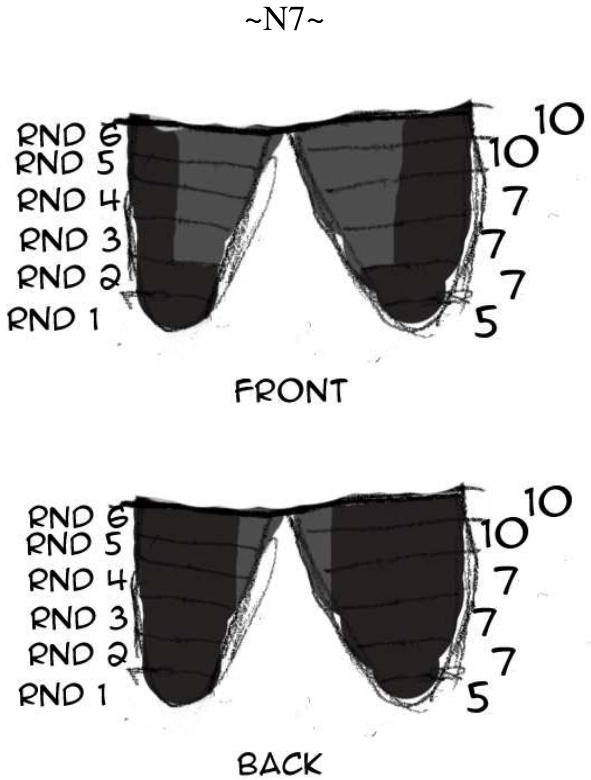
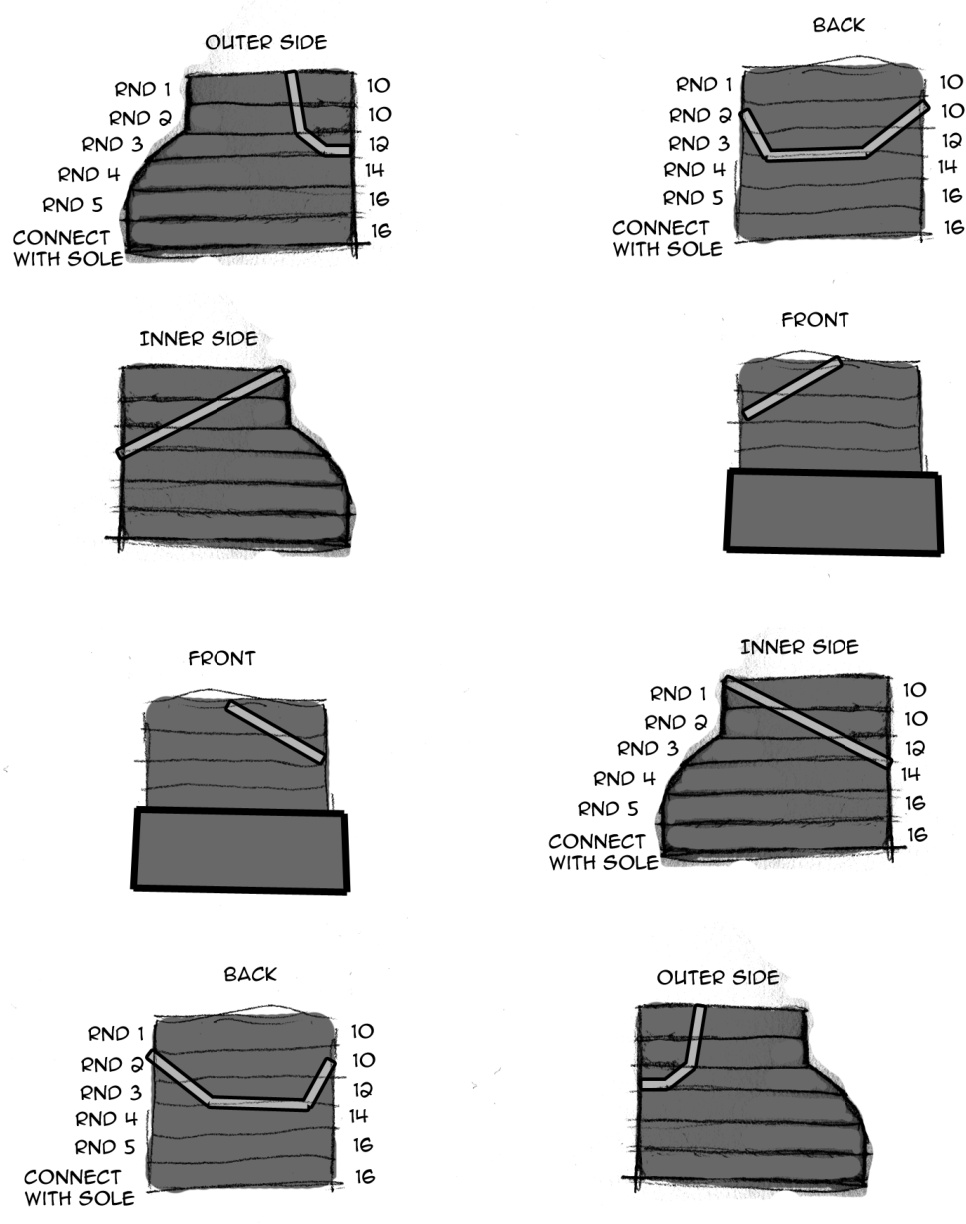
Shoe Tops (make 2): use black yarn Be sure to leave a long tail when starting. This will be used to attach the boot to the leg. ch 10. Rnd 1-2: sc 10. (10) Rnd 3: sc 4, inc 2, sc 4. (12) Rnd 4: sc 5, inc 2, sc 5. (14) Rnd 5: sc 6, inc 2, sc 6.(16). Sl st, FO. Shoe Soles (make 2): use black yarn Rnd 1: ch 4. Skipping the ch closest to but not on the hook, sc into the next chain on the left side. Then, sc into the next chain on the left side. You should be left with a single chain at this point. Sc twice into the left side of the chain and then once into the right side. Then, moving towards your starting point, sc into the next chain on the right side and then the last chain twice. (8) Rnd 2: inc all the way around. Sl st to close rnd. (16) Do not fasten off, instead use the yarn to attach the tops and soles together. Original "Link" Pattern by Becchin Pattern Translated by tanoshimou Pattern Altered To Make Kasumi by vampirecheetah
Mass Effect Kasumi
Attaching the top and sole Line up the sole with the top so that the last stitches you go through will be the sl sts of both sole and top. Sl st and ch in the first stitch. Sc around, making sure to go through both sole and top. Sl st and FO when you hit the end.
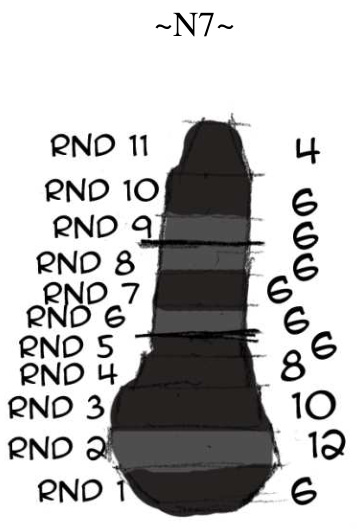
Arms (make 2): use black yarn Rnd 1: sc 6 into magic ring. (6) use gray yarn Rnd 2: inc all the way around. (12) use black yarn Rnd 3: dec, sc 8, dec. (10) use gray yarn Rnd 6: sc all the way around. (6) use black yarn Rnd 7: sc all the way around. (6) use gray yarn Rnd 8: sc all the way around. (6) Original "Link" Pattern by Becchin Pattern Translated by tanoshimou Pattern Altered To Make Kasumi by vampirecheetah
Mass Effect Kasumi
use black yarn Rnd 10: sc all the way around. (6) Rnd 11: sc, dec, dec, sc. (4) sl st, FO.
Leg A (make 1): use black yarn Rnd 1: sc 5 into magic ring. (5) Rnd 2: sc 1, inc, sc 1, inc, sc 1. (7) Rnd 3: (black) sc 4, (gray) sc 2, (black) sc 1. (7: 5 black, 2 gray) Rnd 4: (black) sc 3, (gray) sc 3, (black) sc 1. (7: 4 black, 3 gray) Rnd 5: (black) sc 1, inc, sc 1, (gray) inc, sc 1, inc, (black) sc 1. (10: 5 black, 5 gray) Rnd 6: (black) sc 4, (gray) sc 5, (black) sc 1. (10: 5 black, 5 gray) S1 st, FO. Leg B (make 1): use black yarn Original "Link" Pattern by Becchin Pattern Translated by tanoshimou Pattern Altered To Make Kasumi by vampirecheetah
Mass Effect Kasumi
Rnd 1: sc 5 into magic ring. (5) Rnd 2: sc 1, inc, sc 1, inc, sc 1. (7) Rnd 3: (gray) sc 2, (black) sc 5. (7: 5 black, 2 gray) Rnd 4: (gray) sc 3, (black) sc 4. (7: 4 black, 3 gray) (black) sc 1, (gray) inc, sc 1, (1 gray, 1 black) inc, sc 1, inc, sc 1. (10: 6 black, 4 gray Rnd 6: (black) sc 2, (gray) sc 4, (black) sc 4. (10: 6 black, 4 gray) Sl st, FO.
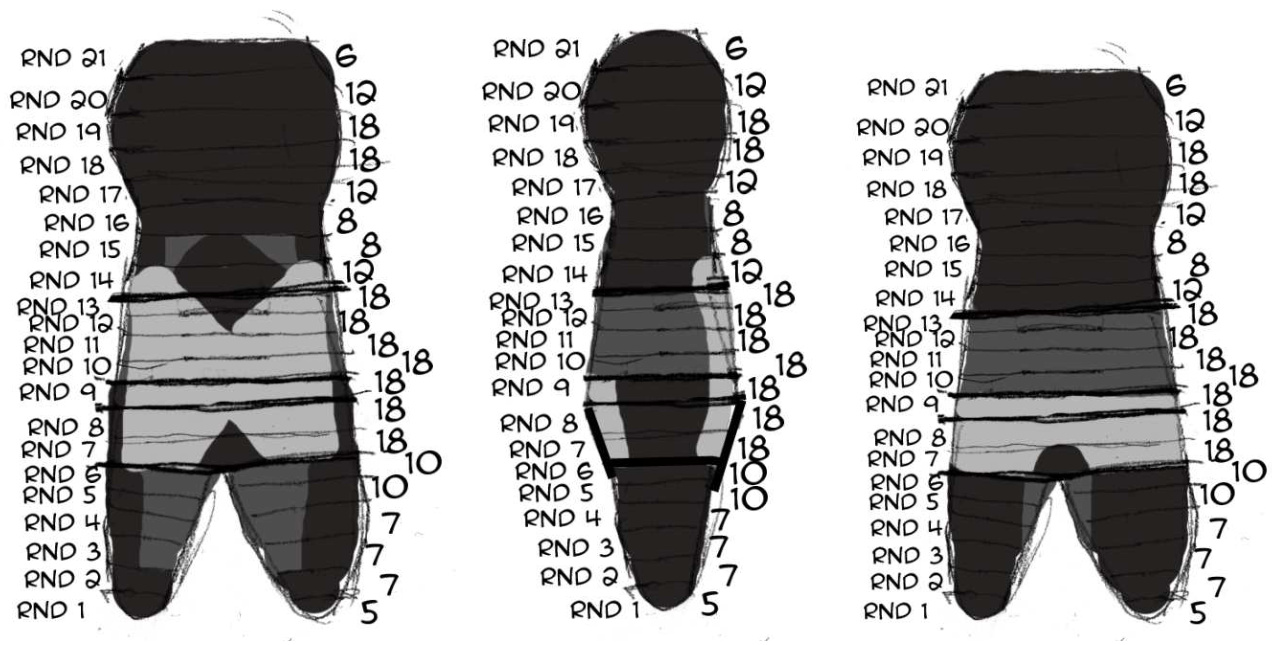
Body (make 1, continue on feet): use black yarn Rnd 7: You'll join the two together with a sl st and a chain through the legs (first through the back/out the front of Leg A's gray stitch, then through the front/out the back of leg B's 3rd gray stitch.) (black) sl st [this is that first stitch], ch 1, sc 1, (lt gray) sc 2, (black) sc 3, (lt gray) sc 2, (black) sc 2, (lt gray) sc 2, (black) sc 3, (lt gray) sc 2, (black) sc 1. There should be 18 sts that you will sc normally and the join should count for 1 bringing you to a total of 19. Original "Link" Pattern by Becchin Pattern Translated by tanoshimou Pattern Altered To Make Kasumi by vampirecheetah
Mass Effect Kasumi
Rnd 8: (It gray) sc 3, (black) sc 3, (lt gray) sc 3, (black) sc 1, (lt gray) sc 2, (black) sc 3, (It gray) sc 3. (18: 11 It gray, 7 black) stuff Rnd 9: (It gray) sc 4, (black) sc 2, (lt gray) sc 7, (black) sc 2, (lt gray) sc 3. (18: 14 It gray, 4 black) Rnd 10: (gray) sc 7, (It gray) sc 6, (gray) sc 5. (18: 6 lt gray, 12 gray) Rnd 11: (gray) sc 7, (lt gray) sc 7, (gray) sc 4. (18: 7 lt gray, 11 gray) stuff Rnd 12: (gray) sc 7, (lt gray) sc 3, (black) sc 1, (It gray) sc 4, (gray) sc 3. (18: 7lt gray, 1 black, 10 gray) Rnd 13: (gray) sc 8, (lt gray) sc 2, (black) sc 2, (It gray) sc 2, (gray) sc 4. (18: 4lt gray, 2 black, 12 gray) Rnd 14: (black) sc 1, dec, sc 1, dec, sc 1, (lt gray) dec, (black) sc 1, dec, sc 1, (It gray) dec, (black) sc 1, dec. (12: 2 It gray, 10 black) stuff Rnd 15: (black) sc 1, dec, sc 1, dec, (gray) sc 1, (black) dec, (gray) sc 1, (black) dec. (8: 6 black, 2gray) Rnd 16: (black) sc 8. (8) stuff Rnd 17: (sc, inc) Repeat all the way around. (12) Rnd 18: (sc, inc) Repeat all the way around. (18) Rnd 19: sc all the way around. (18) Rnd 20: (sc, dec) Repeat all the way around. (12) Rnd 21: dec all the way around. (6) sl st, FO. Be sure that when you stuff, that the neck will be supportive for the head! Original "Link" Pattern by Becchin Pattern Translated by tanoshimou Pattern Altered To Make Kasumi by vampirecheetah
Mass Effect Kasumi
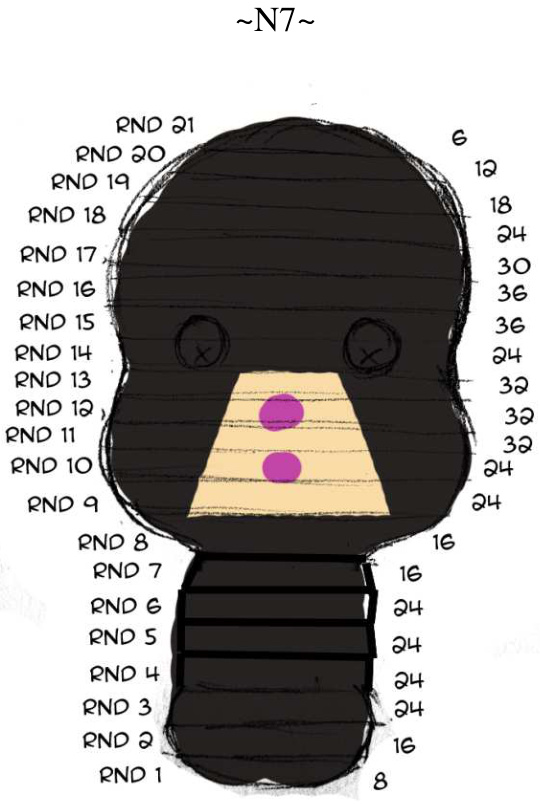
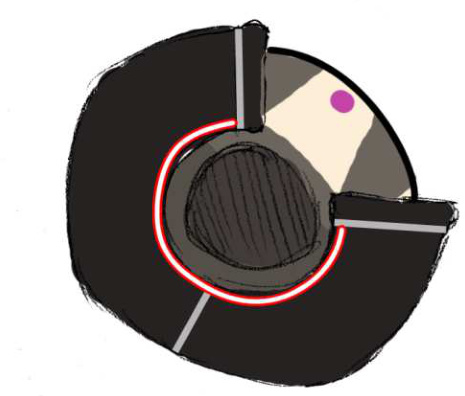
Head (make 1): use black yarn Rnd 1: sc 8 into magic ring. (8) Rnd 2: inc all the way around. (16) Rnd 3: (sc, inc) Repeat all the way around. (24) Rnd 4-6: sc all the way around. (24) Rnd 7: (sc, dec) Repeat all the way around. (16) Rnd 8: sc all the way around. (16)\*\* \*\*This bulb is going to be the socket that the neck ball will slide into. Rnd 9: (black) sc, inc, sc, inc, sc, (skin) inc, sc, inc, sc, (1 skin, 1 black) inc, sc, inc, sc, inc, sc, inc. (24: 17 black, 7 skin) Rnd 10: (black) sc 8, (skin) sc 2, (purple) sc 2, (skin) sc 2, (black) sc 10. (24: 18 black, 4 skin, 2 purple) Rnd 11: (black) sc 2, inc, sc 2, inc, sc 2, (1 black, 1 skin) inc, sc 2, inc, sc 2, (black) inc, sc 2, inc, sc 2, inc, sc 2, inc. (32: 25 black, 7 skin) Original "Link" Pattern by Becchin Pattern Translated by tanoshimou Pattern Altered To Make Kasumi by vampirecheetah
Mass Effect Kasumi
Rnd 12: (black) sc 12, (skin) sc 2, (purple) sc 2, (skin) sc 2, (black) sc 14. (32: 26 black, 4 skin, 2 purple) Rnd 13: (black) sc 13, (skin) sc 4, (black) sc 15. (32: 28 black, 4 skin) Rnd 14: (black) sc 7, dec 3 (mark), dec 1, sc 2, dec 2 (mark), dec 2, sc 7. (24)\*\* \*\*This rnd will have the eyes. Rnd 15: Sc 6, inc 12, sc 6. (36) Rnd 16: Sc all the way around. (36) Rnd 17: (sc 4, dec) Repeat all the way around. (30) Rnd 18: (sc 3, dec) Repeat all the way around. (24)\*\* \*\*Place the eyes in first. Then turn the neck socket inside out. I usually set the head onto the neck, and then stuff it. This way you can get a better grasp on just how much stuffing the head will need. Rnd 19: (sc 2, dec) Repeat all the way around. (18) Rnd 20: (sc, dec) Repeat all the way around. (12) Rnd 21: dec all the way around. (6) Sl st, FO. Hood (make 1):\*\* use black yarn \*\*The hood will be done in rows, not in rounds. Row 1: sc 6 into magic ring, sl st to close. (6) Row 2: ch 1, sc in same st as sl st, inc all the way around, sl st to close. (12) Row 3: ch 1, inc, (sc, inc) repeat all the way around, sl st to close. (18) Row 4: ch 1, sc 1, inc, (sc 2, inc) repeat all the way around, sl st to close. (24) Row 5: ch 1, sc 2, inc, (sc 3, inc) repeat all the way around, sl st to close. (30) Row 6: ch 1, sc 3, inc, (sc 4, inc) repeat all the way around, sl st to close. (36) Row 7: ch 1, sc 4, inc, (sc 5, inc) repeat all the way around, sl st to close. (42) Original "Link" Pattern by Becchin Pattern Translated by tanoshimou Pattern Altered To Make Kasumi by vampirecheetah
Mass Effect Kasumi
Row 8: ch 1, sc 41, sl st to close. (42) Row 9: ch 1, turn, sc 32. (33) Row 10: ch 1, turn, sc 33. (33) Row 11: ch 1, turn, dec, sc 14, dec, sc 13, dec. (30) Row 12: ch 1, turn, dec, sc 12, dec, sc 12, dec. (27) Row 13: ch 1, turn, dec, sc 11, dec, sc 10, dec. (24) Row 14: ch 1, turn, sc 5, dec, sc 10, dec, sc 5. (22) Row 15: ch 1, turn, sc 4, dec, sc 3, dec 2, sc 3, dec, sc 4. (18) FO. Leave a long end for sewing. For a nice finishing edge, you can attach another strand of yarn with a sl st at the end of the hood opening, and sl st around the hood/face opening to help give it an even sloping look. FO.
Sewn Details:
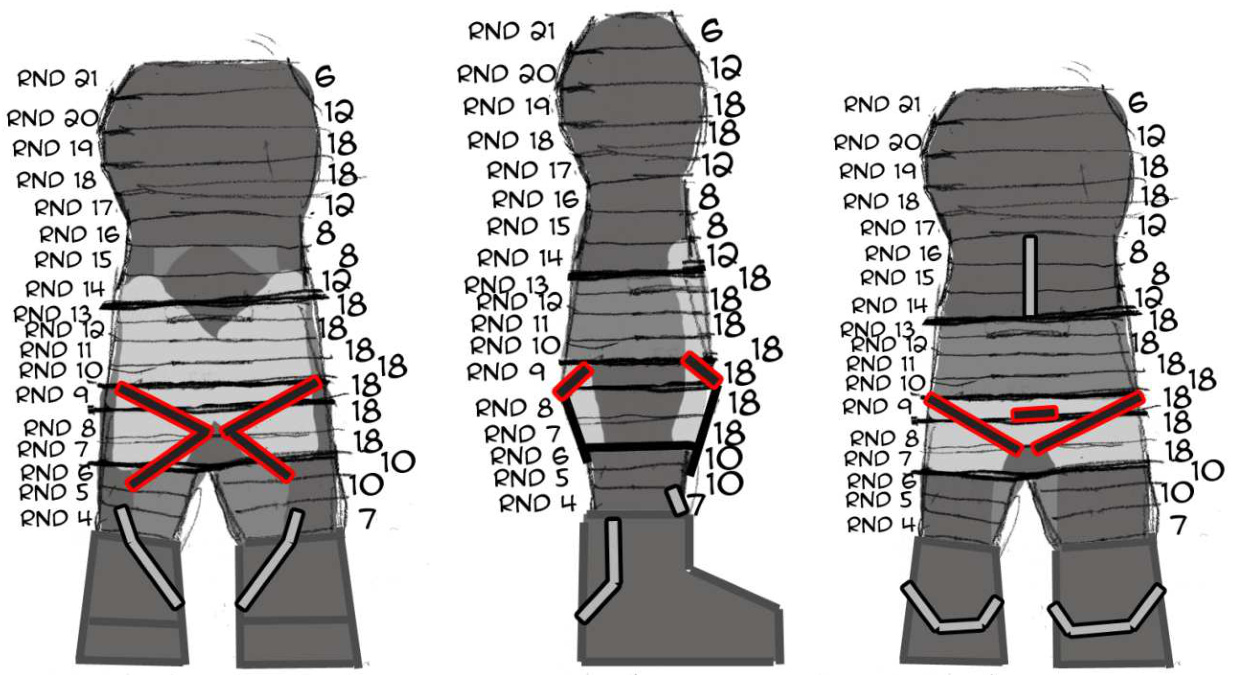
Use a lt gray to sew the boot details, starting on the front leg and working down and around the boot, stopping up the outer side of each boot. Do not attempt this detail until after attaching the boots to the body as you'll be sewing the detail across the pieces and you'll want a cohesive look. Original "Link" Pattern by Becchin Pattern Translated by tanoshimou Pattern Altered To Make Kasumi by vampirecheetah It also may be easier to attach one boot, sew in the detail, attach the other boot, and work on the detail.
With black sew on the belt details to the body. I found it best to start at the front of one leg, moving diagonally up to the hip, around the back, down to the butt, and back diagonally up to the other hip, around to the bottom front of the other leg. There's also just a line in the back to, where the small of the back would be.
Original "Link" Pattern by Becchin Pattern Translated by tanoshimou Pattern Altered To Make Kasumi by vampirecheetah
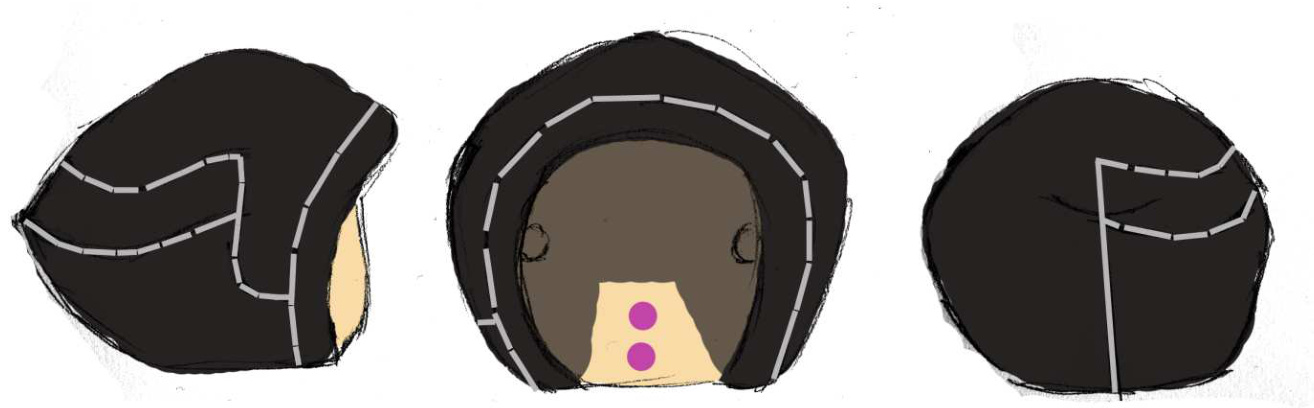
Take the It gray again and add the details to the hood. There's a lining around the hood/face opening, and a unique design along one side of the hood. A curved sweeping pattern that eventually goes down the back of the hood. The It gray is also used on the backside of the body, near/on the neck. It's to give the illusion that the hood's back falls down her neck/shoulders. It's just a straight line of the It gray, looking like it connects to the hood. It's easiest to get the hood done first, attach the hood to the head, then position the head on the body to plot out the best alignment. I usually use pins as a means to mark where my details will go. Taking the head back off will make sewing this line easier.
Assembly:
Stuff and attach the boots to the body. It might be easier to attach one boot, sew on the leg/boot details, then do the other followed by the other boot details.
Add the details to the hood and attach the hood to the head, sewing near the head's socket opening. Finish adding any body details Original "Link" Pattern by Becchin Pattern Translated by tanoshimou Pattern Altered To Make Kasumi by vampirecheetah
Mass Effect Kasumi
Attach the arms to the body, and put the head on.