Courage the Cowardly Dog Beanie

Supplies:
-Patons Classic Wool Merino in Petal Pink. 100% Pure New Wool. 3.5 oz/100 g/223 yd. -Kraemer Perfection in Onyx. 30% Superwash Merino/70% Acrylic. 3.5 oz/100 g/200 yd. -Filatura Lanarota Rich Wool in #152 (Brown). 100% Pure Wool. 50 g/104 yds. -Cascade 220 Wool Worsted in White. 100% Wool. 3.5 oz/ 100 g, 220 yd. -Size H Crochet Hook -Fiberfill -Yarn Needle Gauge: 4 sts per inch in hdc Abbreviations: hdc - half double crochet sts - stitches ch - chain sc - single crochet scdec - single crochet decrease dc - double crochet An instructional video on how to do the Magic Ring method of making a circle in crochet can be found here: http://www.youtube.com/watch?v=FHYVutk2iYY I use this technique in almost all of my crochet patterns, and it's a very good one to learn. Hat sizes are in Small to fit a child, Medium to fit a teen or adult, and Large to fit a larger adult. S (M, L) Hat: With Petal Pink, magic ring 8 hdc. Join with a slip stitch. Round 1: Ch 1. 2 hdc in each st. Repeat around. Join. 16 sts. Round 2: Ch 1. hdc 1, 2 hdc in next st. Repeat around. Join. 24 sts. Round 3: Ch 1. 2 hdc in next st, hdc 2. Repeat around. Join. 32 sts. Round 4: Ch 1. hdc 3, 2 hdc in next st. Repeat around. Join. 40 sts. Round 5: Ch 1. 2 hdc in next st, hdc 4. Repeat around. Join. 48 sts. Round 6: Ch 1. hdc 5, 2 hdc in next st. Repeat around. Join. 56 sts. Round 7: Ch 1. 2 hdc in next st, hdc 6. Repeat around. Join. 64 sts. Round 8: Ch 1. hdc 7, 2 hdc in next st. Repeat around. Join. 72 sts. S size jump to Round 11. Round 9: Ch 1. 2 hdc in next st, hdc 8. Repeat around. Join. 80 sts. M size jump to Round 11. Round 10: Ch 1. hdc 9, 2 hdc in next st. Repeat around. Join. 88 sts. Round 11 and Following: Ch 1. hdc each st around until piece measures 7 %" - 8" or desired length. Fasten off and run in ends. Snout: Cheeks: Make 2 With Petal Pink, magic ring 6 sc. Join with a slip stitch. Round 1: Ch 1. 2 sc in each st around. Join. 12 sts. Round 2: Ch 1. Sc 1, 2 sc in next stitch. Repeat around. Join. 18 sts. Round 3: Ch 1. Sc around. Join. Round 4: Ch 1. Sc 1, scdec. Repeat around. Join. 12 sts. Round 5: Ch 1. Scdec around. Join. 6 sts. Stuff lightly and stitch opening closed. Set aside. Bridge: Side 1: With Petal Pink, ch 10. Row 1: Sc 1 in 2nd ch from hook, sc across. 9 sts. Rows 2 and 3: Ch 1. Sc across. Fasten off. Side 2: Pick up and sc 9 sts from 1 edge of Side 1. Rows 1-6: Ch 1. Sc across. Fasten off. Side 3: Pick up and sc 9 sts from edge of Side 2. Rows 1 and 2: Ch 1. Sc across. Fasten off. Side 4: Pick up and sc 9 sts from edge of Side 3. Rows 1-6: Ch 1. Sc across. Fasten off. Line up the edges of Sides 1 and 4 and sc together. Fasten off and run in ends. Line up Cheeks on either end of the Bridge and stitch in place. Stuff the Bridge lightly before stitching closed. With the Black, stitch 3 French knots on the left Cheek and 1 French knot on the right Cheek. Make whiskers by knotting the yarn to the Cheek and then leaving a little tail. Use the photos a a placement guide.
Nose:
With Brown, ch 2. Row 1: 2 sc in 2nd ch from hook. Ch 1. 2 sts. Row 2: 2 sc in each st. Ch 1. 4 sts. Row 3: 2 sc in the 1st st, sc 2, 2 sc in the next st. Ch 1. 6 sts. Row 4: 2 sc in the 1st st, sc 4, 2 sc in the next st. Ch 1. 8 sts. Row 5: 2 sc in the 1st st, sc 6, 2 sc in the next st. Ch 1. 10 sts. Rows 6-8: Sc across. Ch 1. Fasten off. Nose Bottom: With Brown, pick up and sc sts all around the Nose with 10 sts across the top, 2 in the corner, 6 across the side, 2 in the point, 6 across the other side and 2 in the corner for a total of 28 sts. Join. Rounds 1-3: Ch 1. Sc around. Join. Round 4: Ch 1. Scdec, sc 1. Repeat around, ending with a sc 1. Join. 19 sts. Round 5: Ch 1. Scdec, sc 1. Repeat around, ending with a scdec. Join. 12 sts. Round 6: Ch 1. Scdec around. Join. 6 sts. Stuff lightly and stitch to the Bridge, using the photos as a placement guide. Stitch the Snout to the Hat, using the photos as a placement guide. Eyes: Make 2 With the White, magic ring 6 sc. Join. Round 1: Ch 1. 2 sc in the first st, slip 2, 2 sc in the next st, slip 2. Join. 8 sts. Round 2: Ch 1. 2 sc in each of the next 2 sts, sc 2, 2 sc in the next 2 sts, sc 2. Join. 12 sts. Round 3: Ch 1. 2 sc in each of the next 4 sts, sc 2, 2 sc in each of the next 4 sts, sc 2. Join. 20 sts. Round 4: Ch 1. Sc 2, 2 sc in each of the next 4 sts, sc 6, 2 sc in each of the next 4 sts, sc 4. Join. 28 sts. Round 5: Ch 1. Sc 4, 2 sc in each of the next 4 sts, sc 10, 2 sc in each of the next 4 sts, sc 6. Join. 36 sts. Fasten off. Pupils: Make 2 With the Black, magic ring 4 sc. Join. Round 1: Ch 1. 2 sc in first st, slip 1, 2 sc in next st, slip 1. Join. 6 sts. Fasten off and stitch to the Eyes, using the photos as a placement guide. With the White, stitch some reflections in the Pupils, using the photos as a placement guide. Stitch the Eyes to the Hat, using the photos as a placement guide. With the Black, stitch the eyebrows and lines under the Eyes with a backstitch. The Ears and the Arms are made in a flat round by not turning at the end of the row but flipping it upside down and stitching in the loops on the bottoms of the stitches.
Ears: Make 2
With the Brown, ch 25. Sc 1 in 2nd ch from the hook and each ch to end. Sc 2 more in the last ch. Do not turn. Flip the piece over and sc 1 in the back loop of each ch to end. Sc 2 more in the last ch. 50 sts total. Join with the 1"t st at the top of the round and fasten off. Fold the piece in half. Working through both layers at the same time and starting at the fold, sc 12 sts down the side, the 3 sts on the end and 12 sts down the other side to the fold. Fasten off. 27 sts. Pick up 1 st on the end opposite the fold. Ch 11. Sc 1 in 2nd ch from the hook and each ch to the end. 10 sts. Slip stitch to the original section. Fasten off. Fold the second section in half. Working through both layers at the same time and starting at the fold, sc 5 sts and fasten off. Repeat for the other side. Stitch the raw edge to the original section, stitching a stitch or so in to pull the second section in to make a 90 degree angle. Stitch the Ears to the Hat, using the photos as a placement guide.
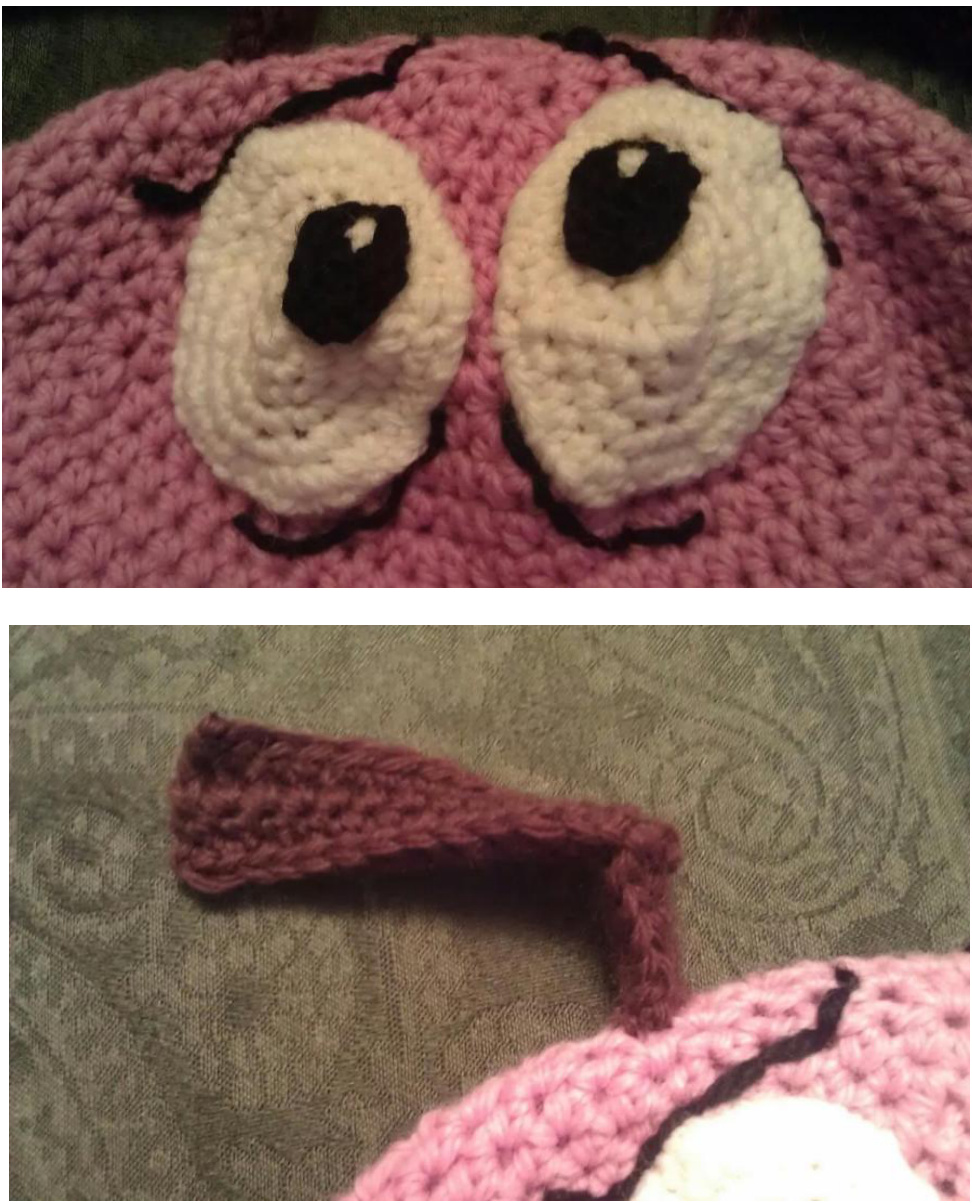
Arms: Make 2
With the Petal Pink, ch 18. Sc 1 in 2nd ch from the hook and each ch to end. Sc 2 more in the last ch. Do not turn. Flip the piece over and sc 1 in the back loop of each ch to end. Fasten off. 35 sts. At the rounded end, join the yarn to the 2nd st from the end. Ch 2, dc 1, ch 2, slip into the same st, slip 1 in next st, ch 2, dc 1 in next st, ch 2, slip into the same st, slip 1 in next st, ch 2, dc 1 in next st, ch 2, slip into the same st. Fasten off. Stitch the middle finger of the hands to the Nose first and then the very ends of the Arms to the Hat. Leave a little slack for the stretch of the hat when wearing. This pattern is @Lissa Snyder, 2011, and may be printed one time by purchaser. It may not be resold or transferred in any form to any other party. Feel free to make finished items for your own use or resale. Credit back to the designer is appreciated but not required. More patterns available at readwriteknit.blog.com, www.ravelry.com/people/iwritetoo or www.etsy.com/people/readwriteknit.


