Beaded Socks - SKA Mystery Pattern
Designed by Emmle, sockapalooza4pal@gmail.com Materials and Equipment ·1 100 gram skein (or two 50 gram skeins) of fingering weight yarn - I used Shibui · US size 1 circular needles, or size to obtain gauge (pattern is written for 2 circulars but should be easily converted to magic loop or dpns) · Tiny crocket hook (size 12 or 13 should work, depending on your beads) Beads (size 8 is best, if you can't get them to work buy 6's) · 6 stitch markers Tapestry Needle Gauge: 7 - 8 stitches per inch (working 8 stitches per inch is good if you have feet Smaller than $8^{\circ}$ diameter). If your feet measure more than $9^{\circ}$ in diameter you can easily modify this pattern so that you work with 72 stitches because it has an 8 stitch pattern repeat.
Abbreviations
b - add a bead (using technique described below) k - knit k2tog - knit two together k3tog - slip 1, K2tog, pass slipped stitch over n1 or n2: needle 1 or needle 2 p- Purl sl1 - slip 1 stitch purlwise ssk - slip a stitch knitwise twice, then knit both stitches together yo- yarn over Adding the Beads: We're going to be adding beads using a crochet hook rather than stringing them on the yarn first. To do this: slide a bead onto the crochet hook grab the next stitch on the left needle with the crochet hook and slip it off the needle slide the bead from the crochet hook onto the yarn loop put the yarn loop back on the left needle knit the stitch For really good directions on how to do this see: http://fluffyknitterdeb.blogspot.com/2005/08/by-special-request-beading-made-easy.html
Clue #1
Cast on 64 stitches loosely using your favorite cast on. Put 32 stitches on n1 and 32 on n2. From now on nl holds the sole stitches and n2 holds the instep stitches. Join being careful not to twist. Cuff: Work in k3 p1 rib for 8 rows
Leg:
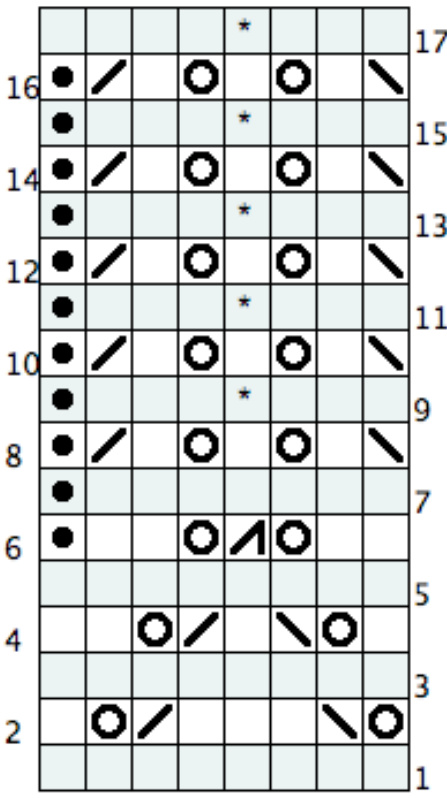
Row $1!\mathrm{~K~}$ all stitches Row 2: \*yo, ssk, k3, k2tog, yo, $k1^{*}$ repeat to end of row Row 3: K all stitches Row 4: $^{*1}\mathrm{k}1$ .yo, sk, kl, k2tog, yo, $k2^{*}$ repeat to end of row Row 5: K all stitches Row 6: $^{\ast1}\mathrm{k}2$ yo, K3tog, yo, k2, p1\* repeat to end of row Row 7: $^{*1}\mathrm{k7}$ , $\mathsf{p}1^{*}$ repeat to end of row Rows 8, 10, 12, 14 & 16: \*ssk, kl, yo, kl, yo, k1, k2tog, $\mathrm{p}1^{*}$ repeat to end of row Rows 9, 11, 13, & 15: $^{*1}\mathrm{k}3$ , b1, k3, p1\* repeat to end of row Row 17: $^{*1}\mathrm{k}3$ ,b1, $k4^{*}$ repeat to end of row For people who prefer charts, here is the chart for the above. “Special' on the key means add abead
Clue #2
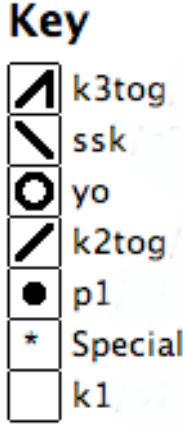
Row 1: $^{*1}\mathrm{k}1$ , k2tog, yo, kl, yo, ssk, $k2^{*}$ repeat to end of row Row 2: k all stitches Row 3: \*k2tog, yo, k3, yo, ssk, $k1^{*}$ repeat to end of row Row 4: k all stitches Row 5 Set-up Step: You need to move the first stitch from N1 to the end of N2 (knit it when you move it) and the first stitch from N2 to the end of N1 (without knitting it) before you start row 5. If you are working with DPNs you need to move stitches at the beginning of each needle following the instructions above. Row 5: yo, k2, p1, k2, yo, K3tog\* repeat to end of row Row 6: $^{*1}\mathrm{k}3$ ,p1, $\boldsymbol{\mathrm{k}4^{*}}$ repeat to end of row Rows 7, 9, 11, 13 & 15: \* yo, k1, k2tog, pl, ssk, kl, yo, k1, \* repeat to end of row Rows 8, 10, 12, & 14: $^{*1}\mathrm{k}3$ , p1, k3, b1\* repeat to end of row Row 16: $^{*1}\mathrm{k}3$ , p1, k3, $\,\,\,\,\mathbf{b}1^{*}$ repeat to end of row Row 17: \*yo, ssk, k3, k2tog, yo, $k1^{*}$ repeat to end of row Row $18;\mathbf{k}$ all stitches Row 19: $^{*}\mathrm{kl}$ , yo, ssk, k1, k2tog, yo, k1, $\mathrm{p}1^{*}$ repeat to end of row Row 20: $^{*1}\mathrm{k7}$ , $\mathrm{p}1^{*}$ repeat to end of row Row 21: $^{\ast1}\mathrm{k}2$ , yo, K3tog, yo, k2, $\mathrm{p}1^{*}$ repeat to end of row Row 22: $^{*1}\mathrm{k7}$ , $\mathrm{p}1^{*}$ repeat to end of row
Once you have completed the lace pattern above work in k3, pl rib until sock reaches 6" or desired length. Optional: If this pattern doesn't have enough beads for you here is a suggestion about how to add more! Instead of just doing k3, p1 rib, do 2 rows of k3, pl rib and on the $3^{\mathrm{rd}}$ row, do k1, b1, kl, p1 rib. Continue to add beads in this way as you like. Just remember, you need to make sure that the beads don't go so far down the sock that they are going to be inside your shoe - that could get really uncomfortable!
Clue #3
Set up For Heel - Move 1 the last stitch from nl to n2, so you have 31 stitches on the n1 (where you will work the heel) and 33 stitches on n2 (the instep stitches). We're doing this so that the instep starts and ends with a purl stitch. This helps hide laddering! Heel flap (eye of partridge with slipped stitch edge) - worked on n1 only: Row 1: sl1, (k1 sl1) repeat across the row to last 2 stitches, k2 turn Row 2: sll, purl to end of row, turn Row 3: sl $1({\mathrm{s}}11\,{\mathrm{k}}1)$ repeat across the row, turn Row 4: sll, purl to end of row, turn Repeat rows 1-4 until you have worked 32 rows. You can work more if you like a deeper heel.
Heel Turn:
Row 1: Knit 16, ssk, k1, turn Row 2: Sl 1, purl 2, p2tog, p1, turn Row 3: Sl 1, knit to within 1 of gap, ssk, k1, turn Row 4: Sl 1, purl to within 1 of gap, p2tog, p1, turn Repeat rows 3 and 4 until allstitches are worked. You will have 17 sts. Knit 1 row even on nl.
Gusset Decrease:
Pick up 1 stitch in each slipped stitch. So far you have 16 or 17 new stitches on the needle. Pick up another stitch or two at the end of the row to prevent holes. Knit across n2 continuing in p1 (k3, pl) rib pattern - in other words, the first stitch will be a purl stitch in every row, then you will k3, p1 to the end of the row. This should continue the rib pattern you established on the foot. Continuing on nl, pick up a stitch or two at the beginning of this row to prevent holes. Now pick up 1 stitch in each slipped stitch - how ever many you did on the left side of the sock. You will have 18 stitches give or take 1 or 2. Knit the rest of the stitches on n1, and n2 in pattern. Then follow these instructions for decreasing the gusset stitches Row 1: N1: k1, ssk, knit to last 3 stitches on the needle, k2tog, k1 N2: Continue in pl (k3, p1) rib pattern. Row 2: N1: Knit, N2: Continue in k3, p1 rib pattern. Continue with rows 1 and 2 until 32 stitches remain on nl (and 33 on n2).
Clue 4
Continue to work in pattern until sock is 1.5’ shorter than desired length. Knit 1 row even, then work the toe. (This is a modified toe from Cat Bordhi's New Pathways for Sock Knitters. I wanted to try a “no Kitchner? toe, so I made I part of this pattern!) Toe: You'll need 6 stitch markers - if you have a set of alphabet stitch markers this is your chance to use them. If not, any stitch markers will do, including loops of waste yarn. Letters refer to the letters on the alphabet stitch markers but aren't essential to working the toe successfully. Row 1: k9 k2tog, place marker A, k10 place marker B, k9 k2tog place marker C, k9 k2tog, place marker D, k10 place marker E, k9, k2tog, place marker F. (60 stitches) Row 2: Knit all stitches Row 3: \*knit to last 2 stitches before marker, $\mathrm{k}2\mathrm{tog^{*}}$ repeat to end of row Row 4: knit all stitches Repeat rows 3 and 4 until 12 stitches remain. Cut yarn leaving a tail. Use tapestry needle to weave the yarn tail through 12 stitches. Pull snug. Work in ends.


