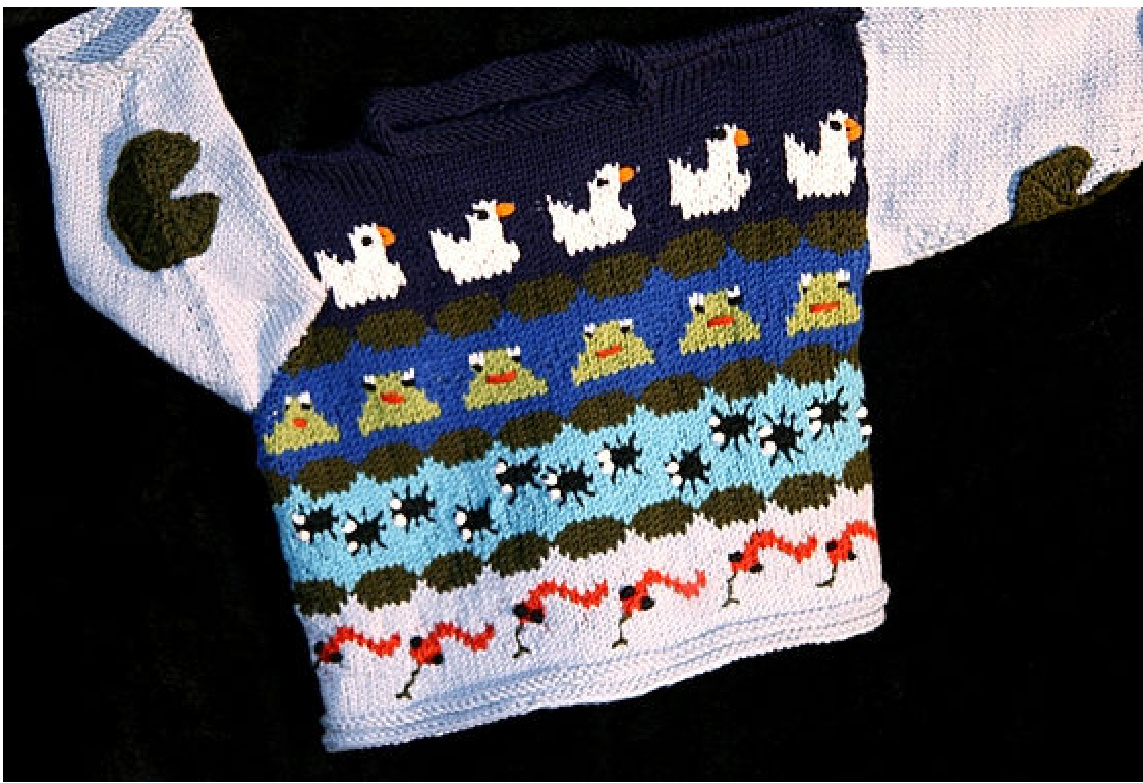
Pondemonium
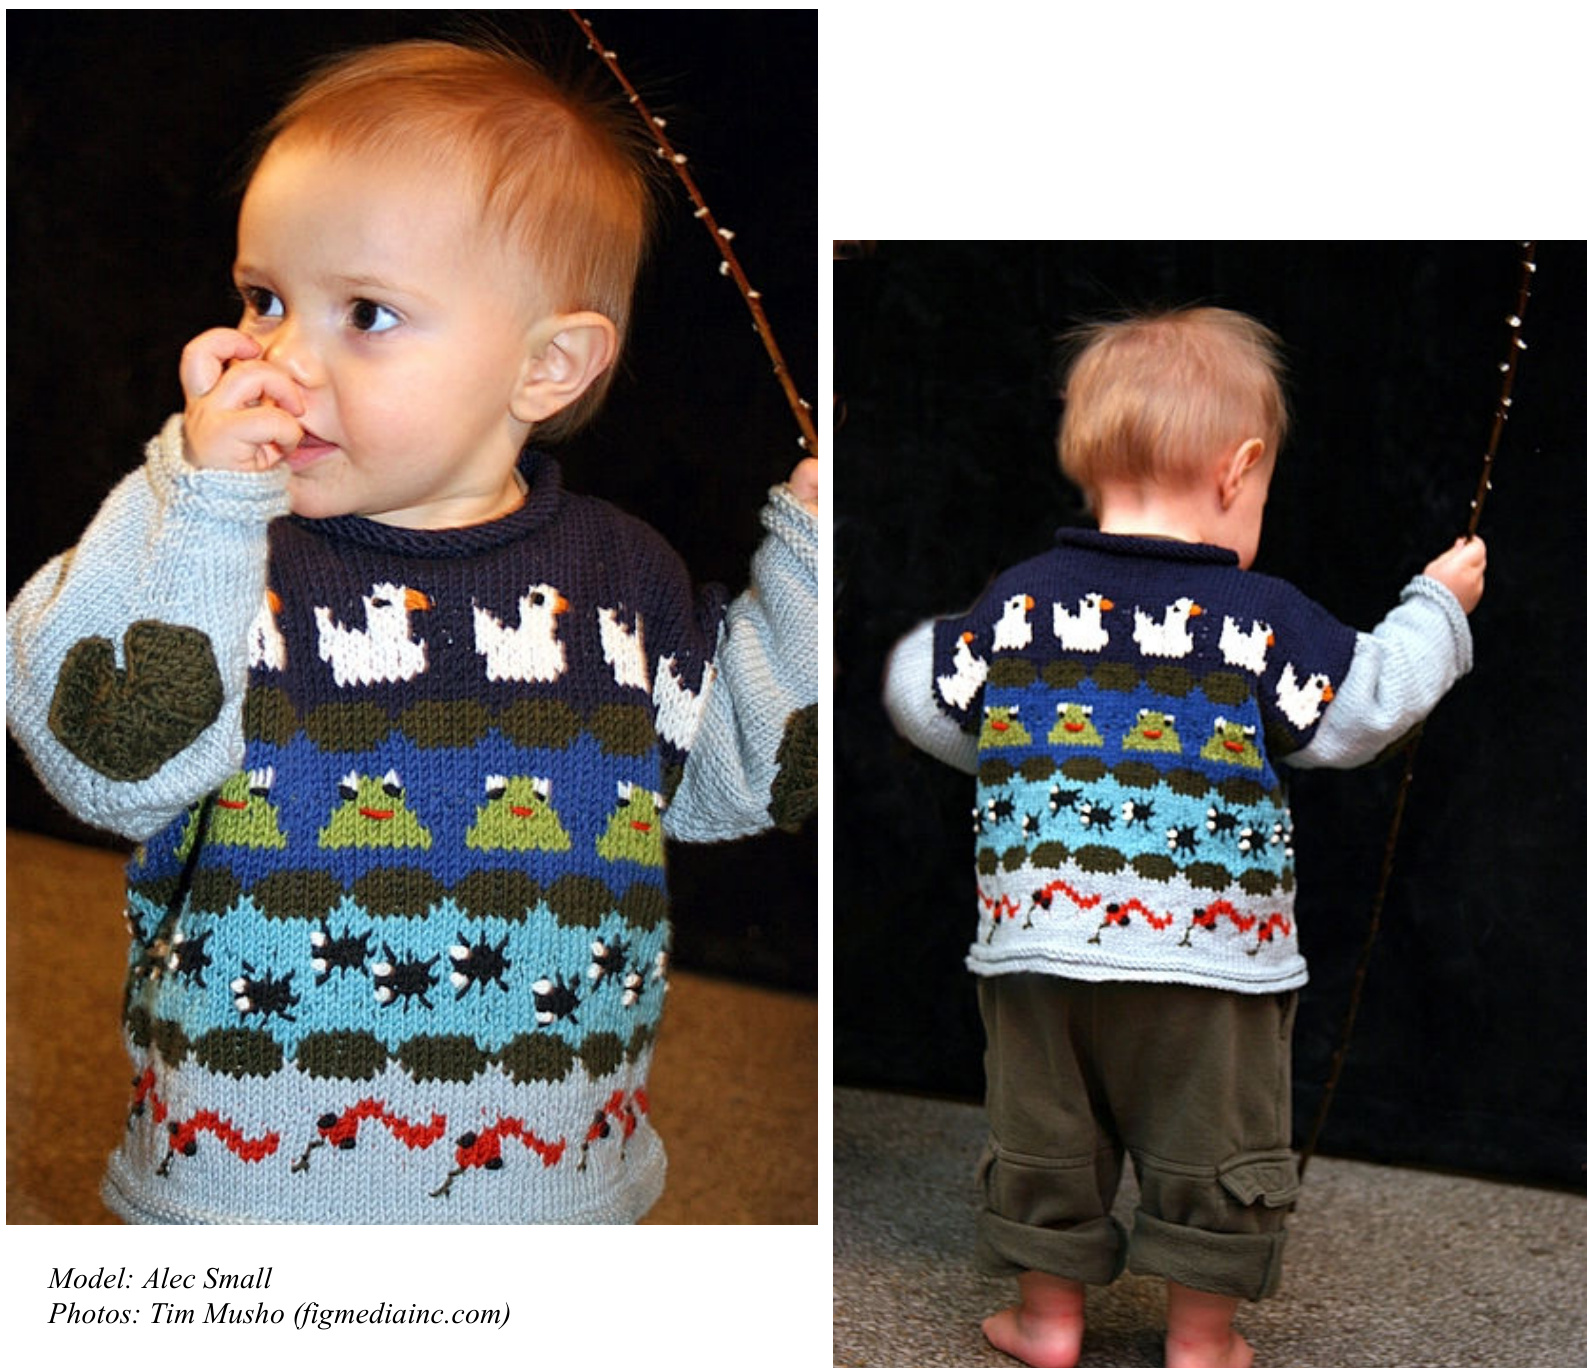
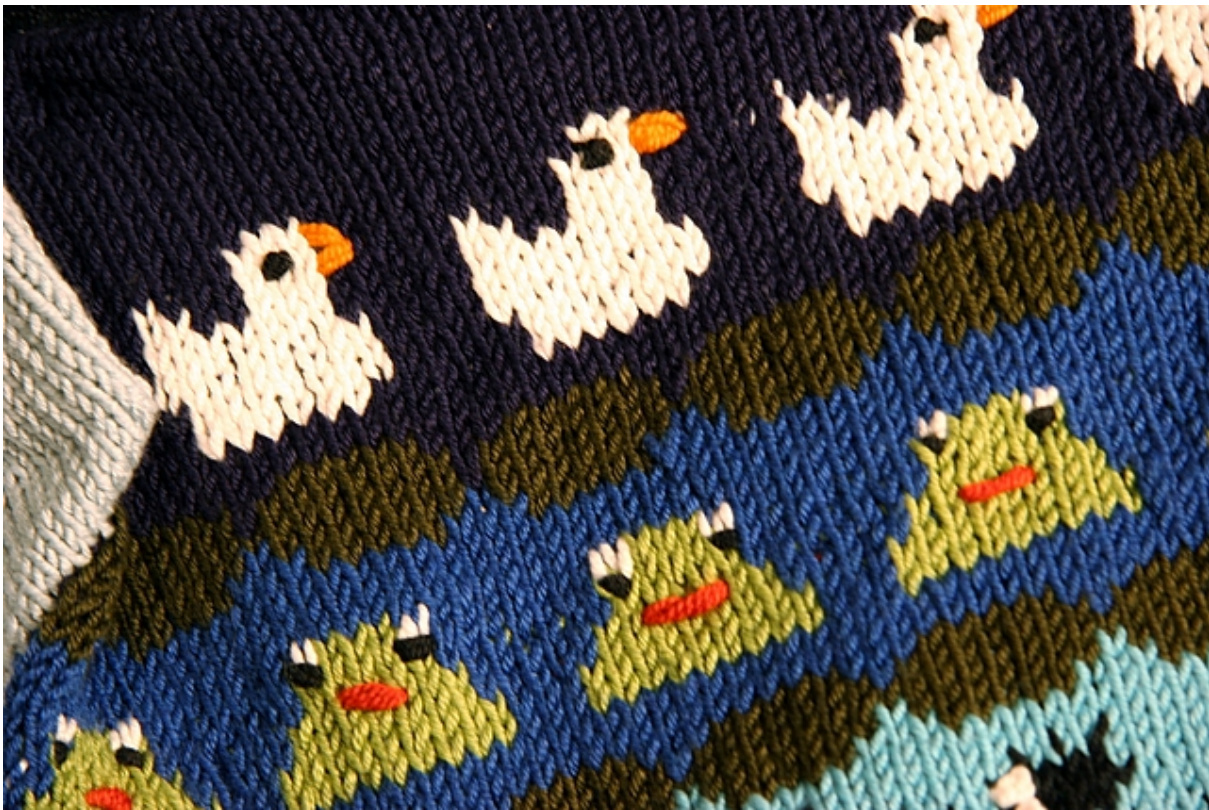
This little Fair Isle pullover is chock full of a kid's favorite creatures. Inspired by the children's song “The Little White Duck", you'll find ducks, frogs, bugs and snakes floating in the water, separated by rows of lily pads. The sleeves are finished with special lily pad elbow patches and “pond ripple' cuffs for maximum cuteness. The fit is loose and comfy, with a tunic style for easy on and off, and a stretchy funnel neck. Knit in a wool/cotton blend, it's the perfect layer for spring weather. Available in sizes 6, 12, and 18 months. Any questions? Contact Jen Small: jenrsmall@yahoo.com, or bluecanarygirl on Ravelry.
Pondemonium Pullover
This sweater is a great introduction to stranded colorwork, for knitters wishing to expand their range. Each row of the pattern features only two colors - the rest of the details are added with embroidery. It's done in DK weight yarn, so there's no tiny needles to contend with. The sleeves are knit in plain stockinette, so there's no floats to catch little fingers. And the sweater itself has no seaming or finishing after the fact - it's knit in the round to the armholes, then uses a three needle bind off for the shoulders. The collar and sleeves are picked up and knit, so when you're done, you're done! SIZING 6 (12,18) months Chest circumference: 24 (25, 26) inches Sleeve length: 6 (6%, 7/2) inches Body length shoulder to hem: 11/2 (13, 14) inches
MATERIALS
DK weight cotton wool blend Main Color (MC) Light blue: 300 yards Medium Blue: 120 Yards Navy blue: 120 yards Aqua blue: 120 yards About 20 yards each of olive green, natural, lime green, black, red, orange Sample knit in Rowan Wool Cotton
TOOLS
24-inch circular needles in size US #5 (or size needed to achieve gauge) 1 set double pointed needles in size US #5 (or size needed to achieve gauge) 4 Stitch markers ·Stitch holders or waste yarn ?Tapestry needle Large glass-head pins to hold appliqués in place
GAUGE
22 stitches/28 rows = 4" in fair isle pattern
PATTERN NOTES
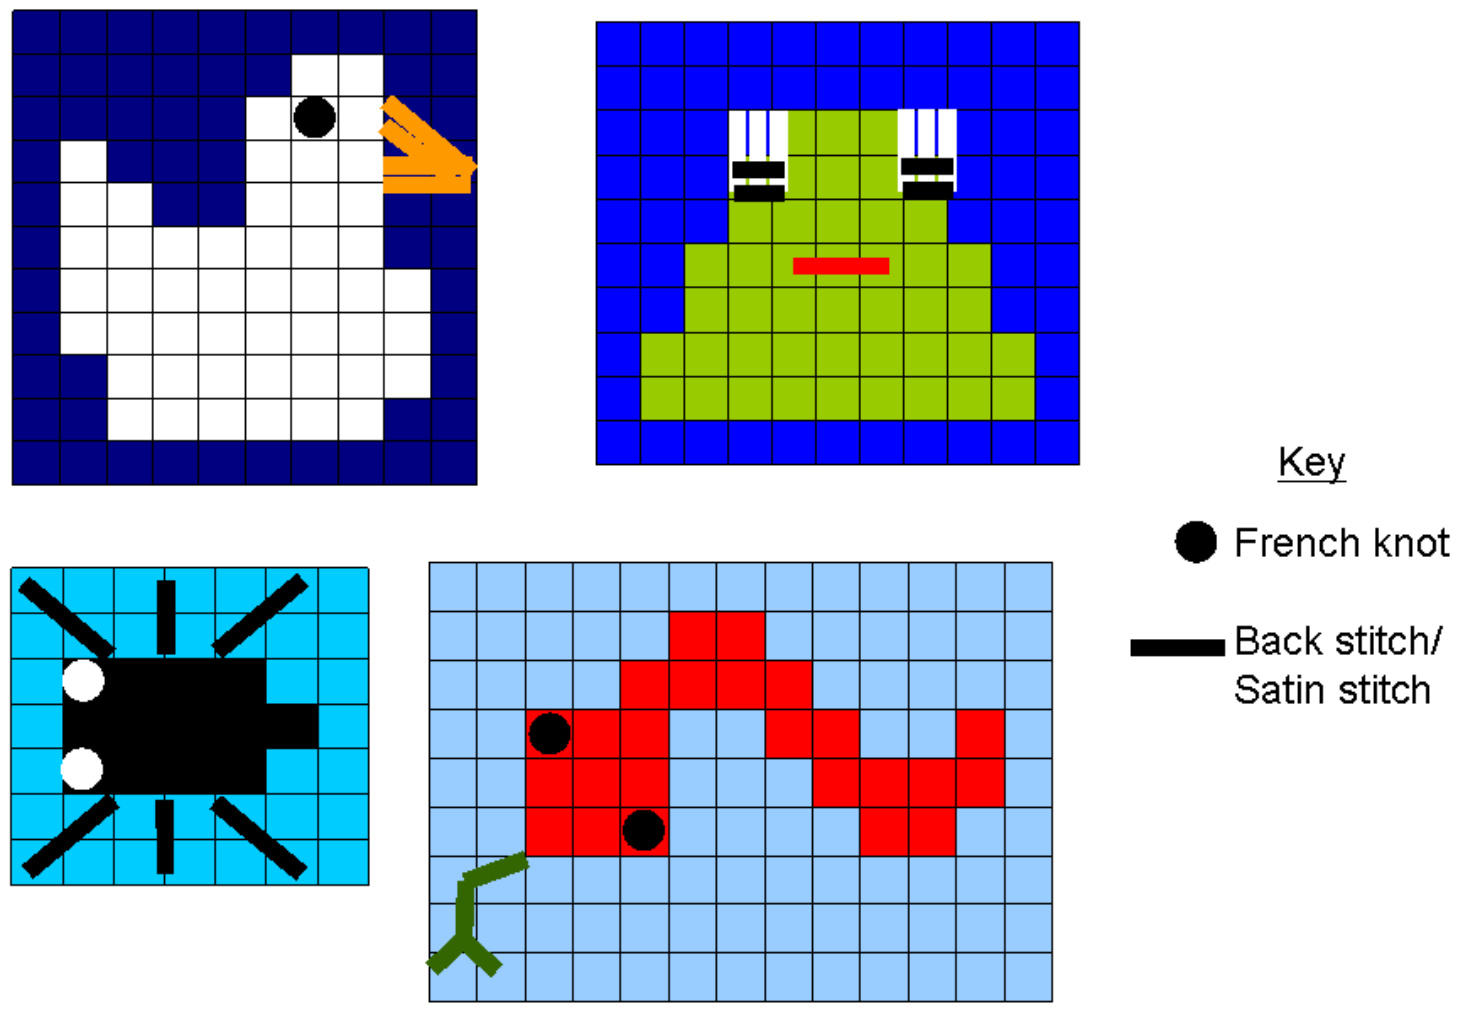
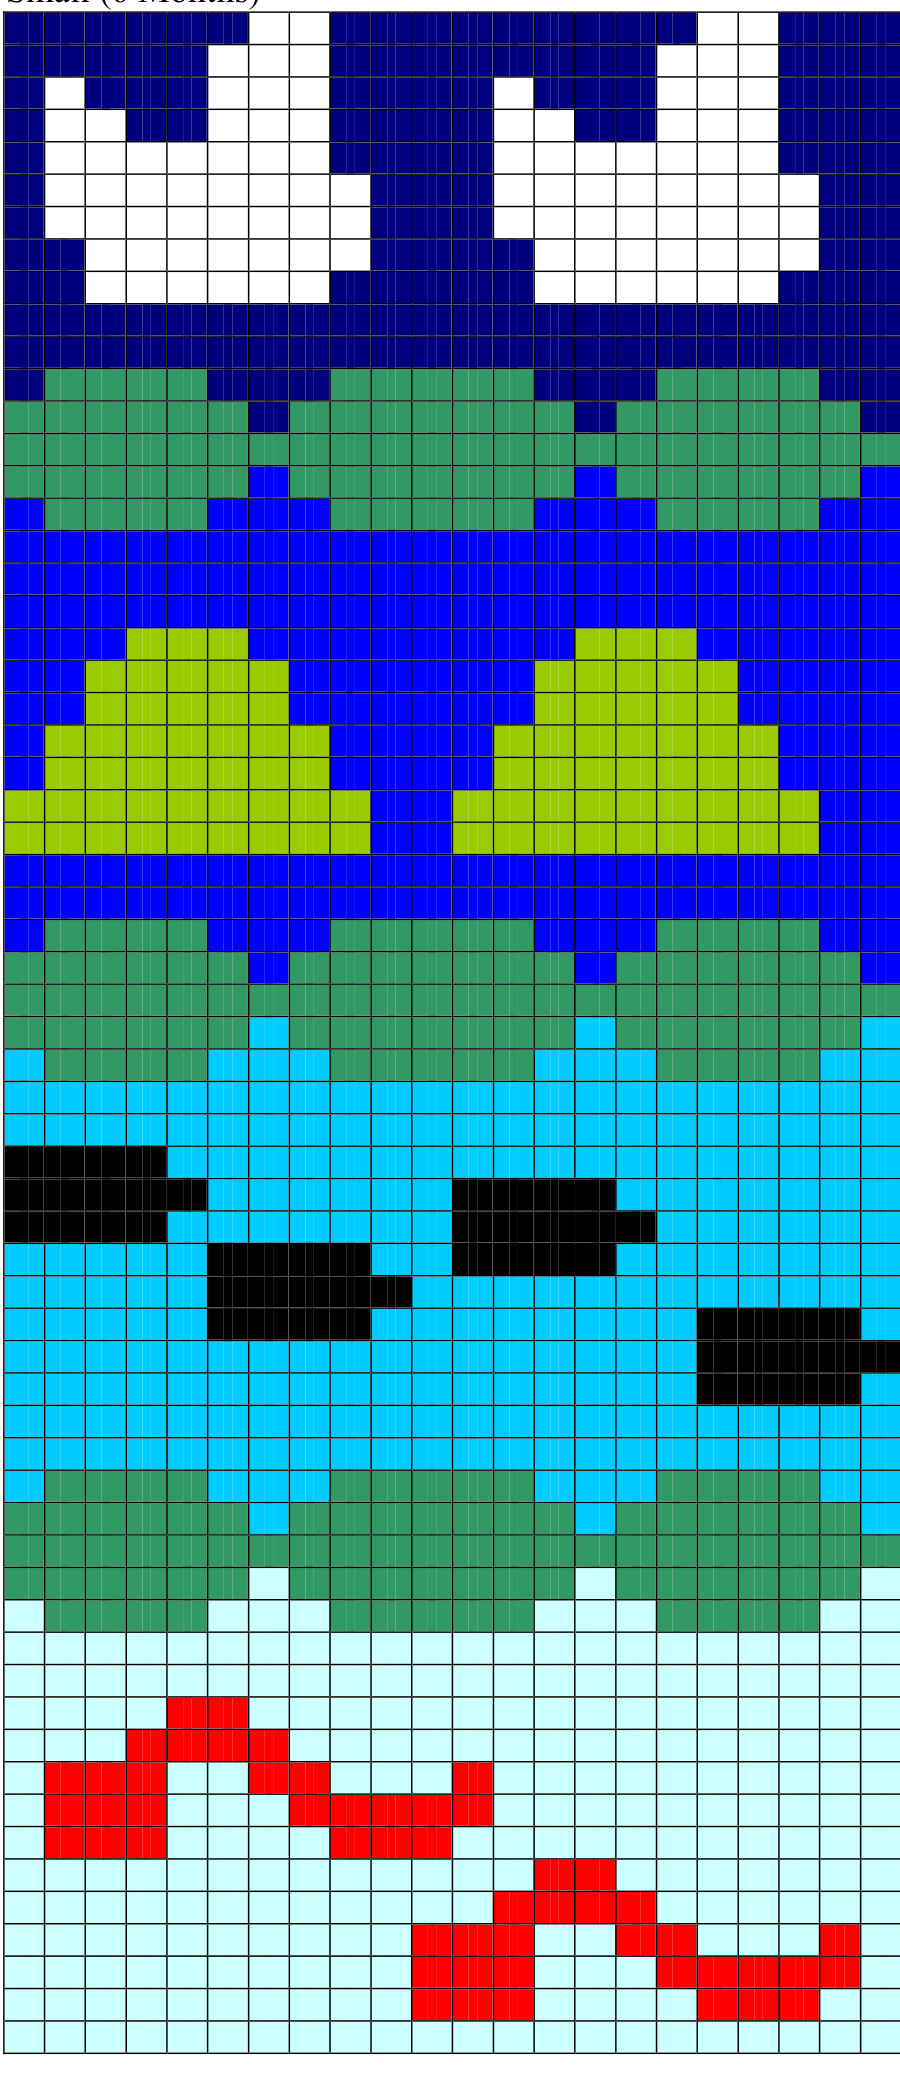
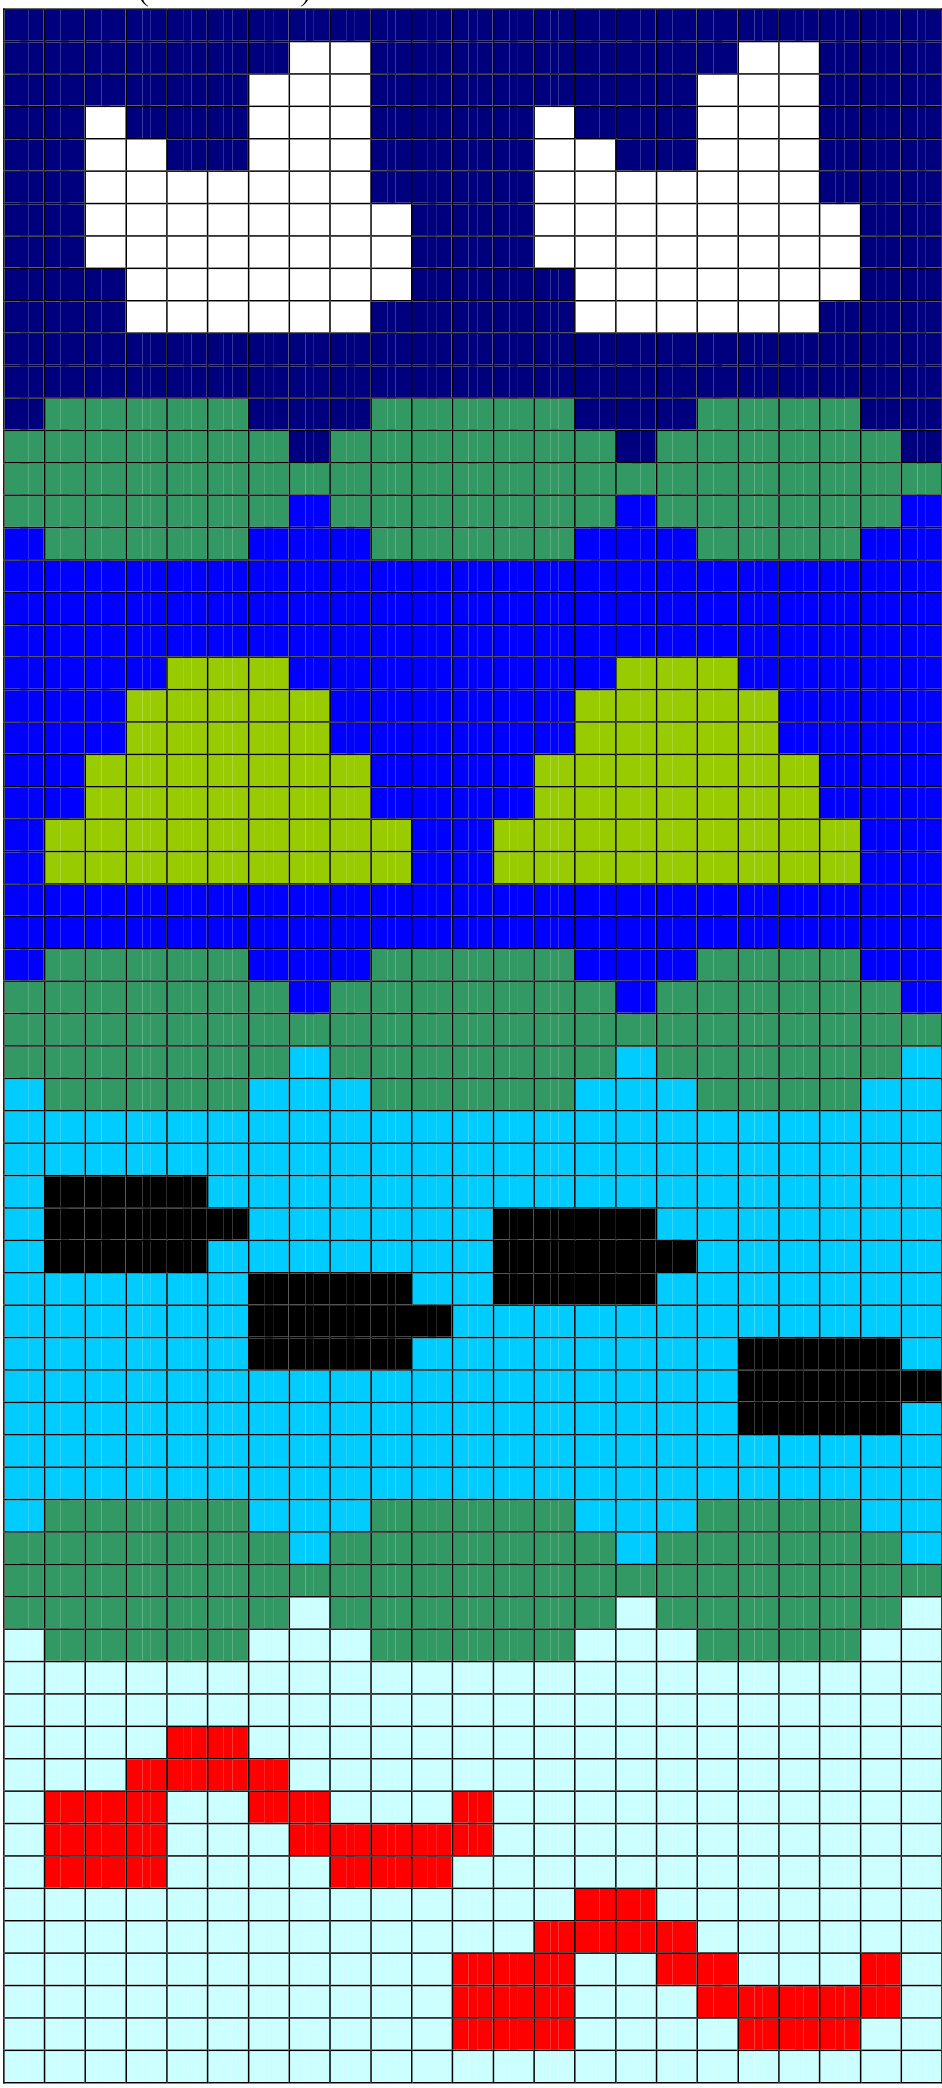
The body is knitted in the round through most of the chart. However, when you divide for the armholes, you will be doing some rows of stranded color work back and forth. Hang in there, it will only be for an inch or two! There is a separate chart for each size. They're designed so that you end up with 6 repeats of the pattern worked evenly around the sweater, no matter what size you're making. Pick the chart that matches the size you're making. For a great guide on stranded colorwork, check out Nanette Blanchard's Stranded Color Knitting, which is available for download. Her booklet takes the fear and guesswork out of color work, from how to hold the yarn to how to maintain good tension, to how to securely weave in ends. The embroidery chart features French knots and satin or backstitch. Make sure that you don't pull the yarn too tight between each bit of embroidery - and weave the embroidery yarn through the strands in the back every 3 or 4 stitches, so you don't have any long floats.
BODY
With MC, cast on 132 [138, 144] stitches onto circular needles. Join in the round. Purl one round, placing a marker at the beginning of the round and one after 66[69, 72] stitches. Knit 3 rounds, purl 2 rounds to create bottom edge. Knit 0 [3, 3] rounds in plain stockinette. Begin working chart, starting at bottom and working fair isle. Be sure to use the right chart for the size you are making. Work chart until body measures 6% [7/, 8] inches from cast-on edge. Continue working in chart, but divide front and back to create armhole openings. To do this, on the next row, work from beginning of row to side marker and turn.
WORK FRONT
Continue to work the front in fair isle chart as set, working back and forth, to the end of the chart. Continue working the front in CC1 until front measures 3/ [3%/4, 4/4] inches from beginning of armhole, ending on a wrong side row. Shape the front of the neck: With right side facing, work across 33 stitches, join new yarn and bind off 6 stitches VERY loosely, work to end. There will be 33 stitches on each side. With the right side facing you, work the left front: Turn, and for this and all other wrong-side rows, purl across. Turn, bind off 3 stitches and knit across to end. On the next right-side row, bind off 2 stitches and knit across to end. Then decrease 1 stitch every right side row 3 times. 25 stitches left on each side. Work until front measures 5 [5/2, 6] inches from start of armhole. Put shoulder stitches on a stitch holder or waste yarn. Leave a long tail for finishing. Work the other side of the front in the same way, but make all bind offs and decreases at the beginning of the wrong side rows, and work the right-side rows even.
WORK BACK
Join new yarn at beginning of back. Continue to work the back in fair isle chart as set, working back and forth, to the end of the chart. Continue working the back in CC1 until body measures 4%2 [5, 5%] inches from cast-on edge, ending on a wrong side row. Shape the back of the neck: With right side facing, work across 26 stitches, join new yarn and bind off 20 stitches VERY LOOSELY, work to end. There will be 26 stitches on each side. Working each side separately, at each neck edge decrease 1 st. 25 stitches left on each side. Work until back measures even with fronts. Put shoulder stitches on a stitch holder or waste yarn. Leave a long tail for finishing. Pondemonium @ Jennifer Small, 2007 Do embroidery on all animals according to chart Turn body inside out, and weave in and trim any ends. Line up front and back shoulders, and work 3 needle bind off on each side. Work the bind off quite snugly, so the seam is firm. Turn body right side out and work collar: using dpn's and CC1, start at a shoulder seam and pick up and knit approximately 58 stitches around the neck. Join in the round and work in plain stockinette for 1.25 inches, making sure that the neck stays very stretchy. Bind off loosely and weave in end.
SLEEVES
With MC start at the underarm edge of the armhole and pick up and knit 54 [60, 66] stitches. Be sure to work a stitch or two in the gap between the front and back underarm. Place marker at center of the underarm, join in the round. Work 7 [8, 7] more rounds straight. Work a decrease round: k1, k2tog, knit to 3 stitches before the end of the round, ssk, k1 Work two rows plain, then continue working a decrease round every third round until you have 34[36, 36] stitches left on your needles. Work cuff: P2 rows, K3 rows, P1 row. Bind off all stitches. Work the same for both sleeves.
OPTIONAL: Elbow Patches
If you wish, work two lily pads and attach as elbow patches on the sleeves. Lily Pad: Using same needles to obtain sweater gauge, with Olive Green, CO 41 stitches, leaving a long tail for sewing. Row 1: K1, (p7, k1) across to end. Turn. Row 2 (right side): p1, (k2tog, k3, k2tog, p1) across to end. 31 stitches. Turn. Row 3: Knit the knits and purl the purls. Turn. Row 4: K1, (k2tog, k1, k2tog, k1) across to end. 21 stitches. Turn. Row 5: Knit the knits and purl the purls. Turn. Row 6: P1, (k3tog, p1) across to end. 11 stitches. Turn Row 7: K1, (p2tog) across to end. 5 stitches. Break yarn. Thread yarn through remaining stitches with a tapestry needle and pull tight. Tie off and weave end through wrong (purl) side of the lily pad. Make another lily pad in the same way. Steam block the lily pads to flatten them out. Using cast on tail, sew lily pads to the elbows of the sweater, over the lines formed by the decreases, centering the lily pads approximately 4 [4'/, 5] inches from the cuff edge. Place the lily pad opening in whatever whimsical position youwish.
FINISHING
Weave in any remaining ends. Lightly steam block the sweater, and adjust the fair isle stitches so that they look smooth and even. Do not block the collar.
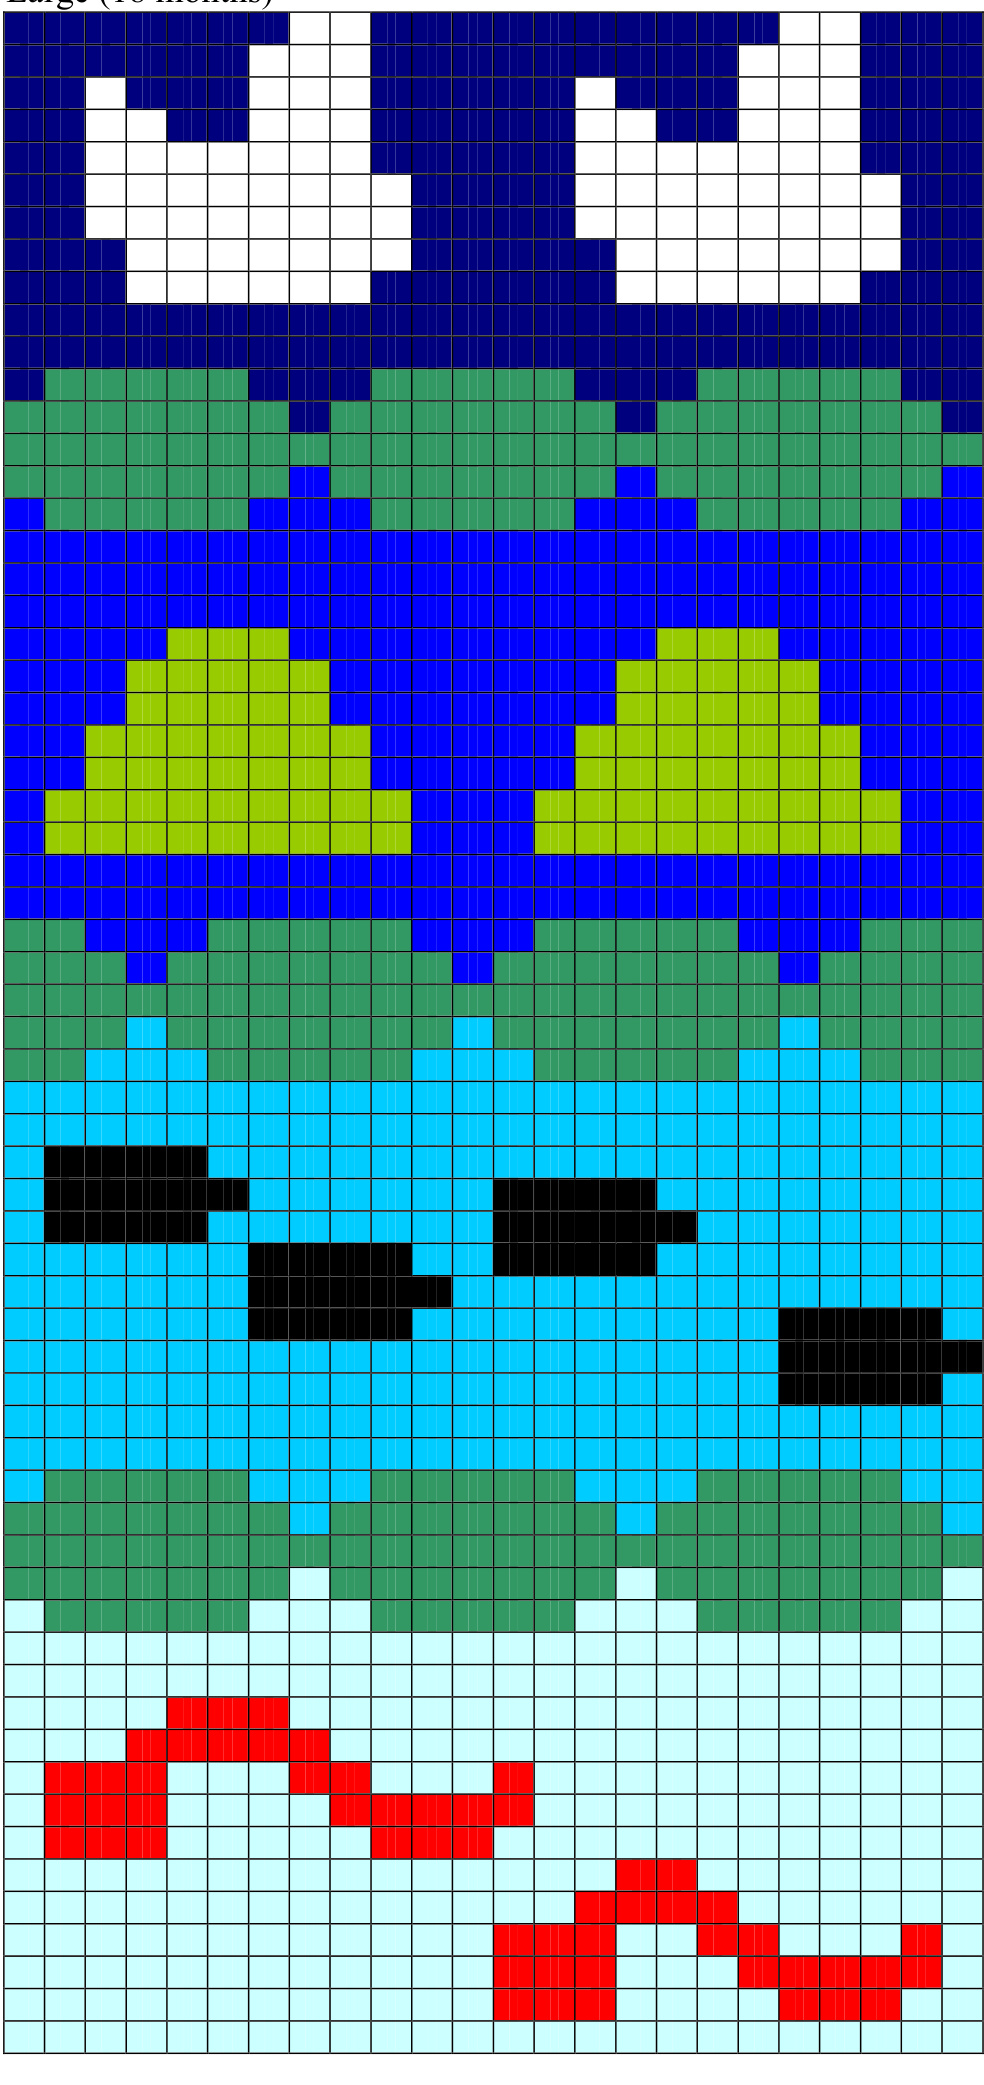
COLOR CHARTS ANDEMBROIDERY GUIDE
Color Key for charts: MC (Light Blue) CC1 (Navy) CC2 (Medium Blue) CC3 (Aqua) CC4 (Olive Green) CC5 (Natural) CC6 (Lime Green) CC7 (Black) CC8 (Red) CC9 (Orange)
Small (6 Months)
Medium (12 months)
Pondemonium @ Jennifer Small, 2007
Large (18 months)