
Machine Knit Sock
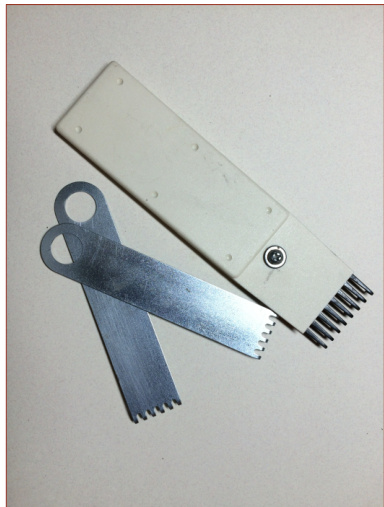
Recommended Tools & Supplies
Knitting machine with ribber Double-eyed bodkin Double-eyelet transfer tool Cast-on comb Ribber, claw and heel weights Decker comb or small garter bar Yarn needle Fingering or sock yarn 8 st x 10 r = 1" Wasteyarn This pattery is available for free at http:// www.ravelry.com/designers/brenda-bell. All Original Content @ 2014 Brenda A. Bell You may use this pattern to knit items for sale. You may distribute individual copies of this pattern in electronic or printed form provided that you do not charge for it and it is accompanied by this notice. You may republish this pattern in any free publication or pattern collection provided that is it accompanied by this notice.
Notes
Sock Size
Use the pattern worksheet on page 4 to adjust the instructions to match your gauge and sock size. Each formula is marked with a letter (A, B, C, etc.). As you work through the pattern, substitute your values where indicated. The sock can be made larger or smaller by increasing or decreasing the number of rows and stitches. If this is your first sock, try making the sample sock using the measurements on the last page. First learn to make a sock — then, learn how to make it fit.
Ribbed Calf
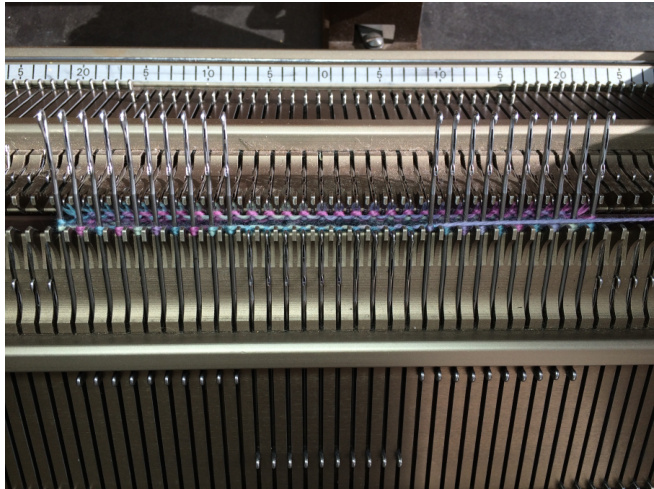
The calf of the sock is knit in industrial rib with the left and right edge stitches on the ribber. Because this type of needle setup doesn't zig-zag as required for the cast-on, you'll first configure the needles for industrial rib, then use the racking handle to shift the ribber needles into the zig-zag position. Initial needle setup (half-pitch): · Right edge needle is on the main bed. · Left edge needle is on the ribber. · Needle group on right has 1 needle.
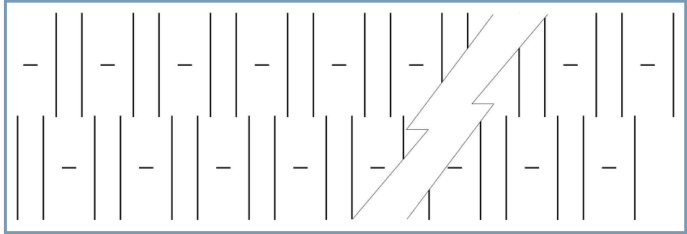
Machine Knit Sock
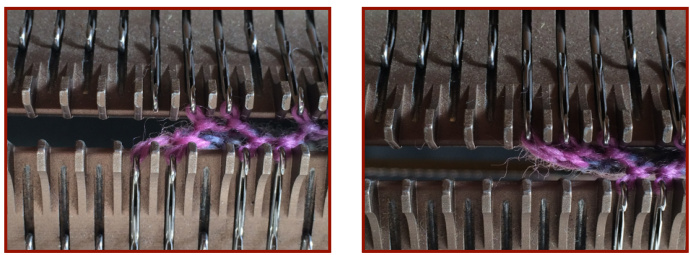
After the ribber is racked one full stop to the right, the needles will be in the right position for the zig-zag row.
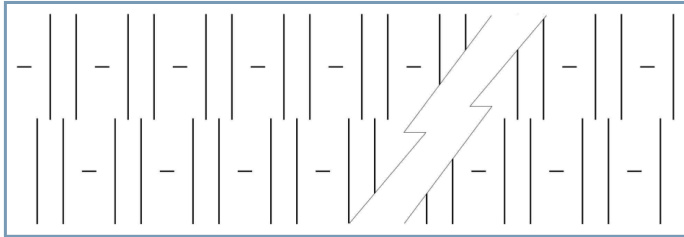
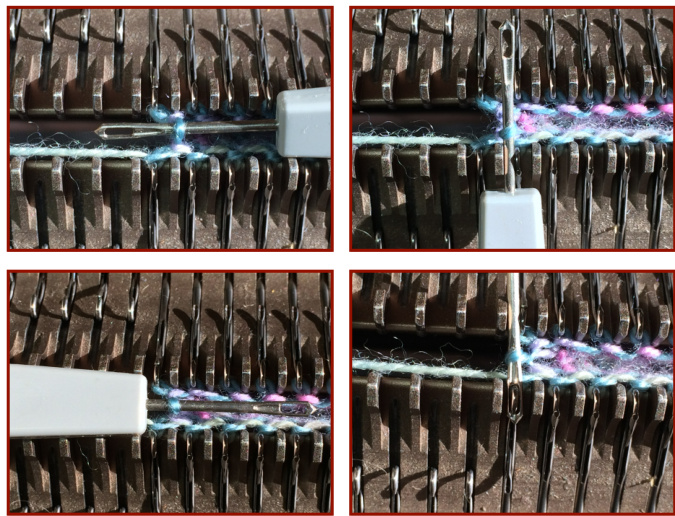
After knitting the zig-zag and circular rows, the ribber is racked one full stop to the left and the right edge stitch is transfered from the main bed to the ribber. This means you'll be seaming knit-to-knit instead of knit-to-purl.
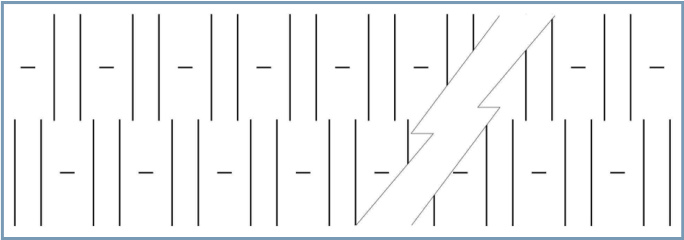
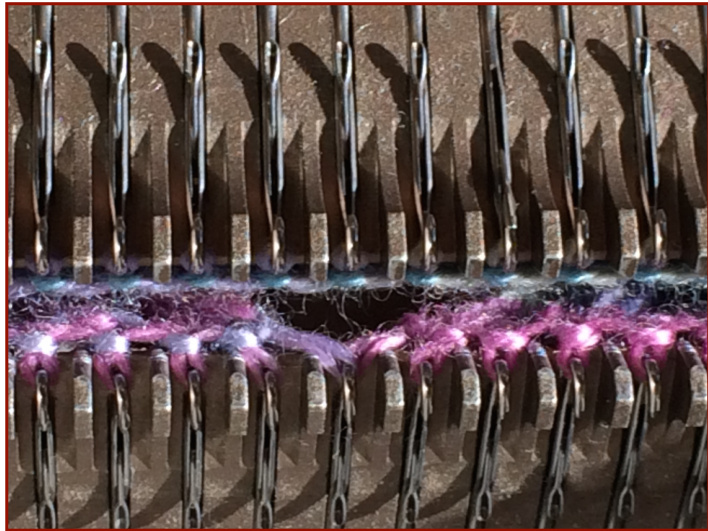
your first two short rows, you have an extra stitch on each edge of the heel bed that isn't connected to the edge stitches on the instep bed. This pattern uses two tricks to hide the holes. The first trick makes use of the little bar that runs between the edge stitches on the two beds. You'll learn how to use those bars to connect the stitches on the instep bed to the extra row of stitches on the heel bed. This will snug up the edge stitches and close the holes. The second trick transitions back to circular one row earlier than normal. I.e., you'll start the circular rows of the foot at the same time you end the short-rowed heel.
Short-Row Heel
The heel is knit on the ribber. The pattern can be reversed to knit the heel on the main bed, but most knitters will find it easier to short-row and manipulate weights on the ribber. A sock pattern just wouldn't be complete without a discussion about "the hole". It's much easier to avoid the hole if you know what's causing it. The holes happen when you knit either of the two edge needles on the heel bed, then reverse direction instead of knitting circular. Simply put, as soon as you knit Don't worry if it's not making sense yet. It will be explained in detail when you get to that section of the pattern.
Foot
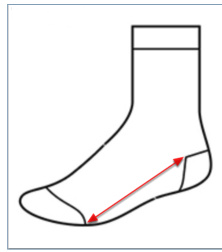
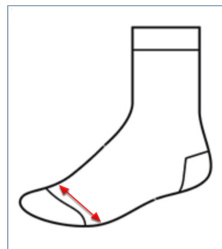
For this pattern, you'll need to know the length of your foot not including the heel and toe. This will usually be about 3 1/2" shorter than the total length of your foot. To be exact, it's the length of your foot minus the length of the short-rows knit for the heel and toe. You'll also need to know the width of your foot around the widest point — usually the ball.
Machine Knit Sock
Grab your favorite pair of socks, lay it flat and measure between the two points where the heel and toe shaping start. Use this measurement as the starting point for foot length. For foot width, measure around the widest part of your foot and subtract 10-15% depending on how snug you want your sock to fit. Use this number as the starting point for foot width.
Either measurement can then be adjusted up or down as necessary.
Tension and Other Good Habits
Pay close attention to your tension mast as you transition through the various sections of the pattern. If your tension is not consistent, you won't have a smooth transition between the circular and shortrow sections. Take the time to get a good tension swatch. Socks have a tendency to grow in length, so be sure you've measured correctly. If you plan to make more than one pair of socks, invest in heel weights. The longer length and hingeless design makes it much easier to move the weights up and you'l want to do that often while shortrowing the heel.
I use three heel weights on my heel: one for the heel itself and two narrower ones on each side.I constantly tug on them to my needles. make sure they're secure and sometimes hold them to keep the stitches firmly on Toe shaping absolutely must be done with a two-needle transfer. If you don't have a double-eyelet transfer tool, make the extra effort to transfer the two edge stitches one at a time starting with the 2nd stitch from the edge. Decreasing a single stitch won't look nearly as nice.
| Machine Knit Sock Worksheet | ||
| Made For: | ||
| Size Notes: Yarn Notes: | ||
| Gauge | ||
| A | Stitches Per Inch | |
| B Rows Per Inch | ||
| Measurements | ||
| Rib Length | ||
| D Ankle Length | ||
| E F | Foot length (not including heel and toe lengths; see Notes) | |
| Foot width | ||
| Formulas | ||
| G | A * F rounded to nearest multiple of 6 | |
| H | G+1 | |
| J | H / 2 rounded up = left (right) needle on front (back) bed | |
| K | H - I = right (left) needle on front (back) bed B * C = number of rib rows to knit for rib rounded to an odd number | |
| B * D = number of circular rows to knit for ankle | ||
| L | H / 2 rounded down | |
| M | M / 3 rounded down | |
| N | ||
| O | M - (N * 2) = # stitches in WP after completing decreasing short-rows | |
| P | H / 4 rounded down = # of stitches to transfer on right side of rib | |
| P + 1= # stitches to transfer on left side of rib | ||
| R | B * E = number of circular rows to knit for foot | |
Pattern
Cast-On
Set ribber: · Half-pitch · Rack to position ribber needle 1L slightly to the left of main bed needle 1L Position carriages on right. Configure needles for industrial rib: L () to _R (J) on front bed L (J) to _R (l) on back bed Rack ribber one full needle right to position ribber needle 1L slightly to the right of main bed needle 1L.
Cast-On Notes
Set both carriages: · Knit in both directions · Tightest tension (R or 1) Thread carriage, leaving a tail for back seam and set mast tension. Knit 1 row COL. Hang combs and weights. Set both carriages to knit circular: · Main bed knits left to right · Ribber knits right to left Knit 1 circular row (+2 on the row counter) COL. Rack front bed one full needle left to position ribber needle 1L slightly to the left of main bed needle 1L. Transfer stitch on right edge of main bed to first empty needle on the ribber. The group of needles on the right edge of the ribber now has two needles instead of one.
Rib
Set both carriages: · Tension 5 (or as appropriate for yarn) · Knit in both directions Set row counter to 0. Knit _-- (K) rows COR. Transfer stitches from ribber to empty needles on main bed _L(1) to R (J). There will be two stitches on the edge needles and every third needle.
Machine Knit Sock
Set ribber carriage to slip in both directions. Take up slack in the yarn and knit 1 row COL. Check the edge stitches to make sure they knit off cleanly.
Rib Notes

Ankle
Set ribber: · Full pitch · Rack to position ribber needle 1L directly opposite main bed needle 1L Replace existing weights with one small weight in the center.
Ankle Notes
Transfer stitches on needles _L (I) to (Q) to ribber 1R to _—L (P). There will be two stitches on needle 1R.
Use the decker comb to transfer stitches on needles __R (Q) to —_R (J) to ribber 1R to __R (P). Knit 1 row COR. Set both carriages to knit circular: · Main bed knits left to right · Ribber knits right to left Set row counter to 0. Knit _ (L) circular rows (2 \* (L) on the row counter) COR.
Heel
Set main carriage to slip in both directions. Set ribber carriage: · Knit in both directions · Tension 4 (MT - 1) Remove the existing weights: · Hang a heel weight inside the circular ankle. · Hang two smaller heel weights or claw weights on the edges. · Hang a small claw weight in the center of the ribbing.
Decreasing Short Rows
Knit 1 row COL. With a transfer tool pointing towards the left edge, catch the bar between the beds. Twist the bar 270° (3/4 turn) clockwise and hang on left edge needle of front bed.
Pull needle on carriage side to HP. Knit 1 row COR. With a transfer tool pointing towards the right edge, catch the bar between the beds. Twist the bar 270° (3/4 turn) counterclockwise and hang on right needle of front bed. Pull needle on carriage side to HP. \* Knit 1 row COL. Pull needle on carriage side to HP. \*\* Repeat from \* to \*\* until there are 10 (O) needles left in WP in the center of the bed COR: · Move edge weights up every 2-4 rows. · Pull down gently on edge weights while knitting a row to keep those stitches stable.
Increasing Short Rows
Move the center heel weight up. \* Push 2 needles opposite carriage to UWP. Knit 1 row COL. Pull 1 needle on carriage side to HP. \*\* Repeat from \* to \*\* until there are 2 needles left in HP on both sides COR: · Pull down gently on the center heel weight to keep the stitches stable. Set both carriages to knit circular: · Main carriage knits left to right · Ribber carriage knits right to left Push two held stitches on left back to UWP. Knit 1 row COL. Make sure the edge stitch knits off cleanly. Use transfer tool to move two held stitches on right back to WP. Set both carriages to T5 (MT). Knit 1 row COR.
Heel Notes
Foot
Set row counter to 0. Knit _ _ (R) circular rows (+2 \* (R) on the row counter) COR. · Check edge stitches on the first row to make sure they knit off cleanly.
Foot Notes

Toe
Using double-eyelet transfer tool, decrease 1 stitch each side both beds. Knit 2 circular rows (+4 on row counter) COR. \*\* Repeat from \* to \*\* 4 times more COR. · Repeat fewer times for narrower socks or pointier toe. · Repeat more times for wider socks or squarer toe. Decrease 1 stitch each side both beds. Knit 1 circular row (+2 on row counter) COR.\*\* Repeat from \* to \*\* until — (O) needles remain in WP on each bed. Remove on waste yarn.
Toe Notes

Finishing
Graft open stitches of toe. Mattress stitch back seam. Weave in yarn ends and secure. Mattress stitch back seam. Weave in yarn ends and secure.
Finishing Notes

| Machine Knit Sock Worksheet | ||||
| Made For: Me | ||||
| Size Notes: | Ladies Us 7.5 medium width | |||
| Yarn Notes: | Purgatory Falls Alpaca | |||
| Gauge | ||||
| A | Stitches Per Inch | 8 | ||
| B | Rows Per Inch | 72 | ||
| Measurements | ||||
| C | Rib Length | の | ||
| D | Ankle Length | 2 | ||
| E | Foot length (not including heel and toe lengths; see Notes) | 5 1/4 | ||
| F | Foot width | 3/4 | ||
| Formulas | ||||
| G | A * F rounded to nearest multiple of 6 8 * 3/4 = 60 | |||
| H | G+1 | 60 + 7 = 67 | ||
| H / 2 rounded up = left (right) needle on front (back) bed | 61 / 2 = 30.5 = 31 | |||
| J | H - I = right (left) needle on front (back) bed | 67 - 31 = 30 | ||
| K | B * C = number of rib rows to knit for rib rounded to an odd number | 12*6= 72 | ||
| L | B * D = number of circular rows to knit for ankle | 12* 2= 24 | ||
| M | H / 2 rounded down | 61 / 2 = 30.5 = 30 | ||
| N | M /3roundeddown | 30 / 3 = 10 | ||
| M - (N * 2) = # stitches in WP after completing decreasing short-rows | 30 - (10 * 2) = 30 - 20 = 10 | |||
| P | H / 4 rounded down = # of stitches to transfer on right side of rib | 60 / 4 = 15 | ||
| P + 1= # stitches to transfer on left side of rib | ||||
| 15 + 7 = 76 | ||||
| R | B * E = number of circular rows to knit for foot rounded up | 12 * 5.25 = 63 | ||


