DITHER

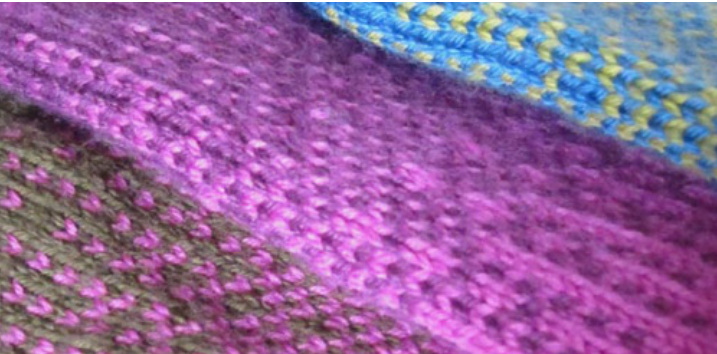
COPYRIGHT ? GENERAL HOGBUFFER 2012 This pattern is essentially a plain stocking stitch sock in its purest form, with the stranded colour work added. This also means the basic instructions will work with any other colour work charts, providing the size of the repeat will fit into the overall stitch count. Originally, I had only published the chart with a few suggestions on how to adapt it for various items, but because of the classification system on Ravelry, this meant it would not show up in 'sock' searches. In my day-to-day work, I frequently have to use Adobe Photoshop, which is a pixel-based graphic program. If you want to generate a gradient limited to just two colours, it will ask you for a 'dither' setting, and my chart represents fairly closely the result you will get when you set the dither to 'pattern'.
Size:
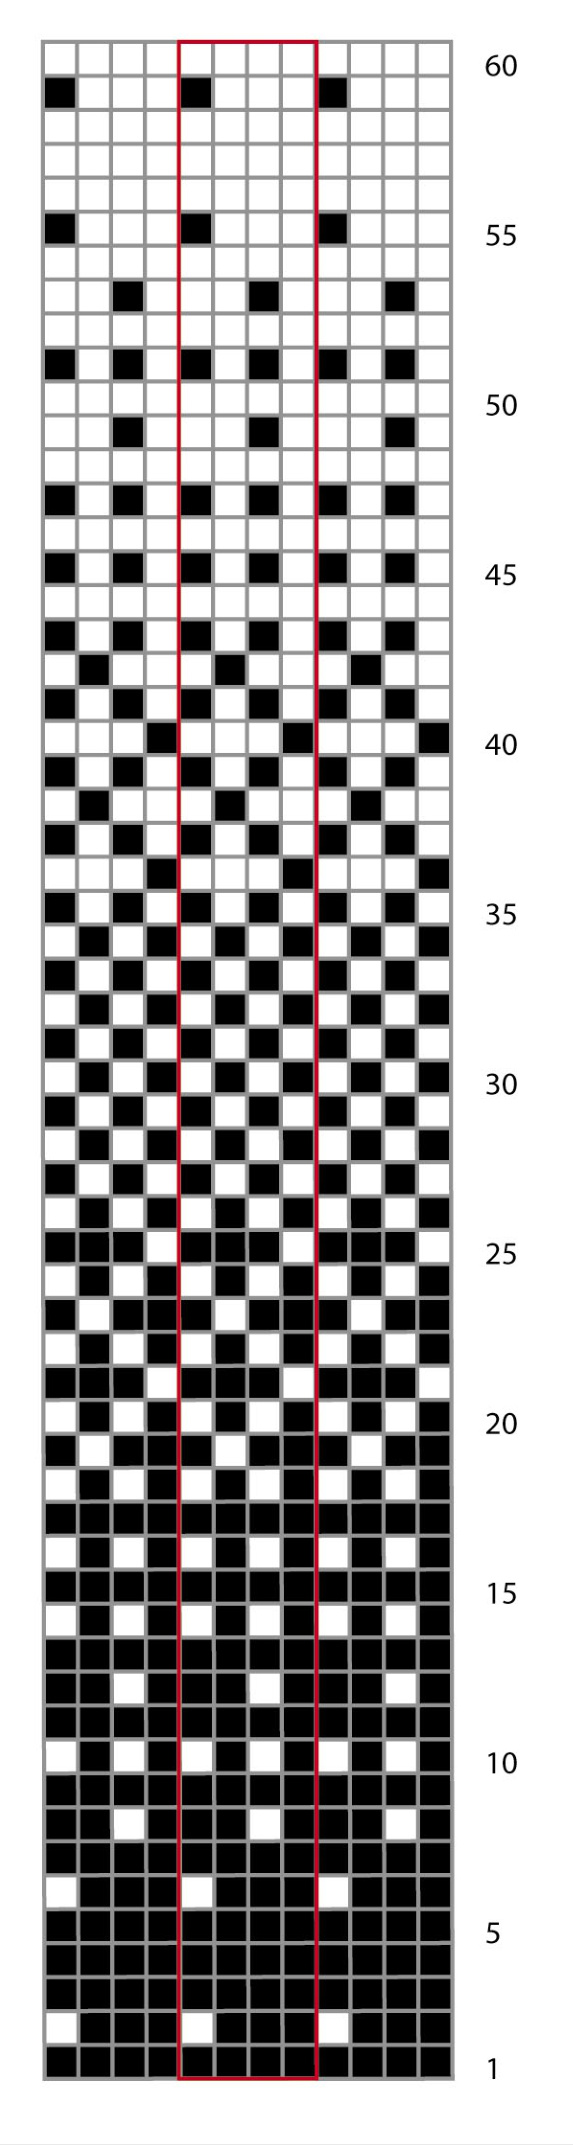
Since the repeat is only 4 sts wide it will work for any size sock, providing the overall st count is a multiple of 4. I am giving examples for 64, 72 and 80 sts, but any other dimensions can easily be calculated. However, the lengthwise repeat is 60 sts, which may be too long for some. If you need to shorten the repeat, the best way is probably to print out the chart, make a few horizontal cuts and overlap the pieces until you are happy with the result. If you would like to work the whole chart on a fairly short sock, please read the suggestions at the end for an alternative placement. As I said before, this is really just a plain stocking st sock, but bear in mind that stranded knitting can not only have an effect on your gauge, it will also produce a fabric that has a lot less stretch than regular stocking st, so it cannot take as much negative ease as a plain regular sock. While, with most sock yarns, I would be comfortable to knit myself a 64 st sock on 2.5 mm needles I will need 72 sts in stranded knitting, and I will knit most yarns with a 2.75 mm needle, so keep this in mind when selecting your size.
Material:
4 ply / fingering / sock yarn in 3 different colours (see also suggestions).Overall totals will always depend on the size of the sock, but for a size 42 sock with 72 sts I used around 35 gr in each colours A and C and around 60 gr in colour B. For this reason, they are a good option for leftovers, especially if you don't need / want to make identical socks. Make sure the colours are fairly solid and have good contrast, otherwise the result will not be as defined (although that can be a good thing, too). 2.5mm / 2.75 mm needles to give you the fabric drape you like; as I said, you may need to go up a size for stranded colour work. Work on circulars or DPN's as per your preference.
DITHER
Cuff:
With your first yarn colour, cast on 64/72/80 sts. Close to a round, taking care not to twist the sts. Work K2, P2 rib for as many rounds as you would like your cuff to be, I normally work 24 rounds. Depending on how tightly you cast on, whether you have a high instep or very pronounce calves, you may find that you are more comfortable with a roomier cuff. For my own socks, I normally cast on up to 80 sts for the cuff and decrease to the actual st count in the first leg round.
Leg:
If you want a longer leg, you can either knit several plain rounds in col A now, or add more rows in col B before the heel. Otherwise, introduce your colour B and start with row 1 of the chart, repeating it 16/18/20 times per round, and knit all 64 rounds of the chart. I would do just a couple of plain rounds with B before starting the heel, but you can start the heel straight after the last round of the chart if you prefer.
Heel:
Still using colour B, work the heel over the half the sts i.e. 32/36/40 sts, working back and forth in rows. Row1: [sl1, K1] repeat to end Row2: sl1, P to end Repeat these two rows for around 36/40/44 rounds in total, although this is personal preference and will depend on the height of your instep. After finishing the heel flap, turn the heel as follows: Row1: [sl1, K1] 8/9/10 times, K1, SSK, K1, turn Row2: sl1, P3, P2tog, P1, turnRow3: sl1, K to 1 st before the gap, SSK, K1, turn Row4: sl1, P to 1 st before the gap, P2tog, P1, turnRepeat the last 2 rows until you have used up all the sts on your needles, ending with a Row 4 and 18/20/22 sts on your needle. K 9/10/11 - this is the centre back of your sock and the new beginning of your rounds.
Gusset:
With needle1,K 9/10/11 Pick up and K 1 st in each of the slipped stitches all the way down the heel flap to the instep. You should pick up half the nember of sts that you have knitted rows in your flap, i.e. 20 sts for a 40 row flap. M1 st in the gap between the flap and the instep sts. K1, place a stitch marker, K across

half your instep sts. With needle2, K across the remaining instep sts bar 1, place a second marker, K1. M1 in the gap between the instep and the flap. Pick up and K one st in each of the slipped sts up the second side of the heel flap, taking care to pick up the same number as on the other side. K remaining sts to centre back. As I said, I would continue to knit a few rounds just plain in col B, but you can start the chart straight away if you prefer. Introducing col C, work the chart as you did for the leg, but work the gusset decreases at the same time as follows: Please note: you will have an even number of sts, but check if your starting number of sts is a multiple of 4. If yes, proceed as normal. If your number is not a multiple of 4 you need to skip 2 sts in the chart just before and just after the instep, otherwise the pattern will not line up after you finished the gusset. Round1: K according to chart until 2 sts before the instep marker, K 2tog. Work across instep to second marker, SsK, work to end Round2: work whole round according to chart, but take care to make the pattern line up on both the sole AND the instep, as the decreases will shift the repeat out of alignment otherwise. Repeat these two rounds until you are back with the total number of sts that you started out with, i.e. 64/72/80 sts all around.
Foot:
Keep working according to the chart without decreasing until you have either finished the chart or until you have knitted up to 2 inches / 5 cms less than your total foot length. If you have finished the chart before you reach the required length keep knitting plain rounds in col C until the work is long enough. If you need to start the toe before you have reached the end of the chart, work the toe as indicated below, but follow the chart at the same time.
Toe:
To place your markers for the toe decreases (if you prefer to use them), work first round as fol lows: K 11/13/15, K2tog, K1, place marker, K1, SSK, K 11/13/15. Repeat on Needle2 Round2: K Round3: K Round4: K Round5: [K to 3 sts before marker, K2 tog, K1, sl marker, K1, SSK, K to end] on each needle Round6: K Round7: K Round8: as Round 5 Round9: K Round10: K Round11: as Round5 Round12: K Round13: as Round5 Round14: K Round15: as Round5 Round16: K Round17: as Round5 Keep working Round 5 until you have a total of 16 sts. With a DPN, K 4 sts from needle1. Move the remaining 4 sts from needle1 and the first 4 sts from needle2 onto a second DPN. Move the last 4 sts from needle2 onto the first DPN. Cut yarn, leaving about 10 inches / 25 cms and graft the toe closed. Turn sock inside out and darn in both loose threads.
Further suggestions:
·It is very easy to substitute other types of heel if you prefer, just work it instead of the flap + gusset heel described here. ·You could do a much short version in only two colours by knitting only the first 30 rows of the chart on the leg, work a stranded flap and turn in the 1 by 1 pattern, and continue to follow the chart just after the heel. Colours A and C could easily be the same, or you could use a yarn with a very long colour gradation (like Noro, Zauberball or Chroma), divide the ball in two and strand the yarn with itself. For a completely different type of sock, try using the chart with only one yarn, Knitting the white squares and Purling the black squares to create a texture gradient.
Glossary:
St, sts stitch, stitches Kknit Ppurl SI slip K2tog knit 2 stitches together SSK slip, slip, knit. Slip 2 stitches separately as if to knit, insert left needle into these two stitches from the right and knit onto right needle. P2togpurl 2 stitches together
DITHER


