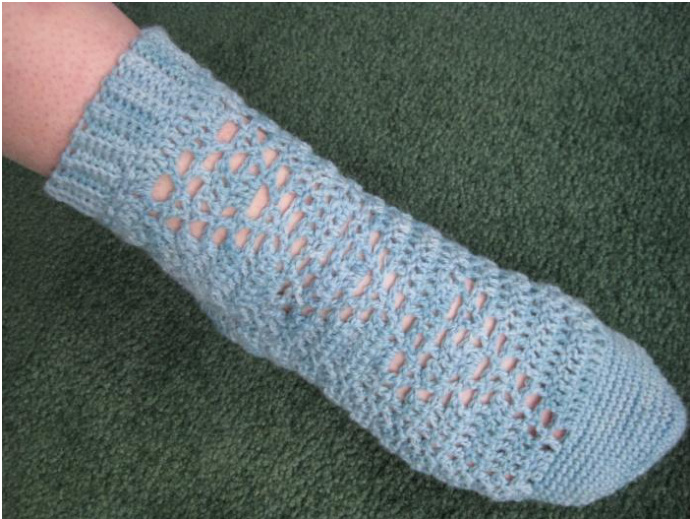
Crochet Crosshatch Socks
A design by Lauren Baker This is a pattern to crochet socks from the toe up. After the foot is complete, a space is left for the heel, and the heel is filled in after the rest of the sock is finished. Skill Level: Intermediate to advanced- this pattern has some shaping and a somewhat complicated design.
Materials
Approximately 400 yards wool/nylon blend sock yarn, fingering weight. Araucania Ranco Solid was used for the sample. Size D 3.25 mm crochet hook Stitch markers
Sizes
The pattern is made to fit a foot circumference (measured around the ball of the foot) of 7 (8, 9) in. The picture shows the 8 in size.
Gauge
6 sc sts and 6 rows gives a 1 in square.
Notes
The sock is worked in rounds. For the "foot" section, a round and a half is worked before each turn. This results in twice the number of rows on the sole of the foot than the top of the foot. The top is worked in double crochet, and the sole is worked in single crochet, so there is twice the number of rows of single as there is double. Parts of the pattern are worked from a chart, which is given at the end of the pattern, along with some instructions for reading it. However, it is assumed that you have some familiarity with crochet charts.
Sock
Toe The toe is worked in rounds without joining or turning. The last st in the round, and a stitch at the opposite side, are marked. Foundation: Chain 5 (8, 11) Rnd 1: Work 1 sc in 2nd ch from hook and each ch until the last ch, work 2 sc in last ch, pm in last sc just worked. Turn work, and work 1 sc in other side of each ch until the last ch, work 2 sc in last ch, pm in last sc worked - 10 (16, 22) sc. Rnd 2: Work 2 sc in first sc, sc in each sc to 1 st before marker, 2 sc in sc before marker, sc in marked st, 2 sc in st after marker, sc in each sc to 1 st before last st (marked), 2 sc in next sc, sc in last st. - 14 (20, 26) sC Rnds 3-9: Repeat last rnd until there are 42 (48, 54) sc. Each rnd should increase the number of sts by 4. Work in sc without further increases until toe is 2 in long.
Foot
At this point, the beginning of the round is shifted slightly because of the way crochet stitches behave in the round. Fold the toe flat so that the first row or so of the toe is not twisted or curved. The stitch markers will not be at the sides of the sock. Work a few single crochet stitches as needed until you reach the fold at the side of the sock. This is now the beginning of the round. There are no directions to use stitch markers in this section of the pattern, but you may wish to place a marker in the first and last single crochet stitches on the sole of the foot to keep track of them after you become familiar with the pattern. Rnd 1: (Rs) Ch 1 (serves to add height), dc in next 0 (2, 3) sts, work chart over next 21 sts, dc in next 0 (1, 3) sc in next 21 (24, 27) sc sts, sl st in first dc (sl st will not be worked into on the next rnd, and the dc will be). Rnd 2: (Ws) Ch 1, turn, sc in next 21 (24, 27) sc, ch 1, dc in next 0 (1, 3) sts, work next row of chart over next 21 sts, dc in next 0 (2, 3) sts, sc in next 21 (24, 27) sc, sl st in next dc. Rnd 3: (Rs) Ch 1, turn, sc in next 21 (24, 27) sc, ch 1, dc in next 0 (2, 3) sts, work next row of chart over next 21 sts, dc in next 0 (1, 3) sts, sc in next 21 (24, 27) sc, sl st in next dc. Repeat rnds 2-3 until sock measures about 3 % in shorter than desired finished length, ending by completing a RS row.
Gusset
Rnd 1 (Ws): Ch 1, turn, sc in first sc, 2 sc in next sc, sc in each sc to last 2 sc, 2 sc in next sc, sc in last sc, ch 1, dc in next 0 (1, 3) sts, work chart over next 21 sts, dc in next 0 (2, 3) sts, sc in each sc, sl st in next dc-23 (26, 29) sc Rnd 2 (Rs): Ch 1, turn, sc in first sc, 2 sc in next sc, sc in each sc to last 2 sc, 2 sc in next sc, sc in last sc, ch 1, dc in next 0 (2, 3) sts, work chart over next 21 sts, dc in next 0 (1, 3) sts, sc in each sc, sl st in next dc25 (28, 31) sc Rnd 3 (WS): Repeat rnd 1 - 27 (30, 33) sc1
Leg
The chart is worked on the back of the leg, above the space for the heel during this section. When you begin the pattern in this space, work the same rows you are on with the front of the sock. Meaning, during rows 3 and 4 when you are told to work the chart twice, work the same row both times. This does mean you may not begin the back of the leg with the first row of the chart. Should be starting on a RS row. The sc with the sl st in rnd 1 will still be used later on the heel, and the sl st will not be worked into at any point. Rnd 1 (RS): Ch 1, turn, sc in each sc, dc in next 0 (2, 3) sts, work chart over next 21 sts, dc in next 0 (1, 3) sts, sl st in next sc, ch 21 (24, 27) loosely, sl st in next dc. Rnd 2 (ws): Ch 3 (does not count as a dc), turn, dc in each ch, dc in next 0 (1, 3) sts, work chart over next 21 sts, dc in next 0 (2, 3) sts, sl st in first dc. Rnd 3 (RS): Ch 3, turn, [dc in next 0 (2, 3) sts, work chart over next 21 sts, dc in next 0 (1, 3) sts] twice, sl st in first dc. Rnd 4 (Ws): Ch 3, turn, [dc in next 0 (1, 3) sts, work chart over next 21 sts, dc in next 0 (2, 3) sts] twice, sl st in first dc. Repeat rnds 3-4 until desired height is reached, keeping in mind about 1 % in will be added by ribbing. Next rnd: Dc in each st around \*During the ribbing, all sc sts worked into other sc sts (meaning all but the first 7, worked into ch sts) are worked into the back loop only. \* Ribbing: Ch 8, sk first ch, sc in next 7 chs, sl st in first 2 dc, turn, sc in next 7 sc, [ch 1, turn, sc in next 7 sc, sl st in next 2 dc, turn, sc in next 7 sc] around. When ribbing entirely circles leg, sl st first and last rows of ribbing together. Fasten off.
Heel
The heel is worked in rnds without joining or turning. Rnd 1 (Rs): Position the sock sole-side up with the tip of the toe pointing towards you. Join yarn at the right corner of the hole in the first sc, and ch 1. Sc in first sc, pm in sc just worked, sc2tog over next 2 sc, sc in each sc across to last 3 sc, sc2tog over next 2 sc, sc in last sc, pm in sc just worked, sc2tog over next ch st (was used to add height during the first leg rnd similar to a turning ch) and first ch st worked into for the base of the leg, sc in each ch st to the last ch, sc2tog over last ch st and rem space before beginning of rnd -46 (52, 58) sc. Rnd 2 (Rs): Sc in marked st, sc2tog, sc in each sc to 2 before next marked st, sc2tog, sc in marked st, sc2tog, sc in each sc to 2 before marked st, sc2tog. id 2 until 12 (16, 18) sts remain. Fasten off, sew heel seam across. Weave in all ends
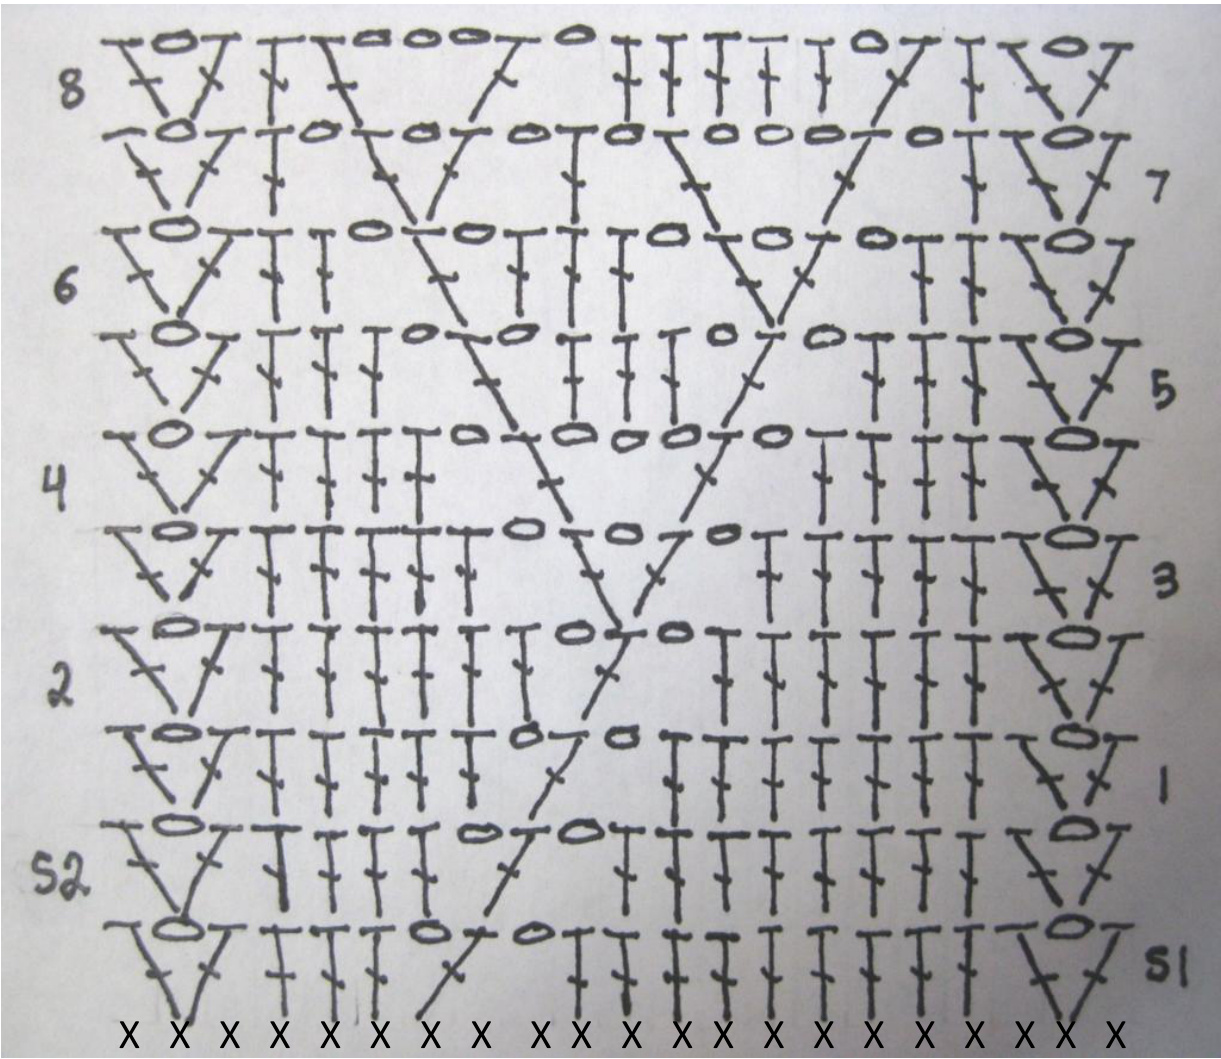
Chart
Work setup rows once (S1 and S2), then work rows 1-8 in sequence as you work the foot, gusset, and leg. Do not start the chart over with the beginning of a new section. The pattern should flow up from the end of the toe to the top of the leg. The chart is comprised of chain stitches (the ovals) and double crochet stitches (the columns). Odd rows are read from right to left, and even rows are read from left to right. Start reading the chart from the side with the number. The row of X's at the bottom indicates the last row of single crochet stitches before the chart begins. When beginning the chart, do not work another round of single crochet. The last row of single crochet before the chart is given to help transition into the chart section.
| ToF | T | To | oTo | T | T | T | T | T | ToT | ||||||||||||||||
| 8 | Tof | T | T | Tof | 7 | ||||||||||||||||||||
| 6 | Tof | T | T | T | T | lol | T | TOf | |||||||||||||||||
| To | T | T | OTO | T | T | T | OTO | T | T | Tof | 5 | ||||||||||||||
| 4 | FoT | T | T | T | T | T | T | T | T | Tof | |||||||||||||||
| Tof | T | T | T | OTOTd | T | T | T | Fof | 3 | ||||||||||||||||
| 2 | ToT | T | T | T | T | ol0 | T | T | T | T | T | T | TOf | ||||||||||||
| ToT | T | T | T | T | T | T | T | T | T | T | ToF | 1 | |||||||||||||
| s2 | T | T | T | T | T | T | T | T | T | Tof | |||||||||||||||
| Tof | T | T | T | T | T | T | Tof | s1 | |||||||||||||||||
| + | + | + | + | + | + | + | + | + | + | + | + | + | + | + | + | + | + | + | + | + | |||||
| 21 | 20 | 19 | 18 | 17 | 16 | 15 | 14 | 13 | 12 | 11 | 10 | 6 | 8 | 7 | 6 | 5 | 4 | 1 | |||||||
| 3 | 2 |
This is an alternate version of the chart with the last row of sc from the toe showr


