LITTLE STRING BAG
The main body of the bag is done in the round, so you'll need a stitch marker. The finished size is approximately $20\;\;\mathsf{c m}/8$ inches deepand $25\ \mathsf{c m}/10$ inches wide (unstretched), whilst the bag opening is $20\;\mathsf{c m}/8$ inches in diameter. The internal pocket is made first and attached to the bag as the bag is worked. It measures approximately $9\;\mathsf{c m}/3.5$ incheswideby $10\;\mathsf{c m}/4$ inches deep. You can change the size of your pocket by making it wider or deeper, or even add in extra ones to suit your needs. Tension is not important for this pattern, so feel free to use whichever cotton yarn you have to hand.
Materials
Techniques Required
150g/300m Patons $100\%$ cotton DK 1 button, $15\mathsf{m m}/\,^{1}/_{2}$ inch diameter Hook 4mm/G Chain stitch (ch) Slip stitch (ss) Double crochet (dc) Cord stitch
Cord Stitch
This is simply double crochet that is crocheted from left to right (with the right side facing) and produces a lovely sturdy finish to your work. If you have trouble with this stitch, it can be replaced with a row of slip-stitches instead (with either the right or the wrong side of your work facing).
21 ch, leaving a long end of yarn to use for sewing the pocket side with. 1. Right side: 1 dc into the second ch from the hook. 1 dc into each ch to end. 1 ch, turn (20) 2. 1 dc into each, 1 ch, turn (20) 3. Repeat row 2 until the work measures 21-22 cm, a total of approximately 51 rows. Ending with the right side facing. Next row:Wrong side: 1 dc into next 10.7ch,1 dc into last 10 dc.1ch,tun (20) N.B. these 7 ch forms the button loop, you may need to make it larger or smaller depending on the yarn you are using and the size of the button you have chosen. Next row:Right side:1 dc into each dc of the previous row.Keep your work in front of the ch loop, 1 ch, turn (see images below) (20)
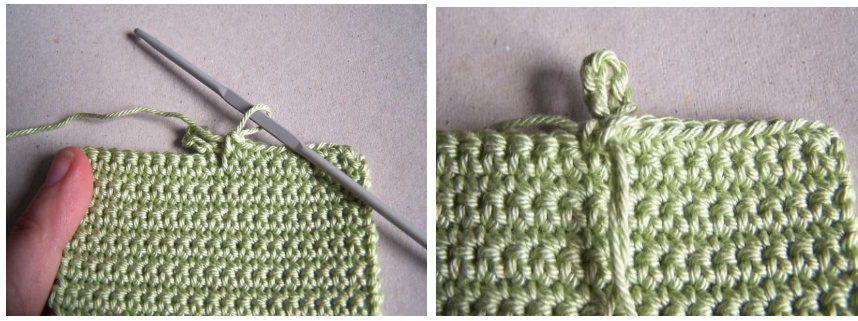
Forming the button loop. Last row: 1 dc into each (20).
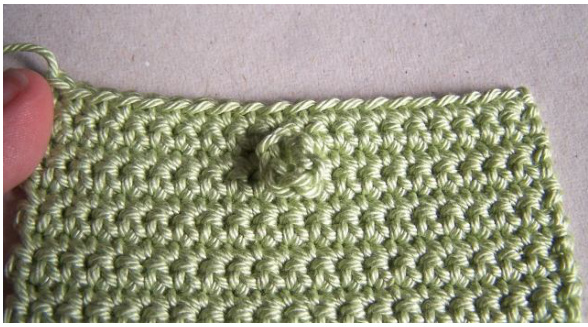
Finish off,leaving a long end for sewing. Fold the bottom edge of the pocket up so that it is just under the button loop. Sew down both sides of the pocket. The pocket is now ready to be inserted into the bag. Don't forget to sew on your button. Place it on the front of the pocket, ensuring the loop fits around it.
Bag
5 ch, ss into the first ch to form a ring 1. 6 dc into the ring. Continue in spirals, without joining each round 2. 2 dc in each dc around (12) 3. \*1 dc into the first stitch, 2 dc into the next. Repeat from \* around (18) 4. \*1 dc into each of the next 2 dc, 2 dc into the next. Repeat from \* around (24) 5. \*1 dc into each of the next 3 dc, 2 dc into the next. Repeat from \* around (30) 6. $^{\star}1$ dc into each of the next 4 dc, 2 dc into the next. Repeat from \* around (36) Continue increasing in this manner, increasing 6 stitches each round, until you reach 96 stitches. 16. \*1 dc into each of the next 14 dc, 2 dc into the next. Repeat from \* around (96) 17. $^{\star}3$ ch, miss the first dc, 1 dc into the next. Repeat from \* around, ending with 3 ch 18. Miss next 2 dc, 1 dc into the next 3 ch loop of the previous round. $^{\star}3$ ch,1 dc into the next 3 ch loop. Repeat from \* around, ending with 1 dc into the first 3 ch loop formed at the start of the round
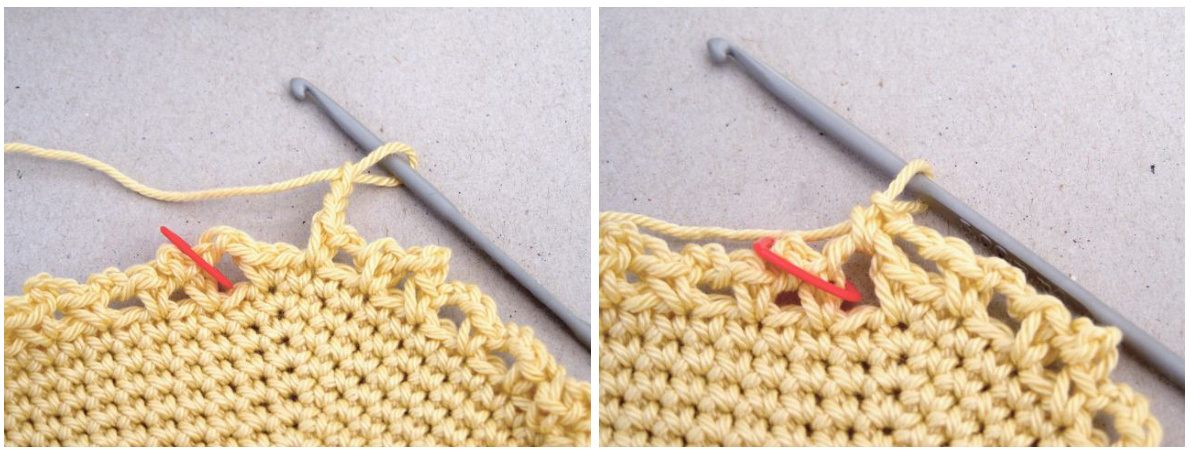
The end of round 17 and the start of round 18 20. $^{\star}5c\mathsf{h}$ , 1 dc into the first 3 ch loop. Repeat from \* around, ending with 5 ch 21. $^{\star}1$ dc into the next 5 ch loop, 5 ch. Repeat from \* around, ending with 5 ch Repeat round 21 three more times. 25. $^{\star}\sf{1}$ dc into the next 5 ch loop,7 ch. Repeat from \* around, ending with 7ch Repeat round 25 twice. 28. \*1 dc into the next7chloop,5ch.Repeat from\* around, ending wih5 ch Repeat round 28 twice. 31. \*1 dc into the next 5 ch loop, 3 ch. Repeat from \* around, ending with 3 ch 32. 1 dc into the next 3 ch loop,1 dc into ext dc,\*1 ch, miss 3 ch loop,1 dc into next dc. Repeat from \* around ending with 1 dc into the last dc. 33. 1 dc into each dc and each 1 ch space around (96) 34. 1 dc into each dc around (96) Repeat round 34 twice. Then attach the pocket as follows: 36.12dc.1dcthrough the first dcof the pocket andthe next dcof the bag top (see photos below), continue working through both dc's for the next 19 dc. 1 dc into each dc to end (96) 37. 1 dc into each dc around (96) 38. 10 dc, 25 ch, miss 25 dc, 23 dc, 25 ch, miss 25 dc, 1 dc into each of the next 13 dc 39. 10 dc, 1 dc into each 25 ch, 23 dc, 1 dc into each 25 ch, 13 dc (96) 40. 1 dc into each dc around (96) 41. repeat round 42 (96) 42. repeat round 42, ending with a slip stitch into the next stitch (96), DO NOT cut the yarn
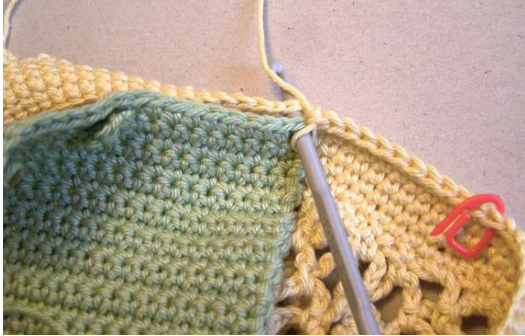
Attaching the pocket.
Please note that in this picture, the pocket does not yet have the sides sewn together To finish: With the last loop of the previous stitch still on your hook, turn the work so that the right side is facing. Complete a row of cord stitch around the top, ending with a slip stitch into the last dc. Finish off. For each handle, attach the yarn with the right side facing and complete 1 row of cord stitch around each handle. If not already done, sew a button into place for the pocket. $\circledcirc$ Gilly Bettney 2008 version 1.2 Sew in all the ends. Your bag is now complete. N.B. A row of ss can be worked, as an alternative to the cord stitch.
Alternatives
Try working the trim in a different colour. Add crocheted flowers, fringes or other motifs to the bag. Increase the number of rows of 5 ch loops/7 ch loops worked to produce a longer bag. Use a thicker yarn and a larger hook to create a larger bag. Increase the number of ch when working the handles, but still only miss 25 dc, to make larger handles. If you spot any mistakes in this pattern, please do not hesitate to contact me: herebegb.etsy.com Thank-you, and I hope you enjoy this pattern!


