Hearts and Birds
An original design by Becca Brody
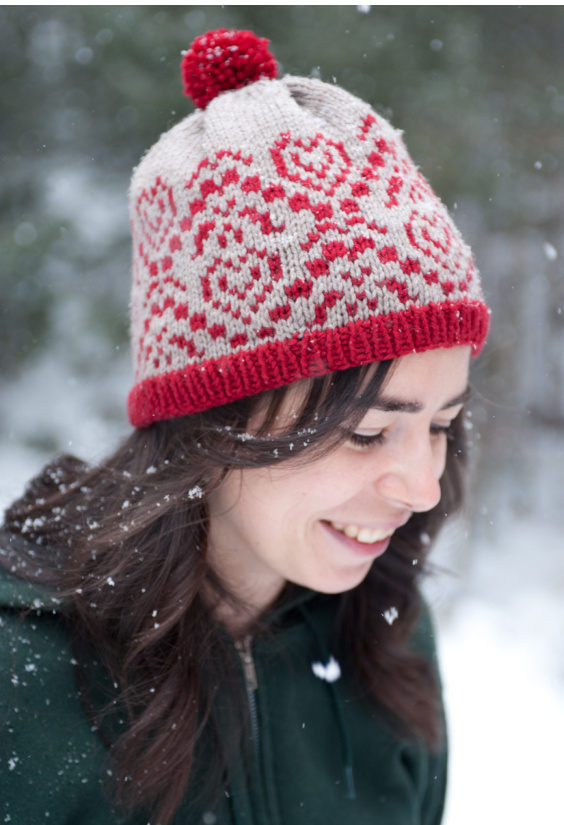
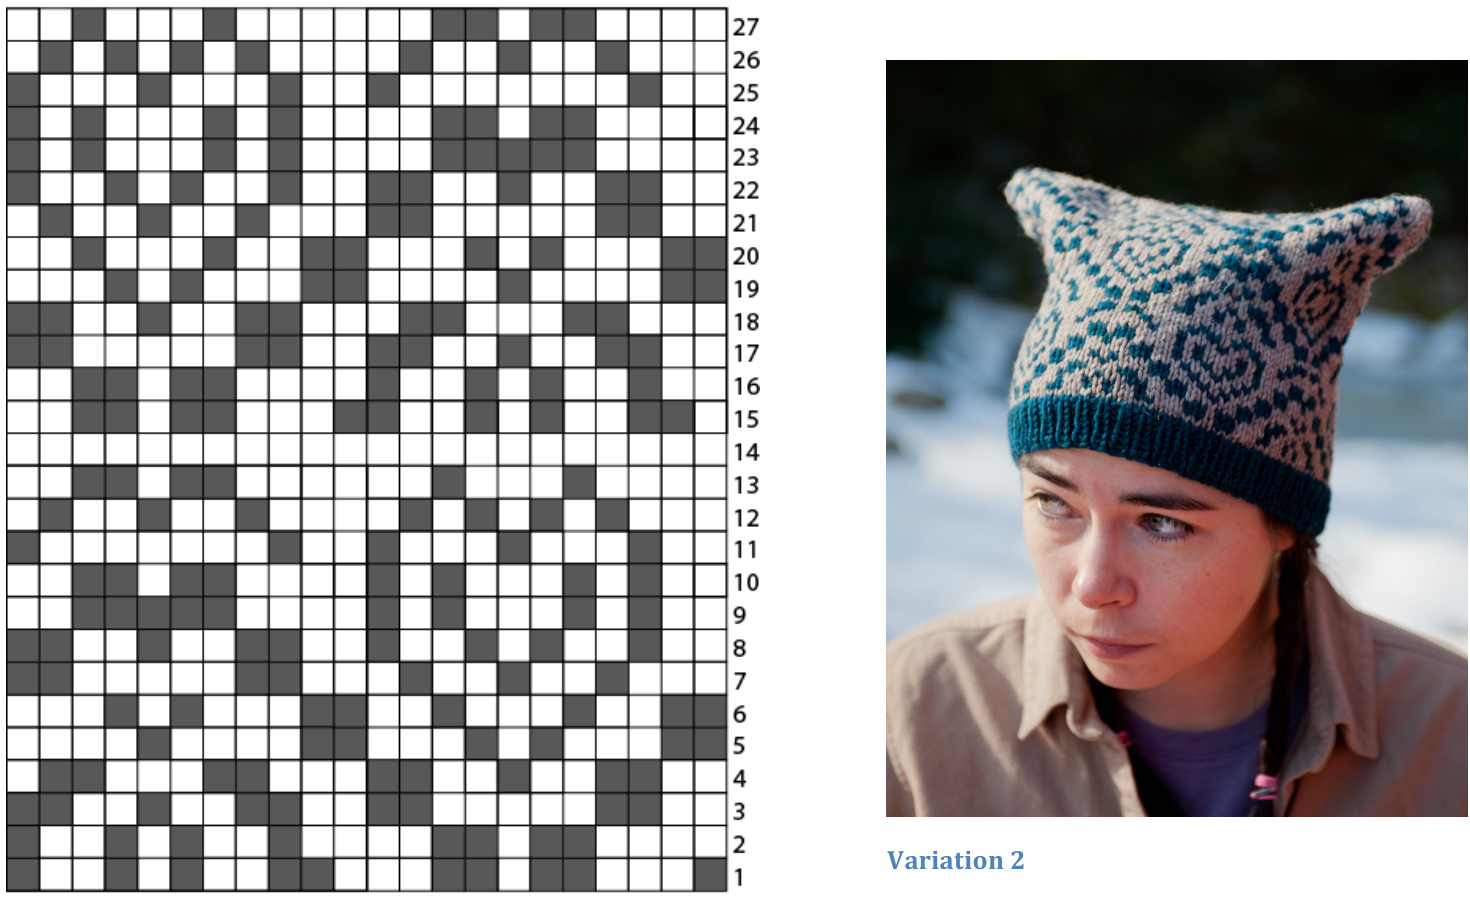
Whether you see Hearts and Birds or Hearts and Volcanoes, this hat will keep you warm through Valentine's Day. This is a stranded design worked in two colors of worsted weight yarn, and two variations are given. Variation one is topped with an optional pompom and features a solid colored gathered-look top, while the square version is completely patterned and features pointy “ears."
In this design, it is important to carry the non-working yarn loosely behind the stitches so that the yarn floats do not pucker after blocking. It may help to fan out the stitches on the right needle before switching colors to ensure you are working with enough slack. Yarn: This hat was designed using Valley Yarns Northampton, but any worsted weight yarn should do well. Main color (MC): Light Grey, half of one 100g skein Contrasting Color (CC): either Garnet or Ocean Heather, half a skein
Variation 1
Needles: Size 5 & 7 double-pointed or 16" circular or size needed to obtain gauge. DPNs or 2 circular needles in the larger size will be required for the decreases/bind off at the top the hat. Tapestry needle for finishing. Gauge: 5.5 stitches/ 1 inch (2.5 cm) in stockinette stitch. Row Gauge (only important for Variation 2): 25 rows equals 4 inches (10cm) in chart pattern. Instructions for both variations: With CC, and smaller needles, loosely cast on 110 stitches and distribute around your double pointed needles (if you are using them). Place marker and join into round, being careful not to twist. Work in knit one, purl one rib until piece measures 1 inch (2.5 cm) from cast-on edge. Switching to larger needles, join MC and knit one row plain Begin chart. There will be five repeats of each row of the chart to equal one round of the hat. FOR VARIATION ONE (solid gathered top & pompom): At the end of the chart, cut CC, leaving a 6-8 inch tail for weaving in. In MC, knit all stitches until the piece measures 8 inches (20.5 cm) from cast on edge. Then begin crown decreases (if you have been knitting on one 16" circular, now is the time to switch to DPNs or 2 circular needles). Row 1: \*k2tog, repeat from \* until end of row (55 sts). Row 2: knit. Row 3: \*k2tog, repeat from \* until 1 stitch before end of row, knit 1 (28 sts). Row4:knit Row 5: \*k2tog, repeat from \* until end of row (14 sts). Cut yarn, leaving an 8-10 inch tail for finishing. Thread the yarn onto a tapestry needle and pass it through the remaining live stitches, pulling it tight to close the hat. Pull the yarn to the wrong side of the fabric and fasten off. Weave in all ends and block the hat by soaking in warm water for 15 minutes, gently squeezing out excess water and air-drying flat. See page 3 for information on making a pompom.
FOR VARIATION TWO (square hat with “ears"):
After completing the chart, knit one row in plain stockinette, then work rows 1-14 of chart again. Cut CC leaving a tail for weaving in. Knit two rows plain with Mc. Piece should measure approximately 8 inches (20.5 cm) from cast-on edge. If piece measures less than 8 inches from cast on edge, continue working in plain stockinette until piece measures 8 inches. This means your row gauge was slightly off . Set up for 3-needle bind-off: turn work inside out so that purl stitches are on the outside. Slip first 55 stitches onto one DPN. Slip the second 55 stitches onto a second DPN. Hold these needles parallel to each other. The last stitch that was worked should be on the needle facing you on the right hand side, and the yarn should be hanging from this stitch. On the first bind-off stitch you will simply move the yarn around to the back before knitting. To work the three needle bind-off: \*insert a third needle into one stitch on the front needle and one on the back needle as if to knit. You will knit these two stitches together. Keep this new stitch on the 3rd needle. Repeat this action from\*, and you will have 2 stitches on the third needle. Pass the first stitch over the second stitch. Continue in this fashion until you have bound off all stitches and there is one stitch remaining on the 3rd needle. Fasten off and weave in all ends, and block as in variation 1.
HEARTSANDBIRDS CHART:
Main Color
Hearts and Birds Pattern Copyright 2013 Becca Brody
Pompoms!
There are many online tutorials explaining how to make a pompom. Search for “pompom tutorial" on Google or YouTube. Here is my system. Cardstock or light cardboard Several yards of the CC yarn (the more yarn you use, the fatter the pompom will be) Tapestry needle Scissors Pompom template- the one below will make a pompom about 2 inches (5cm) across. 1. Trace and cut two of the pompom template in the cardstock and stack them on top of each other with a 12-14 inch length of yarn sandwiched between them following the curve of the circle. The ends of this yarn should hang on either side of the notch, and these ends should remain free. 2. Wind the remaining yarn snugly around the sandwiched templates (from the outer edge through the inner hole, back to the outer edge). An even distribution isn't crucial but I generally work from one end to the other. When you have wound enough, cut the end of the yarn. (I left the middle hole about halfway filled). 3. Find the ends of the length of yarn you sandwiched in the template and loosely tie around the yarn in the center (you will need to pull this knot tighter, so don't make one that cannot be adjusted). 4. Next, take your scissors and carefully cut the yarn wrapped around the outer edge of the template. Tighten the knot if it seems like strands are going to escape from the pompom while you are cuttingthe goal is to end up with all of the short, cut strands in the middle of the donut hole, with a length of yarn knotted around them in the middle. 5. Once you have finished cutting, you will tighten the knot and tie it off so that it does not loosen. Make sure the short pieces of yarn in the pompom are secure. If they are not you can tie another length of yarn or wrap and knot the length a second time, making sure it is drawn tight around all of the strands. At this point you can discard the template, fluff out the pompom, trim it to a more round shape, and attach it to the hat at the crown.
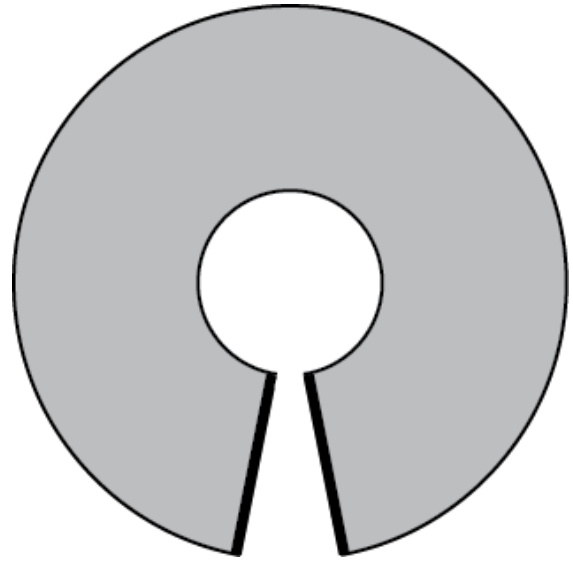
Pompom template (cut 2)


