Funky Argyles
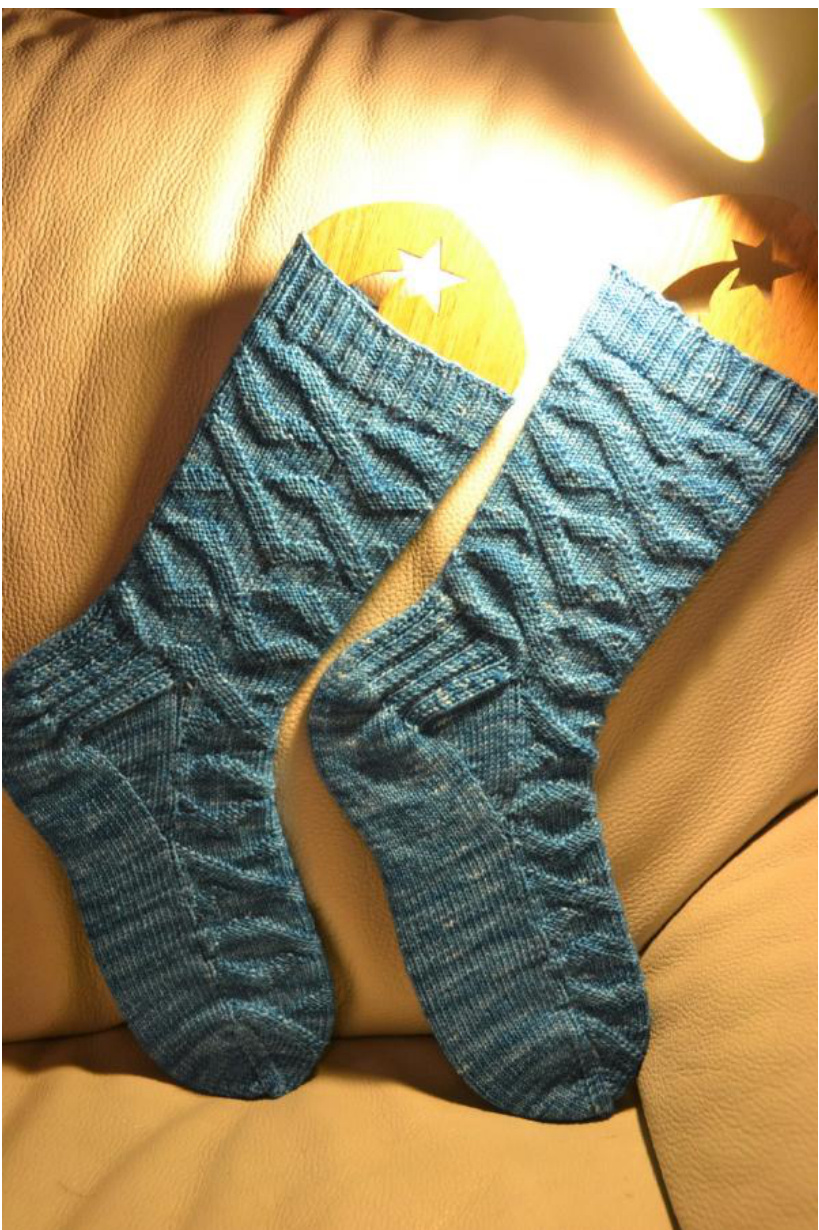
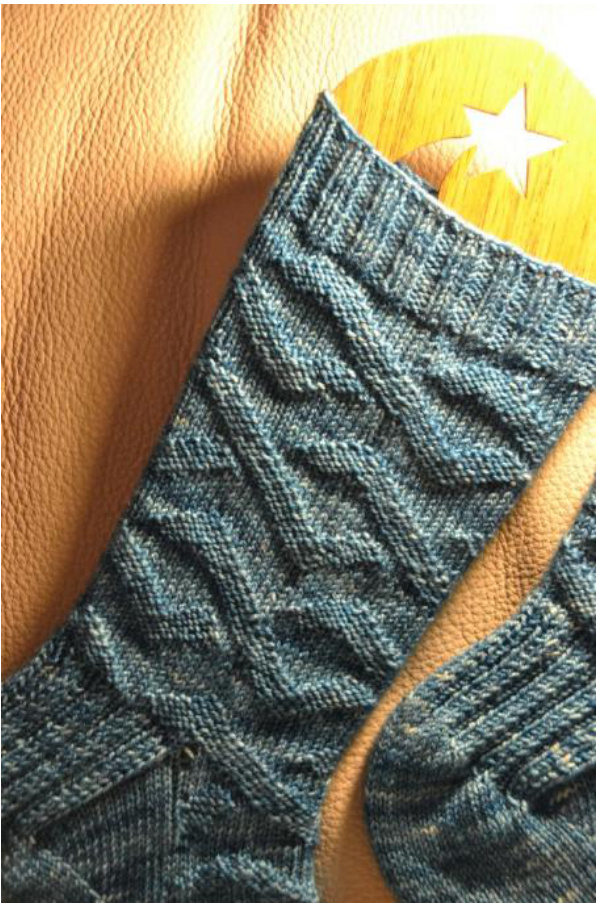
This simple toe-up sock was designed for a beginning sock knitter who has knit one or two “vanilla" socks already and who is looking for something a bit more challenging. Knits and purls are the only stitches used to create textured diamonds in a pattern that is suitable for both men and women.
SIZE
Ladies' Smal/Medium & Medium/Large (Medium/Large measures approx. 7.5" /19cm unblocked on the leg and 7"/18cm unblocked on the foot).
MATERIALS
400 yds/365m fingering weight sock yarn. Circular or Double-Pointed needles, sized to obtain a gauge of 8.5sts/13 rows per inch/2.5cm over stockinettest. 2 stitch markers. Tapestry needle for grafting toe. Note l: No matter what your choice in needle, always use the size that gives you the gauge listed above - every knitter's gauge is unique, and can be different with different techniques. The size Medium/arge sample shown herein was knit on 2.25mm circular needles (Magic Loop method). Note 2: 1 have written this pattern for knitting with one or two circular needles, however it can be adjusted to using five double-pointed needles (DPN's) - just divide the stitches of Needle 1 evenly over DPNs 1 & 2, and the stitches of Needle 2 over DPNs 3 & 4. PATTERNABBREVIATIONS&EXPLANATIONS st = stitch P = Purl RS = Right Side = The side of the fabric that will be visible when you wear it WS = Wrong Side = The side of the fabric that will be hidden when you wear it. st st = Stockinette Stitch = K all right-side rows, P all wrong-side rows Nl, N2 = Needle 1, Needle 2 RHN = Right Hand Needle= The needle that is being held in your right hand LHN = Left Hand Needle = The needle that is being held in your left hand. LIFTEDINCREASEDESCRIPTIONS The foot construction calls for use of a “Make 1 stitch" technique. 1 find that the Lifted Increase method gives the smoothest fabric, so l have provided a description of the technique below. You can find a basic illustration of the technique by clicking on the following link, but do note that there is an error in the description of Step 2 of the Lil - the text should say Left needle not Right: http://www.knotions.com/techniques/increases/how to knit lifted increases.aspx RLl = Right Lifted Increase= Insert the tip of your right needle into the stitch one row below the first stitch on your left needle. Lift this stitch and place it on the left needle, taking care to ensure it doesn't slip over the stitch next to it. Knit the stitch and transfer it to the right needle, taking care not to slip off the stitch that was originally on the left needle. LLl = Left Lifted lncrease = This increase is worked on a stitch that is two rows below the needle. Insert your left needle into the second stitch below the first stitch on your right needle (the stitch that has just been worked). Place this stitch on the left needle, knit it through the front loop and transfer the newly created stitch to the RHN. ssk = Slip, Slip Knit = Slip one stitch knitwise onto the RHN, slip a second stitch purlwise onto the RHN, then insert the LHN through the front of both slipped stitches and knit them together. Knit two together= insert the RHN into the next 2 sts on the LHN and knit them together P2Tog - Purl two together= insert the RHN into the next 2 sts on the LHN and purl them together. Sll or Sli wyib = Slip 1with yarn in Back=holding the yarn to the back of the work, slip the next st as if to purl from the LHN to the RHN Sli wyif = Slipl with yarn in Front =holding the yarn to the front of the work, slip the next st as if to purl from the LHN to the RHN pm = Place Marker Slide a stitch marker onto the Right Needle. sm = Slip Marker Slide the stitch marker from the Left Needle to the Right Needle W&T= Wrap and Turn =When working a RS row, bring the yarn to the front of the work, slip the next st purlwise from the LHN to the RHN, bring the yarn to the back of the work, slip the st just wrapped back to the LHN and turn the knitted fabric around so that the WS is facing you, ready to start working in the other direction. When working a WS row, bring the yarn to the back of the work, slip the next st purlwise from the LHN to the RHN, bring the yarn to the front of the work, slip the st just wrapped back to the LHN and turn the knitted fabric around so that the RS is facing you, ready to start working in the other direction. Picking up Wrapped sts = Use the tip of your RH needle to pick up the wrap of the st on the LH needle and place it on the LH needle. Insert the LH needle through both the wrap and the stitch and work them together (K2tog on RS, P2tog on the WS) Turn = Turn the knitted fabric around so that the other side of the work is facing you ready to start working in the other direction. You do this at the end of every row when working a flat piece, but when turning a heel, this instruction to turn the work will occur before you reach the end of the row. Sts at Rest = When turning the heel, not all sts on the needle get worked. These are sts at rest when looking at the charts
TOE
Cast on 16 sts using Judy's Magic Cast on (Cat Bordhi describes it really well in this YouTube video: http://www.youtube.com/watch?v=lhBISoAhhQY ) or the Turkish Cast-on best described in FluffyKnitterDeb's blog : http://luffyknitterdeb.blogspot.co.uk/2005/10/knitting-made-easier-turkish-caston.html > 8 sts per needle. Round 1: Ni: Knit Row 1 of the appropriate CHART 1 N2: K all sts Round 2: Ni: Knit Row 2 of the appropriate CHART 1 N2: K1, RLl, K to last st, LLl, K1 Continue, as set, following the appropriate CHART 1 for Ni and repeating Rounds 1 and 2 for all sts on N2 until you complete the round for Row 3l (33) of Chart 1 → 56 (64) sts in total.
FOOT
Note: In this section, CHART 2 is meant to be repeated as many times as necessary to achieve your desired foot length. Once you have completed row 38 (42) of CHART 2, start back at Row 1 and continueknittingasset. Continue as set, following the appropriate CHART 2 for the sts on Nl and knitting all sts on N2 until work measures 3 %4 “/9.5 cm less than desired total foot length. Note the row of Chart 2 that you ended on.
GUSSET INICREASES
Round 3:
Ni: Work the next Row of CHART 2, N2: K1, LLl, K26(30), RLl, K1. Ni: Work the next Row of CHART 2, N2: Kl, pm, K28(32), pm, K1. Ni: Work the next Row of CHART 2, N2: K to one st before the m, LLl, Ki, sm, K to next m, sm, RLl, K to end. Ni: Work the next Row of CHART 2, N2: K all sts, slipping all markers as you come to them Repeat Rounds 3 and 4 until you have a total of 86 (94) sts → 28 (32) sts on Ni and 58 (62) sts on N2 Note: It is important to note that the LLl increase that happens on Round 3 is actually done using the last st on Ni as the “donor" st (some patterns refer to this st as the “grandmother st"). For all subsequent increase rounds, the donor st will be on N2.
TURN HEEL
Note: 1 have included a chart at the end ofthe pattern for the Heel Turn that may help visualize what happensasyouworkit. Work the next Row of CHART 2, across the sts on Ni. Note the row you just completed. Note: The Heel is turned only on the stitches on N2, so for this section, remember that you will be working BACK AND FORTH across the gusset and foot sts. Row 1: K42 (46), W&T Row 2: Sliwyif, P26 (30), W&T Row 3: Sliwyib, K to one st before wrapped st, W&T Row 4: Sllwyif, P to one st before wrapped st, W&T peat Rows 3 and 4 until you are left with ll unwrapped sts in the middle, ending with a W: HEEL FLAP SET-Up ROUND Note: The following instructions are for the working ofa single complete ROuND of knitting - starting withtheunwrappedstsonN2. Sll and K across all remaining sts on N2 (this includes the gusset sts), picking up the wrapped sts and knitting them as you come to them. Work the next row of Chart 2 across the sts on Ni. HEEL FLAP (worked back and forth across sts on N2 only) Note: 1 have included a chart at the end ofthe pattern for the Heel Flap that may help visualize what happens as you work it. Row l: K42 (46), lifting the wrapped sts as you come to them. SSK, Turn. Row 2: Sliwyif, \*Pl, SLiwyif, Pl, K1. Repeat from \* 5(6) more times, then Pl, Sliwyif, P2tog, Turn. Row 3: Sliwyib, K2, \*Pl, K3. Repeat from \* 5(6) more times, SSK, Turn.
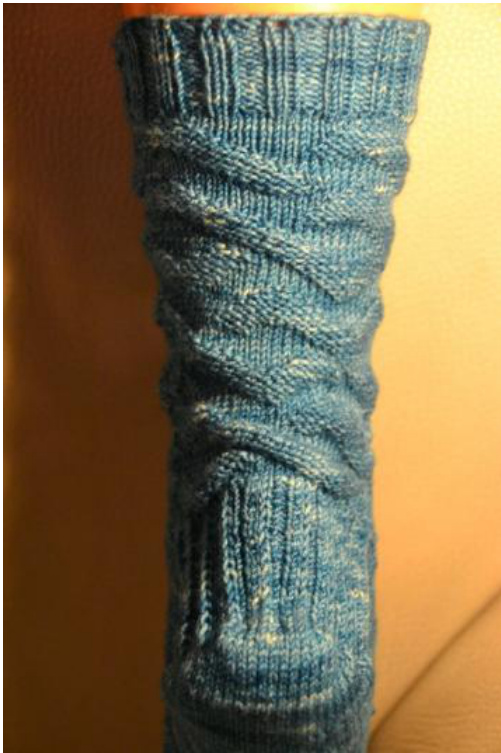
Repeat rows 2 and 3 until 29 (33) sts remain on the needle, ending after having completed Row 3 but DO NOT TuRN work. Note: At this point, all the gusset sts but one (on the RHS of the sock if you are looking at it from the back) will have been “consumed" by the decreases. Note: You are about to re-start knitting in the round permanently - starting with the row you last knit on CHART 2 during the Heel Flap Set-Up. The pattern is now going to be worked twice in one round: once across the sts on Ni and then again across the sts on N2. Nl: Knit the next row of CHART 2 across the instep sts on N1 N2: K2TOG, then K the remaining sts according to the same row of CHART 2 you just knit on N1 (remember to start on the second st) Continue knitting in the round as set, repeating rows l-38 (1-42) of CHART 2 once across each needle as often as necessary until leg is I y2"/4cm shorter than desired length. Note: The samples were knit ending on a row 19 (21) or 38 (42), as this makes a relatively “clean break" inthepattern.
CUFF
Knit 14 rounds of K2, P2 ribbing. Bind off loosely (l prefer Jeny's Surprisingly Stretchy Bind-Off, described really well in this Knitty article: http://www.knitty.com/SSuEfallo9/FEATjssbo.php .
IN CASEYOUWEREWONDERING...
My name is Laura Jenkins and I've been knitting since my grandmother Helen Matte took pity on me in my teenage attempts to make my boyfriend a sweater. l am currently attempting to pass my knowledge on to my 12-year-old daughter Jenny, and am swiftly developing an even deeper appreciation for the time my Neenie spent with me, patiently explaining knitting, purling, increasing and decreasing - this is not an easy skill to teach!! 1 work full-time in the pharma industry, and am lucky enough to work for one of the larger players, which has given me and my family the absolute privilege of being moved around to a couple of different manufacturing sites in our network. After working for 15 years in my home country of Canada, I was given the opportunity to work for four years in Normandy, France and have just recently relocated to the Lake District in the UK; both of these wonderful areas have inspired me and my designs. I started designing socks as a means of challenging myself during the Sock Knitters Anonymous group's DYO month in June 2009, and have been slowly growing my repertoire. If you have any comments on this pattern, please feel free to contact me through Ravelry, where I'm known as Laura]. Happy knitting!
CHARTS&SYMBOLS
The following symbols are found in the charts for this design. See Abbreviations & Explanations section for a description of the stitches represented.
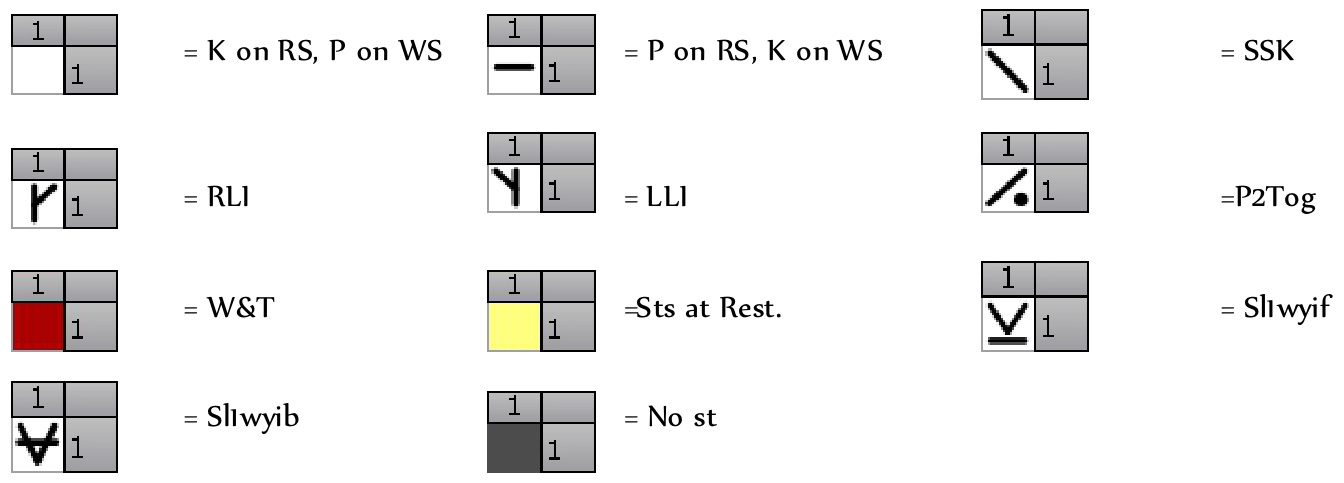
CHART 1 - Medium
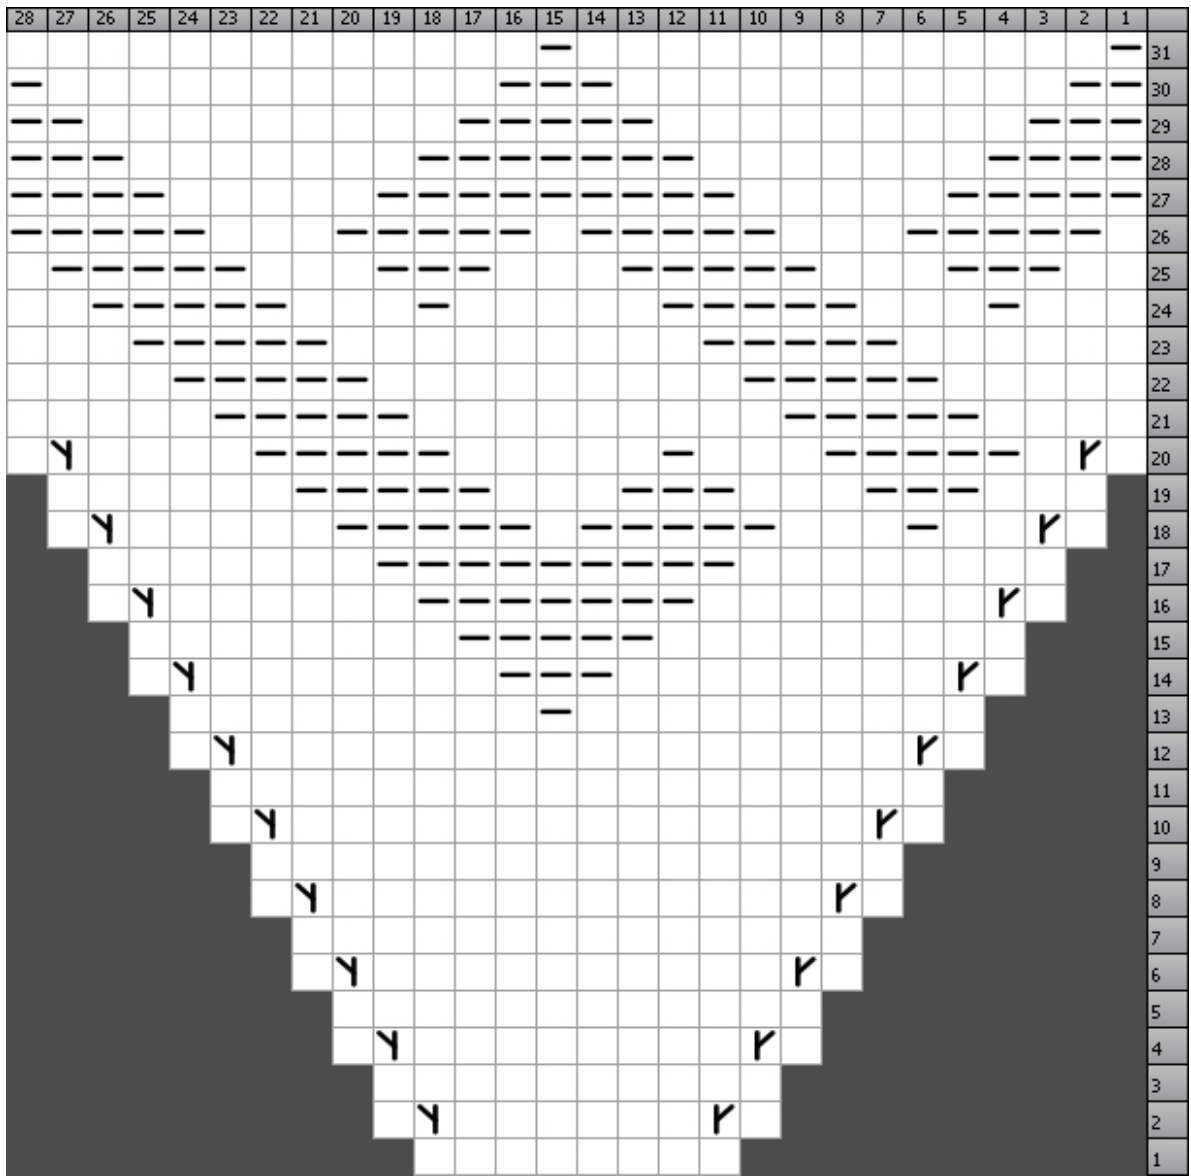
Copyright 2012 Laura Jenkins. All rights reserved. For personal, non-commercial use only. Instructions and charts may be photocopied for personal use only.
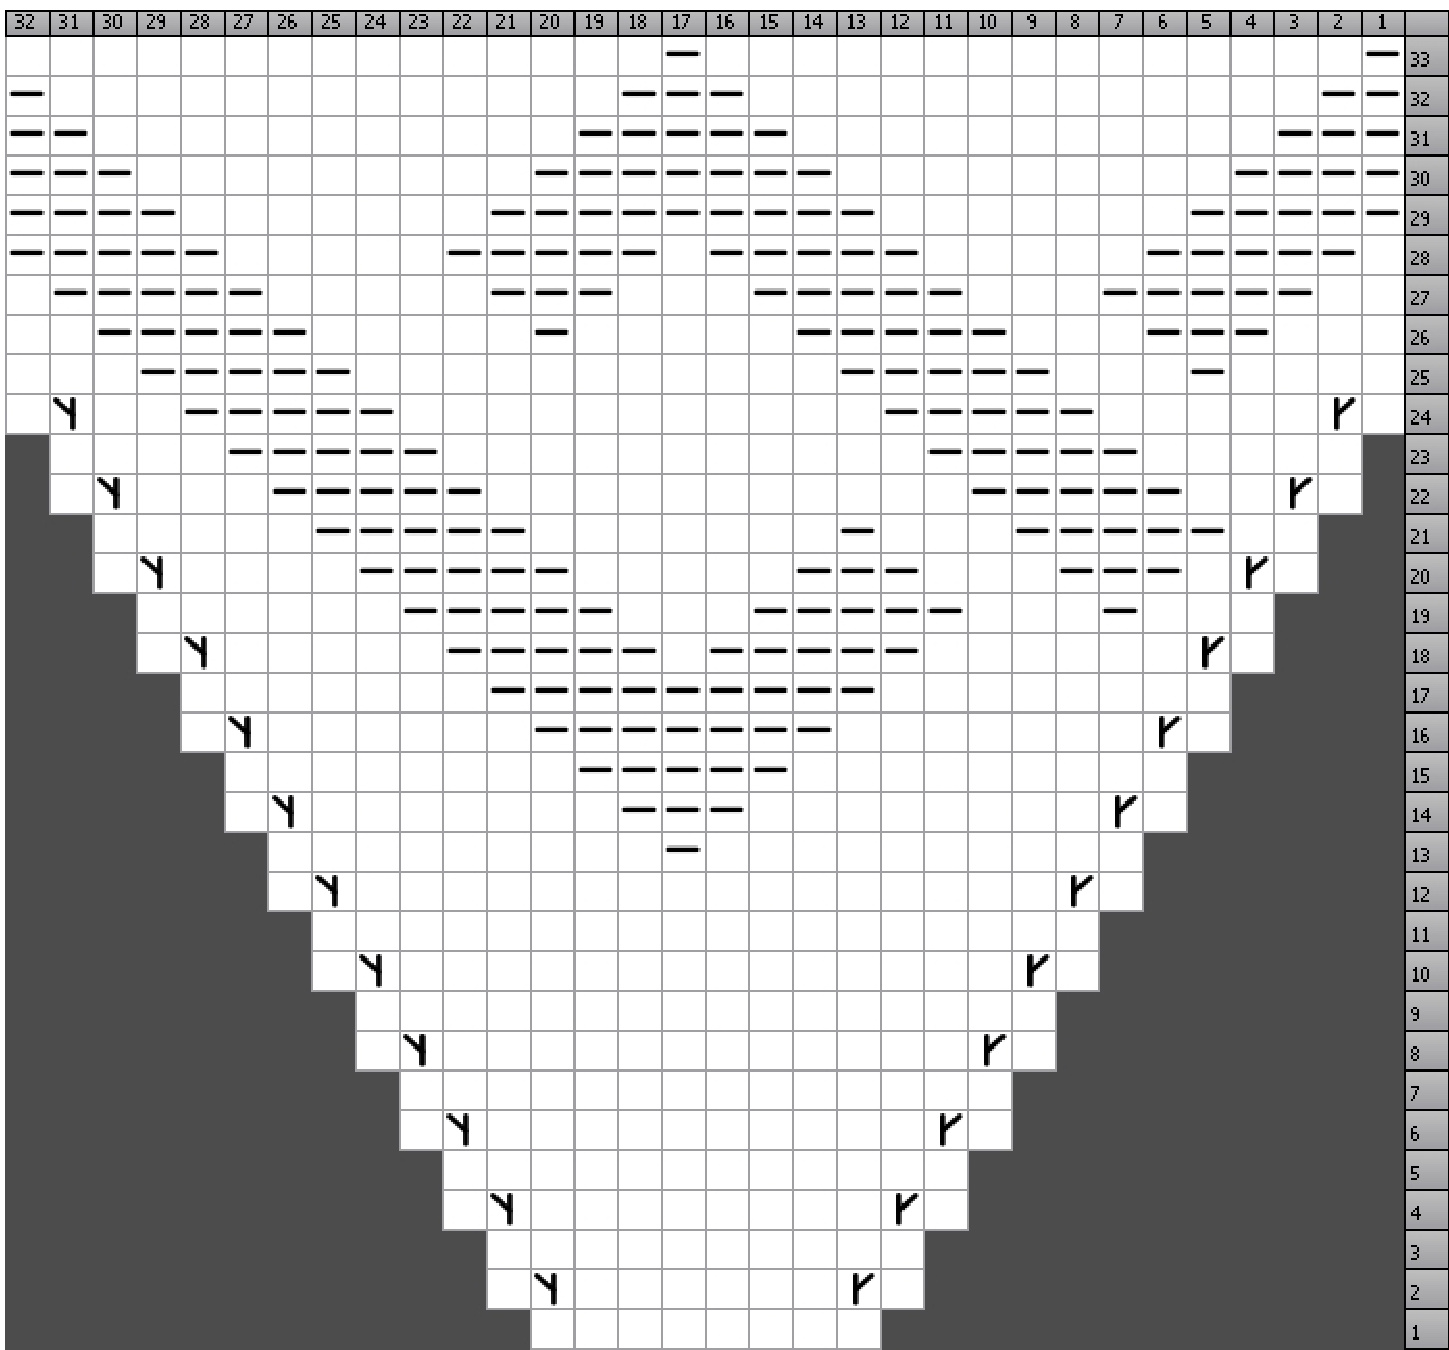
CHART 1 - Large
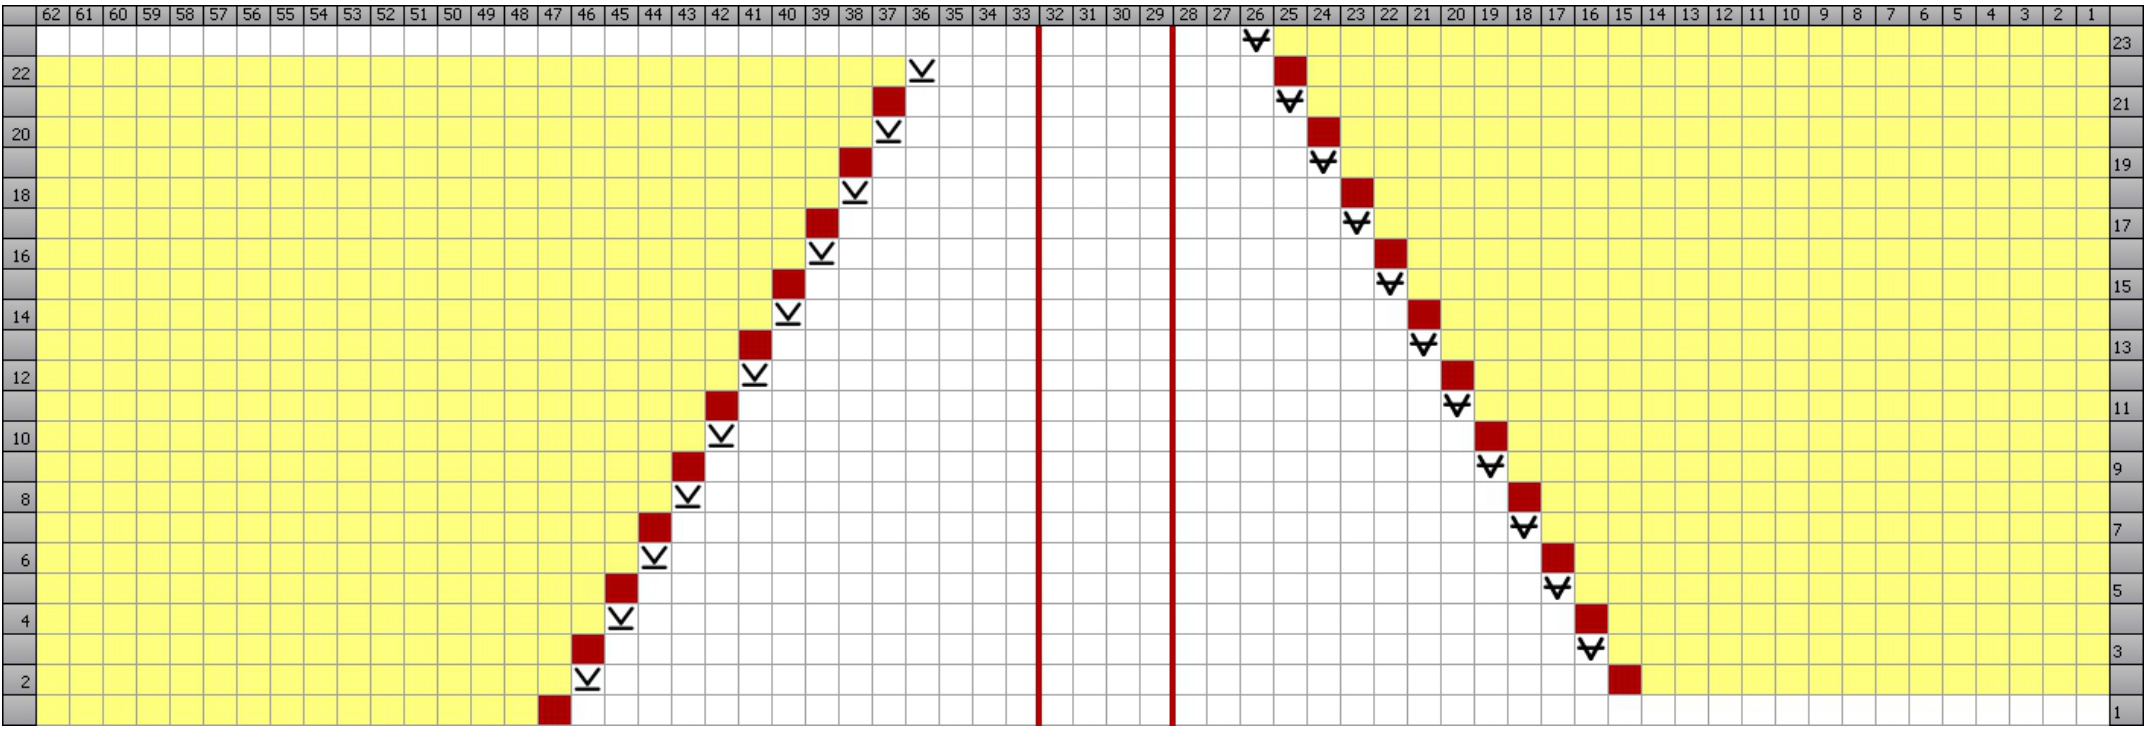
Heel Turn Chart:
1have included this chart as a means of visually describing what happens when you turn the heel. Work all sts for size Large, omit sts between the red lines for size Medium.
Heel Flap Chart:
1 have included this chart as a means of visually describing what happens when you work the heel fap. Work all sts for size Large, omit sts between the red lines for size Medium.
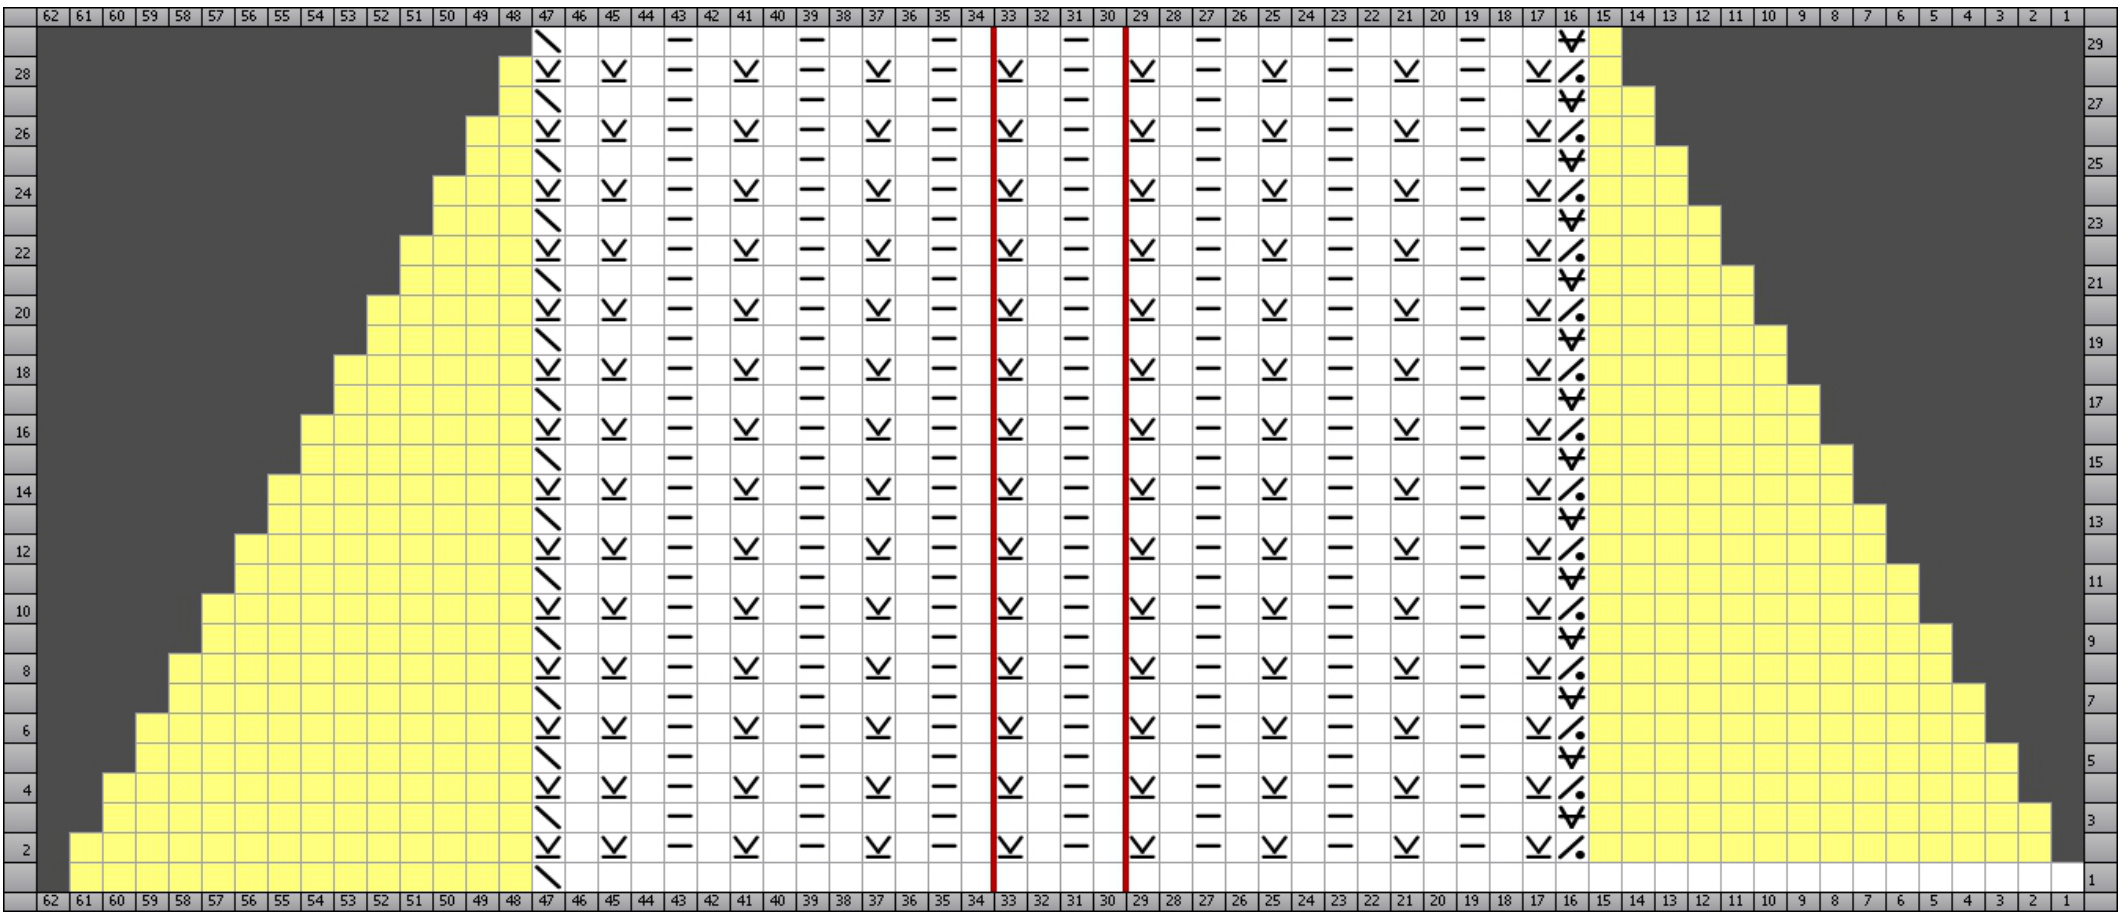
CHART 2 - Medium
| 28 2726252423 222120191817161514131211109:76 5432 | 1 | |||||||||||||||||||||||||||
| 85 | ||||||||||||||||||||||||||||
| 37 | ||||||||||||||||||||||||||||
| 36 | ||||||||||||||||||||||||||||
| 35 | ||||||||||||||||||||||||||||
| 33 | ||||||||||||||||||||||||||||
| 32 | ||||||||||||||||||||||||||||
| 31 | ||||||||||||||||||||||||||||
| 30 | ||||||||||||||||||||||||||||
| 29 28 | ||||||||||||||||||||||||||||
| 27 | ||||||||||||||||||||||||||||
| 26. | ||||||||||||||||||||||||||||
| 25 | ||||||||||||||||||||||||||||
| 24 62 22 21 20 19 18 17 16 15 14 13 12 11 10 9 8 5 寸 3 1 | ||||||||||||||||||||||||||||
CHART 2 - Large
| 18 | 15 | 14131211109 | 8 | 3 | |||||||||||||||||||||||||||
| 42 | |||||||||||||||||||||||||||||||
| 41 | |||||||||||||||||||||||||||||||
| 4 | |||||||||||||||||||||||||||||||
| 39 | |||||||||||||||||||||||||||||||
| 38 | |||||||||||||||||||||||||||||||
| 37 | |||||||||||||||||||||||||||||||
| 36 | |||||||||||||||||||||||||||||||
| 35 | |||||||||||||||||||||||||||||||
| 34 | |||||||||||||||||||||||||||||||
| EE 32 | |||||||||||||||||||||||||||||||
| 31 | |||||||||||||||||||||||||||||||
| 30 | |||||||||||||||||||||||||||||||
| 29 | |||||||||||||||||||||||||||||||
| 28 27 26 25 24 23 22 21 20 19 18 17 16 15 14 13 12 11 10 | 8 [-. 4 3 1 | ||||||||||||||||||||||||||||||


