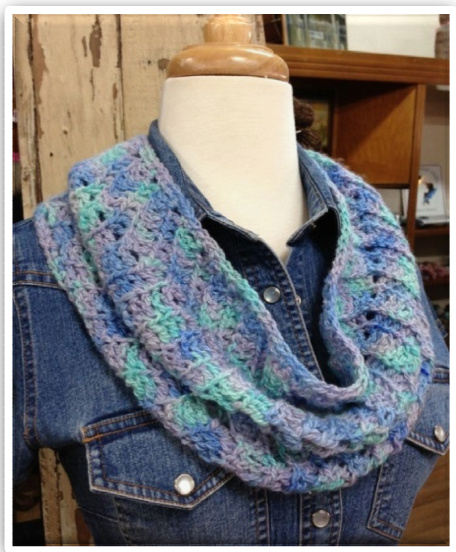
Chevron Rising Collared Cowl
By Erin Chastain-Harris Skill Level: Easy Unblocked Measures: height-8 inches, A) circumference-32 inches, B) length-35 inches (point to point) Yarn: 200 yards (183 meters) of your favorite worsted weight yarn (Sample Bluebonnet Hills Alpaca Ranch in Variegated Color, 99% Alpaca/1% Angelina, Worsted Weight, 200 yds/ 3.5 oz) Needle: #10 USA Size J (6mm) Optional Notions: decorative pin or button Gauge Swatch: 1 chevron x 6 rows in pattern = 4 inches Publish date: March 2013 Correction date: None
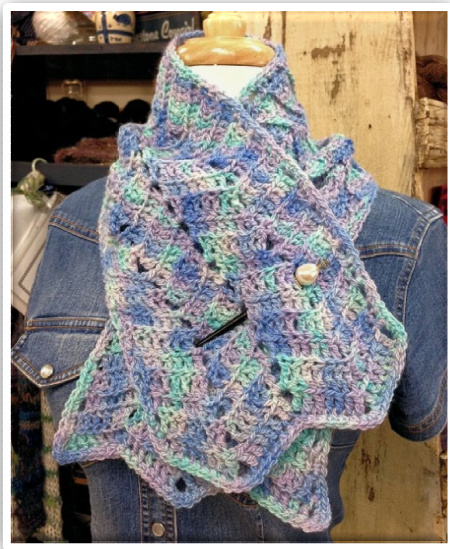
This versatile circular or collared cowl features vertical chevrons. Stitches in the front or back loops set the chevron zig zag pattern in relief and chain spaces provide a lacy look. The cowl can be easily adjusted for circumference or length by adding or subtracting rows. The height is changed by adding or subtracting in 15-stitchincrements.
Stitch Explanation:
V-stitch is (dc, ch 2, dc) in same stitch.
Notes:
The instructions presented are for a 2 chevron cowl [(2 chevrons x 15 sts) + 3 ch = 33 ch]. V-st creates the chevron peak and sk 2 sts produces the valley. Although RS/WS is utilized in the pattern, this cowl is reversible and can be draped several ways.
Abbreviations:
beg = begin/beginning BLO = back loop only ch = chain stitch FLO = front loop only post = body or pillar of the stitch RS = right side sk = skip Sl st = slip stitch sp(s) = space(s) st(s) = stitch(es) V-st = V stitch WS = wrong side
Pattern Instructions: Ch 33
ROW 1 (RS): Dc in 3'd ch from hook. Working in BLO [dc in each of next 6 ch, sk 2 ch, dc in each of next 6 ch], V-st in next ch. Repeat [to ] once. 2 dc through both loops in last ch. Ch 3 (counts as dc now and in the future), turn.—1 V-st, 2 ch-2 sps, 28 dc sts (Pattern continued on page 2.)

Pattern Instructions: (con't from page 1)
ROW 2 (WS): Dc through both loops in same st. Working in FLO [dc in each of next 6 dc, sk 2 dc, dc in each of next 6 dc], V-st in ch-2 sp. Repeat [ to ] once. 2 dc through both loops in last dc. Ch 3, turn.—1 V-st, 2 ch-2 sps, 28 dc sts ROW 3 (RS): Dc through both loops in same st. Working in BLO [dc in each of next 6 dc, sk 2 dc, dc in each of next 6 dc], V-st in ch-2 sp. Repeat [ to ] once. 2 dc through both loops in last dc. Ch 3, turn.—1 V-st, 2 ch-2 sps, 28 dc sts Repeat ROws 2 and 3 twenty three more times or as many as needed for desired length. End with ROW 3. Do not fasten off. Continue with finish option A orB.
Finishing options:
A) Circular Cowl
JOIN: On RS connect to opposite end as desired; either in a cylindrical fashion or add a twist to create a moebius. Sl st through one loop (FL/BL) of each end in each dc across. To join peaks and valleys sk dc that are part of the V-st and join ch-2 sp to sk-2 sp with Sl sts. Do not fasten off. EDGE 1: With RS facing, rotate to edge side, ch 1. [2 sc in each dc post around. Join to beg ch with Sl st. Fasten off.] EDGE 2: With RS facing, join to unfinished edge side, ch 1. Repeat [ to ] onEDGE1.Weaveinends.
B) Collared Cowl
With RS facing rotate work 90 degrees clockwise. LONG EDGE 1: 3 sc in post of last dc made, 2 sc in each dc post across, 3 sc in last dc post on edge. 2-POINT END: Sc in each of next 7 dc, 3 sc in ch-2 sp, sc in each of next 6 dc, sk 2 dc, sc in each of next 6 dc, 3 sc in ch-2 sp, sc in each of next 7 dc. LONG EDGE 2: 3 sc in first dc post, 2 sc in each dc post across, 4 sc in last dc post on edge. 3-POINT END: [Sc in each of next 6 dc, sk 2 dc, sc in each of next 6 dc] 3 sc in ch-2 sp. Repeat [ to J once. Sc in corner, join to beg sc with Sl st. Fasten off, weave in ends. Attach decorative pin or button in preferred location to secure cowl. Page 2 of 2


