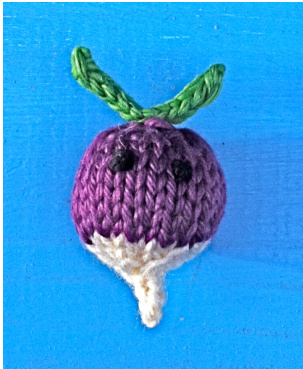
Tanya Turnip (or Rudy Rutabaga)
Materials:
Purple yarn White yarn (or cream for Rudy Rutabaga) Green yarn Black yarn Double-pointed needles Tapestry needle Stuffing of some variety Tanya Turnip or Rudy Rutabaga can be made using any type of yarn, just be sure to use needles 2-3 sizes smaller than recommended so the stuffing doesn't show through.
Directions:
Repeat bracketed stitch sequences as indicated. Stitch counts for each completed round appear in parentheses. When embroidering, draw yarn through the stuffed piece to the place where you wish to stitch, and then draw yarn back through piece when finished. This will effectively keep your stitches in place. Radish Rnd 1: CO 6 sts in purple. Distribute stitches among 3 needles and join in a round. Rnd 2: [Kfb] 6 times (12) Rnd 3: [Kfb] 12 times (24) Rnds 4-8: Knit 5 rounds (24) Switch to white (or cream) Rnd 9: Knit 1 round (24) Rnd 10: [K2tog] 12 times (12) Rnd 11: [K2tog] 6 times (6) Stuff your turnip or rutabaga Rnd 12: [K2tog] 3 times (3) Rnd 13: K1, K2tog on same needle (2) Rnd 14-15: With both stitches on the same needle, knit 2 rows of I-cord. (2) Break yarn and pull it tightly through last two stitches to secure. Leaves Using green, cast on 2 stitches. Knit 10 rows of I-cord. Break yarn and pull it tightly through last two stitches to secure. Eyes Using black, embroider two eyes about six stitches down from the top and about two stitches apart. Embroider two stitches over half of a knit stitch for each eye. Finishing Using green, attach the leaves to the top. Place the middle of the I-cord in the middle of the veggie's head. Drawing the green yarn through the veggie's body, and then back out the other side, make one stitch in the center of the I-cord to secure the leaves, pulling the stitch tight to make the leavespopup. Lastly, using your tapestry needle, sew any unsecured ends back through the piece to hold them in place, and then trim them. You may need to use a needle to push cut ends into the piece so they don't show. You're finished!
Stitches and Abbreviations Used:
Kfb = Knit front and back - For this increase, knit on stitch through the front loop, as you normally would, but don't slip it off the left hand needle. Knit another stitch through the back loop of the same stitch on your left hand needle, then slip the stitch off. Now you will have two stitches on your right hand needle instead of just one! K2tog = Knit 2 together - Knit through the front loops of two stitches at once to decrease by One. I-cord = I-cords are knit using two double-pointed needles. Cast on the correct number of stitches, then slide your stitches to the other end of the needle, so that your working end is at the far left. Begin knitting at the rightmost stitch, as usual, but bring your working end across the back of your cast on stitches to do so. Continue in this manner, sliding your work to the other end of your needle and bringing the working yarn across the back of all your stitches at the beginning of each row. This will create a rounded column of stitches.


