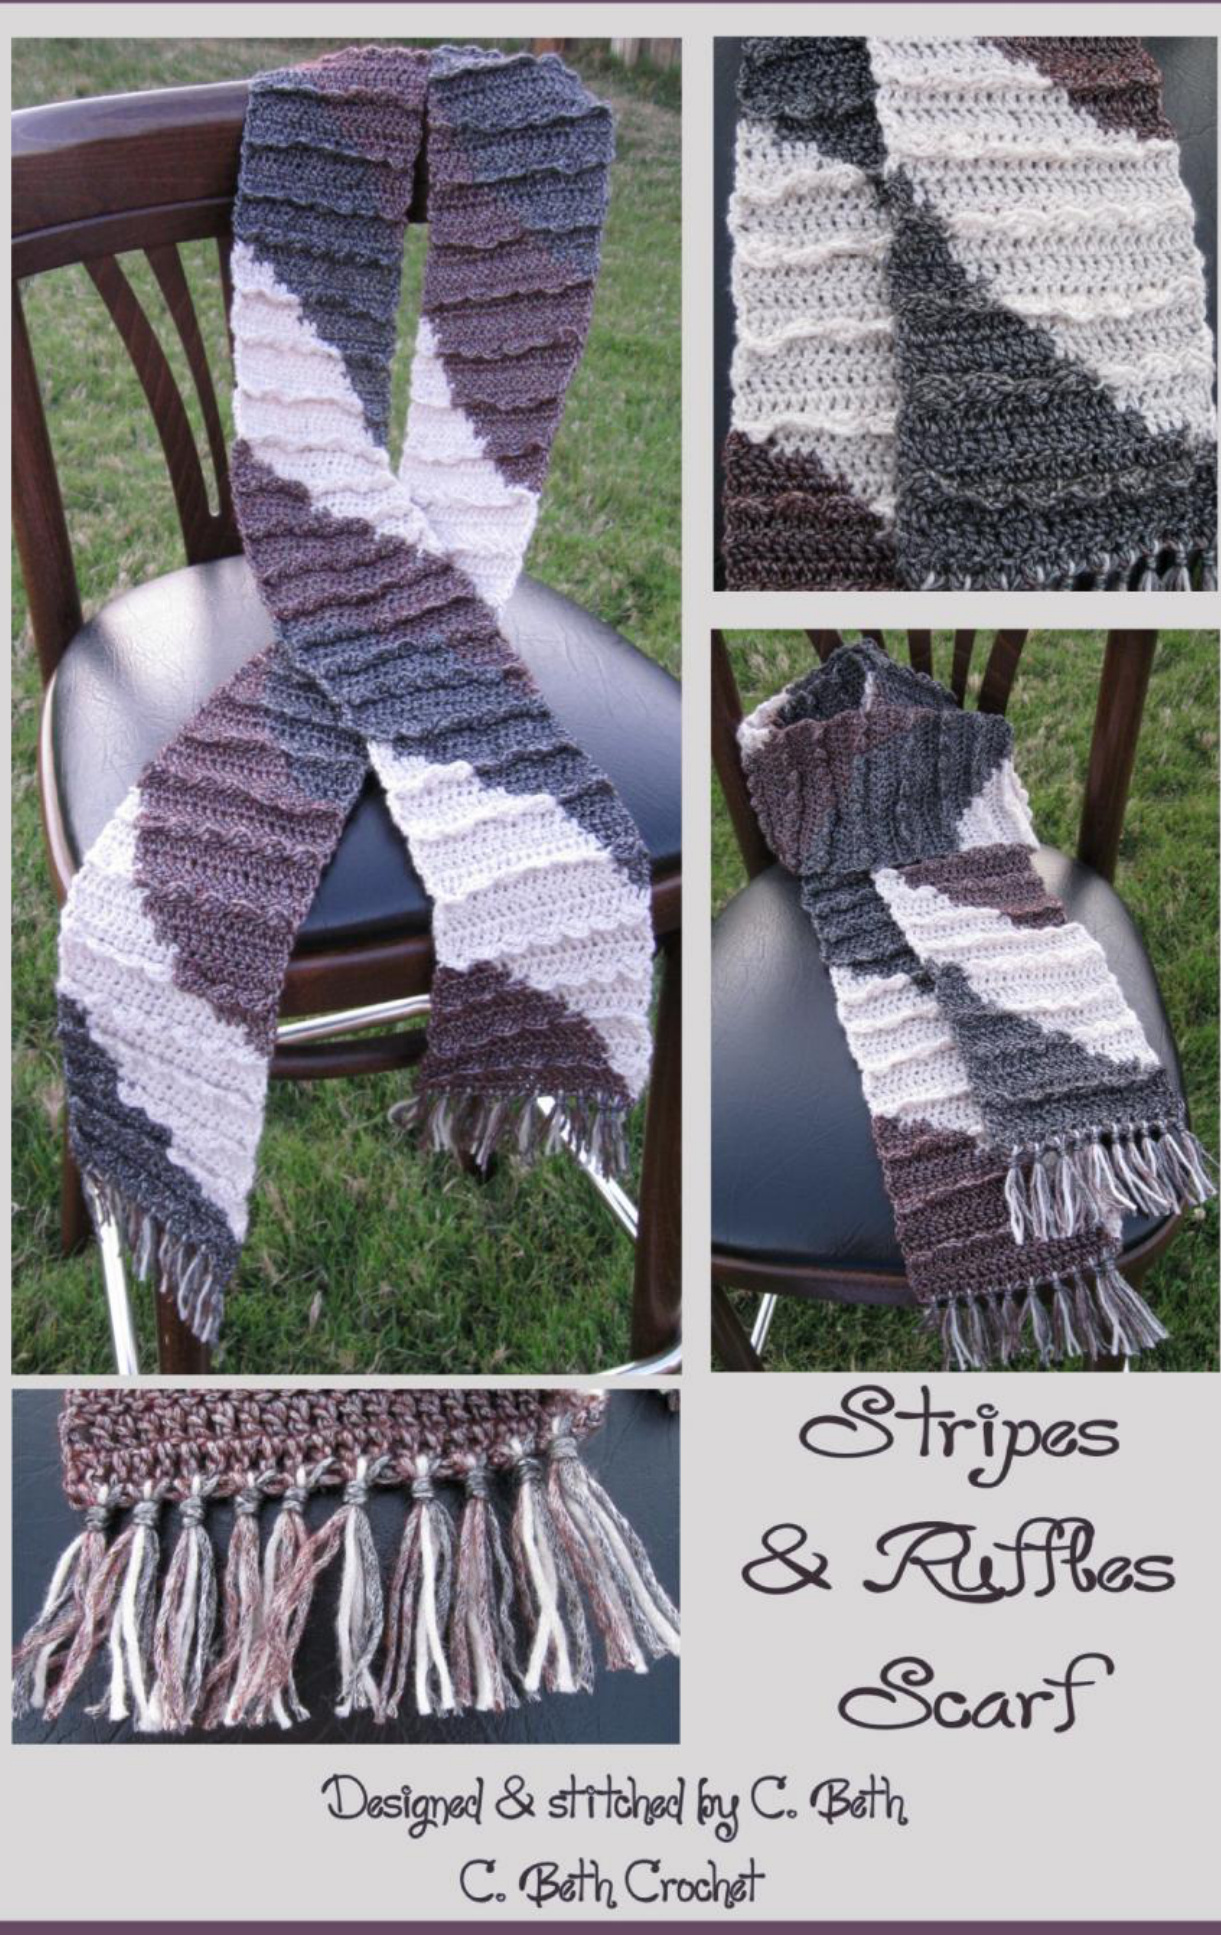
Rows of Ruffles Scarf
Pattern by C. Beth, cbethcrochet.com 2014 You may use this pattern to make scarves to sell, as long as you're not mass-producing the scarves. You may not sell the pattern itself or claim the design as your own. If you redistribute the pattern, please do so by referring people to the Ravelry.com download page or by distributing this printout. Thanks! Questions? Contact C.Beth at cbethcrochet@gmail.com
Yarn & Hook:
I used Sublime Lustrous Extrafine Merino DK weight yarn (67% extrafine merino wool, 33% nylon), approximately 115 g/4 oz; and an F/5 hook. Any DK or sport weight yarn should work, and bulkier yarns (worsted or heavier) should work too, though you will want to adjust the hook size, the number of rows, and possibly the width.
Difficulty:
The single-color scarf can be completed by a relatively inexperienced crocheter, though the optional tassels on the end may be trickier. The multiple-color version can be completed by an intermediate crocheter who feels comfortable with frequent color changes.
Reminder:
I used to have the hardest time knowing how to start a new row after turning at the end of a row. Follow these instructions to have nice, straight edges: After completing the starting chain at the beginning of a row, skip the first stitch and begin work in the next stitch. At the end of the row, the last stitch will be at the top of the starting chain from the previous row. This video (which I didn't produce!) shows how to do it: https://www.youtube.com/watch?v=mczUosKuRWk. I suggest frequently counting stitches to make sure you have the correct number in each row.
Let's Get to Work! Single-Color Version (Multi-Color Version on next page):
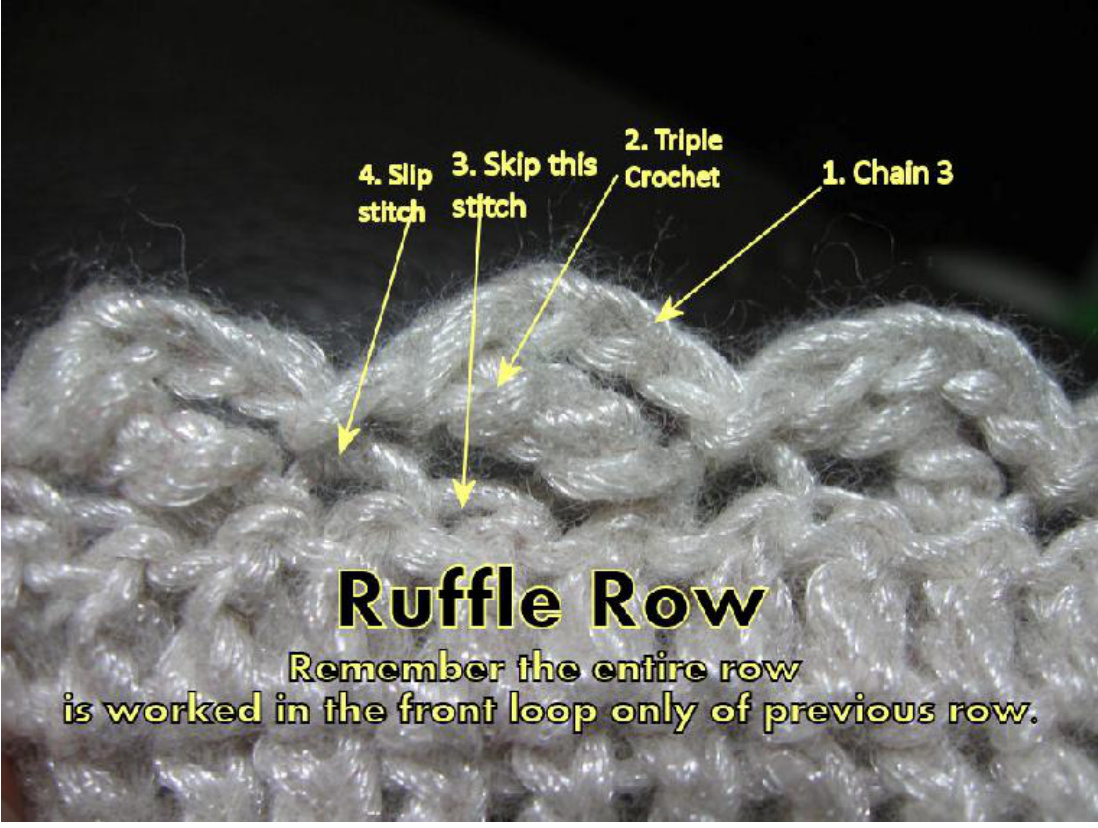
Row 1: Ch-23 Row 2: Starting in 3rd ch from hook (these chains count as 1 dc), work 1 dc in each of the following 21 ch. Turn. (22 dc) Row 3: Ch-3 (counts as dc here and throughout), 21 dc. Turn. (22 dc) Row 4: Repeat Row 3. Row 5 (Ruffles! This row is worked in the FRONT LOOP ONLY of the previous row.): \*Ch-3, 1 tc (in front loop), skip 1 stitch, sl st in front loop of next stitch. Repeat from \* 6 more times. Turn. (7 ruffles) See photo on last page. Row 6 (This row is worked in the BACK LOOP ONLY of ROW 4, leaving Row 5 free to stick out from the scarf.): Ch-3, 21 dc (in back loops). Turn. (22 dc.) You will want to count and make sure you have the right number of stitches—things look a little different on this row! Repeat Rows 3 through 6 until the scarf is about as long as you'd like. Your repeats should end withRow4. I made mine about 6 feet long, and 228 rows (including initial row of chain: Continue to Finishing, page 5.
Multi-Color Version:
To change from one color to another: In the stitch PREVIoUS to the color change, work the stitch as normal until the final yarn over. Use the new yarn color for this final yarn over. Pull the new color through, and continue! There is an excellent video (which I did not produce) demonstrating this here: https://www.youtube.com/watch?v=3wAmFSsjOjQ. If the stitch previous to the color change is a slip stitch, insert the hook, and yarn over with the new color, pulling it through. It is NoT necessary to cut the yarn every time you change colors! Just let Yarn A hang there when you switch to Yarn B, trying not to get them tangle! When you switch back to Yarn A in the next row, it will be right there waiting for you! Because the stitches don't match up perfectly from row to row (for instance, in one row you may have 8 stitches of Yarn A, and you may have 10 stitches of that color in the next row), you will need to carry the yarn on the back side of the scarf, and work over it. To see what I mean, check out the "Working over the strand" diagram in this tutorial (which I did not write): http://www.dummies.com/how-to/content/how-to-carryyarn-in-crochet.html. Just do your best to "work over" any stretches of yarn that cross over anothercolor.
See photo of color close-up on last page.
Row 1: Color A: Ch-23. Row 2: Color A: Starting in 3rd ch from hook (these chains count as 1 dc), work 1 dc in each of the following 21 ch. Turn. (22 dc) Row 3: Color A: Ch-3 (counts as dc here and throughout), 21 dc. Turn. (22 dc) Row 4: Color A: Ch-3 (counts as dc here and throughout), 21 dc. Turn. (22 dc) Row 5 (Ruffles! This row is worked in the FRONT LOOP ONLY of the previous row.): Color A: Ch-3, 1 tc (in front loop of next st), skip 1 stitch, sl st in front loop of next stitch. Repeat from \* 6 more times. Turn. (7 ruffles) See photo on last page. Row 6 (This row is worked in the BACK LOOP ONLY of ROW 4, leaving Row 5 free to stick out from the scarf.): Color A: Ch-3. 18 dc (in back loops.) Color B: 3 dc (in back loops.) Turn. (22 dc) You will want to count and make sure you have the right number of stitches—things look a little different on this row! Row 7: Color B: Ch-3, 5 dc. Color A: 16 dc. (22 dc) Row 8: Color A: Ch-3, 13 dc. Color B: 8 dc. (22 dc) Row 9 (Ruffles! This row is worked in the FRONT LOOP ONLY of the previous row.): \*COLOR B: Ch-3, 1 tc (in front loop of next st), skip 1 stitch, sl st in front loop of next stitch. Repeat from \* 2 more times for a total of 3 ruffles in Color B. Then... \*\*COLOR A: Ch-3, 1 tc (in front loop of next st), skip 1 stitch, sl st in front loop of next stitch. Repeat from \*\* 2 more times for a total of 4 ruffles in Color A. Turn. (7 ruffles) Row 10 (This row is worked in the BACK LOOP ONLY of ROW 8.): Color A: Ch-3. 11 dc (in back loops.) Color B: 10 dc (in back loops.) Turn. (22 dc) Row 11: Color B: Ch-3, 11 dc. Color A: 10 dc. (22 dc) Row 12: Color A: Ch-3, 7 dc. Color B: 14 dc. (22 dc) Row 13 (Ruffles! This row is worked in the FRONT LOOP ONLY of the previous row.): \*COLOR B: Ch-3, 1 tc (in front loop of next st), skip 1 stitch, sl st in front loop of next stitch. Repeat from \* 4 more times for a total of 5 ruffles in Color B. Then... \*\* COLOR A: Ch-3, 1 tc (in front loop of next st), skip 1 stitch, sl st in front loop of next stitch. Repeat from \*\* 1 more time for a total of 2 ruffles in Color A. Turn. (7 ruffles) Row 14 (This row is worked in the BACK LOOP ONLY of ROW 12.): Color A: Ch-3. 5 dc (in back loops.) Color B: 16 dc (in back loops.) Turn. (22 dc) Row 15: Color B: Ch-3, 16 dc. Color A: 5 dc. (22 dc) Row 16: Color A: Ch-3, 3 dc. Color B: 18 dc. (22 dc) Row 17 (Ruffles! This row is worked in the FRONT LOOP ONLY of the previous row.): \*COLOR B: Ch-3, 1 tc (in front loop of next st), skip 1 stitch, sl st in front loop of next stitch. Repeat from \* 5 more times for a total of 6 ruffles in Color B. Then.. COLOR A: Ch-3, 1 tc (in front loop of next st), skip 1 stitch, sl st in front loop of next stitch for a total of 1 ruffle in Color A. Turn. (7 ruffles) Row 18 (This row is worked in the BACK LOOP ONLY of ROW 16.): Color A: Ch-3. 2 dc (in back loops.) Color B: 19 dc (in back loops.) Turn. (22 dc) Row 15: Color B: Ch-3, 19 dc. Color A: 2 dc. (22 dc) Now you're done with Color A, and Color B will be considered Color A. Repeat Rows 4 through 15 until the scarf is about as long as you'd like. Your repeats should end with Row 4. You may use more than two colors if you wish! When you bring in a new color, it will now be consideredColorB. I made mine about 6 feet long, and 228 rows (including initial row of chains.) Continue to Finishing, page 5.
Finishing:
Work in ends of yarn. Ends are fine without any trim, but if you wish, you can do fringe or, as I did, small tassels.
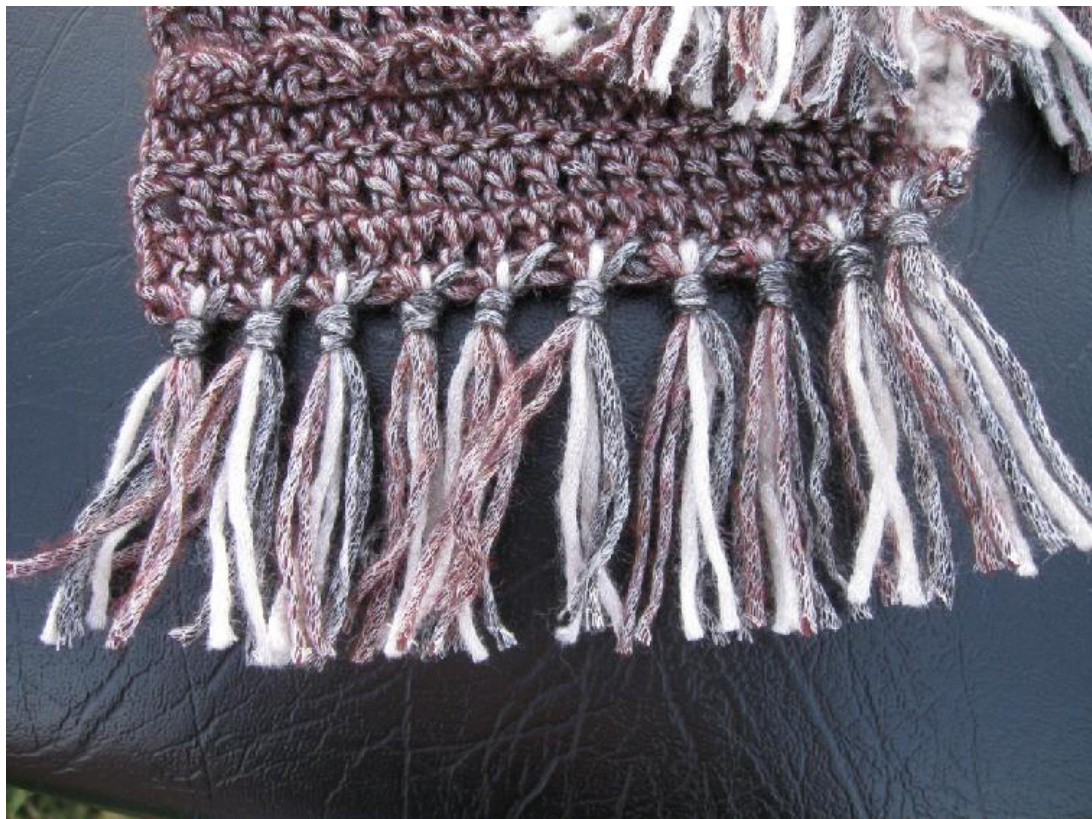
Tassels (See photo on last page):
To make the first tassel, thread 1 piece of yarn (6-8 inches) in between double crochet stitches 1 & 2, another piece of yarn between stitches 2 & 3, and another between stitches 3 & 4. (Since the yarn is doubled when it's threaded through, you'll have 6 ends, which should all be fairly even at the bottom.) Wrap a new piece of yarn around all 6 pieces of yarn, near the base, to make a tassel. When you've finished wrapping, secure the wrapped portion by using a yarn needle to pull the end of the wrapping yarn up and underneath some of the wrapping you just did. When the wrapping yarn exits at the top of the tassel, work it into the body of the scarf. Work the first end of the wrapping yarn into the body of the scarf as well. For the next tassel, the first piece of yarn should go between stitches 3 & 4 (the same space as the last length went for the previous tassel), the next piece of yarn between stitches 4 & 5, and the next between stitches 5 & 6. Wrap it, and repeat tassels across. You should end up with 10 tassels. I used one long piece of yarn to wrap all 10 tassels. At the beginning and end, I worked the ends into the body of the scarf, and in between each tassel, I used a yarn needle to work the wrapping yarn back into the body of the scarf and to work my way over to the next tassel. eat on the other end of the scarf, and trim the tassels to the length you wish
Photos
Ruffles:
Tassels: