Copyright Information
You may use this pattern for personal or charity use as long as you have hand-made the finished item. You may not use this pattern for commercial purposes or for sale if you have not hand-made the item. You may sell finished items from this pattern. I do appreciate being credited as the pattern designer. You may not sell the pattern itself. You may not copy, pass on or post this pattern anywhere online or offline, if you wish to share this pattern please direct the person to the pattern by sending them a link. You may not claim this pattern as your own or use it as teaching material. If you are not sure if you might infringe copyrights, send me an email to sofia@kennedyfamily.co.nz
Materials Required
3mm or 3.5mm Hook (US size D/3 or E/4, UK Size 9, 10, or 11) Yarn Needle, Scissors and Stuffing. Small quantities of embroidery floss for the facial features and detailing. Optional safety eyes. 50 Meters 8ply (Double Knitting) yarn
Abbreviations (US terminology)
SC = Single Crochet ST =Stitch CH = Chain SL ST = Slip Stitch FO =Finish Off INC = Single Crochet Increase (or single crochet twice in one Stitch) DEC = Single Crochet Decrease (or crochet two Single Crochet together)
Additional Information
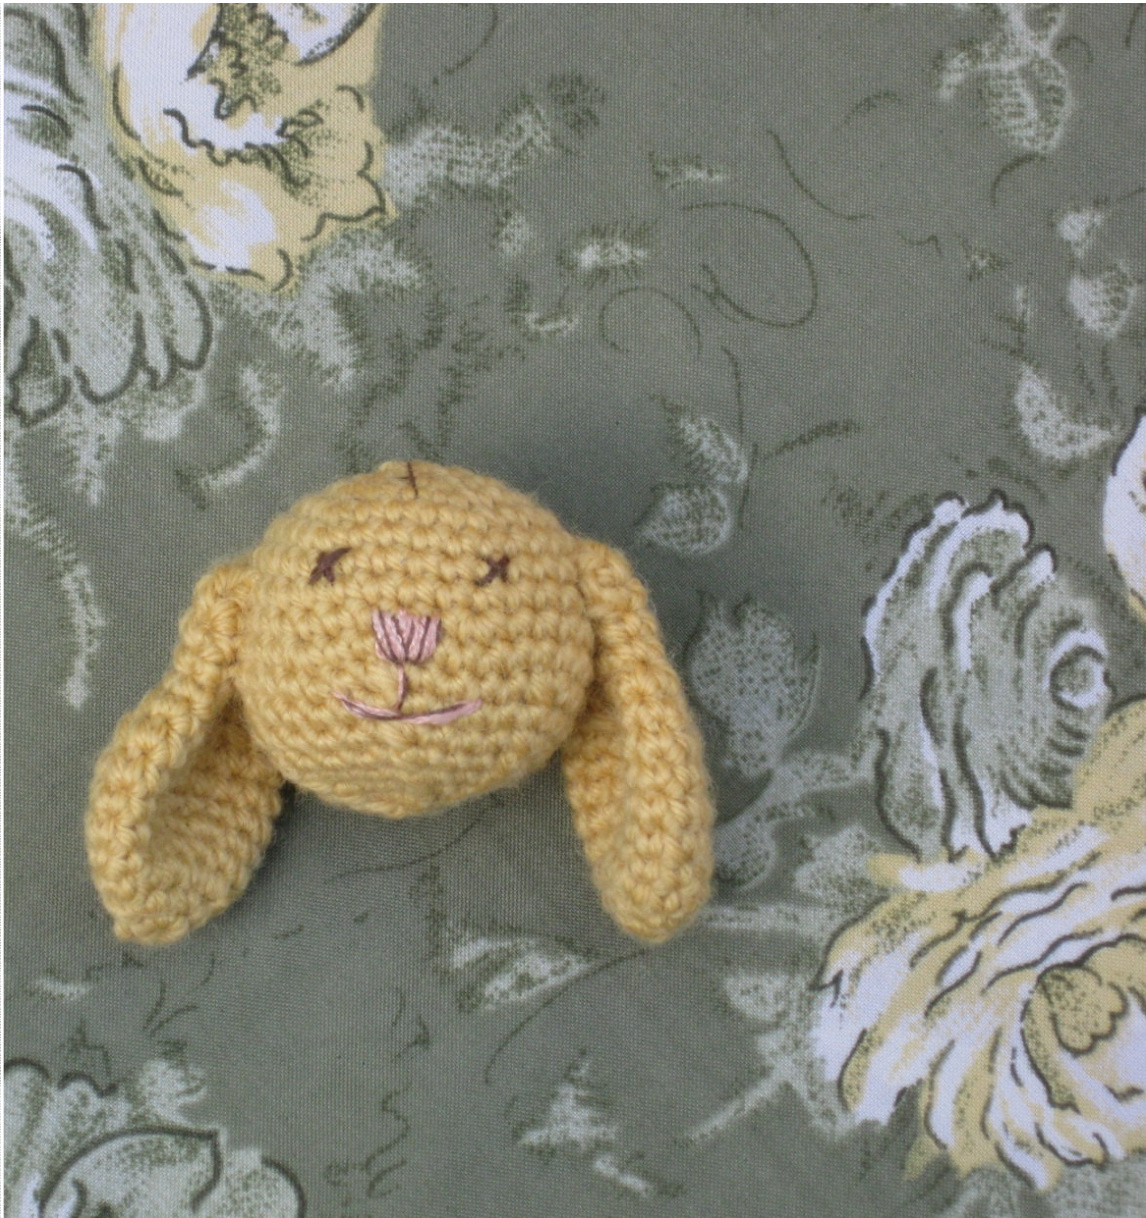
Skill level: Beginner Finished Size: My example is 7cm high from tip of ears till top of head, 15cm around at the top of the ears, however your toy's size will be dependent on the yarn and hook size used. This Amigurumi Rabbit was inspired by the story 'The Little Velveteen Rabbit' it has a bit of detailing to make it look more 'vintage. It'll go great as a bag tag, as a mobile, to top a baby rattle or small cuddly. Gauge is not important for this pattern; you are aiming to create a dense fabric, so make sure your stitches are tight enough so you cannot see the stuffing when finished. If you do not have the suggested thickness of yarn, substitute with whatever yarn you have or like to use, and change your hook size up or down depending on the difference in thickness. The pattern is worked in a continuous spiral, do not join the rounds. You can choose to move a stitch marker each round to indicate the start and finish, or you can count stitches, whichever you prefer. The number of stitches in each round, when it is completed, are indicated in brackets () at the end of the line. Ears (make two - do not stuff) Round 1 Create a Magic Circle with 5 SC (5) Round 2 INC 5 times (10) Round 3 \*INC, SC\* repeat from \* around (15) Round 4 SC in each stitch around (15) Round 5 \* INC, 2 SC \* repeat from \* around (20) Round 6-8 SC in each stitch around (20) Round 9 \* DEC, 2 SC \* repeat from \* around (15) Round 10 \* DEC, SC \* repeat from \* around (10) Round 11&12 SC in each stitch around (10) The following two 'rounds' are done as rows, turning at the end of each row. This gives a flatter area to stitch down. Row13 SC for 6 stitches, CH 1 and turn Row14 SC for 5 stitches, SL ST to finish - leaving a tail for sewing
Head
Round 1 Create a Magic Circle with 6 SC (6) Round 2 INC 6 times (12) Round 3 \*INC, SC\* repeat from \* around (18) Round 4 \* INC, 2 SC \* repeat from \* around (24) Round 5 \* INC, 3 SC \* repeat from \* around (30) Round 6-8 SC in each stitch around (30) Round 9 \* INC, 4 SC \* repeat from \* around (36) Round 10 SC in each stitch around (36) If using safety eyes, attach these now somewhere between rounds 6 & 7 Round 11 \*DEC, 4 SC\* repeat from \* around (30) Round 12 SC in each stitch around (30) Round 13 \*DEC, 3 SC\* repeat from \* around (24) Round 14 \* DEC, 2 SC \* repeat from \* around (18) Round 15 \* DEC, SC \* repeat from \* around (12) Start stuffing now, continuing to stuff as you close the hole Round 16 DEC around (6) Round 17 DEC untilthe hole closes. FO by leaving a tail for sewing, cut the yarn, thread it on a needle and pullit back through the hole so that the bottom of your toy is nice and smooth 'blending in' with the rest of the stitches. Finish off by stitching on the ears, facial features and vintage details and your little rabbit is ready!


