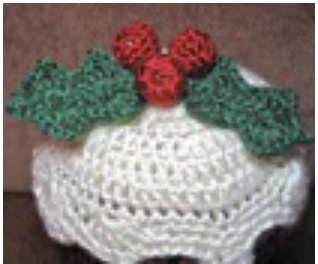
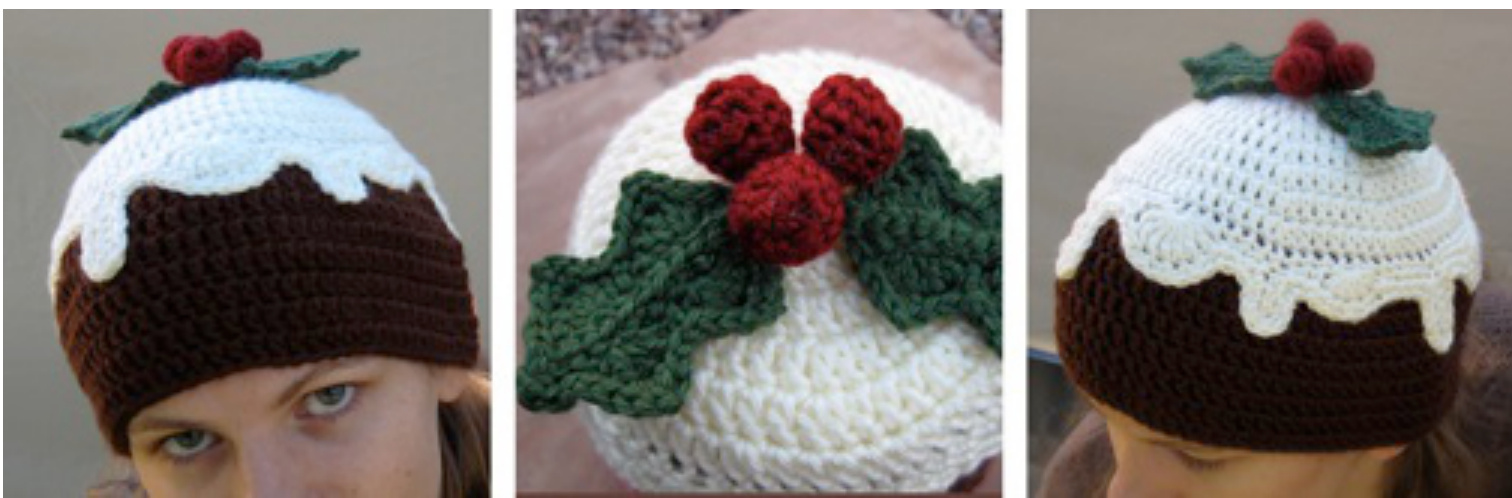
Christmas Pudding Hat
Designed by SP Sandsteel
H Size Hook F Size Hook Tapestry needle Worsted weight yarn in green, red, white and brown Stuffing (a tiny amount for the berries) Yarn Suggestion: Caron Simply Soft
Please note: Pattern is written using American crochet terminology.
Sizing:
Infant (6-12 months): 5 increase rows (60 st) and 9 brown length rows (14 rows total) Child/Teen: 6 increase rows (70 st) and 9 brown length rows (15 rows total) Adult: 7 increase rows (80 st) and 10 brown length rows (17 rows total) Depending on your yarn choice, tension and gauge, sizing may vary. To obtain a hat in a half-size, switch to a G size hook.
Icing, Part One (in white):
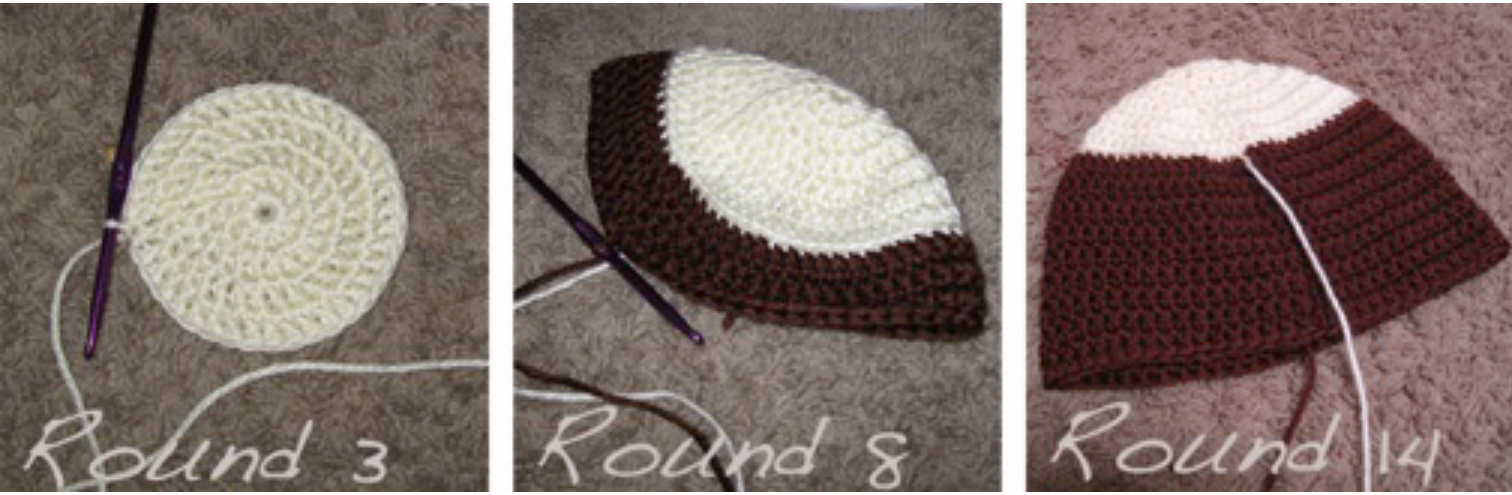
Piece is crocheted in individual rounds, using the H size hook Chain 4, slip stitch in 1st ch to form ring Ch 2, 10 dc through center of the ring, slst in the top of the first dc to join (10) Row 1: ch 2, 2dc in each stitch around, slst to join (20) Row 2: ch 2, (2dc, dc) around (30) Row 3: ch 2, (2dc, dc, dc) around, stsl to join (40) (Picture: Round 3) Row 4: ch 2, (2dc, dc 3 times) around, slst to join (50) Row 5: ch 2, (2dc, dc 4 times) around, slst to join (60) Switch to brown. Do not cut white yarn. Keep white yarn on the outside of hat while working in brown.
Cake (in brown):
Row 6: in back loops only, ch 2, dc around, slst to join (remember to make sure white yarn is on outside of hat!) (60/70/80 st depending on size) Row 7-14: through both loops as normal, ch 2, dc around, slst to join (60/70/80 st) (Picture: Round 8, Picture: Round 14; infant size) Cut brown yarn when hat is 14/15/17 rows (or desired length). Leave a tail and weave in end with a tapestry needle.
Icing, Part Two (in white):
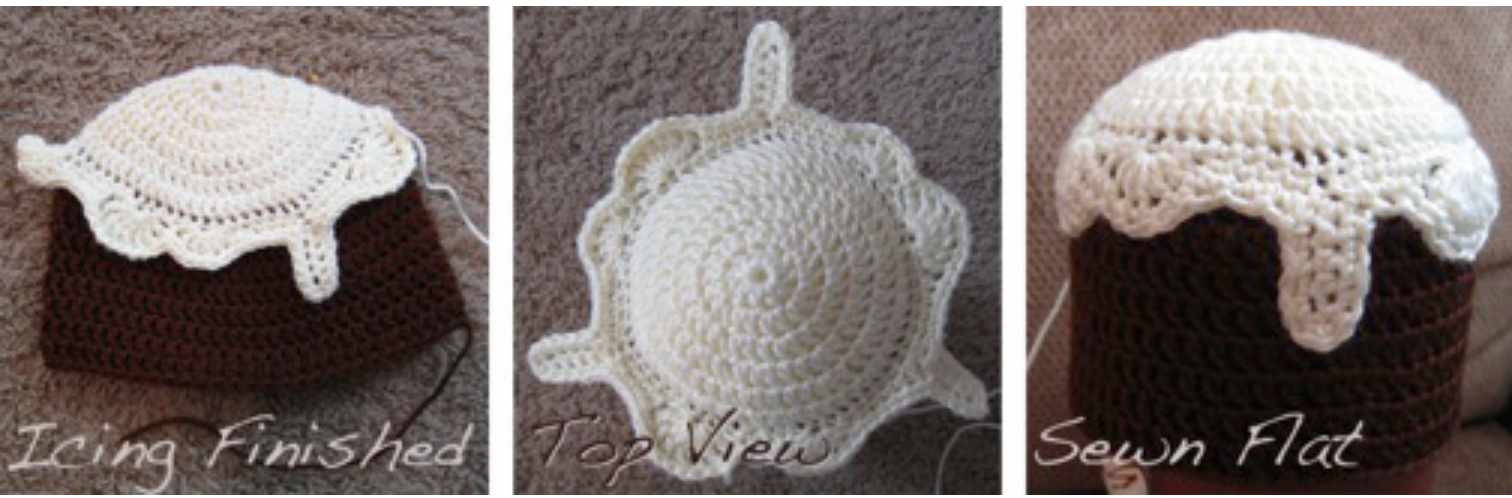
Front loops of end of white round are still visible. The white yarn is hanging off the outside of your work. Work with the top of the hat towards you. Row 1: Pick up a stitch and sc in each front loop allthe way around. Slst at the end of the round to join. Row 2: \*Skip 1 stitch, dc 5 times in the next stitch, skip 1 st, slst in next st, sc in next 4 stitches, slst, ch 6, hdc in 2nd ch from hook and working back down chain, hdc in each ch st (5 hdcs). Slst in same slip stitch in main row, sc 4 times, skip 2 st, 7 tc, skip 2 st, slip stitch, (for adult size, add: sc, sc, sc, slst, ch 4, hdc 3 times back along chain, slst in next stitch, sc, sc)\* Complete everything between the $\mathsf{\Omega}^{\star}\mathsf{s}\,3$ times. Note: Improvise with the icing drizzle! If you want longer peaks, simply chain more in each chain section. Substitute double crochet sets for triples if you like, and if you come to the end of your icing round and have extra space (i.e., it didn't join up properly), you can sc to the end or add a dc, tc, or chain for extra drizzle. Row 3: Ch 1 and sc around. At the peak of any icing drip, 2sc, sc, 2sc, with the sc being the middle stitch in the peak (the 2scs just help you turn the corner without the piece curling under). Slip stitch to join. Cut yarn leaving a long tail. With a tapestry needle, sew the icing edge to the hat So it lies flat. (Pictures: Icing Finished, Top View, & Sewn Flat for smallest size hat)
Holly Leaves (in green; make 2):
Chain 11, slst in 3rd ch from hook. Moving back along the chain, (skip 1 chain stitch, 5dc in next st, skip 1 ch st, slst) 2 times. Chain 1. Rotate the leaf, keeping the same side towards you. Working up the opposite side of the chain, slip stitch in the first chain stitch. (Skip 1 stitch, 5dc in next stitch (opposite the other 5dc set you made), skip 1 stitch, slip stitch) two times. (Picture: Leaf 1) The “slst in 3rd ch from hook" directions earlier formed a small pointy section. Sc into the 2nd ch, which will be the peak of the point. Ch 2, then sc back in the same stitch. $^{\star}{\sf S I}$ st 2 times, (sc, ch 2, sc) in next stitch (it will be the center dc from the previous round's 5 dc set). Sl st 2 times, skip 1 stitch (the stitch that was the slip stitch between the 2 5dc sets in the previous round), sl st 2 times, then (sc, ch 2, sc) in the next stitch. SI st 3 times.\* You are now at the bottom of the leaf. Repeat between the $\star_{\sf S}$ across the opposite side of the leaf. Slip stitch one last time. Cut yarn and weave in end. (Picture: Leaf 2)
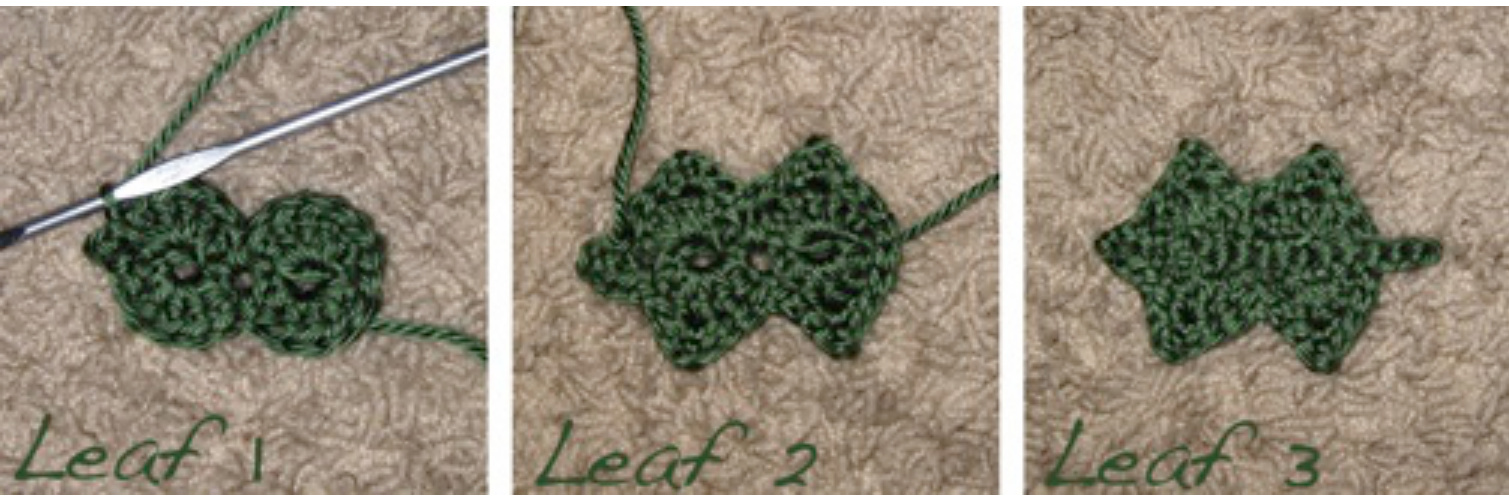
Leaf Stem (optional): Chain 14, slip stitch in every stitch back along the chain. Leave a long tail and sew the strip down the center of the holly leaf. It will fill in the holes, give the leaf more “leafy" texture, and also should hang over about 1cm past the end of the leaf to act as a stem. (Picture: Leaf 3)
Holly Berries (in red; make 3):
Crochet in a continuous spiral, using the F size hook Chain 3, slip stitch in 1st ch to form ring 6 sc through center of the ring (6) Row 1: (2sc, sc) 3 times (9) Row 2-3: sc around (9) Row 4: (sc2tog, sc) 3 times (6)
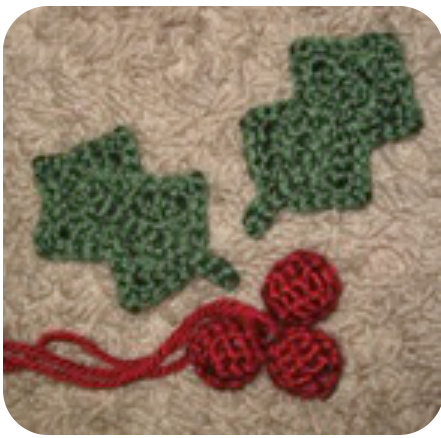
Stuff berry. Cut yarn leaving an 8 inch tail. Using a tapestry needle, weave the yarn through the remaining stitches and pull tight until hole is closed. Poke needle up through the center of the berry and pull yarn out the top center hole. Leave the string long for joining to hat later. Sew leaves onto top of hat with tapestry needle. Then sew berries into the center of the hat (through the center hole if possible). Weave in ends securely and trim yarn.
$\circledcirc$ Copyright 2009 by SP Sandsteel. This work is licensed under the Creative Commons Attribution-Non Commercial-No Derivative Works 3.0 License. To view a copy of this license, please visit: http://creativecommons.org/licenses/by-nc-nd/3.0/ This is a paid pattern from www.sociallyskiled.com. Do not redistribute without designer's permission. For questions or comments, please email the designer at sandsteeldesigns@gmail.com


