AMY LEE
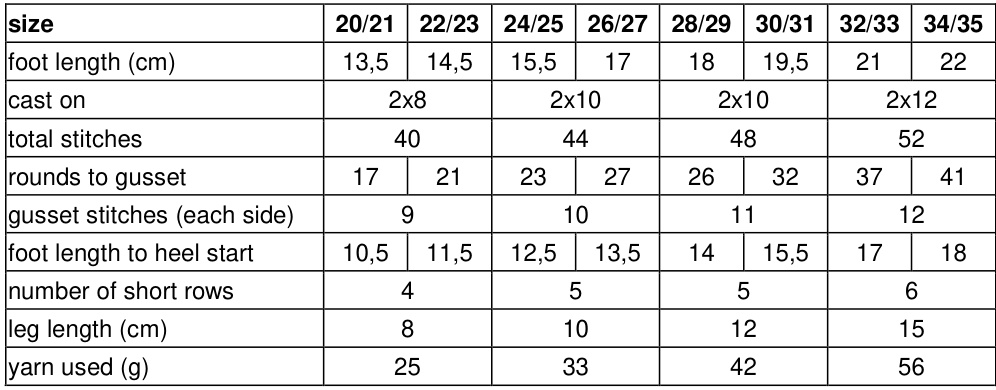
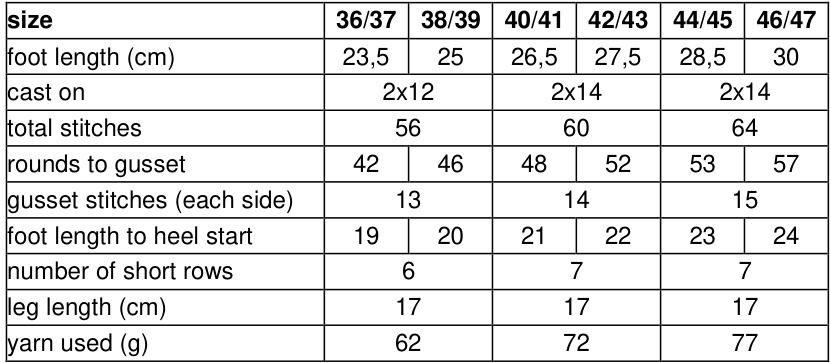
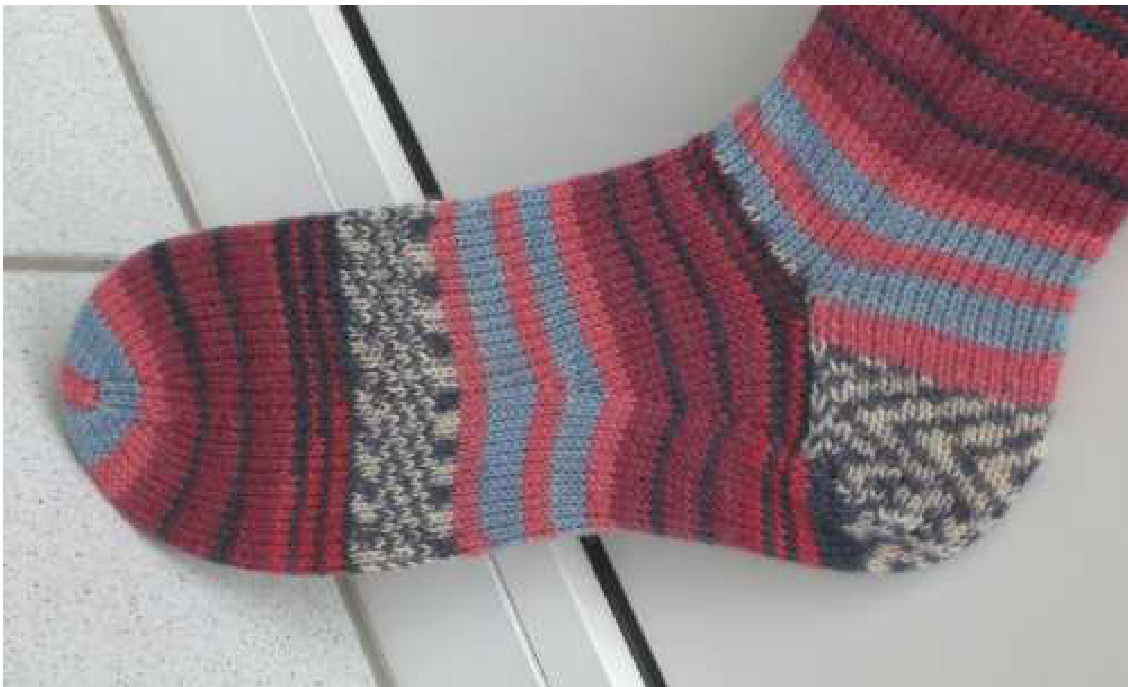
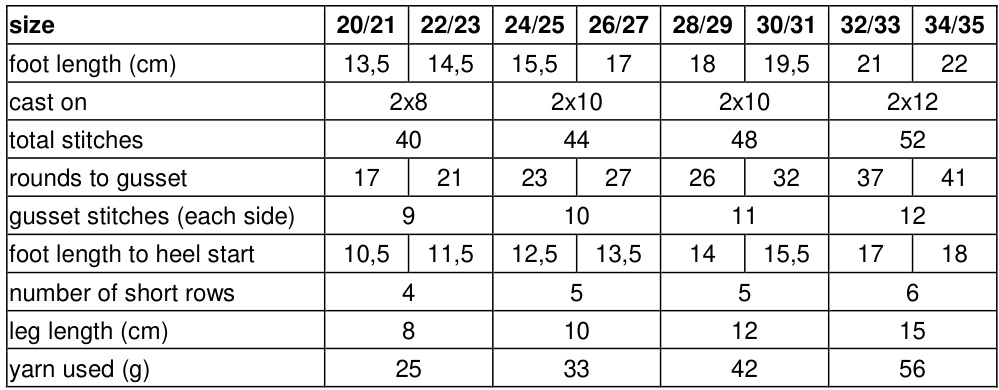
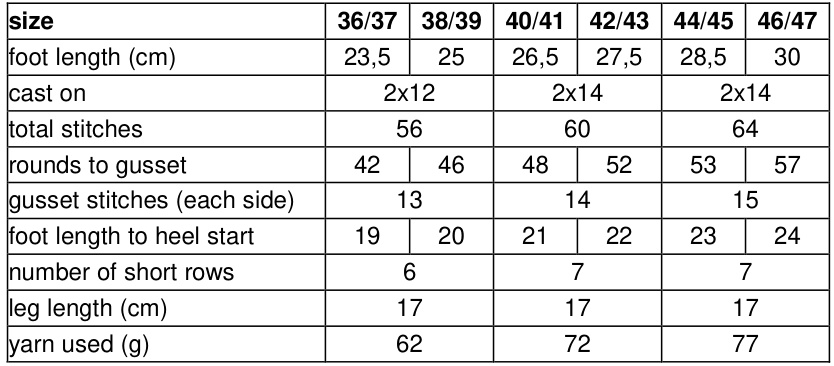
basic pattern for toe up socks sizes: EU 20/21 (foot length 13,5cm) to EU 46/47 (foot length 30cm) gauge: $l0c m=32$ stitches and 44 rounds
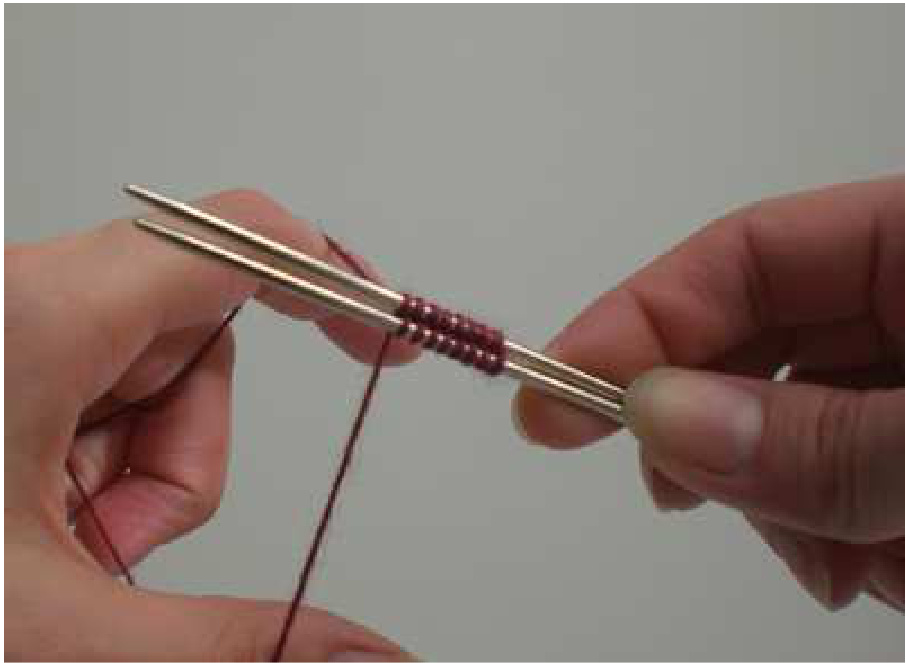
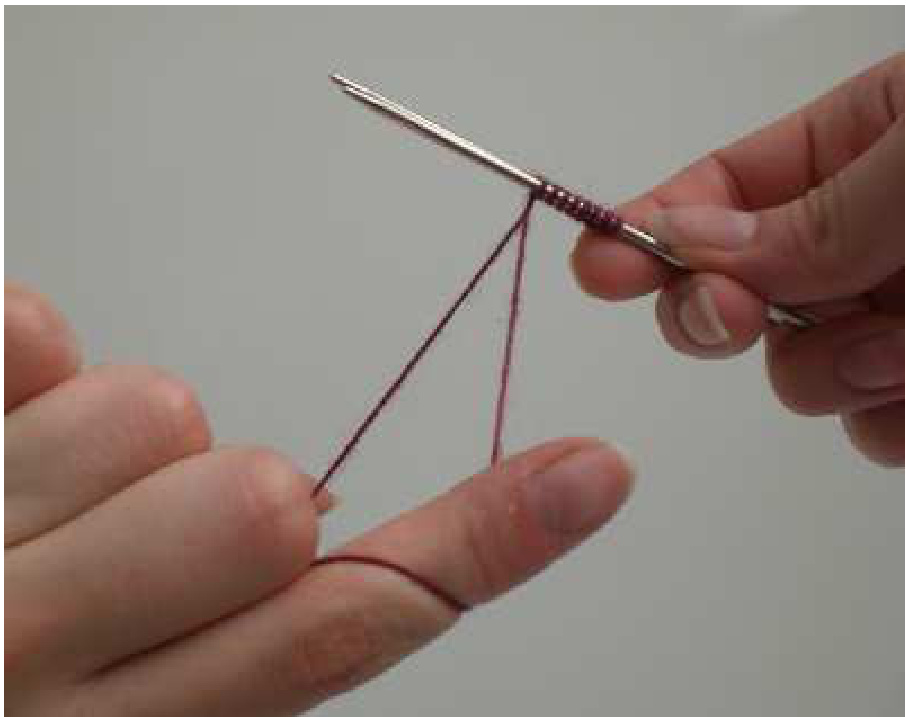
Part one shows you how to do special techniques needed for sock knitting, such as "magic cast on", lifted increases and "pulled stitches" - with pictures! Part two consists of the basic instructions for stockinette socks. All important data like foot length, stitch count, rounds to gusset and so on are summarised into a table. Part three is a short instruction with table on one letter sized page. You can fold it in half and put it in your knitting bag to keep it handy. Hold the yarn as for a classic long tail cast on, but reverse the yarn ends: the ball end runs over the thumb and the end runs over your index finger.
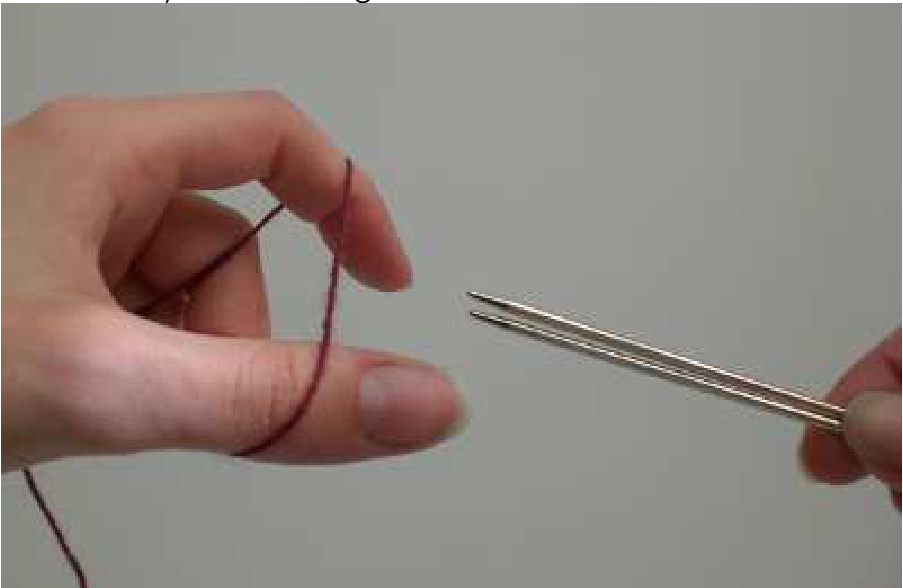
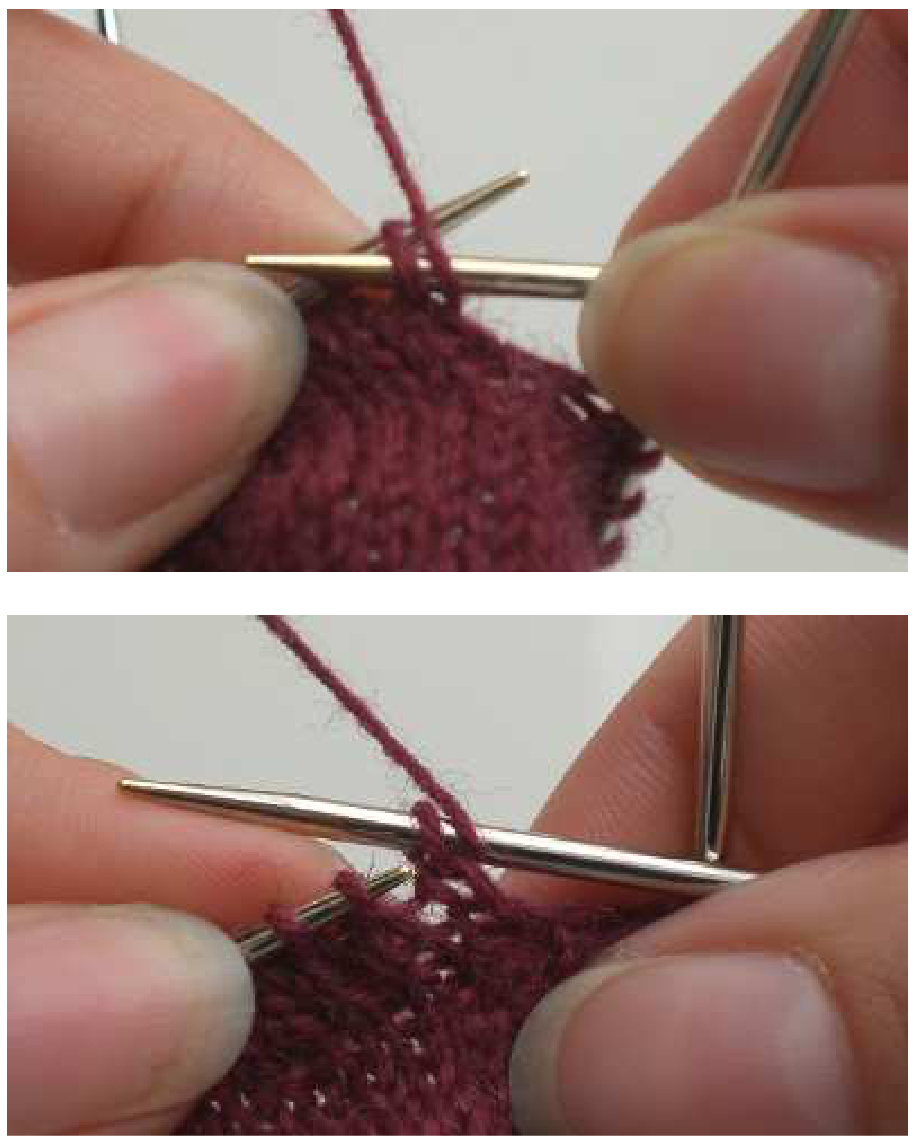
Hold 2 needles together. Pick up a loop with the lower needle.
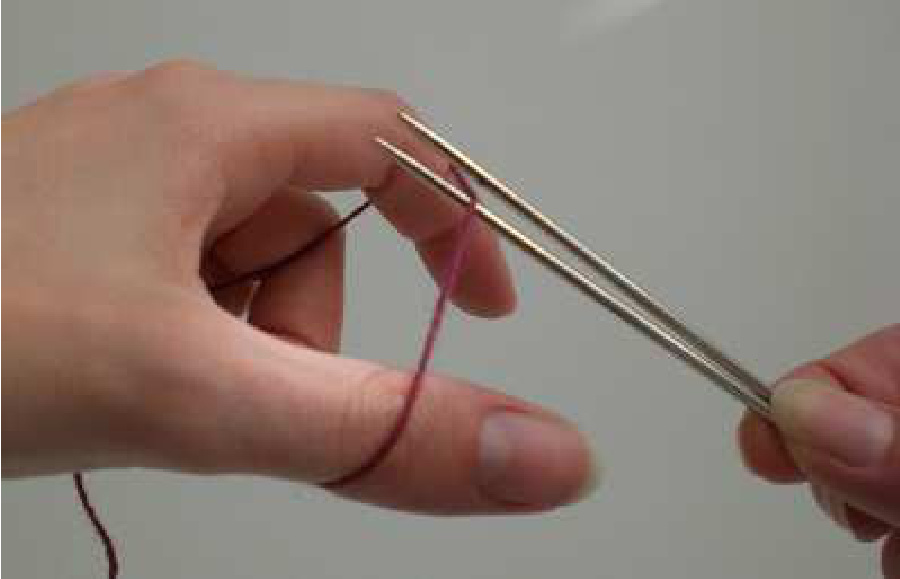
The next loop is formed over the upper needle. This upper needle grabs the lower yarn, and the yarn runs between the needles and up.
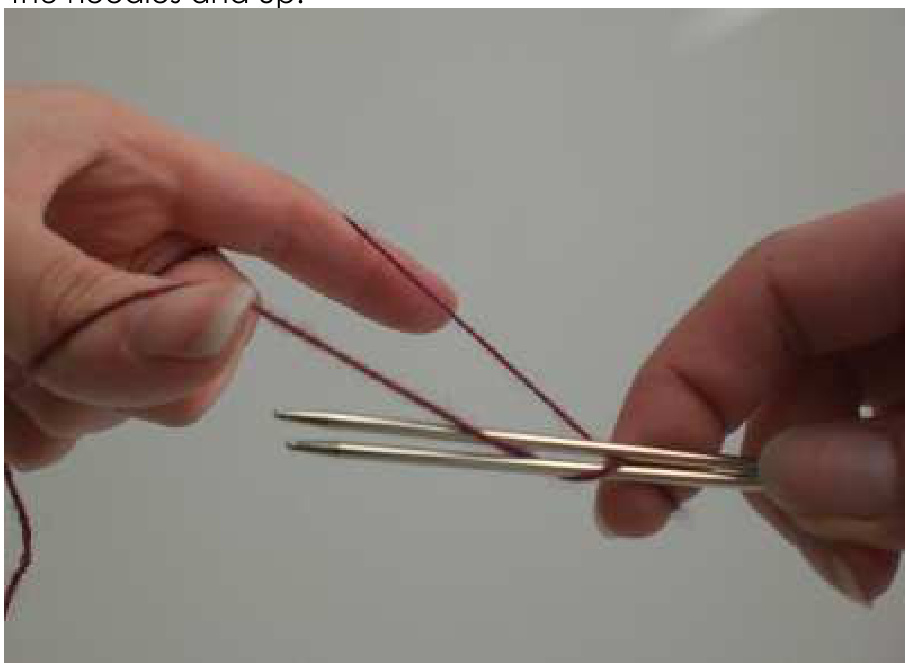
Now the lower needle comes to action. This lower needle grabs the upper yarn, and the yarn runs from the bottom to the front and between the needles.

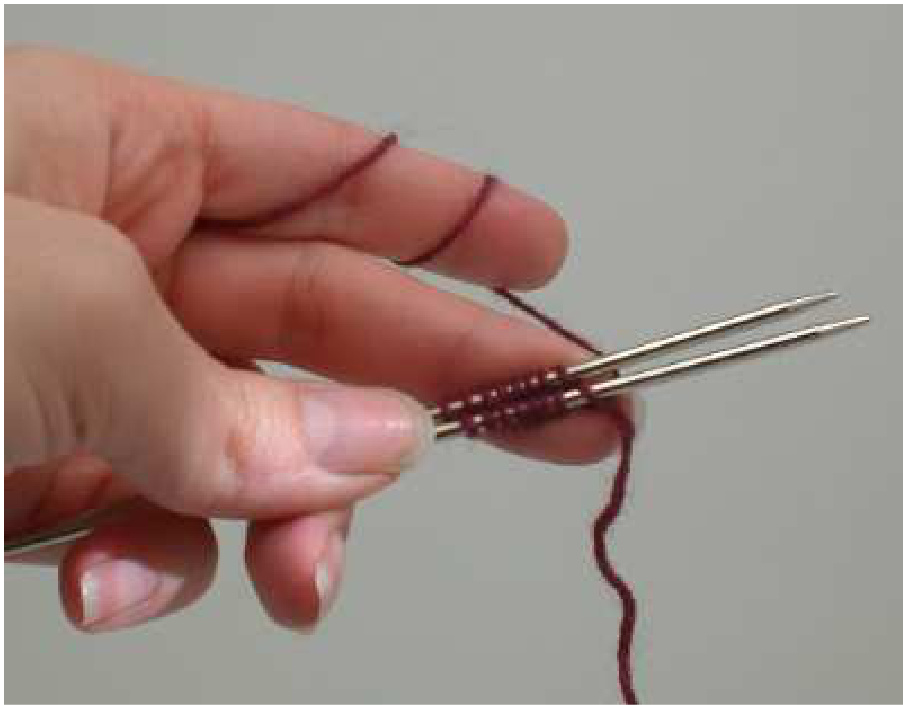
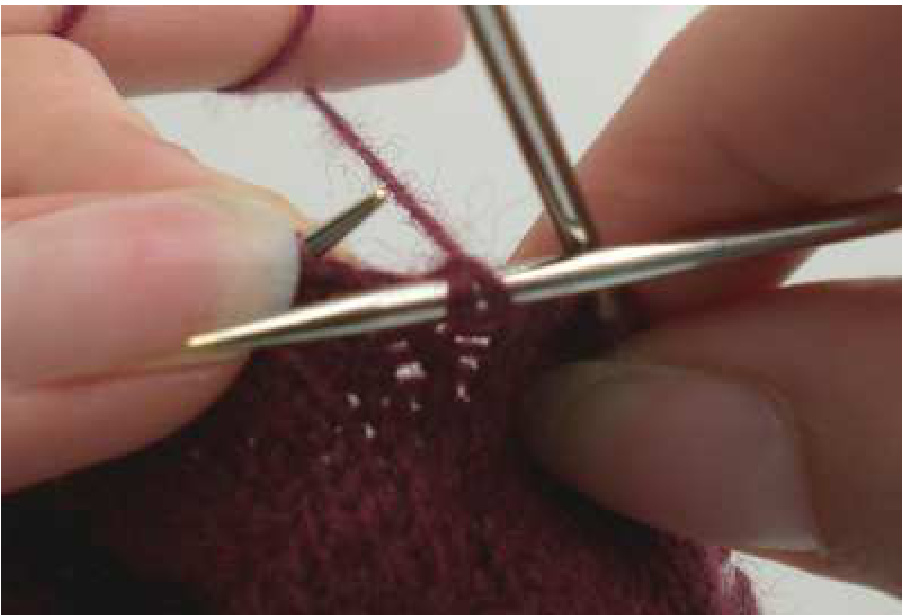
Repeat those two actions until you have enough stitches. End after forming a loop over the upper needle. Both needles have the same stitch count.
The picture shows a cast on of , $\mathbf{\mathcal{Q}}\times\mathbf{8}^{\cdots}$ . That means you have 8 stitches on the upper and 8 stitches on the lower needle. Finally you need to twist the yarn ends. I twist my leff hand counterclockwise by half a turn. The ball end gets twisted to the right and to the back.
Finally wind the ball end around your fingers as usual. Rotate the needles by 180 degrees clockwise.
Note: Wind the yarn tightly around the needles, otherwise the stitches on the first round will be too loose. The first round is a bit tedious to knit; do it slowly to avoid dropped stitches. LR = lifted increase to the right Insert the right needle into the first stitch on the lefft needle, but not into the actual round; put it into the stitch one row lower. The needle enters the loop from the front. Put this loop on the left needle and knit it.
LL $=$ liffted increase to the left Insert the left needle into the stitch just knitted, but not on the actual round; put it into the stitch one round lower. The needle enters the loop from the front. Knit it.
Put the yarn to the front, over the left needle. Slip it purlwise together with the first stitch.
Now pull on the yarn. This results in two loops instead of a stitch.
Hold the yarn pulled and knit on. This instruction is basically written for double pointed needles (dpns), but can be used for circular needles as well. with dpns, you number the needles starting from the beginning of the round from 1 to 4. Needle 1 resembles the first half of stitches on the circilar needle 1, and needle 2 the second half. You can put a marker in the middle, but this is not necessary. Needle 3 resembles the first half of stitches on the second circular needle, and needle 4 the second half. You should put a marker in the middle of the circular needle 2, because this is the “center back" of the sock which is referred to in this instruction. Note: To mark the beginning of the round, you can put a crochet marker, or just a piece of scrap yarn, on the indicated place. The beginning changes from the side (foot part) to the back (heel) and back to the side (leg).
gauge
$10c m=32$ stitches and 44 rounds needle size 2,5mm or that size with which you get gauge Note: the toe explained here is especially suitable for square toes.If you have pointier toes, you can alter the instructions. For example, you can start with fewer stitches and work more increase rounds. If you worked more rounds on your toe, you need to subtract those extra rounds from the foot part to keep the overall sock length unchanged.
Casting On
Use the technique you prefer. Some examples are magic cast on, turkish cast on or the figure 8 cast on. I prefer the magic cast on (see tutorial). The chart tells you how many stitches you need. E.g. "2x10" means that you have 10 stitches on the upper and 10 stitches on the lower needle. Note: if you work with selfstriping yarn and you want to have identical socks, choose a color transition for the starting point. It is quite easy to find that place in the color repeat again, so you can start the second sock on the same place.
Increases on the toe
Increases are done in every other round. special technique: lifted increase You can use any technique for the increases. I like the lifted increase, because it creates a nice line. See tutorial for the lifted increases. $\mathsf{L R}=$ lifted increase to the right Insert the right needle from the front into the loop of the next stitch the round below the actual stitch. Slip this stitch onto the left needle and knit it. LL $=$ lifted increase to the left Insert the left needle from the front into the last knitted stitch on the round below the actual stitch. Knit this loop. Roundl: needle 1 and 3: knit1, LR, knit needle 2 and 4: knit to the last stitch, LL, knit1 Round2: knit Repeat this two rounds until all the needed stitches have been increased. See chart for total stitch Count.
Foot
Knit the needed amount of rounds for your chosen size (see chart). Needle 1 and 2 resemble the instep, needle 3 and 4 the sole of the sock.
Gusset
Increases are done every other round. You can use any technique you want. I use "makel". Note: gusset increases can be made on any place, not just the side of the sock. I like to increase at the beginning of needle I and the end of needle 2.
special technique: make1
Pick up the strand between the actual and next stitch, inserting the left needle from the front. Knit through the back loop. Roundl: needle1: make1, knit needle2: knit, make1 needle 3 and 4: knit Round2: knit Repeat fhose fwo rounds until you have increased fhe needed amount of gusset stifches on each side (see chart for number of gusset stitches). Example: 10 gusset stitches means that you need to increase 10 stitches on every side of the gusset. important: in the last round, end after needle 3. This is the center back of the sock.
Heel Turn
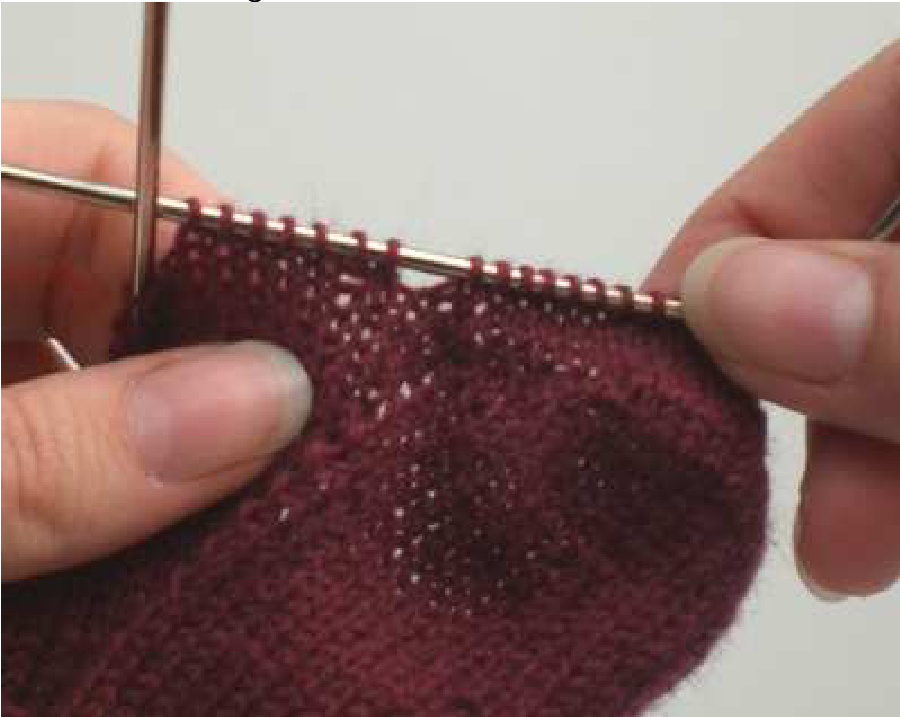
The heel turn in worked in short rows. You can use any technique you want. I will use the "pulled stitches" for this instruction. special technique: pulled stitches PS $=$ yarn to front, slip yarn and 1 stitch purlwise. Pull on the yarn so that the stitch turns into two loops. See also the tutorial. Note: start of the round is now the center back. If you are using circulars, place a marker if you have not done it already. first set of short rows needle1: knit to end and turn. Ps, purl to center back needle4: purl to end and turn. Ps, knit to center back. In each following set of short rows, work one stitch less before turning. You do not need to count; just knit to the last Ps and turn. Work as may sets of short rows as stated in the chart. You should have as many PS on each side as you have done sets of short rows.
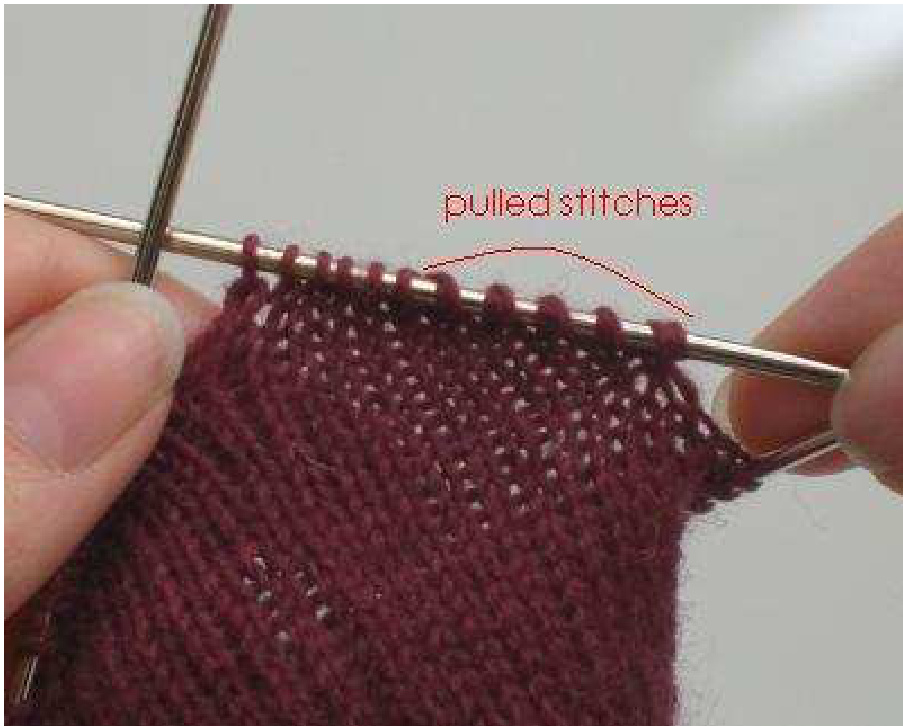
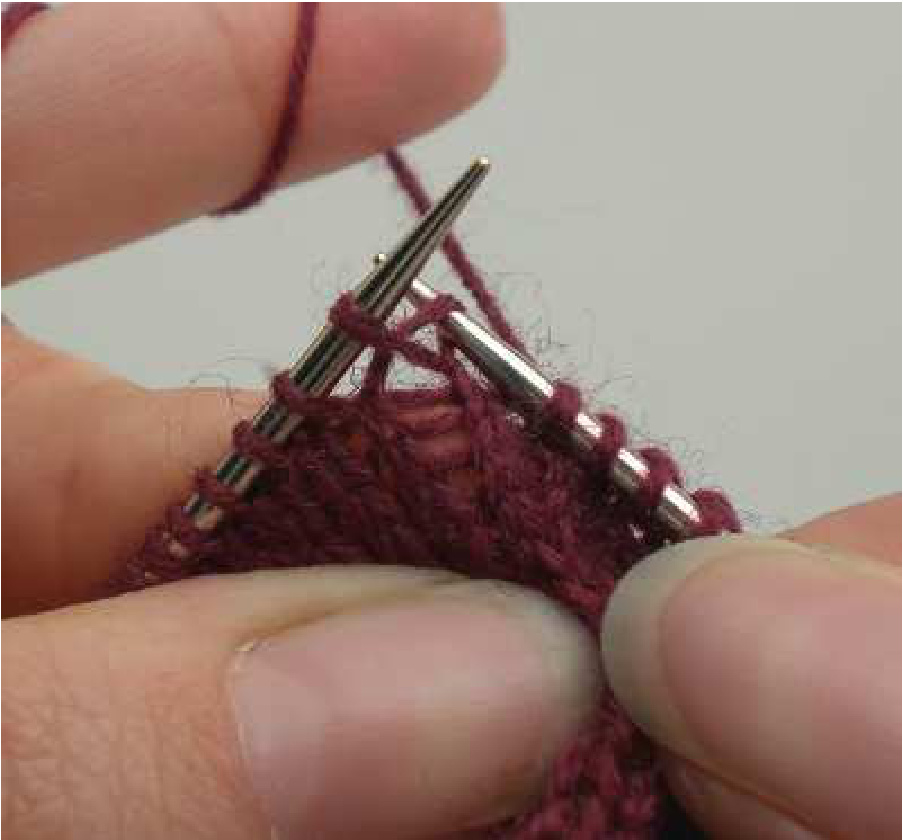
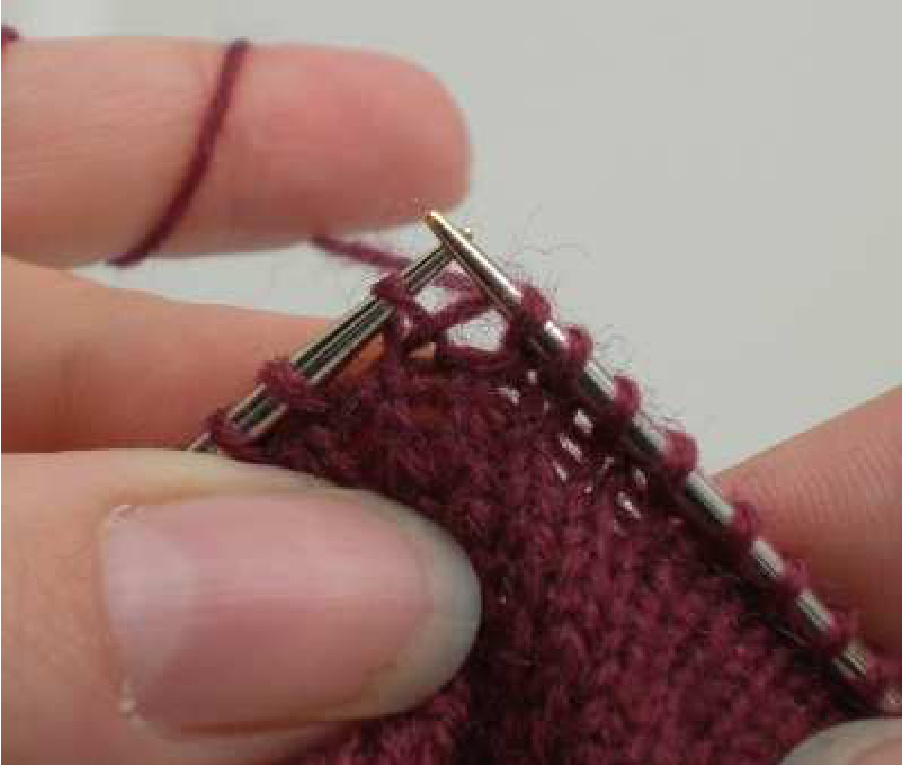
The picture shows 5 pulled stitches on the right side. You can identify them by the two loops sitting close by another. Finally work one round, knitting the two loops of the PS together. The total stitch count does not change.
Heel Flap
Slip the gusset stitches to the sole needles. That means slip the gusset stitches from needle 2 to needle 1 and the gusset stitches from needle 3 to needle 4.
special abbreviation
ssk $=$ slip 2 stitches separately knitwise, knit them together through the back loop p2tog $=$ purl 2 stitches together Row 1 and 2: needle1: knit as many stitches as you have gusset stitches, ssk, turn, slip1 with yarn in front, purl to centerback needle4: purl as may stitches as you have gusset stitches, p2tog, turn, slip1 with yarn in back, knit to centerback Continue in this manner until just one gusset stitch is left on each side. Note: you do not need to count all the time. After the slipped stitch will be a gap. The stitch before and affter this gap will be worked together.
Then work one round with the last decreases as follows: needle1: knit until 2 stitches, ssk needle 2 and 3: knit needle4: knit 2 together, knit to end Working like this, you should get no holes in your fabric. If you still do, pick up a strand on the gap and work it through the back loop; in the following round work 2 stitches together to keep the allover stitch count unchanged. Now knit needle 1 to shift the start of the round back to the side of the sock.
Leg
Knit in rounds until 2-4 cm less than the height given in the chart or as high as you want. Work the last $2{-}4\;\mathsf{c m}$ in ribbing; work (knitl1, purll1) or (knit2, purl2). Note: depending o the recipient's leg form, you can increase some stitches on the leg part.
Binding of
You need to bind of loosely. There are several methods to do this. I like this one: work 1 stitch as it appears, \*work one stitch as it appears, knit the two stitches on the right needle together through the back loop. Repeat from \* until just one stitch is left. Cut the yarn leaving a tail and pull on fhe needle unfil the end slips fhough fhe fabric. Weave in fhe ends. Note: the amount of yarn used given in the chart is only valid of you knit the sock as stated in the chart. This means, if you knit a longer leg, you will use more yarn than given in the chart.
Short Instructions for Toe Up Socks
Toe Up Socks gauge: 32 stitches 0 44 rounds $=$ 10 cm Magic cast on the number of stitches given in the chart. Increase every other round for the toe - beginning of needle 1 and 3: knit1, LR, knit - end of needle 2 and 4: knit until 1 stitch left, LL, knit1 Work foot part in rounds; see chart for number of rounds. Increase every other round for the gusset. See chart for number of gusset stitches. Work short rows for heel turn. See chart for number of short rows. Work one round. Slip gusset stitches from needle 2 to needle 1 and those from needle3 to needle 4. Work heel flap. Knit the leg part in rounds. Work the last 2-4 cm in ribbing. Bind of loosely.


