Ladies Boyshorts with Bikini top
A crochet pattern by Sandra Hagan DesignsTM @2012 All Rights Reserved

Materials
Sinfonia cotton sportweight yarn 3.5mm crochet hook %" Elastic for waist Tapestry Needle
Gauge
16dc and 8 rows = about 4 inches
Size Guide
| Sizes | Small | Medium | Large |
| Hips | 33"-34" | 35"-38” | 39"-43" |
| Size Reference | 3to5 | 6to9 | 10 to 14 |
Size Note: Sizes are written in order of small (medium, large) throughout pattern. Otherwise, directions apply to all sizes.
Pants Left Leg
Begin at bottom of leg and work up. Ch 86(96,104) Row 1: Dc in 4th ch from hook and each ch across, turn. (84,94,102dc) Is first dc now and throughout), dc in each dc across row. Fasten Off. (84,94,102dc) Row 3: Skip first 6 sts of row below and join yarn with a sl st and Ch 2 in next st, dc across row leaving last 6 sts unworked, turn. (72,82,90dc) Row 4: Ch 3, dc in each dc across row, turn. (72,82,90dc) Row 5: Ch 3, dc dec (once), dc in each dc across row to last three sts, dc dec(once), dc into top of turning ch, turn. (70,80,88dc) Row 6: Ch 3, dc in next dc and cont across row, turn. (70,80,88dc) Row 7: Rep Row 5. (68,78,86dc) Row 9: Rep Row 5. (66,76,84dc) Row 8: Rep Row 6. (68,78,86dc) Row 10: Rep Row 6. (66,76,84dc)
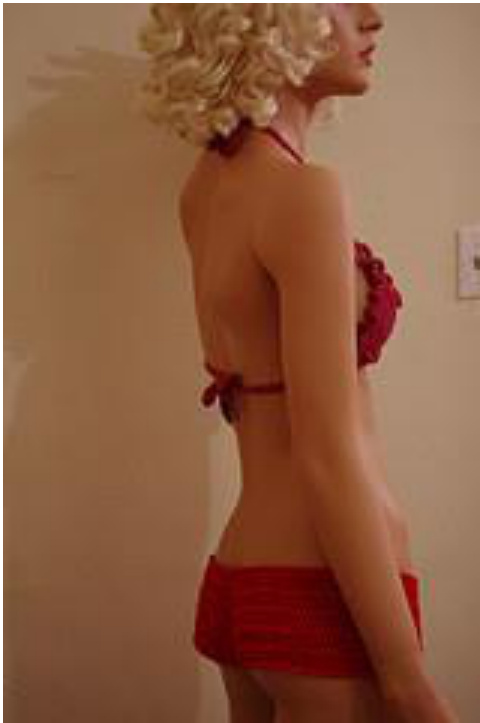
For the low dip front (as seen in photos) continue to Rep Row 6 until you complete 10(15,20) rows. Fasten off.
OR
For higher waistline, continue to Rep Row 6 until you complete 15(20,24) rows. Fasten off.
Pants Right Leg
Make same as Left leg When you have both legs (or both sides of shorts) completed, place them together so you can sew the two center seams. You may sew these by hand using the same yarn you made the shorts or you may sew the seam on a machine. Either way it will work out fine. Turn the shorts so that you can seam up the crotch (that's the extended piece on the legs). IF you want to sew in a liner, trace the fabric for cutting out before you sew the shorts together. Hand sew or machine sew the lining in before joining pieces of shorts.
Waistband
Join yarn with a sc in any st on the top of the shorts. Work sc all around the top, joining with a sl st when you get to the end of the round. Ch 1, turn, and work back around with sc. Rep once more. Fasten off. Weave inlooseends. Cut elastic so it's the same size as your shorts are around. Lap the two ends together and sew them so you have a nice round of elastic. Using your yarn and tapestry needle, work a series of X stitches over your elastic, to act as a casing. Fasten off at the end of your round and weave in any loose ends. If you want to put elastic in the legs you may do so the same way you worked the waistband and use the same size elastic. It's up to you. Otherwise you are done with you new boyshorts and can slide them on and enjoy! @2011, All Rights Reserved By Sandra Hagan DesignsTM
Make the top
Same yarn and hook (make two pieces) Begin with a ch 2 Row 1: Sc in 2nd ch from hook, ch 1, turn. (1sc) Row 2: Sc inc (that's 2 sc worked into one st), ch 1, turn. (2sc) Row 3: Sc in first st, sc inc in last st, ch 1, turn. (3sc) Row 4: Sc in each st, working sc inc in last st, ch 1, turn. Repeat this row until cup is as wide and long as you want it to be. For the best look, the top corner of the cup should be level with the armpit. Work sc around the side of the cup starting at the end of the last row. When you get to the top corner, chain 100 and then sc back down the chain. Work sc on the opposite side of cup. At bottom of cup, ch 3(for dc), turn so you now working on bottom of cup, work dc across the bottom edge, fasten off at the end of row. (The dc is where you weave your tie through and will enable you to scrunch the cup to fit your breast just theway you like it)
To make the tie that goes through the bottom of your bra cups
One way is to make a chain of about 2o0, turn and sc across the chain, fasten off. Another way is to make a chain of about 2o0, turn and dc across the chain, fasten off. OR make a chain of about 200, turn and hdc across the chain, fasten off. OR knit a simple I-cord using 3 sts and two dpns. At end of row, simply slide the stitches to the other end of needle, bring the working yarn over and continue knitting. It's not as hard as it sounds, I promise you. Continue knitting until the cord is long enough to go around the body and tie into a bow. You may sell the finished items that you make from my patterns. I think it only fair that you be allowed to make money from your work. The pattern is my work. Please do not make copies to sell or give away, do not post on the internet for all the world to see and download. Disclaimer: The pattern is merely a guide. As such, I cannot be held responsible for any misinterpretation or personal variances in work. All gauge is approximate.


