Jordan's Fingerless Gloves
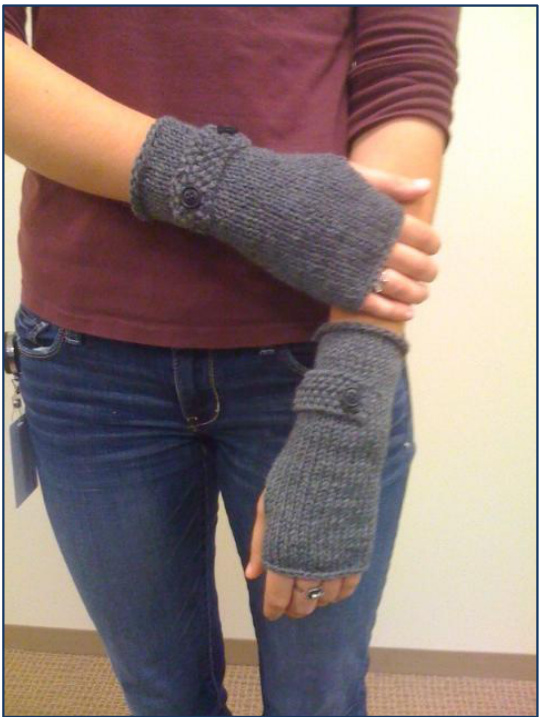
By: Denise Boyd A friend of mine, Jordan (graciously modeling) showed me a pair of these on the internet she liked and being a knitter having the condition Knititis, I blurted out I can make those for you, and I did. I of course then searched Ravelry and found one posted by Missy Angis which I tweaked a bit to get what I needed. So here is my pattern version.
Gloves: Make 2
CO 31 sts on three #8 DP's needles (or needles to get gauge for you) To lock last stitch I cast on an extra stitch on last needle then moved it over to end of the first needle then passed one stitch over to lock the dp's tightly. If you are adept at working in the round you need not do this and just cast on 30 but it is a cool trick for those of you who struggle then place marker at beginning of round. Work in the round knitting every row until 5-6” (desired length).Doing this makes the bottom rolls which create a hip look versus the ribbed cuff look. Working the thumb: Next row: Row 1: Working from (WS) Slip the first stitch purl wise, then purl the row. Row 2: Slip the first stitch knit wise, continue to knit the row
\*\*NOTE: you are NOT working in the round now but back and forth across the needles in st stitch\*\*
Row 9; At start of this row, knit while joining the round, making sure to tighten up that join stitch good. All row including above row, knit for a total of 16 rows (or to the length you'd like) CO loosely and weave in tail.
Glove Trim Flaps: Make 2
CO 6 sts. (8 for a wider flap), leaving leave a sufficient tail to sew flap to glove. Work in seed stitch: Seed St: Row 1: \*K1,P1\* repeat from \* to \* end Row 2: \*P1,K1\* repeat from \* to \* end Repeat rows 1 and 2 until piece measure 3" Bind off leave a sufficient tail to sew flap to glove.
Finishing:
Attach your buttons to flaps using matching thread before sewing to glove. Sew flaps to gloves using tails, then weave in ends and wear! Note: I went back and reinforced the top of thumb opening to give it a bit more strength so it would not pull.


